
Introduction
Latest Update: Nov 7th 2021 - Updated Mr. Nothing, Pinus knights, Mizuki combos. Added optimal rotation for Dusk with Pudding and knights combo. Added Saileach and Pudding CC info.
This guide is intended to be updated often. Please check back after new CN content has been released for the latest updates. Be sure to save this page and visit often!
There are a variety of operator combinations to fit your base needs whether it be LMD, EXP, or Orundum for all sorts of base setups including 252, 243, or other variations. If you are looking for a basic base or setup guide, the following pages might help:


The RIIC base combos and operators are available with pictures to demonstrate how high production efficiency can reach. These do not list all combinations but should be used as an idea of how you can plan and arrange your base to maximize your resource demands. Pictures below are used at a lvl 3 TP, lvl 3 Factory, max command center, and max facilities.
Disclaimers:
- This guide will assume all operators are promoted to have peak functions in base.
- This guide is not a suggestion to promote operators solely for the base.
- This guide should be used as a means to understand the possible combinations available in RIIC base.
- For discussions/recommendations on Operators to promote for their base skills:

Terminology
Both CN and EN pictures will be used in this guide.
- TP = Trading Post
- PP = Power Plant
- CC = Command Center
- LMD = Lungman Dollars
- EXP = Experience tickets
- AO = artificial orundum/Orundum/originium
- Ops = operators
- E0/1/2/ = Elite 0 rank, Elite 1, Elite 2
- +x% = Production boosts for that facility can be read as 1% or 0.01. This does not account for innate facility boosts, IE: the +0.03 or 3% from a level 3 factory.
- Example: 1.6 + 0.2 = 1.8 or 180%
Base format follows as is:
- Trading post/ factory/ power plant. IE:
- 243 = 2TP/4Factory/3PP
- 252 = 2TP/5Factory/2PP
- Amiya and Swire grants trading post bonus of +7% or 0.07.
- Kal’Tsit (Kal) grants factory bonus of 2% or 0.02.
Factory Combination: Abyssal Hunters and Gladiia
- Required ops: Gladiia in CC, Abyssal Hunters in factory.
- Abyssal hunters (AH) include: E0 Specter, E0 Andreana, E0 Skadi (Guard) to be placed in the factory.
Gladiia at E0: For each AH in factory, production of all AH across all factories +5%. If the AHs are in one factory, the combined AH will cap together at +45%.
Gladiia at E2: For each AH in factory, production of all AH across all factories +10%. If the AHs are in one factory, the combined AH will cap together at +90%.
The morale of the AH in the factory does not matter.
- Gladiia's morale drain and recovery is dependent on the number of AH in the dorm or outside the dorm.
- +0.5 morale drain per AH outside dorm.
- -0.5 morale drain per AH in dorm.
- additional -0.5 to morale drain for each AH with full morale in dorm.
- Gladiia herself counts as an AH so she will always have a morale drain at an increased rate.
Picture below is of E0 Gladiia granting the bonus, Notice that there was a bug allowing BluePoison to be considered an AH. Morale of the AH is not considered in this combo. The Gladiia bug is already removed.

this is with E2 Gladiia

Factory Combination: Rosmontis
- Required ops: E2 Rosmontis, E2 Whisperain, E2 Iris, E0 Dusk, (E2 Saileach optional but suggested)
- Facilities: lvl 3 office, a lvl 5 dorm, all dorms full. Base setup 252 that does not have max lvl office or dorms can still benefit at a lower production gain.
Rosmontis can provide a total of +55% production boost if you set up the base with other synergizing operators.
- E2 Rosmontis by herself grants +20% (all 4 dorms must be full of operators)
- E2 Iris in lvl5 dorm grants +5%
- E2 Whisperain in lvl3 office grants +20% (must have active morale)
- E0 Dusk in CC will grant +10% (for the first 12 or first half of her morale)
+20 +5 +20 +10 = 55
E2 Rosmontis, E2 Waai Fu, E2 Mayer, E2 Iris in lvl 5 dorm,all dorms full, E2 WhisperRain in lvl3 office, Dusk in CC. Gold bar production.
Optional: E2 Saileach can be placed in the CC to boost the HR facility when WhisperRain is in the office to maintain high refresh rates. This will counteract the loss in HR production when WhisperRain is in the office.

The picture above shows Rosmontis at +55, Wai Fu at +40, Mayer +30, and Kal granting +2% = +127%
Below is an example of EXP production with Feater and Conviction


Factory Combination: Weedy
- Required Operators: E2 Weedy, E1 Purestream, E2 Passenger, E2 Eunectes, and Lancet
- Required Facilities: Factories will have Weedy, Purestream, Passenger. CC will have Eunectes + 4 other ops. Lancet must be in one of the PP.
This combination will grant facility production boosts dependent on the number of TP and PP you have. It utilizes Eunectes base skill with Lancet to increase the number of available PP counted.
Total production from that single factory will be +20/PP and +20/TP in whatever setup you have:
- 252 using lvl2 factory= +15x4 and +20x2 = +100% (passenger not used)
- 252 using lvl3 factory = +20x4 and +20x2 = +120% (passenger, weedy, purestream)
- 243 = +20x5 and +20x2 = +140%
- 333 = +20x5 and +20x3 = +160%
- 153 = +20x5 and +20x1 = +120%
- 432 = +20x4 and +20x4 = +160%
- 513 = +20x5 and +20x5 = +200%
Here is a picture of a 333 setup using this combination.

1.60 + 0.02
Note: Kal’ Tsit grants the +0.02
With the addition of the Pinus knights content. The Weedy combo can fit well with the dusk rotations using Puddings CC skills. This allows for Kal to rest while Pudding will provide the same +0.02 bonus that Kal grants (they can not stack with each other).
Please refer to Pinus knight combo section for the optimal Weedy rotation.
Factory Combination: Basic gold, EXP, and orundum
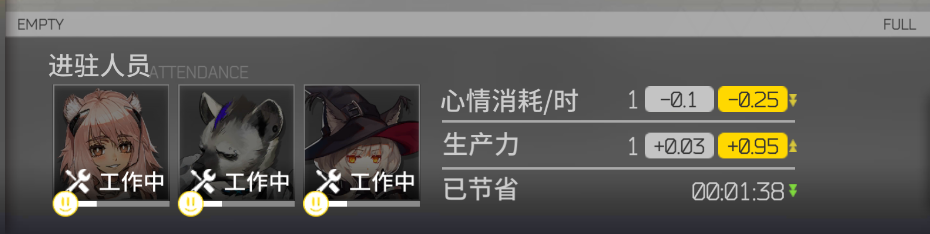


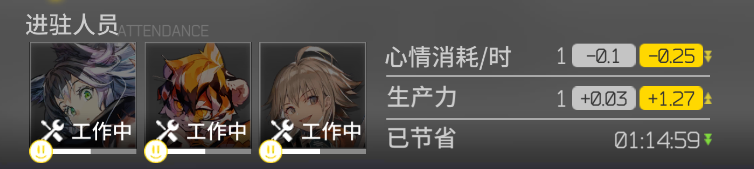
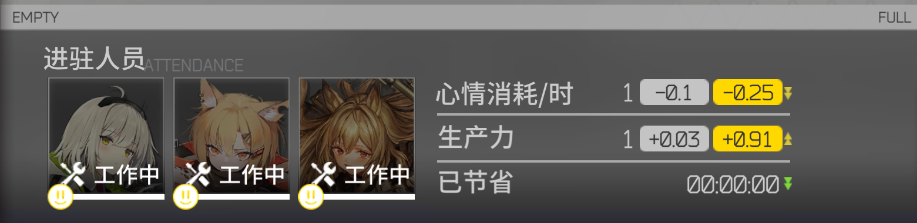
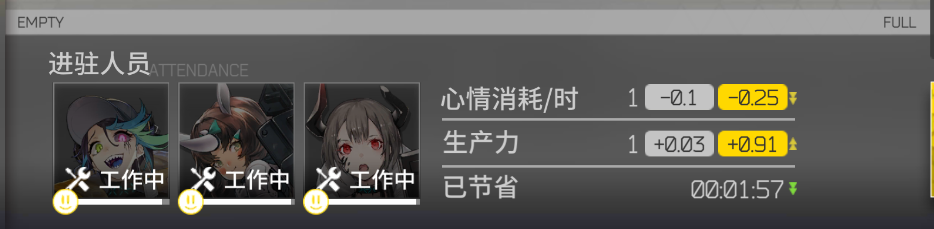
Factory Combination: Pinus Knights
- Required ops: E2 Flametail, E2 WildMane, E2 Fartooth, E2 Ashlock, lvl30 Justice
- Facilities: CC, PP, lvl3 factory
E2 Flametail is placed in the CC, Justice is placed in the PP, and the remainder of the knights - WildMane, Fartooth, and Ashlock are placed in an EXP factory.
With the introduction of Pudding and Justice bot, we now have an alternative to Kal. Note that Pudding requires at least two robots in the PP facilities, as since one of the PP has to have Justice for this combo, it would be best to utilize Pudding's bonus and have another PP filled with another robot. In this case, the 2nd PP can be Lancet which we can then utilize the weedy combo at the same time. Rotation example shown below.

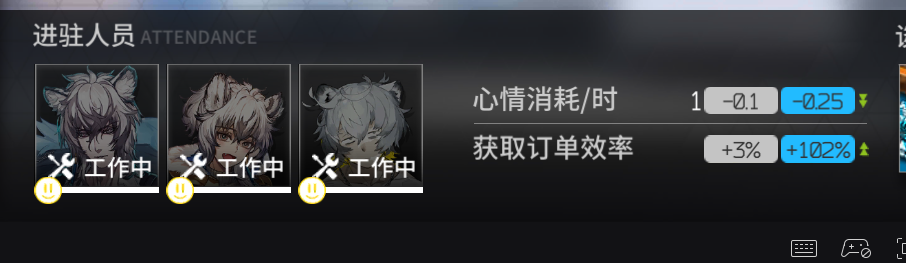
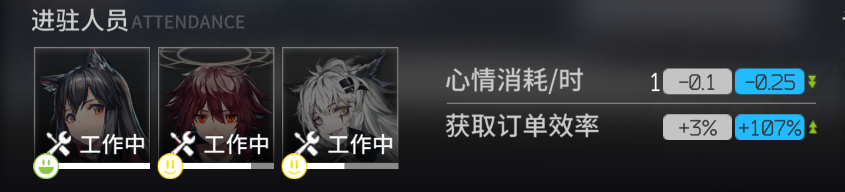
Each of the knights will be +25% at base + 10% each for having Flametail in CC. Justice will provide +5% to WildMane for being in PP. Amiya/Swire in CC will provide +5% and Kal/Pudding will provide +2%.
Pinus Knights combo, Weedy combo, Mr. Nothing combo - rotation example:
Factory Combination: Vermeil
- Required ops: E1 Vermeil, capacity increasing operators.
Vermeil combos with other capacity boosters and is efficient with Scene and Ceobe for EXP production.
E1 Vermeil, E2 Ceobe, E2 scene (91-106% for EXP).
E1 Vermeil, E2 Pallas, E2 Scene (96-106% for EXP) +2% from Kal


Factory Combination: Bubble
- Required Ops: E1 Bubble, E2 Vulcan, + any capacity op
E2 Vulcan works great with Bubble as Vulcan is the only op that has a high enough capacity to fully utilize Bubble's base capacity skill. Her skill is 3% per capacity gain for any operator that has more than 16 storage otherwise, it is 1% gain per capacity.
E1 Bubble, E2 Vulcan, E0 Bena (93%). +2% from Kal for 95%.

E1 Bubble, E2 Vulcan, E2 Asbestos (can swap out with a +30% to make a higher total of 92%).
Factory Combination: Mizuki
- Required ops: E2 Mizuki, any 2x ops that are 25% (excluding Rhine ops)
Mizuki provides an alternative to a 90% combo by turning two other ops that are at 25% efficiency into 30% each, granting 90% from the factory trio. This does not work with Rhine ops such as Silence, Mayer, or Ptilopsis. This combo does work with Waii Fu.
The example below is E2 Mizuki, and 2x 25% efficiency ops (Roberta and Perfumer).

Trading Post Combination: Archetto
- Required ops: E2 Archetto, E2 Snowsant, E2 Exusai
E2 Archetto gains +2% per dorm lvl across all dorms granting her 2x 20 = 40%

the 7% comes from amiya.
+40 +35 + 35 = 110%
The combination below is an example of not using Exu in the combo if you need to maintain Exu, Texas, Lappland trio combo.

Trading Post Combination: Kirara, Tuye
- Required ops: E2 Kirara, E2 Tuye
- Required facilities: 2 gold factories or 4 gold factories.

2 gold factories: 4x 15% /2+10% = 40%

4 gold factories: 8x 15% /2 +10% = 70%
Tuye grants 5% TP bonus + 15% per 2x gold factories.
Kirara grants 5% TP bonus + 2 additional gold facility count per 2x gold factories.
Trading Post Combination: Mr. Nothing
- Required ops: E2 Mr. Nothing, E2 Mulberry, E0 Dusk at less than half morale, (Optional E2 Saileach) 2x ops high-efficiency ops to pair with Mr. Nothing.
- Facilities Required: lvl5 CC, lvl3 office, lvl3 TP
Note that Dusk must be less than half morale to grant Mr. Nothing a bonus. This makes it very tricky to incorporate into a rotation. A rotation example is provided in the Pinus Knight combo section.
E2 Saileach is optional to counteract the loss in office refresh production from E2 Mulberry.
Note that Snowsant does not work on Mr. Nothing directly. She works with the other ops such as Archetto.

Example above is Mr. Nothing gaining +55% from Dusk and Mulberry. 40% from Archetto, and 35% from Snowsant. +5% from Amiya/Swire, and +2% from Kal/Pudding.
Trading Posts Combination: Jaye
- Required ops: E0 Jaye, E0 Texas, E2 Lappland
Jaye is a unique operator that loses a base skill once promoted. Consider Jaye's use in base and in combat before promoting him.
Jaye, Texas, Lappland (14 order capacity, Jaye gains +4% per empty order slot for a starting total of +56%, Texas and Lappland gives +65%, Amiya/Swire from CC gives +7). Jaye loses 4% for each order completed left in the queue.

Time duration of E0 Jaye, E0 Texas, E2 Lappland combo, notice that it is a bit over 25 hours with max full CC .

The math for Jaye:
E0 Jaye, E2 Silverash, Orchid after 12 hours. There is 15 capacity with +20 from SA, +25 from orchid and +60 from E0 Jaye for a starting total of +105%. Jaye loses 4% for each order completed left in the queue. Notice it dropped down to 73% because 8 orders were completed within the 12 hours (eventually becoming -32% overtime).

If you have E1'd Jaye, you can still use him for base.
- Required ops: E1 Jaye, E2 SilverAsh, E2 CliffHeart
E1 Jaye, E2 SilverAsh, E2 Cliffheart. No orders completed (Order capacity = 18, E1 Jaye gains +4% per empty order capacity for a starting total of 72, but loses 1 capacity for each 10% bonus from other operators so it is a -12% from SA and Cliffheart’s bonus).
[SA +20, +15 from Cliffheart, +60 from Jaye, +7 from Amiya/Swire in CC]
Trading Post Combination: Shamare
- Required ops: E2 Shamare, E2 Tequila, E2 Bibeak/E2 Kafka
Further testing is required to determine if Bibeak or Kafka is more effecient.
With the introduction of Tequila, the Shamare combo has become one of the most profitable setups to use in base. Tequila allows for an additional 500 gold for every 4-bar order that is made while he is already in the facility. This is not retroactive meaning you can not put Tequila into the facility when there is already 4-bar orders completed and expect them to change nor is it active when morale is depleted. As long as Tequila is present before the order is begun, the bonus is applied. Picture below is a reference to how it can be micromanaged to further utilize tequila as he is only required at the start of the order and can be removed afterwards. This is not suggested as it required heavy micromanagement. I suggest just leaving him in the shamare combo the whole duration.


(Kafka skill is named differently than Bibeak and Shamare’s skill, yet have the same function). It appears to have an increase in high bar orders and possible stacking.

Amiya provides 7%.
It is calculated out to be roughly ~2% of production from the increased bar order bonus. This total out to be:
+90% +2% = 92%
There is a ramp-up to this combination meaning it will take a few orders before it reaches optimal production of consistent high bar orders. Ramp-up time is about 4-5 orders before you begin to see consistent 4 bar orders.
This trio is not suggested to swap in and out before an order is complete due to the fact it has a ramp-up timer. However, it is suggested to keep this trio as long as possible and squeeze the most orders out of it once past the ramp-up time to maximize getting 4-bar orders as shown in the picture. The most you can get is a total of 41 bar orders within a 24 hour period but that does not account for ramp-up time. When you keep this trio in the TP for the whole morale duration, it is suggested to drone this TP as much as possible if the resources are available, this will allow it to produce as much as possible beyond ramp-up time.
Trading Post Combination: Texas, Lappland, Exusai
- Required ops: E2 Texas, E2 Lappland, E2 Exusai
Amiya provides the +7% bonus.
+65 from Texas and Lappland, +35 from Exusai = +100
Texas is preferred to be E2 to extend the duration of the combo.
Command Center Combination: Multiple ongoing combos
- Required ops: Dependent on which combinations are ongoing.
If there are multiple ongoing base combinations happening at once, the CC operator can be used to spread the bonuses across all facilities.
Kal’Tsit grants +2% to every factory.
Pudding grants +2% to every factory (requires at least 2 robots in the PP facilities).
Saileach is optional but grants +20% to office facility for any ops that are less than 30% efficient (useful for when rotating with Whisperain and Mulberry).
Amiya/Swire grants +7% to every TP.
Dusk grants +10 to Rosmontis combo while in her first 12 morale.
Gladiia grants +10% to each AH in the factory.
R6 ops will reduce morale and can stack with each other (combination shown below).
Depending on when a combination is rotated in or out, swap out the respective CC operator as needed.
It is best to use as many R6 ops together as possible in the above combination as their morale bonuses stack upon each other.
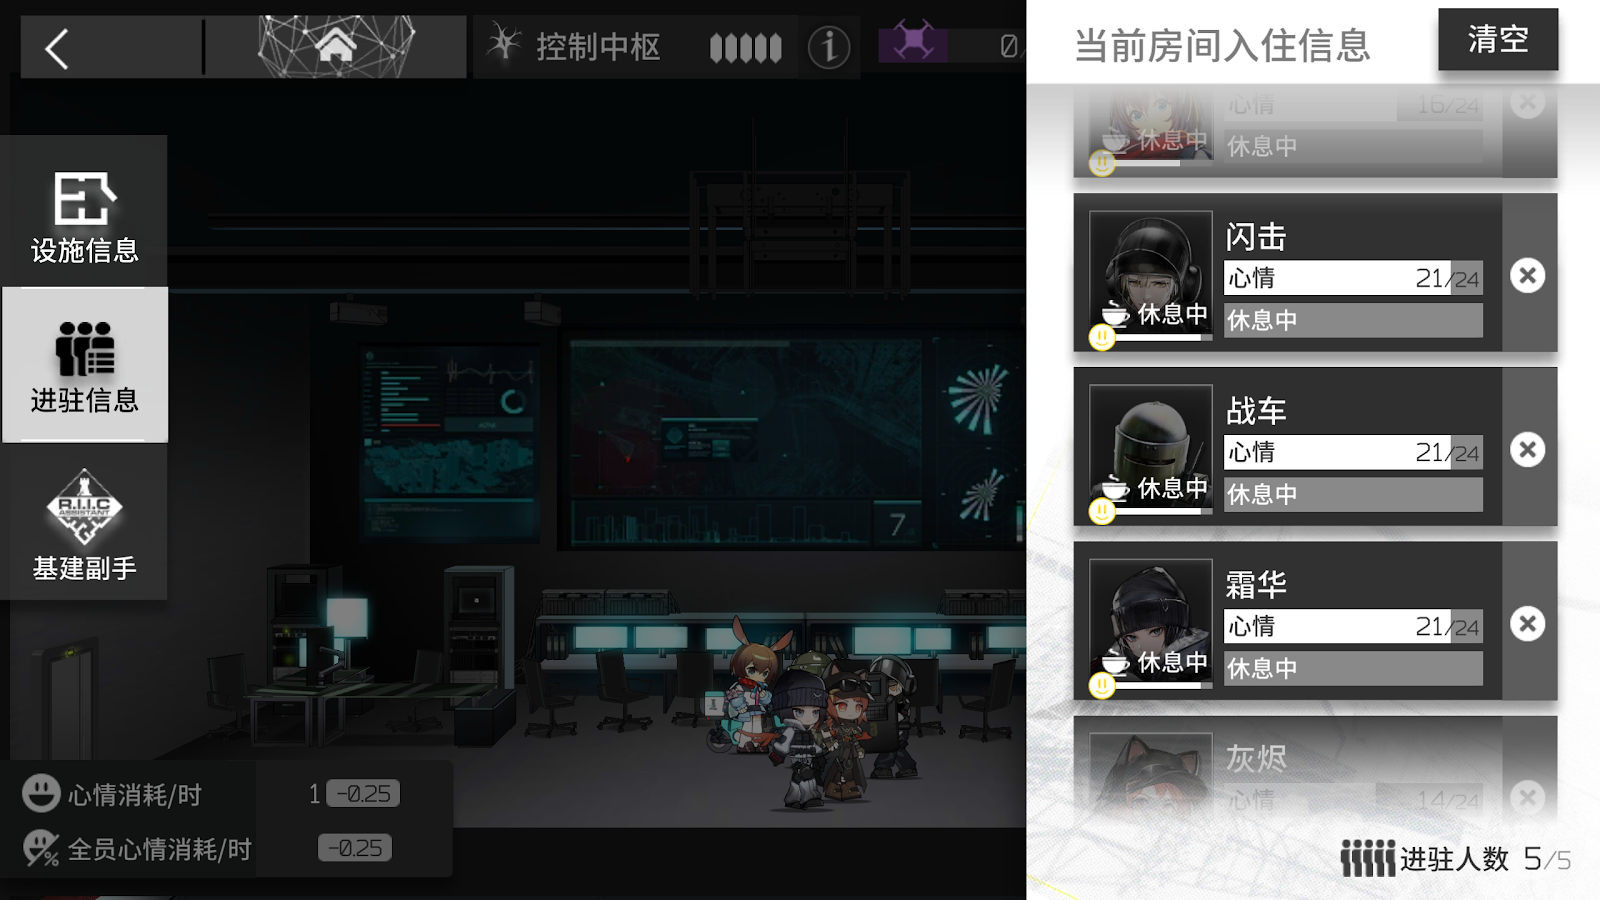
Command Center Combination: Rainbow 6
- Required ops: All four of the Rainbow6 operators
Rainbow 6 operators will regenerate morale in the CC if all 4 operators are present. It will take 20 hours to regenerate a whole 1.0 morale. Below is proof of morale regeneration in the CC.
Utilizing this combination will allow for an infinite duration CC along with a 5th CC operator.
The 5th CC operator that has morale drain however may not be able to sustain infinite duration depending on how fast the morale drain is.

Workshop setup: Arene
- Required Ops: E0 or E1 Arene
Setup requires:
- E1 Arene with dorms full of low morale operators (E1 Arene gains bonus for each op below 20 morale)
- Having 20 permanently low morale operators in base to utilize Arene's skill anytime
There is no actual combination for workshop however you can achieve maximum chance of byproduct through Arene and setting up the base.
Arene can gain the highest byproduct bonus matching Nian (as shown below) by setting up operators in the dorm. It is suggested having 20 different ops that you do not use in base so you can keep them at low morale at all times whenever you need to use Arene ("Arene base slaves"). Base setup is easier to use when you use the base overview button on the top left of the base screen. This will allow you to change out all dorms quickly.
Notice that Arene can achieve the same bonus as Nian.


The base overview button on the top left will allow quick swappings of the 20 low morale ops.
Credits
Thank you to my fellow RIIC members and players from AKO Discord and RIHQ Discord.
Malicast#8591 from Discord.
Last updated: June 27, 2021.