Time to Get Completely Annihilated: The Re-Annihilated-ing
Lungmen Downtown is the third level of Annihilation released for Arknights, and it's a doozy. Unlike Annihilation 1 and 2, Annihilation 3 can’t be held by a few key chokepoints. The entire map is a line that needs to be held, and it's not an easy task. In particular, Lungmen Downtown gets incredibly nasty after 350 kills. There are many ways to clear this map, but almost all of them require specific combinations of Operators to succeed. Fortunately, we’re here to help you get through it.
The rewards for completing Annihilation 3 are as follows:
- 153,000 LMD
- Qualification Certificate x30
- Advanced Certificate x30
- Frontline Battle Record x23
- Tactical Battle Record x65
- Limit on Weekly Annihilation Orundum +100
In this article, we’ll start by going over a recommended team composition and a step-by-step walkthrough that can help players reach the dreaded 350 killzone. From there, we’ll suggest several Operators who are commonly used to finish off this map. You can mix and match the strategies based on which Operators you have pulled/ leveled. (If you need a quick refresher on how Annihilation Mode works, or are looking for Annihilation 1 or 2 clear guides, take a look here:

As always, remember that this is not the only way to clear this map! We encourage you to search for other strategies if this one isn’t working for you.
Team Composition

V1: 1 Skill-Recovery Vanguard: Courier = Scavenger < Zima = Texas < Siege. As usual on Annihilation stages, we need them to Block-2 and supply as much DP as possible. Equip Skills that maximize DP recovery.
Note: Using Siege with her S2 (Aerial Hammer) for this position can be more difficult than you might expect. Early on, a lot of enemies will likely die before they get to Siege, so she won't trigger Aerial Hammer and gain DP. If you're struggling with Siege, consider equipping her S1 instead for more reliable DP gain.

M1: 1 ST Medic: Gavial < Myrrh < Silence = Warfarin (debatable) = Shining. Myrrh being able to heal multiple targets and Silence having map-wide healing range with her Medical Drone are very valuable here, and Shining’s physical damage barriers can save lives.
Note: Gavial and Warfarin’s strengths don’t necessarily play to this stage’s needs. They might have a more difficult time healing on this map than some of the other options. Also note that a second AOE healer can be used here if desired; however, since AOE Medics have lower burst healing than ST Medics, you may have trouble when the Arts Master Drones hit the field unless your second AOE Medic is fairly high level.
M2: 1 AOE Medic: Perfumer = Ptilopsis = Nightingale. This stage is very difficult without at least one AOE Medic, and each has different specialties to bring to the field. Perfumer’s global healing does a lot to counter the enemy crossbows. Nightingale’s Phantoms can be clutch for absorbing enemy aggro, and her RES aura makes surviving the drones a lot easier. Ptilopsis brings extra SP to the team, which is always a good thing.

S1: 1 Sniper with 3x5 range: ShiraYuki < Platinum < Meteorite. Having 3x5 range allows this Sniper to help pick off critical enemies later in the fight. E1 range for ShiraYuki and Meteorite is enough for this purpose, although their E2 range is much better.
S2: 1 Anti-Air Sniper: Kroos < Jessica < Meteor < Blue Poison < Exusiai. (Platinum is not included here because she is much better in the S1 or S3 position.) Note that this Sniper will be taking a lot of damage from drones and the auto-crossbows, so they need to be high enough level to survive. Blue Poison in particular is very fragile and will need to be E2 if placed here.
S3: Any Sniper, even a 3* like Kroos or Catapult. There are a lot of drones on this stage, and the Arts Master Drones in particular are quite tanky. You need a lot of ranged damage to take them all down. (Provence is not ideal here due to her short range, although her high DPS may make up for it.)


T1, T2, and T3: There are three “lanes” in Lungmen Downtown that need to be defended, so each lane needs a sturdy Operator with Block-2 or higher who can hold the line throughout the battle. This can be a Defender, a Guard, a Vanguard, or (for bottom lane) even a Push Specialist. Let’s look at what each lane needs in turn.
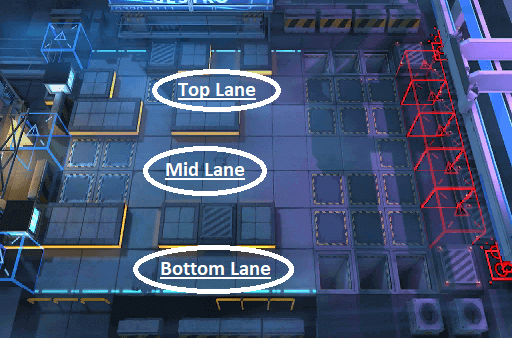
Top Lane (T1): Top lane has to deal with a lot of drones, so if you’re able to stick a Ranged Guard here, they can do a lot of good work. Face them down towards mid lane and they can even provide some cover fire when they aren’t under attack themselves. If you don’t have a Ranged Guard, consider a unit with self-sustain (i.e., Estelle) or innate RES (i.e., Gummy).
Mid Lane (T2): Mid lane is two squares wide and therefore has to deal with the largest number of enemies. This is a great place for a Healing Defender (RES and healing are both very important on this stage) or an E2-promoted AOE Guard. If you have only one Operator who can Block-3, this is probably where they should go.
Bottom Lane (T3): Bottom lane tends to be the easiest to defend. It’s also conveniently located next to a large pit. Croissant, Shaw, or FEater with their Skill 2 equipped at Skill Level 7 can Push almost every threat to bottom lane into said pit safely and reliably. If you don’t have them at Skill Level 7, this is another good place for a Ranged Guard (placed facing upwards so they can help with mid lane). Alternately, you can put a second Vanguard here if you’re having trouble getting enough DP to deploy your units.
Here is a general ranking for possible “tank” candidates across all three lanes:


We won’t actually be placing these units on the map in our step-by-step walkthrough. However, they may be the most critical part of your strategy. These are the Operators that are going to get you through the bloody massacre that is the Lungmen Downtown 350+ killzone.
Because it requires very specific strategies to get past the 350+ killzone, we’re going to go into more detail on who to use and how to use them at the end of this guide. Just keep these unit slots in mind for now and consider which Operators can fill them once we get there. (Spoilers: a lot of them are going to involve Arts damage.)
One of these slots can also go towards a “decoy unit” if you’re having difficulty with general enemy aggro or with the Bombtail enemies. The Robots (Lancet-2 and Castle-3) are perfect for this, as they don’t count towards your Unit Limit. Fast-Redeploy Specialists (Gravel and Projekt-Red) are also good. Otherwise, just use any cheap Operator like Yato or Fang.
Recommended Levels
The levels your Operators need to succeed will depend somewhat on which Operators you have, their rarities, strengths, etc. A good guideline would be to have your entire team at E1 Lvl 60 or higher, with Skill Level 7. If you can promote a few Operators to E2 – especially Operators who have high-impact E2 promotion benefits – then you should really be ready to go. Check out our Operator E2 Priorities article to see which Operators might be best to promote first!
It is possible to finish Lungmen Downtown with lower level Operators, but, obviously, the higher their levels and Skill development, the easier it will be to succeed. If you aren’t nabbing 400 kills even with perfect play, then it might be best to enhance your Operators!
Regarding Friend Summons:
While it is recommended to eventually clear Annihilation: Lungmen Downtown with your own units to unlock Auto-Redeploy, it is worth using a strong friend support if it will help you get more kills and more one-time rewards. This can also help you raise your weekly Orundum limit more than would be possible with your own units only.
- If you don't have any of the "Secret Weapon" Operators described in Part Two of this article, prioritize bringing one of them to help you get through the 350 killzone phase of Lungmen Downtown. Some of the easiest-to-use options are Lappland, Meteorite, Eyjafjalla, and SilverAsh.
- If you need more DPS, consider Exusiai, Meteorite, Eyjafjalla, or E2-promoted Angelina.
- If you need more survivability, look for a strong AOE Medic like Ptilopsis or Nightingale.
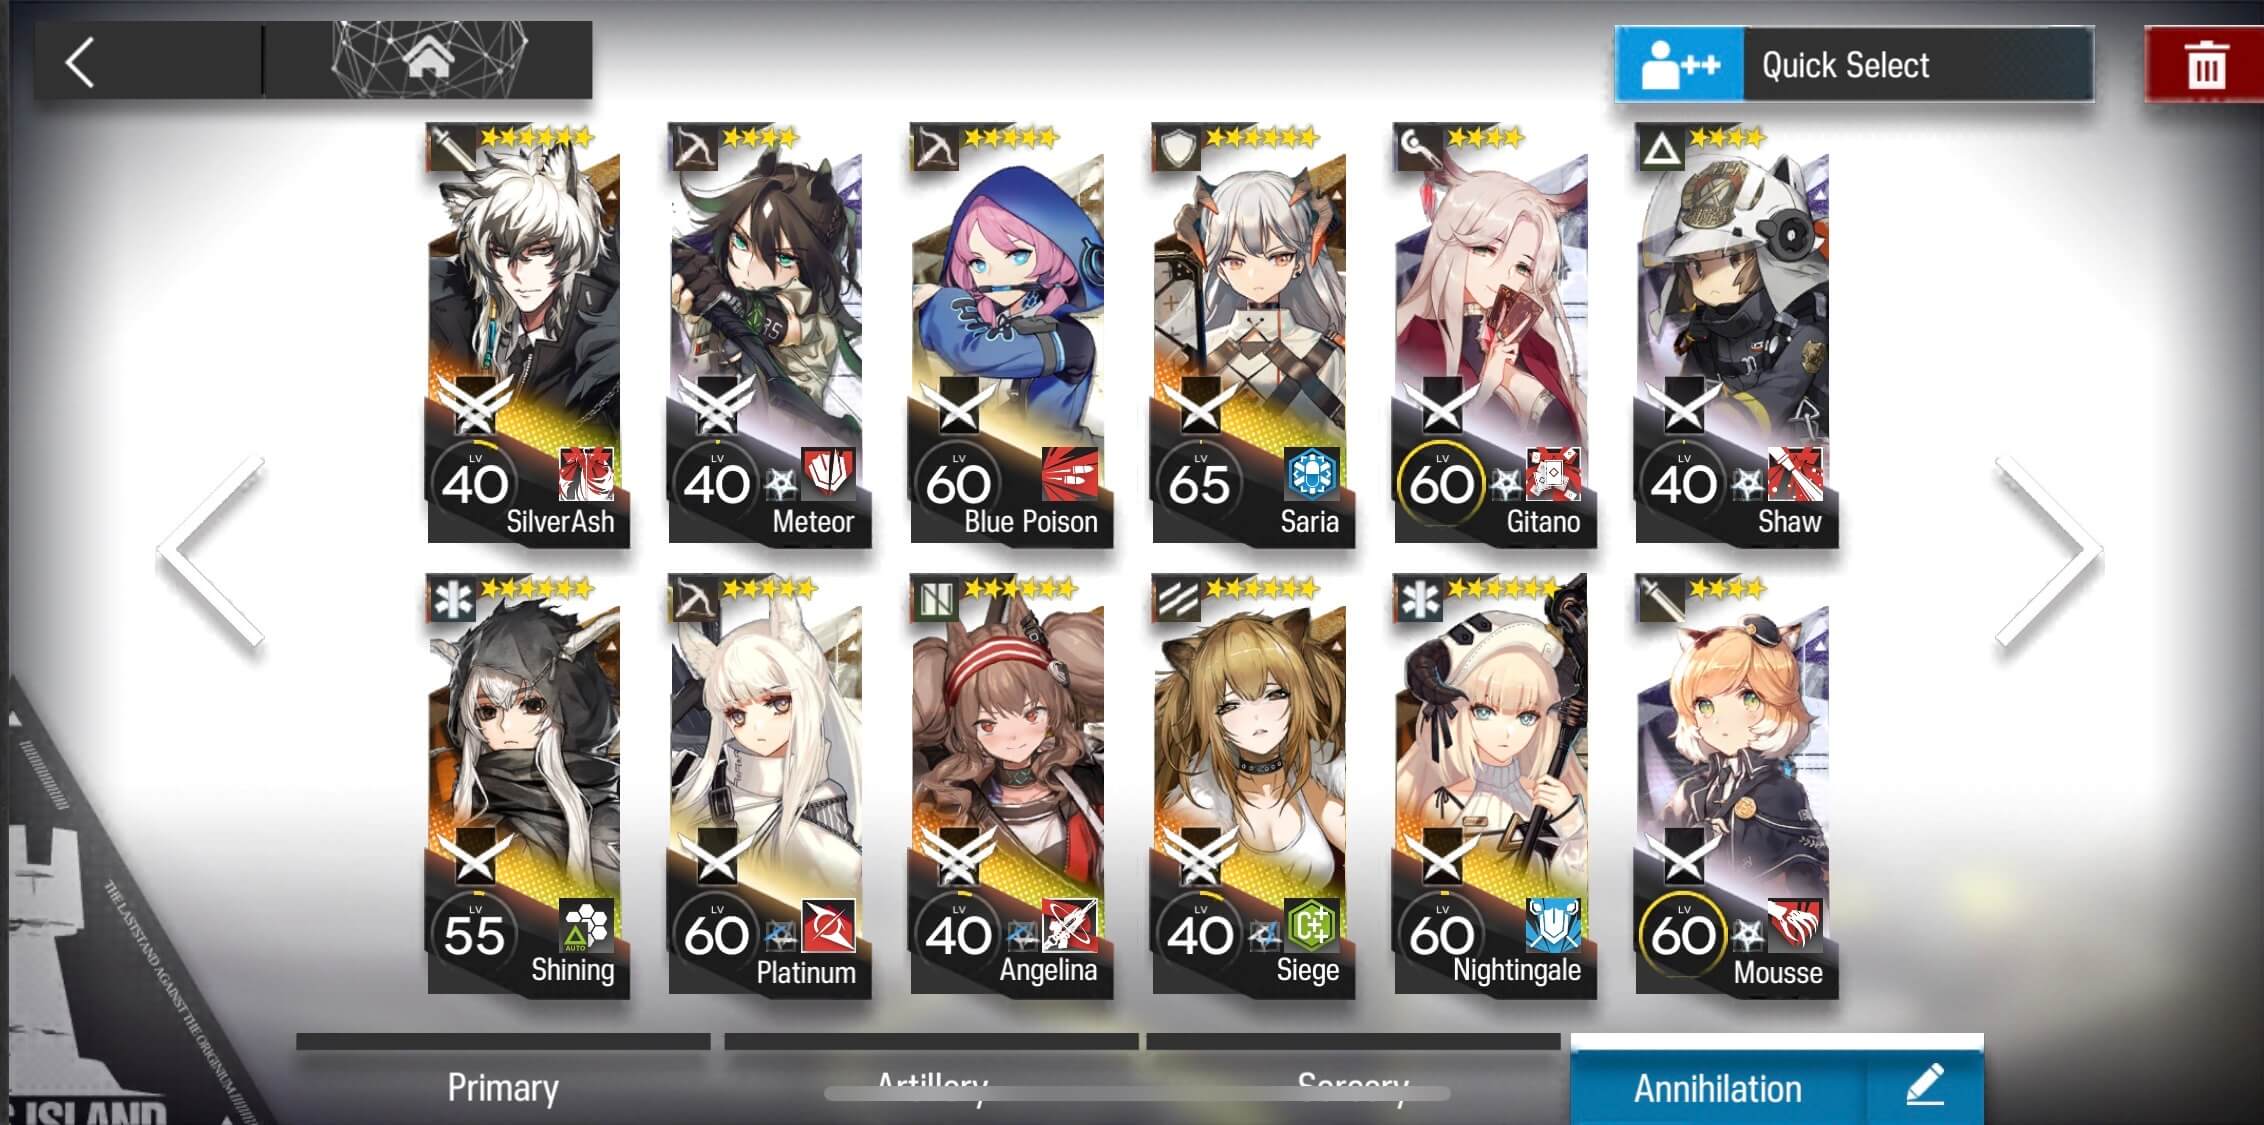
Example Team:
Here is an example of a team that can work. Please note that it is not a recommended team (especially given the number of high-rarity Operators), just an example of a team comp that can work:
Common Troubles
Here are some of the problems that players often have with this map. Preview them now to avoid mistakes, or come back to them after failed attempts for insight on how to improve.
I hit 350 kills and then I die!
- At 350 kills, Lungmen Downtown kicks the difficulty up several notches. It can be very frustrating to make it this far only to fail repeatedly.
- Check out Part Two of this guide for specific strategies on making it through the waves after 350. If you don’t have any of the Operators described there, look through your Friend Summons and see if you can bring one from a friend’s roster.
- If you’re still having trouble, you may need to level, promote, and Skill Enhance your Operators to make them stronger. Lungmen Downtown is a big difficulty spike, and your Operators need to be up to the challenge.
What’s up with the automatic crossbows? Can I get rid of them?
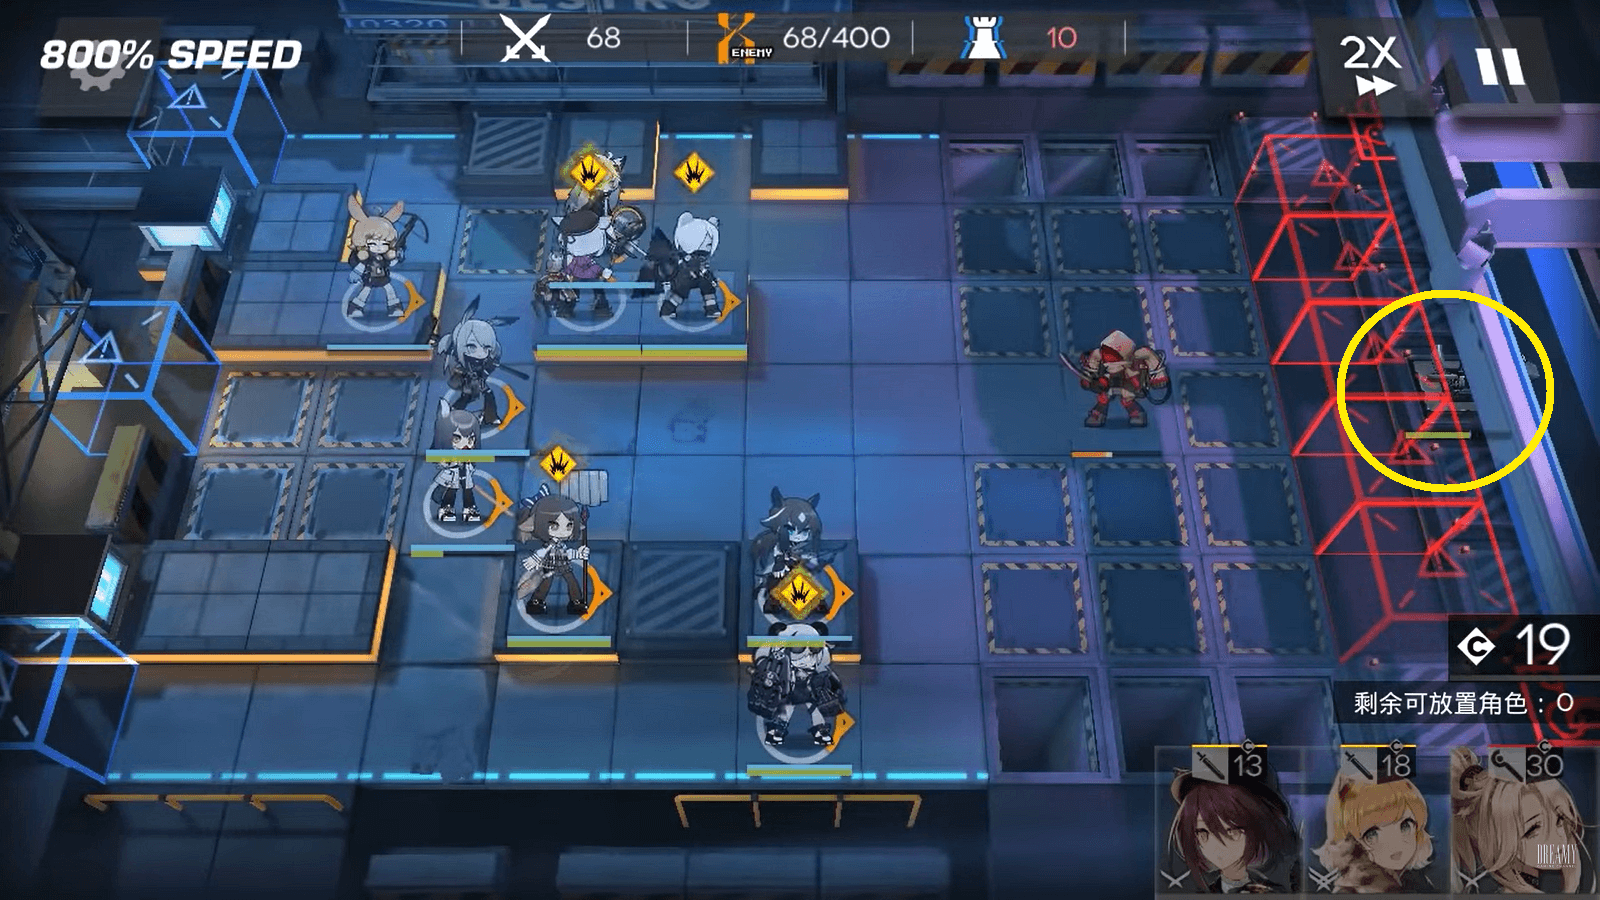
- Around kill 68, 118, and 200, a crossbow falls down on the far-right side of the field and begins firing at your Operators. At 300 and 350 kills, crossbows drop in two lanes simultaneously.
- Each crossbow shoots in a straight line every 6 seconds, dealing 600 physical damage to the closest Operator in its horizontal lane. This means that, once you reach 350 kills, one Operator in every lane is taking 600 damage every few seconds.
- These crossbows cannot be killed or disabled. Their constant damage means that the rightmost ally in every lane must be placed in range of a healer or they will quickly be shot down.
- If the crossbows are killing your Operators, you may need more healing from your Medics. Level and promote them if possible. Also keep in mind that these crossbows are the main reason that one of your Medics MUST be an AOE Medic. Two ST Medics are very unlikely to be able to keep up with the crossbows’ constant DPS.
The invisible Casters are killing my Operators!
- Make sure you are following the deployment order presented in this guide very precisely! It’s important to deploy units farther to the right BEFORE units farther to the left. This helps pull the Casters’ aggro along your ranks rather than letting them focus one unit until they die.
- Try deploying more units with innate RES, such as Healing Defenders.
- If you're bringing a Fast-Redeploy unit (Gravel or Projekt-Red) as a decoy for the Bombtails later on, you can drop them down during this wave to eat a few shots and save some of your more crucial Operators.
- If you have a friend with an E2-promoted Nightingale, definitely consider bringing her and using her Phantoms as decoys for the invisible Casters.
Drones are slipping through my ranks.
- Level your Snipers and increase their Skill Levels. Promote at least one of them to E2 if possible. Remember that Skill Levels can provide as big of an impact as actual levels, if not moreso!
The Arts Master Drones are slaughtering my team!
- Higher DPS from your Snipers may be necessary. Snipers are key to finishing this map because these drones are such an issue. Level them, promote them, and increase their Skill Levels if possible.
- The same tips that apply to the invisible Casters apply here. Deploy Healing Defenders, drop Fast-Redeploy units as decoys, and/or bring an E2-Nightingale as your Friend Summon.
I need more healing! Can’t I deploy a third Medic?
- For the most part, Lungmen Downtown doesn’t have huge damage spikes, just lots of sustained damage that happens consistently. This means your Operators also need to be receiving consistent healing. However, with so much space to defend, it’s hard to spare more than two unit slots for Medics.
- One option is to train an Operator with global healing potential. Perfumer and E2-Angelina can passively heal all allies, and Silence can deploy her Medical Drone anywhere.
- Another option is to add Healing Defenders to your lineup. Healing Defenders are especially great in Lungmen Downtown because they have RES, helping them resist the laser drones.
- You can also add DPS units who have the ability to heal themselves. For example, Estelle can heal herself with her S2, and Nightmare can heal herself and surrounding allies with her S1.
I don’t have enough DP to follow the deployment order.
- Switch your Vanguards to their Skill 1s. As a general rule, S1 will give more efficient and guaranteed DP over time.
- If you’re using Siege with her S2, you may not be getting enough DP because not enough enemies are reaching Siege. Place her down and then hold off on deploying other Operators until absolutely necessary so she gets the maximum amount of DP from her S2. (If this still doesn’t work, your Siege may be too low level. Switch to another Vanguard or just use her S1.)
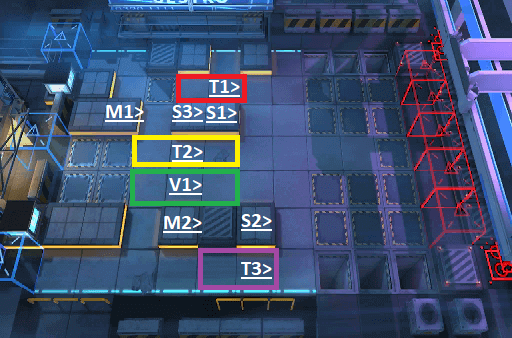
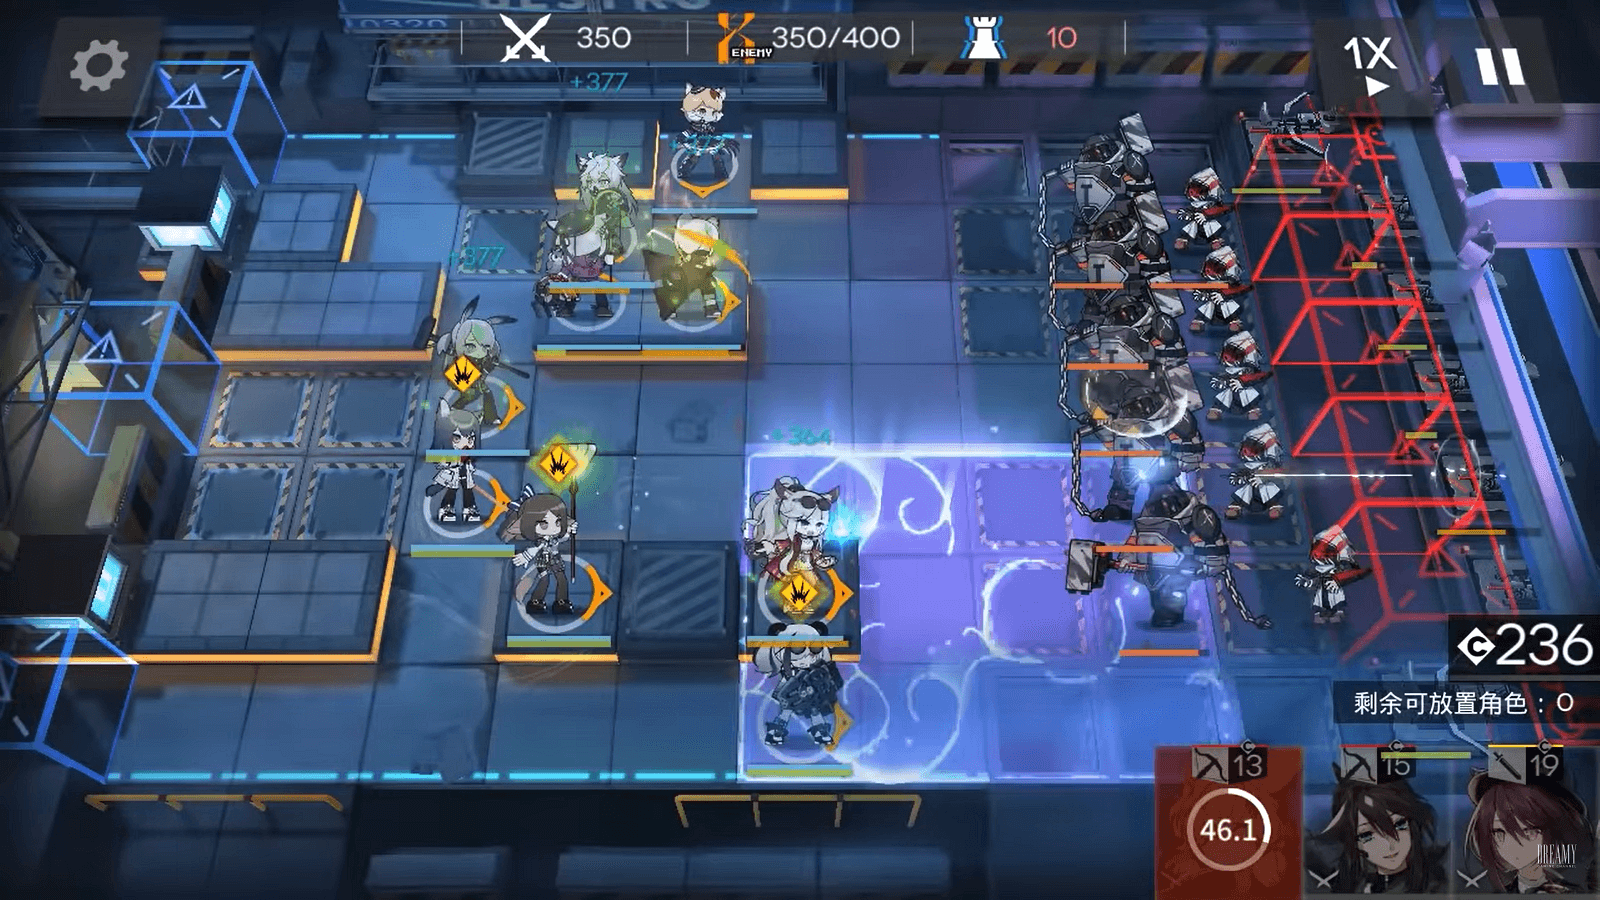
Strategy: Part One
Set up your first formation as seen in the image below. Placement order should be done as follows, and each Operator can be placed as soon as there is sufficient DP. Note that placement order is important, as enemies will target the most recently placed Operator in their range. Placement can be seen in the image below.
V1 -> S1 -> S2 -> S3 -> T1 -> T3 -> M1 -> M2 -> T2

While the deployment order shown above is a good one to follow for most team compositions, the exact positions shown in the screenshot above may not work to your Operators' strengths. In particular, the exact placement of your Tanks and Medics may need to change depending on who you are using.
Please note that the screenshots shown throughout the rest of this article use some of the placement variations shown below. The deployment positions shown in each screenshot may not match what is best for you. Be sure to take your Operators' Skills and Traits into consideration when deciding where to place them.
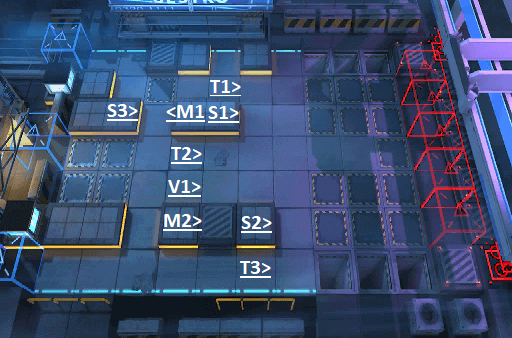
TANK VARIATIONS
You have some leeway in where to place your Tanks on this map. The highlighted areas below show some alternate positions you might consider for these units:
- T1 Variations: You may want to move T1 back one space if they are dying too quickly. This gives S1 and S3 more time to shoot down incoming enemies.
- T2 Variations: It's good to place T2 farther forward if they have RES so they can draw drone aggro sooner. Alternately, if enemies are sneaking past T1 up top, you might want to place T2 one space backwards so they can block the route from top lane to mid lane.
- V1 Variations: V1 should usually be directly adjacent to T2, no matter where T2 is placed. However, if Siege is your V1, you MAY want to place her one space ahead of T2 so she can use Aerial Hammer more easily.
- T3 Variations: T3 MUST be in the square next to S2 if T3 is a Push Operator. Otherwise, you can move T3 one space back if they are dying too quickly. This gives S2 more time to shoot incoming enemies (like with T1).
MEDIC VARIATIONS
If you are using two AoE Medics instead of one AoE and one ST, you will want to place your Operators in the following positions:
This keeps all of your Operators within range of your two AoE Medics. (The Tank variations shown above still apply here, as all variations listed should still be within healing range.)
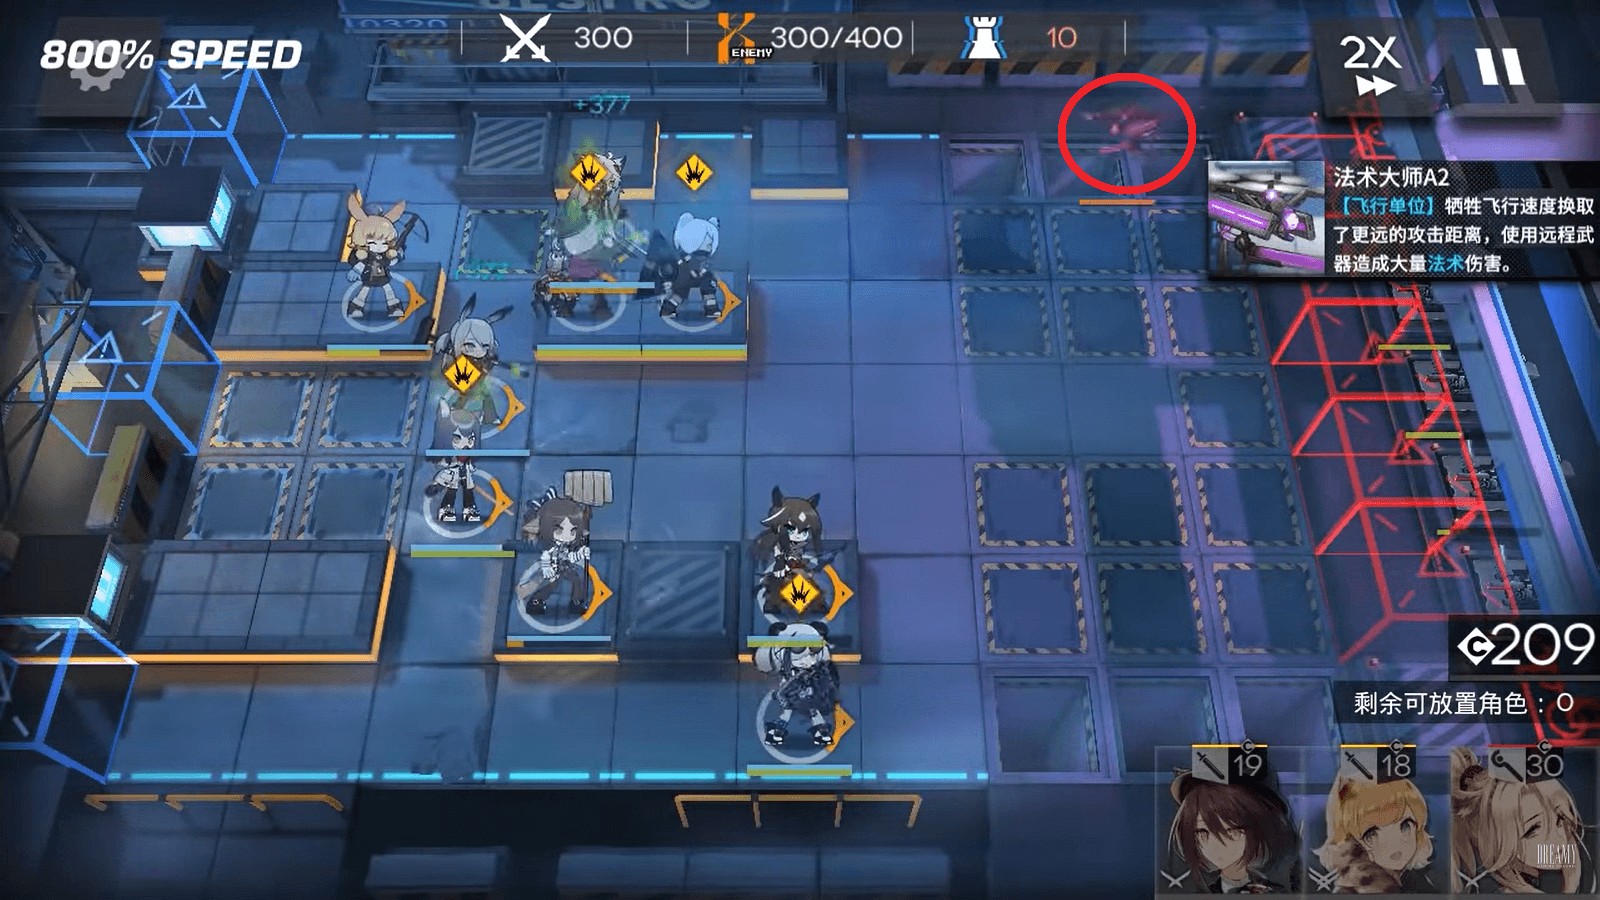
The most important enemy in the entire map is enemy #64. Why? Well, we don't want to spoil the surprise. Just keep an eye out for him the next time you run Annihilation 3.
Shortly after kill 68, the first crossbow drops down on the map, so you must have deployed at least M1 by then.
Around kill 84, two Red Jetpacks drop down on top lane, so you must have deployed T1 by then to block them.

Your entire team needs to be deployed by about kill 119.
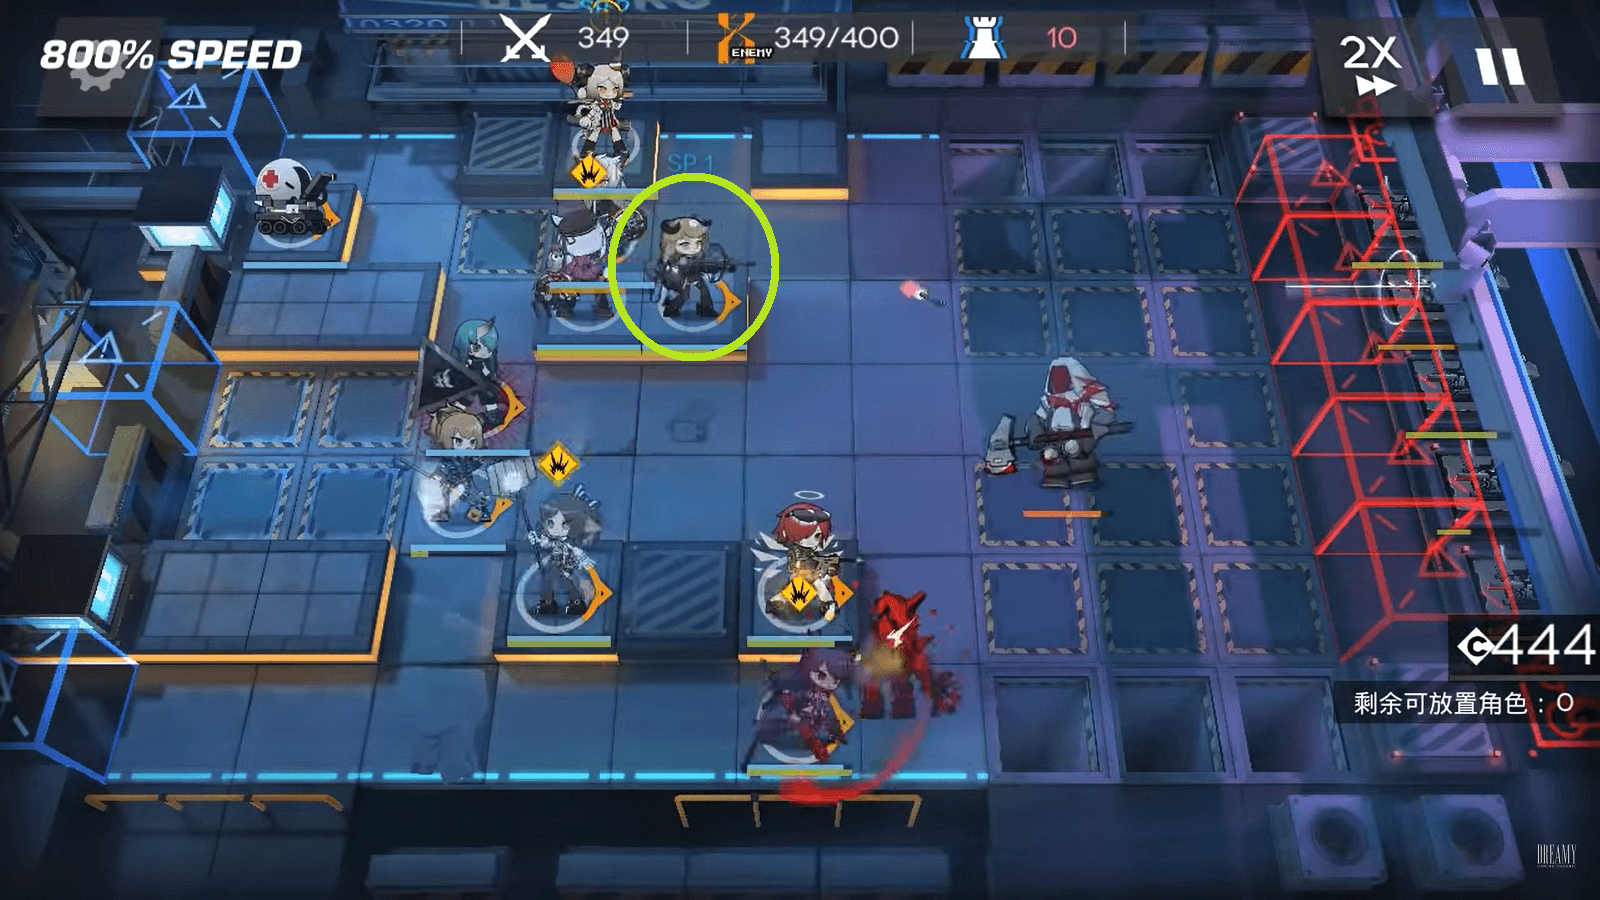
Once your entire team is deployed on the map, there's an important aggro-management step you may want to take. You see, later in the map, your S2 is going to come under a lot of heavy fire. In order to help them stay alive, it can be very wise to shake up the aggro order. Doing this is very simple, and now is the perfect time to do so:
- Retreat your V1.
- Wait for your V1's redeploy cooldown to run down.
- Deploy your V1 in the exact same spot they were in previously.
This will put both your V1 and T3 higher in the aggro order than S2, spreading the enemy aggro around more evenly. You can perform this step anytime between now and the 200 kill point (which is usually when your S2 might start having trouble surviving).
VARIATION: Deploy the Secret Weapon!
Your V1 doesn't have to be the unit you deploy here. All that matters is that you deploy a unit in the V1 spot so they will be higher in the aggro order than your S2. If your V1 has already generated all the DP you need to deploy your full army (plus maybe 100 extra DP in case of an emergency), you can replace them with any unit in your arsenal -- preferably one of the Secret Weapons you're going to need for the end of the map.
In this case, the strategy you want to follow is even simpler:
- Retreat your V1.
- Immediately deploy any Secret Weapon/ Flex unit in your V1's spot.
"Do I Have To Do This?"
This step is entirely optional. The purpose is to spread damage around between your V1, S2, and T3 so your M2 has an easier time healing them all. If S2 isn't dying, then you don't need to do this step at all.
The invisible enemies start coming at 119, including several invisible Casters. Fortunately, the Casters are polite enough to wait, giving you some time to sweat over their appearance before they attempt to murder you.
The Casters start moving at about kill 156. Be prepared to trigger Skills at that time if you have to. However, you may also need some Skills for the laser drones that are coming up at 200 kills, so don’t overextend.
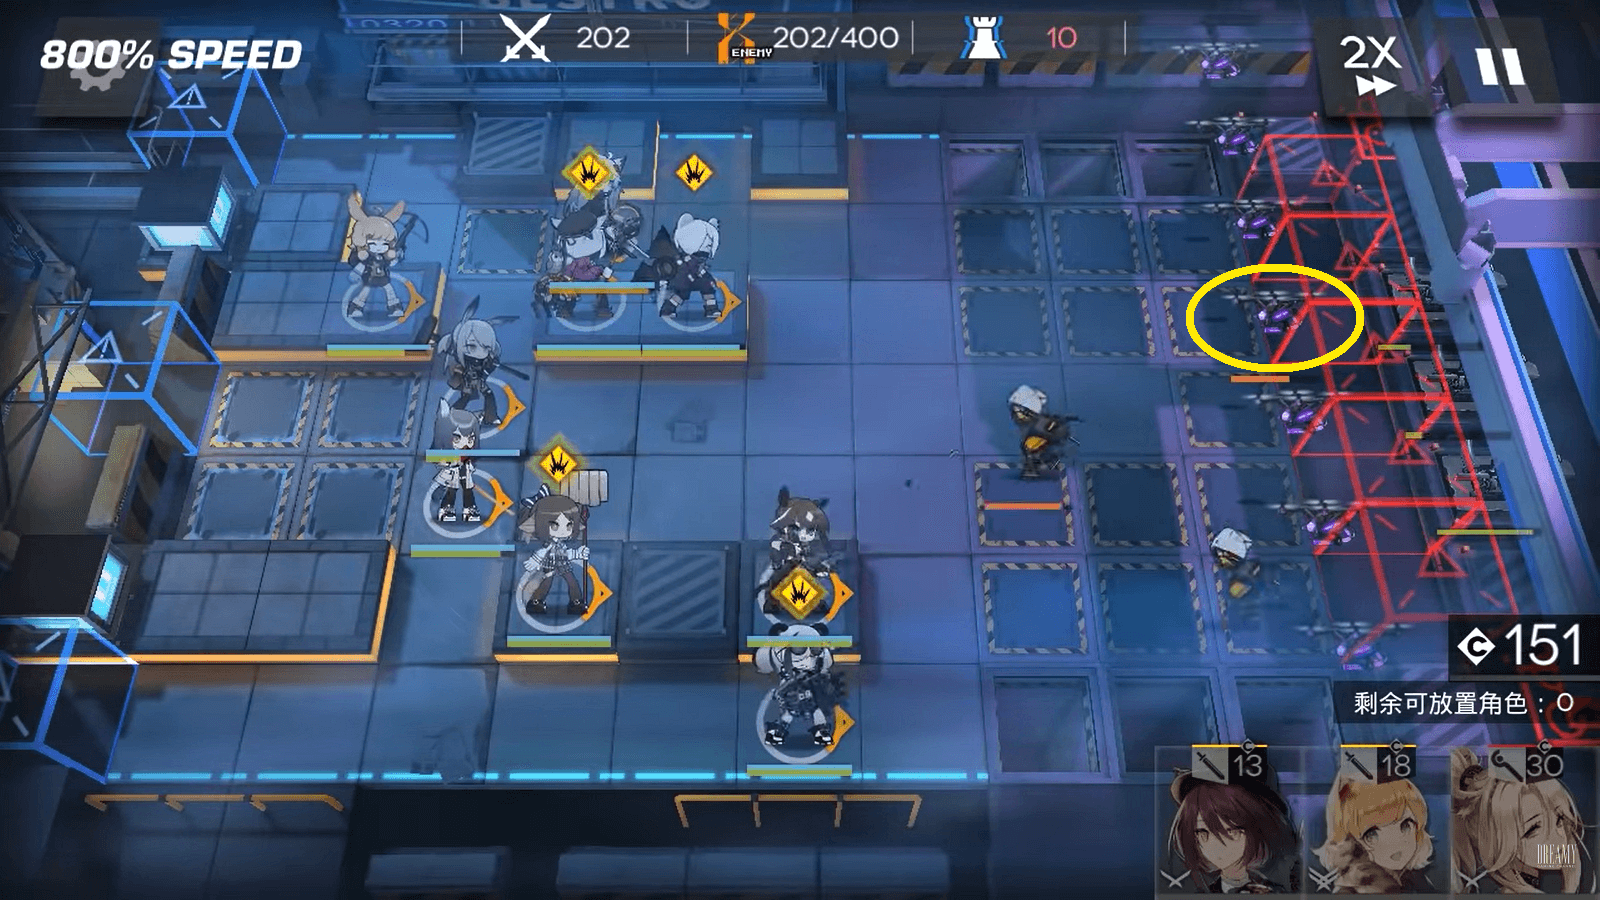
At 200 kills, a whole line of laser drones deploys. The middle drone will start moving forward at about 210 kills, and the rest of the line will follow two at a time at set intervals afterward. These purple mosquitos deal Arts damage, so they can do a lot of damage very quickly.
Another line deploys at 225 kills. This line begins moving forward in the same pattern at 235 kills. However, while this line is moving, more laser drones will be deploying and flying straight towards you without pausing.
Keep a close eye on your Operators throughout this blizzard of laser damage. Trigger Sniper Skills for extra damage and Medic Skills for extra survivability if you need them.
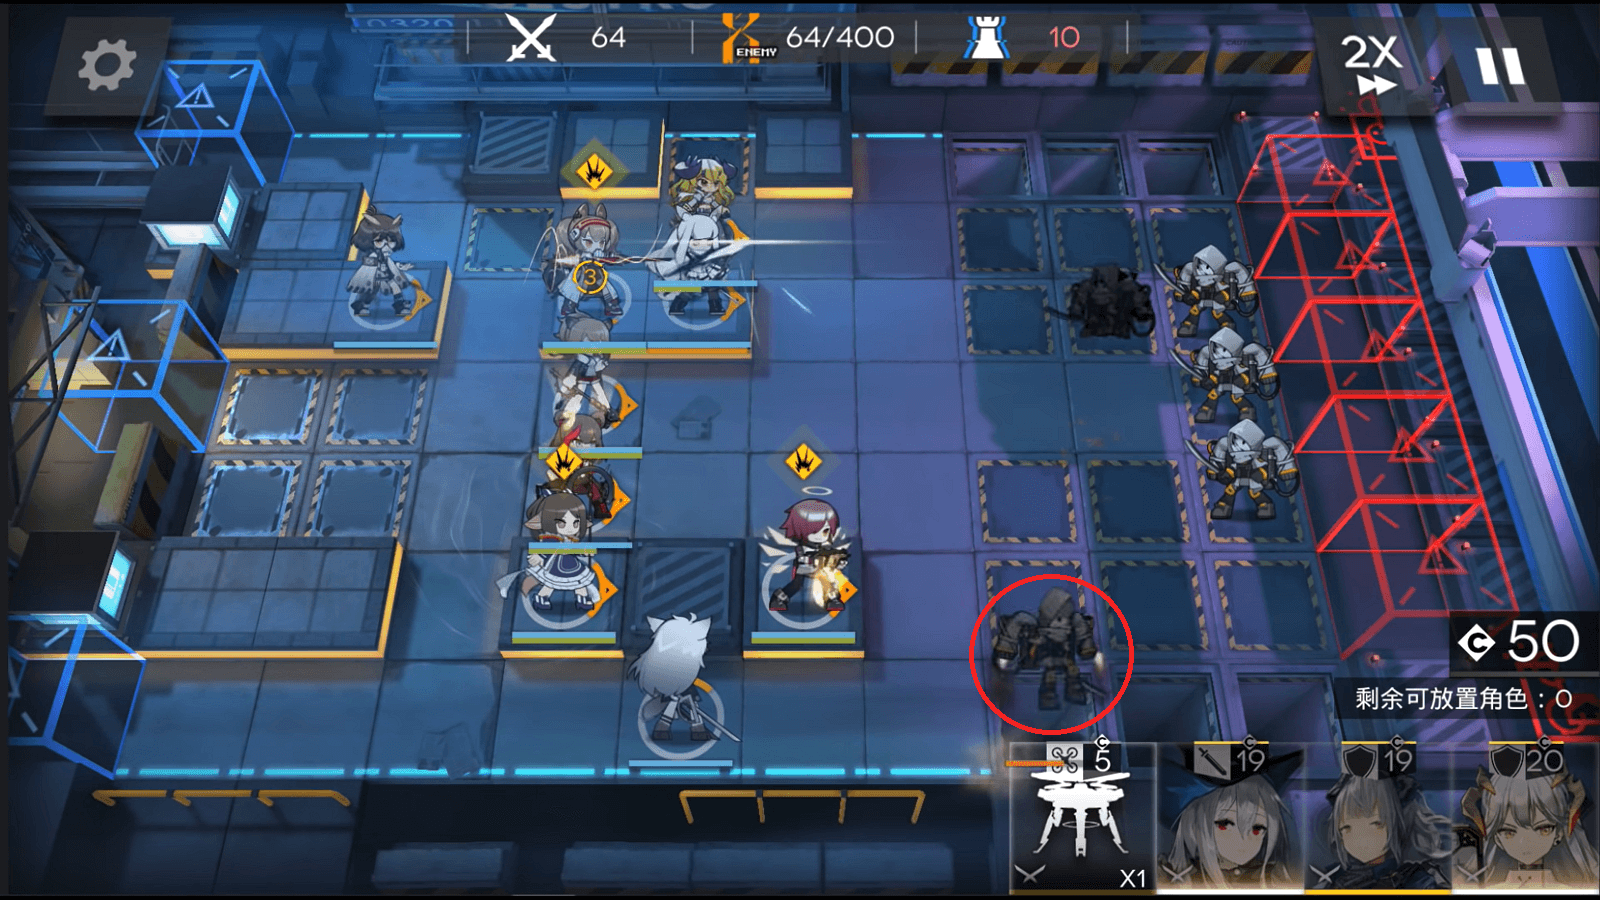
At 264 kills, the Bombtails come out to play. If you have positioned your Snipers properly and your S2 has 3x5 range, then the Bombtails should all die before they can get close enough to bomb your team.
On the other hand, if you’re having trouble with the Bombtails, you can also use a decoy unit (as described above in the "Team Composition" section). Retreat a unit you won’t need for a little while (probably V1) and drop your decoy unit here:
This should trigger the Bombtails to drop their bombs on this unit. Retreat the decoy as soon as the bombs drop and replace your V1 when you can. The Bombtails should now be no trouble at all.
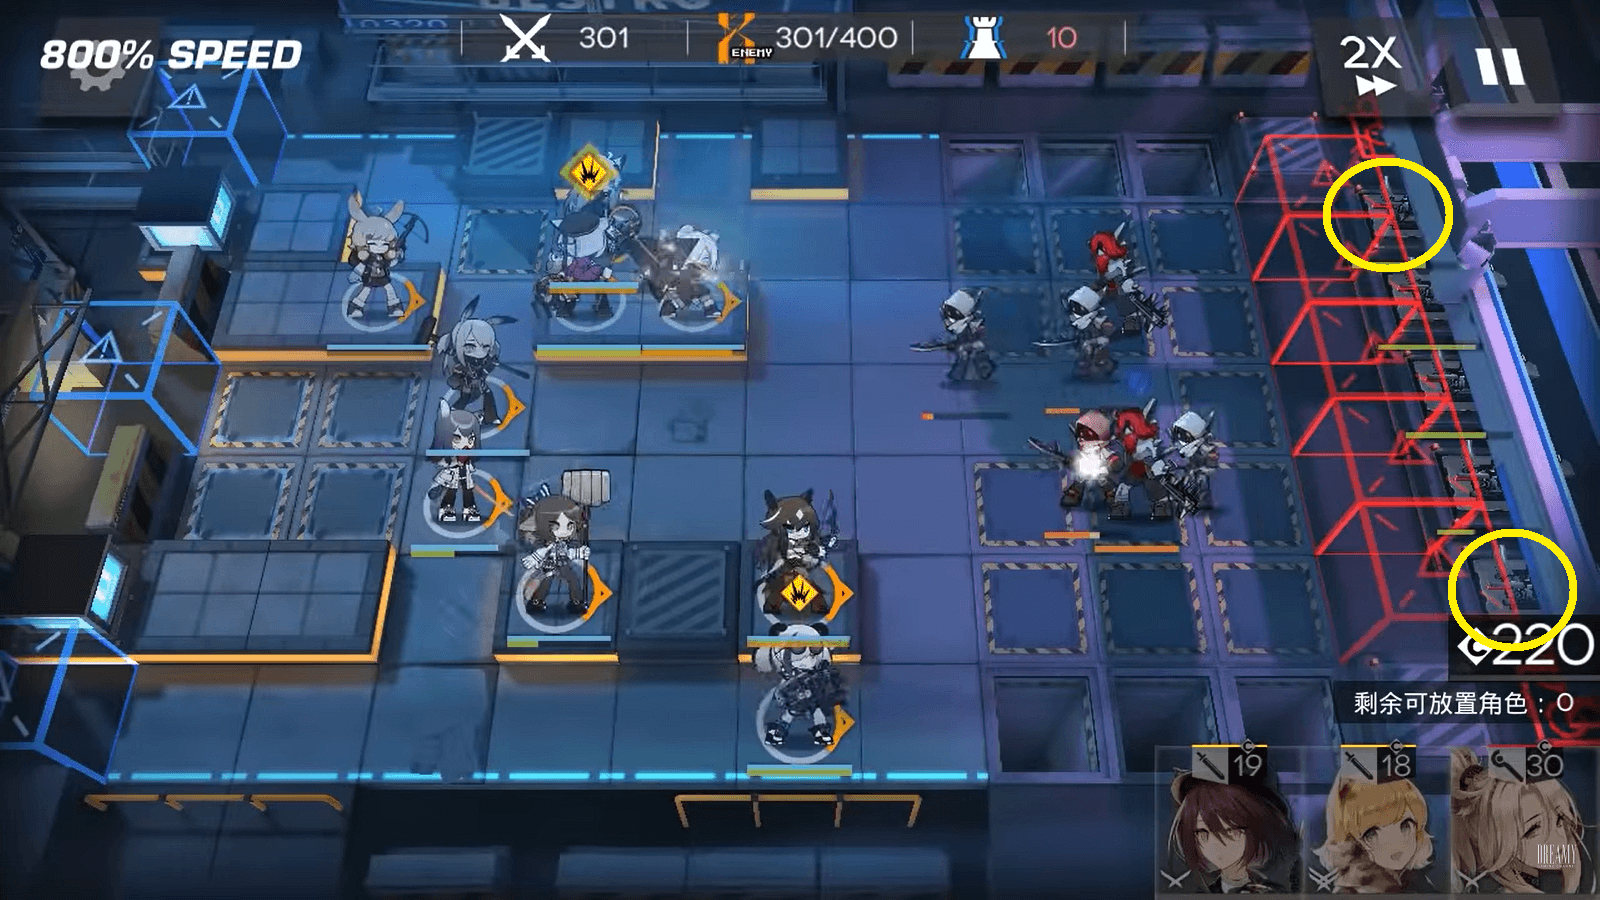
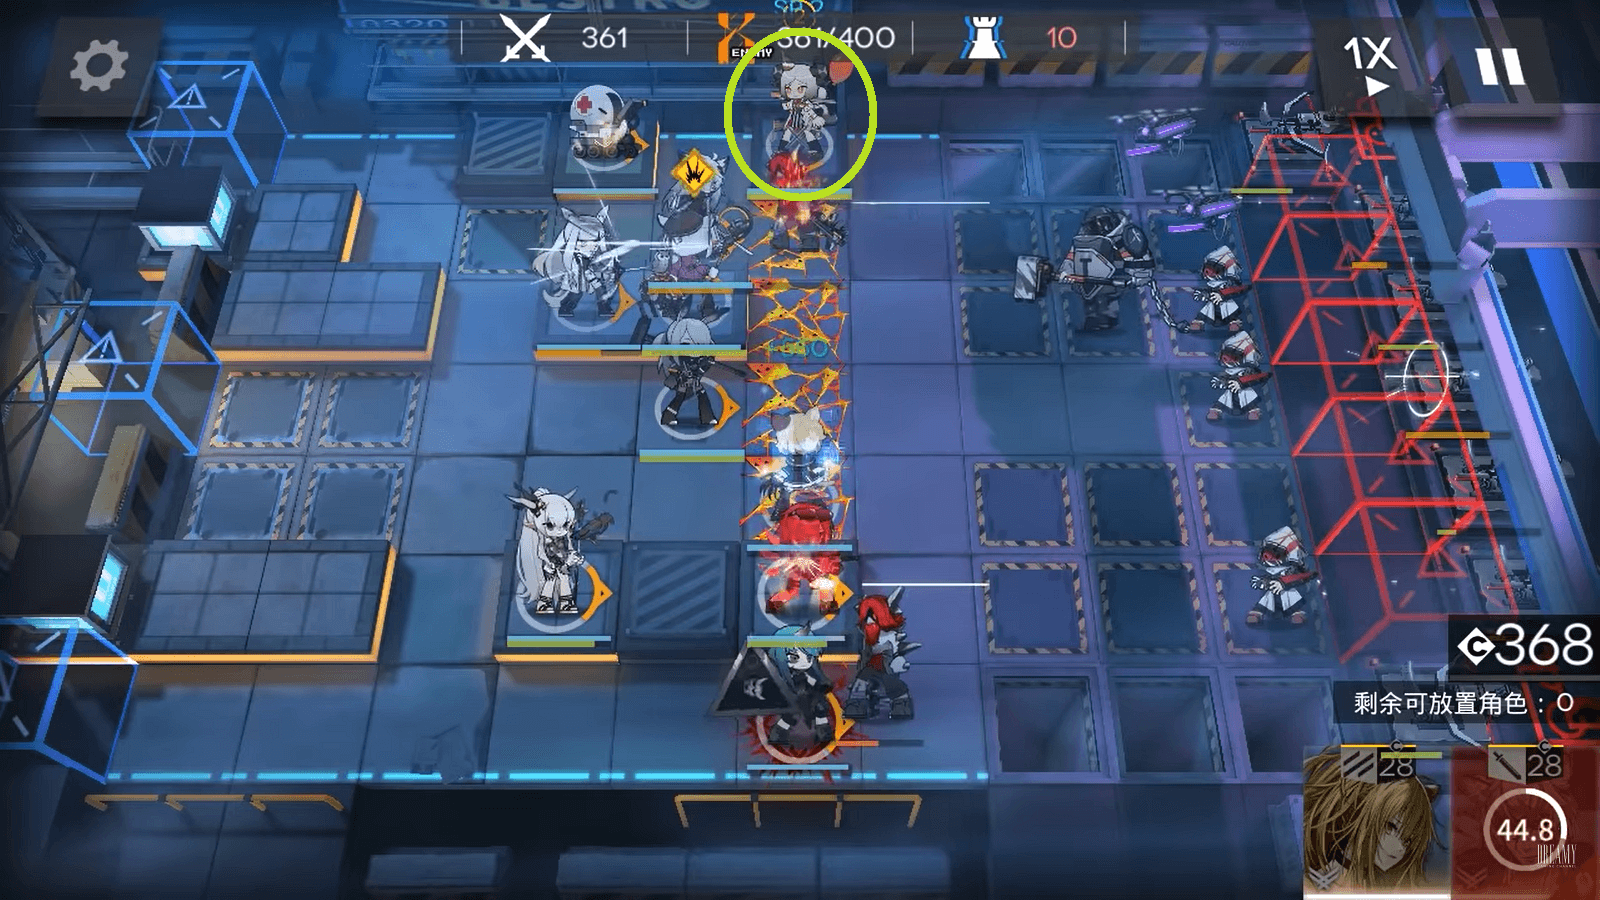
Things take a step up at 300 kills, when the Arts Master Drone deploys. These are tough customers who deal a lot of Arts damage. When it starts firing on your top lane, you might want to trigger Medic Skills to help keep your Operators alive (Silence's Drone, Nightingale's Phantom, etc.)
Note also that two crossbows deploy at this time rather than just one. You can see where they deploy in the following screenshot:
Two Arts Master Drones deploy at 340 kills: one at the top lane and one at the bottom lane. Again, prepare to use Medic Skills if needed.
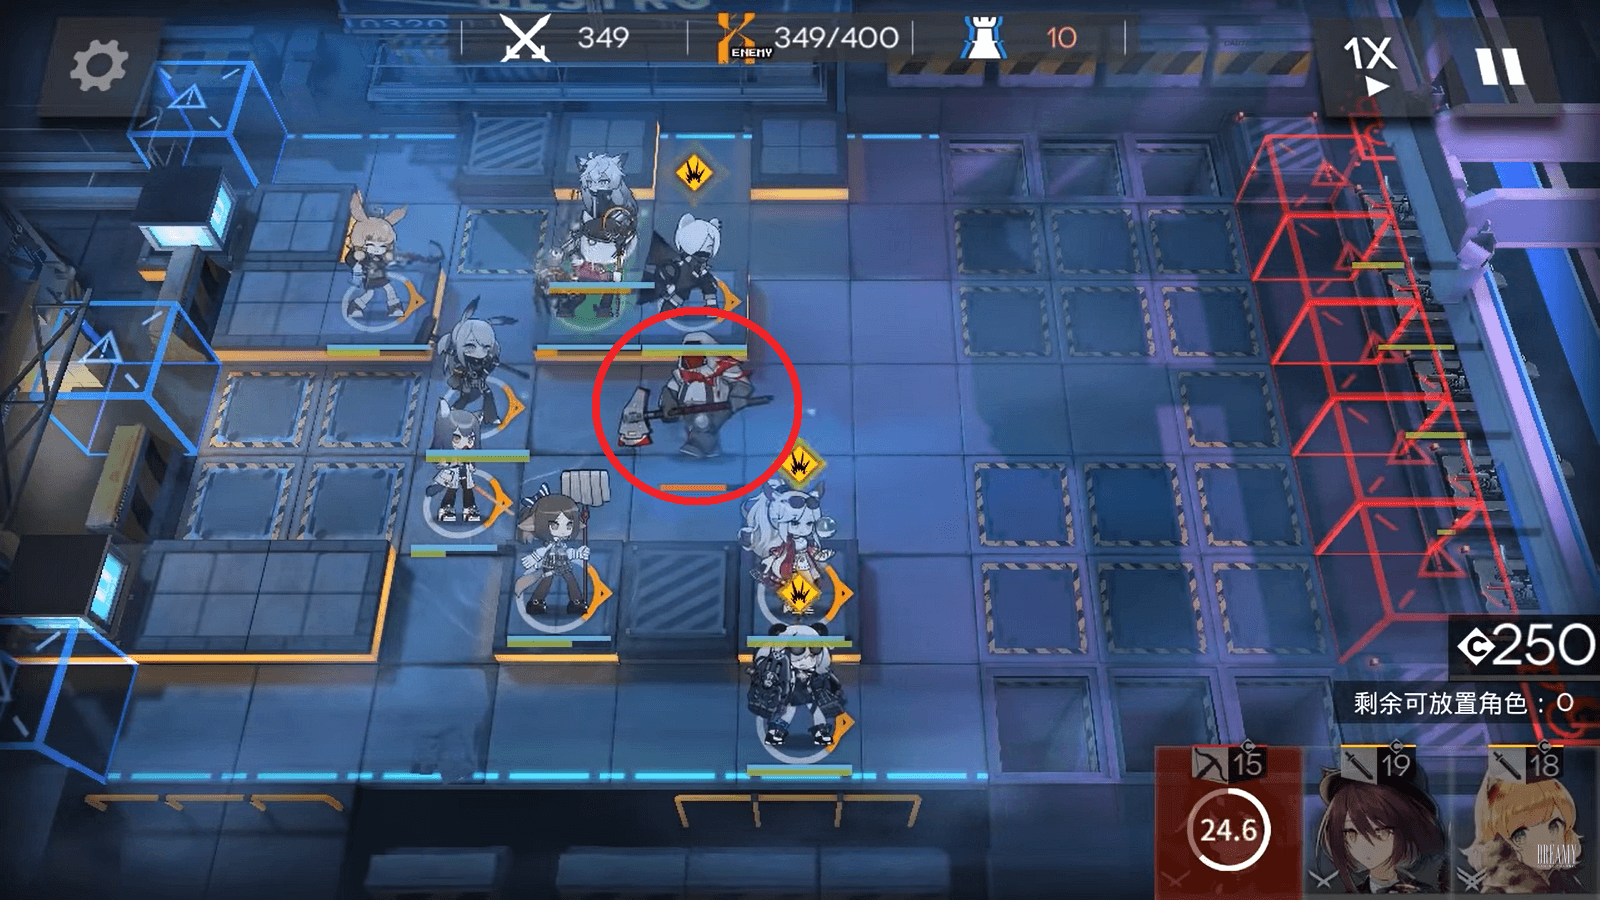
Just before you hit 349 kills, a big butcher appears and heads towards mid lane. Get ready: once you’ve killed this big butcher, you’re going to be in the final stretch.
Strategy: Part Two
350 kills is when Lungmen Downtown takes off the kid gloves:
- The final two automatic crossbows deploy.
- An entire line of Hammer Bros emerges, followed by an entire line of Archmages, followed by an entire line of Arts Master Drones.
- A constant wave of Zombie Junkmen begin deploying at this time.
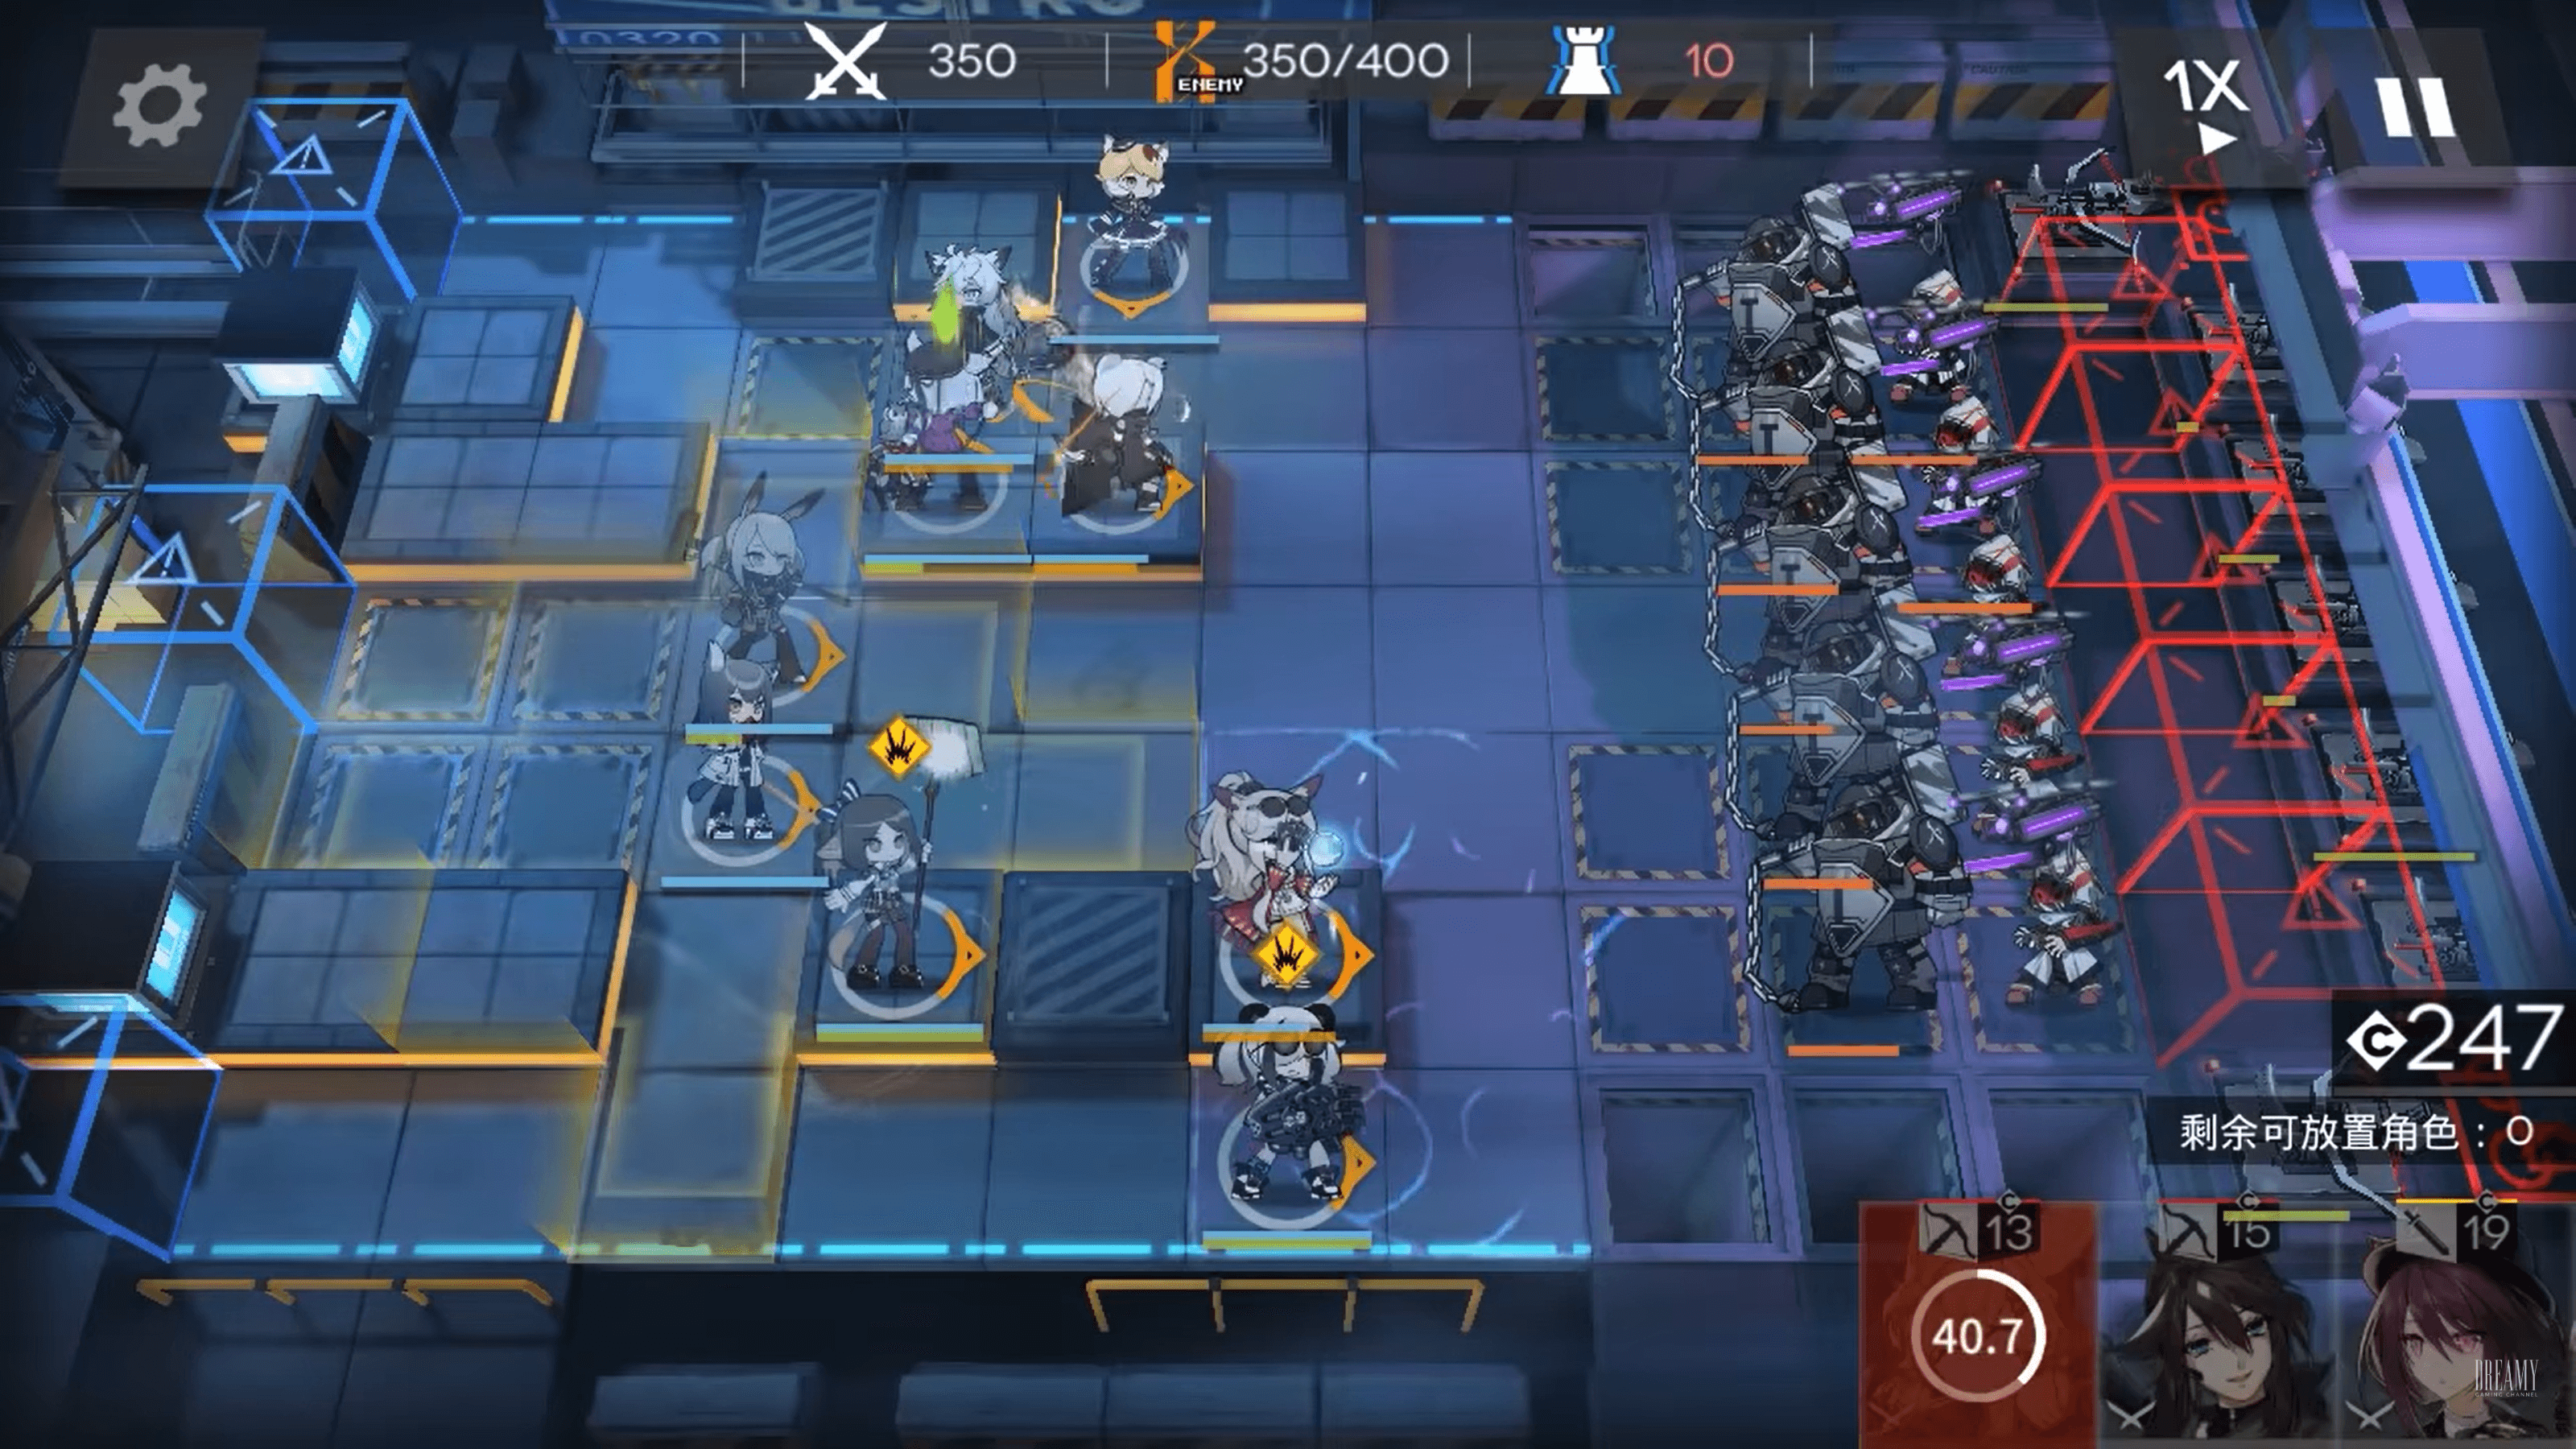
Hammer Bros are incredibly nasty. They have an enormous amount of HP, ATK, and DEF, so they hit like dynamite strapped to a runaway train and they take seventeen years to kill. But none of that is the worst part. The worst part is that they can use a Skill to Stun your Operators, and a Stunned Operator cannot Block! Left unchecked, Hammer Bros can just walk right past your defenses without a problem.
The last wave sets in at 380 kills:
- The Hammer Master deploys.
- Several Hammer Bros will deploy one at a time and move towards the middle lane in a zig-zag pattern.
- Zombie Junkmen will continue to spawn, as will Red Scimitars and -- terrifyingly -- Arts Master Drones.
If you hit 350 kills without a plan, you will be toast. Fortunately, there are lots of Operators who can help you finish off Lungmen Downtown. Let’s take a look at some of the most prominent options here.

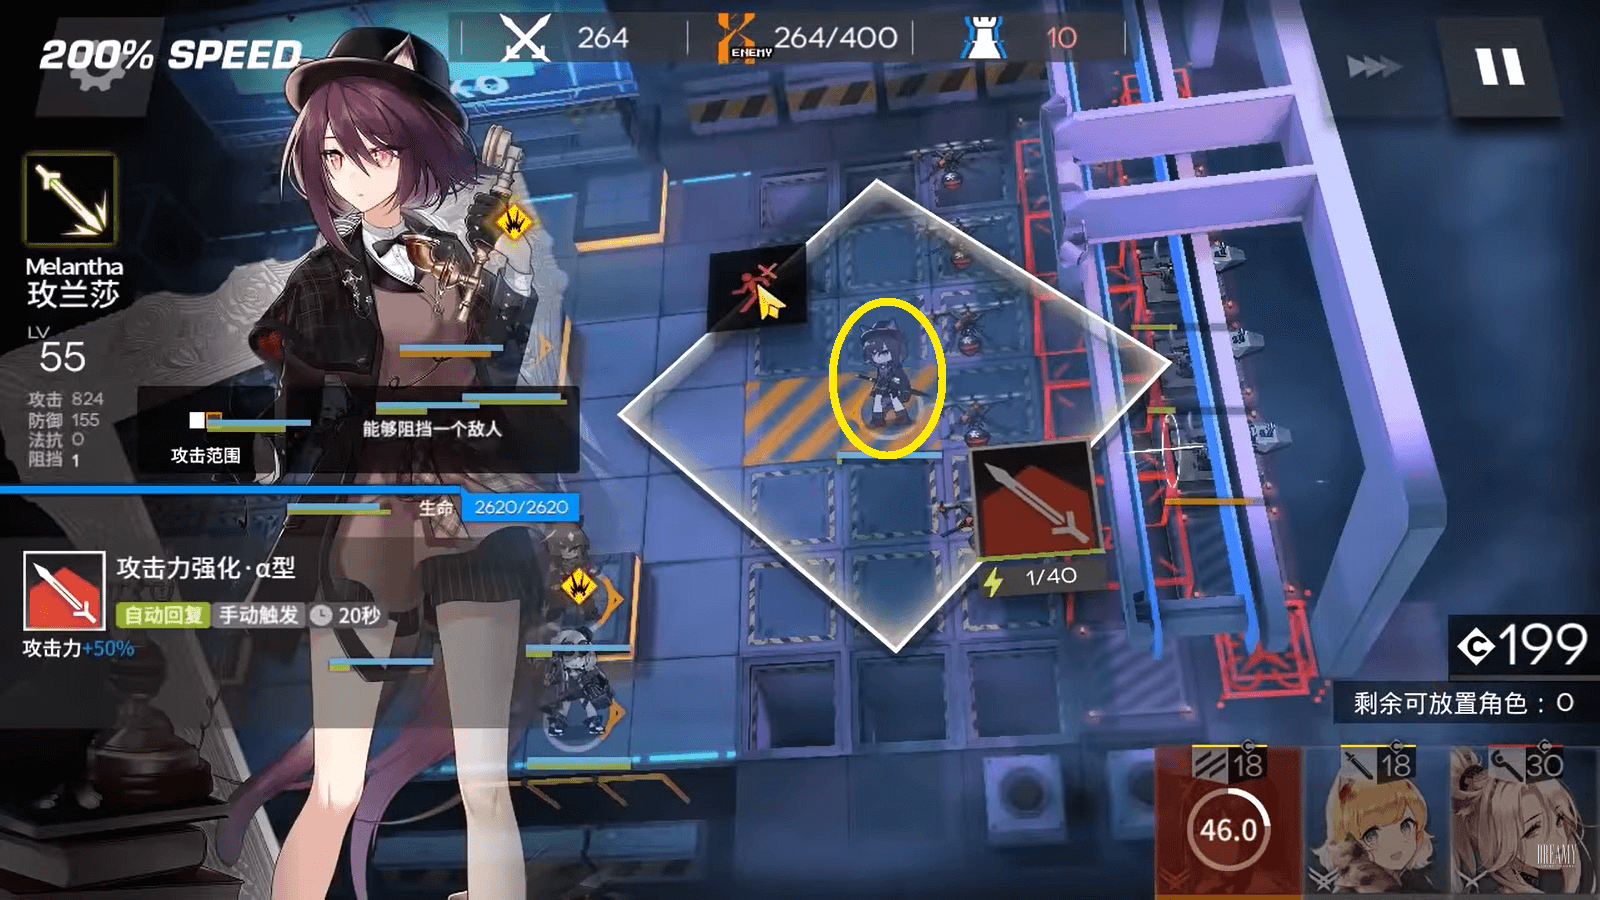
- Lane: Bottom
- Necessary Level: E1 Max Lvl
- Skill: Destiny (Skill 2) Skill Level 7
Gitano’s S2, Destiny, extends her attack range from 3x3 to 3x4. When placed on bot lane, this gives her just enough range to attack the bottom two Hammer Bros. At max-level E1 and Skill Level 7, she has just enough damage to kill them both before they start moving.
At 340 kills, two Arts Master Drones deploy. Once your S2 has killed the bot-lane drone, retreat S2 and replace them with Gitano so Gitano has time to charge Destiny. As soon as the bottom two Hammer Bros have moved into Destiny range, activate the Skill and mow them down.
At this point, you’ll want to retreat Gitano and redeploy S2. Be careful about deploying S2 back in the front spot, though, as the final waves of Arts Master Drones may slaughter them. It's safer to place them behind your bot-lane Medic instead.
For more details on using Gitano in this position, check out YouTuber Dreamy’s video on the “Gitano cheese.”

- Lane: Top or Bottom (also helps with Mid)
- Necessary Level: E2 Lvl 20+
- Skill: Skill 1 for survivability, Skill 2 for extra DPS (Skill Level unimportant)
Lappland trivializes the Hammer Bros due to her Silence, which prevents them from Stunning your units. At E1, her Silence only lasts for 1 second, which is pretty dicey. At E2 the effect lasts 5 seconds, which is more than enough to keep the Hammer Bros under control.
If sufficiently leveled, Lappland can hold the T1 or T3 spot on your team with minimal assistance. Position her with her range aimed towards the center and she can help out with mid as well. As long as you have enough DPS to burn through the Hammer Bros as they arrive, it’s smooth sailing with Lappland around.
See Lappland in action, courtesy of YouTuber Peacecow.

- Lane: Top/ Mid
- Necessary Level: E2 Lvl 20+
- Skill: Buckshot (Skill 1) Skill Level M3
Between her Talent and her S1, Meteorite can take out the entire 350 wave by herself… if RNG is on her side. Because the 350 wave stands still for so long, it gives Meteorite plenty of time to open fire on them.
The issue is that her Talent needs to proc on at least a few S1-enhanced shots, or she won’t do enough damage quickly enough. This is why Meteorite must be promoted to E2 and her S1 leveled to M3 - so that her Talent has the best possible chance of proccing and she has the highest attack multipliers possible. Even then, you may need an ally who grants SP gain (i.e., Ch'en) for this strategy to work consistently.
Dreamy shows what Meteorite’s capable of in this video.

- Lane: Top/ Mid
- Necessary Level: E1 Max Lvl
- Skill: Ignition (Skill 2) Skill Level 7+
The splash damage from Eyjafjalla’s S2 allows her to get an early start on blowing up the 350 wave, much like Meteorite. She should be placed in the S1 or S2 spot to give her the best targeting on her foes.
If you’ve promoted your Eyjafjalla to E2, you may be tempted to use her S3 instead. While this Skill is very potent, it’s not ideal for clearing the 350 killzone on Lungmen Downtown because of its short uptime and long cooldown. Stick to S2 instead.

- Lane: Top/ Mid
- Necessary Level: E2 Lvl 20+ (40+ preferred)
- Skill: Pyroclasm (Skill 2) Skill Level 7+ (M3 preferred)
Ifrit can burn most of Lungmen Downtown to the ground on her own, but it requires some unorthodox tactics. By placing Ifrit at the top of the stage and positioning her downward, she can blow fire across both the top and mid lane. Place your frontline up against her range to corral enemies in her line of fire and Ifrit will take care of most of the stage by herself.
More than most of these Operators, relying on Ifrit here means you’re placing your life in her hands. She must be able to do enough DPS to kill foes as they reach your frontline or you’ll quickly be screwed. Be sure you put as much EXP and Skill Leveling into Ifrit as possible before using her for the 400-clear.
Here is a strategy for using Ifrit in more detail, as told by YouTuber Dreamy.

- Lane: Top/ Mid
- Necessary Level: E2 Lvl 20+ (40+ preferred)
- Skill: Arcane Staff - Anti-Gravity Mode (Skill 3) Skill Level 7+ (M3 is highly recommended)
Between the crazy range/ DPS on her S3 and its quick recharge speed, Angelina is one of the best options for handling this stage quickly and safely. Precise use of her S3 allows her to carry her team through the 350 killzone without issue.
Get a grasp of the timing for using Angelina with Dreamy’s video on the subject.

- Lane: Any (or all of them!)
- Necessary Level: E2 Lvl 20+ (for one lane) E2 Lvl 80+ (for all lanes at once)
- Skill: Truesilver Slash (Skill 3) Skill Level 7+ (M3 is highly recommended)
People have good reason to call SilverAsh overpowered. With his S3, SilverAsh can hold any one lane (two lanes if he’s positioned well) or even be dropped right in the middle of the 350 wave and slay almost the entire enemy force singlehanded. The latter requires an enormous amount of investment, but make no mistake, this investment will pay you back in spades.
See SilverAsh handle one lane or the entire squad in these videos from Dreamy.
- Lane: All
- Necessary Level: E1 Lvl 60+
- Recommendations: Midnight, Mousse, ShiraYuki
If you don’t have any of the above Operators (or if you’re looking for a challenge,) there are certainly ways to clear Lungmen Downtown with lower-rarity Operators. However, it’s going to take a lot of careful planning to make it work.
Arts-based Operators like Midnight, Mousse, and ShiraYuki are good choices to start building your team, since they are able to ignore the Hammer Bros' high DEF. Operators who can ignore DEF completely, like Franka, are good for a similar reason. You need to be able to stall the Hammer Bros after they've used their Stun ability, so Slow Supporters like Istina or decoy units like Gravel can be useful as well. Take a look at other people’s strategies to get a feel for the stage, then put together a strategy you can be proud of!
Once you’ve made it past the Hammer Master, it should be smooth sailing to the end of the stage. But don’t get complacent! Those Arts Master Drones can still swoop into your base at the last moment and ruin your day. Stay vigilant just a little longer until the Victory screen appears, then rack in your sweet Orundum and other rewards. Congratulations on a job well done!