Introduction To Modules
- Modules were first introduced during the Summer Carnival event (CN: 8/3/2021) and act as equipment that Operators can select to bring into a stage. Modules provide:
- Bonus effects to Traits
- Some improvements to Operator stats
- To unlock an Operator's module:
- Certain Level and Trust requirements must be met
- Some materials must be spent
- Some missions must be completed
- Module Data Blocks are needed to unlock Modules. These are a limited resource, so players should be selective about which Modules they unlock. 6★ Operator Modules require 4 Module Data Blocks to unlock, 5★ Modules require 2, and 4★ require 1. Sources for obtaining Module Data Blocks:
- Free
- 4 free one time with the Module Training
- 1 free each week through weekly missions
- Purchasable
- 4 per month from the red cert shop
- 4 per month from the yellow cert shop
- 2 in the shop for each new sidestory-farm-event (not in reruns or the min-story events)
- 1 in the shop for each new Contingency Contract event
- Free
- By default, Operators who have new Modules will start equipped with a default Module that has no effect. These default Modules are not listed on this page.
- Module info can also be found on each Operator's page.
- A list of all Modules and the Module info can also be seen using filters and views in our interactive Operator list here or on the Module list page here:

Priority List Notes
- New Modules will be added as time permits, from oldest to newest.
- An obvious note, but Modules should only be considered for Operators you actually use.
- Each Module will have two rankings that have a slightly different focus:
- Operator Impact: Focuses solely on the impact/ importance of the module to the Operator themselves, regardless of how strong that Operator's role might be in the meta.
- Meta use: Focuses more on how likely the Module is to see use in meta play, rather than the degree of improvement to the Operator themselves.
Operator Impact Rankings
- High Priority: This Module is a good one for this Operator and directly supports their strengths/ best use.
- Medium Priority: This Module is an ok one for this Operator and somewhat supports their strengths/ best use.
- Low Priority: It might make a difference, it might not. Only consider these if you don't have higher-priority Modules in the near future, and even then you might be better off saving.
- NO: This is just a bad Module for this Operator, and it will make little to no difference at all. Do not waste your resources.
Meta Use Rankings
- High Meta Use: This module is for a very meta Operator. You should definitely see the Module use in your meta play.
- Medium Meta Use: This Module is for a somewhat meta Operator. It might see some use in your meta play depending on your roster.
- Low Priority: Not a meta Operator or the Module is not useful in their meta use.
6★ Modules

Pallas

|
'Ούρος'
|
Can attack enemies from range; When attacking enemies not blocked by self, increase ATK to 130%
|
CN:
NA:
|
Operator Impact: High
Meta Use: Medium
Explanation: The extra 10% may not seem like much, but because it stacks multiplicatively with her Vigor (and notably S1), it is core for her DPS to be competitive with the best options. If you are going to use Pallas in her best role as a consistent DPSer, then you will want to prioritize this Module.

Magallan

|

Drone Control Module.P
|
The first summoned unit does not consume deployment slots (The last summoned unit on the field does not return a deployment slot when retreated or defeated)
|
CN:
NA:
|
Operator Impact: High (if using her S1 to stall)
Meta Use: Medium
Explanation: When using her S1 for a Bind/ Slow option (typically her best role in high-end use), this allows her to better support a fully deployed team by taking up fewer deployment slots (down to 1 if only using a single drone). If you typically only use Magallan for Trust Farming or for limited Squad size challenges, then the impact for this Module should be LOW or NO.

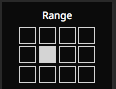
Nightingale

|

'Closed Hope'
|
Attack Range expands
|
CN:
NA:
|
Operator Impact: Medium
Meta Use: Medium
Old range:

New range:

Explanation: The primary reason to use Nightingale is her S3, which already has an expanded range that includes the range expansion of the Module and more. Thus, the Module only matters during less threatening times when S3 isn't active and only covers a single additional tile, so it will only matter when you need to cover an Operator specifically in that spot with normal healing. Thus, it won't matter very often, but when it IS useful, it can open up strategic uses for her that are not possible otherwise. A solid part of the Module not to be overlooked is the RES she gains, which is amplified by her S3, giving herself up to 12.5 extra RES at M3 when the skill is active.

Fartooth

|

First-show Support Set
|
The further away the enemy, the higher the damage dealt (up to an increase of 15%)
|
CN:
NA:
|
Operator Impact: High
Meta Use: Medium
Explanation: The attack range of Fartooth's Archetype, and especially her Skills, are designed to take enemies out from a long distance. Her Module increases her damage against enemies that are far from her, which meshes perfectly with this purpose. As a DPS-focused Operator with a high ATK to begin with, a damage increase modifier supports her core use, and the stat increases further improve her DPS. (for further info see this article)

Phantom

|

Miss Christine's Felt
|
Refunds a large portion of the current DP Cost when retreated
|
CN:
NA:
|
Operator Impact: High
Meta Use: High
Explanation: This is a great module for this unit, directly addressing one his biggest challenges: his high redeployment cost. DP costs increase by 1.5 times on the second deploy of an operator, and double on all deployments after that. For a Potential-1 Phantom, that means his DP costs for deployment go 10 -> 15 -> 20 ->20 ... If you throw in an extra 5 DP for each clone deployment, Phantom's DP consumption can get pretty high.
Typically, Operators receive a 50% refund of their deploy costs when they are retreated, so the above Phantom would regain 5 -> 7 -> 10 -> 10 DP refunded for each respective deployment. The Module increases the amount of DP refunded on retreat from 50% to 80%. This makes the refund for each retreat: 8 -> 12 -> 16 -> 16 for a DP GAIN of 3 -> 5 -> 6 -> 6 for each retreat. Considering Phantom's high DP costs, gaining an 6 DP for every retreat can make a huge difference if you need to use him a lot.
Keep in mind, however, that Operators receive NO DP Refund if they die or are forcibly retreated, so this module won't help if Phantom is being used to soak damage and is dying.

Passenger

|

Electromagnetic Regulator
|
Attacks deal Arts damage and jump between 4 enemies. Each jump deals 10% less damage and inflicts a short Slow
|
CN:
NA:
|
Operator Impact: High
Meta Use: Medium
Explanation: This Module is necessary for dragging Passenger out of the basement of 6★s and making him a usable, competitive option in some scenarios. The increased Slow effect brings it in-line with standard Slower Supporters and the increased ASPD is a welcome gain for his relatively slow attack speed. It reduces the damage decay per jump from to 10%, which may not seem like much at first but really adds up over more jumps and more attacks. This can be especially noticeable when using his S3, for example, which delivers a lot of attacks in a short period and can be stacked.

Ch'en
|
Rhodes Island Standard Combat Sword
|
Deals 10% more damage with skills
|
CN:
NA:
|
Operator Impact: Medium / High
Meta Use: Medium / Low
Explanation: Ch'en's Skills are her primary source of damage, so increasing Skill damage is welcome. The biggest problems for Ch'en, however, are the high SP costs and slow on-attack charging for S3, and the mixed damage of her S2 limiting its one-shot potential. The ASPD bonus and extra damage this Module offers does take some small steps towards improving her issues, but it isn't going to be enough to change her standing in meta usage.

Bagpipe

|
Piledriver Spear Magazine
|
Generates 2 DP after this unit defeats an enemy; Refunds the current DP Cost when retreated
|
CN:
NA:
|
Operator Impact: Medium / Low
Meta Use: High
Explanation: The extra DP on kill can be a nice bonus, but it really won't make much difference most of the time since she will still need to be paired with a DP-generating Vanguard (typically Standard Bearer Vanguards). The DP-generating Vanguards are usually able to generate enough DP on their own that the DP-on-Kill doesn't end up being a make-or-break factor.
The second bit of the Module can potentially represent a larger DP saving for players that like to redeploy Bagpipe later in stages as a heli-drop assassin, a role she is quite proficient at. As part of their Trait, Charger Vanguards refund their base DP Cost on retreat. Redeploying an Operator increases their DP Cost, but the normal Archetypal trait only refunds the base DP cost, not the higher redeploy DP cost. This Module makes it so that the higher redeploy DP costs are fully refunded on retreat (not just the base costs). This can mean up to 13 DP per retreat for Potential-1 Bagpipe. However, with her long redeploy time and low base DP costs, this is not likely to be much of an issue most of the time.
Although Bagpipe's module improvements don't represent a huge overall impact to her use, she is so strong and relevant in the meta that there really isn't much reason NOT to get this Module and enjoy the small QoL improvements it provides.
5★ Modules

Swire
|

Self-defense Lipstick
|
Can attack enemies from range; When attacking enemies not blocked by self, increase ATK to 130%
|
CN:
NA:
|
||||||

Whislash
|

Whipsword Wire.L
|
Can attack enemies from range; When attacking enemies not blocked by self, increase ATK to 130%
|
CN:
NA:
|
Operator Impact: Medium
Meta Use: Low
Explanation: Although low DPS is one of their problems, unlike Pallas, these two don't have the kits to utilize this buff to much effect because of their relatively low base ATK and Skill ATK modifiers. If you use them, the Module will improve them, but it won't drastically change their overall performance, which will remain poor.

Mayer
|

'Meeboo' Control Terminal XP
|
The first summoned unit does not consume deployment slots (The last summoned unit on the field does not return a deployment slot when retreated or defeated)
|
CN:
NA:
|
||||||
|
Scene
|
Improved Lens.P
|
The first summoned unit does not consume deployment slots (The last summoned unit on the field does not return a deployment slot when retreated or defeated)
|
CN:
NA:
|
Operator Impact: Medium
Meta Use: Low
Explanation: If Mayer or Scene are being used in normal content, it is typically being done without expecting or needing them to be deployed along with a full team. Either they are being used to cheaply deploy multiple units early that will eventually be replaced by full Operators; their supply of replenishable deployables are being utilized; or they are being used to clear with fewer Operators in the squad. In these situations, the extra unit slot gained when their summons are deployed won't usually make much difference.
That being said, if you want to use them along with full teams or want to play Summoner-only runs, this Module will help make things easier/ more viable.

Breeze
|

Surgical Instrument Kit
|
Attack Range expands
|
CN:
NA:
|
||||||

Ptilopsis
|

Medic Environment Analyze System
|
Attack Range expands
|
CN:
NA:
|
Operator Impact: Medium
Meta Use: Low / Medium
Old Range:
New Range:
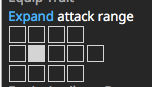
Explanation: The increase in normal attack range will only matter when you need to cover an Operator specifically in that spot with normal healing. The fact that it doesn't apply to Skill range is a downside, but it doesn't even really matter much since Ptilo S2 already covers the new range and more, and Breeze's S2 can reach the same tile by utilizing the splash range. Thus, the module won't matter very often, but when it IS useful, it can open up strategic uses for them that are not possible otherwise.
|
Andreana
|
Gunsmithing Toolkit
|
The further away the enemy, the higher the damage dealt (up to an increase of 15%)
|
CN:
NA:
|
Operator Impact: Medium/Low
Meta Use: Low
Explanation: The damage boost is maximized (15%) when the enemies is at the furthest distance from Andreana (for more info see this article), who also has no range expansion. This means that Andreana will almost never be able to use the maximum damage scale from the module. Optimistically, the module gives Andreana +65 ATK by itself, which is massively boosted by her S2. Furthermore, even if she can't use the module's maximum effect, just half of the boost could be massive to her 4k ATK. But since the module calculates after defense, it's not as nice as it could be. Realistically, if you get the module, the primary reason is for the stats.

Firewatch
|
Field Sniper Equipment
|
If the attacked enemy remains alive, gain 1 additional SP
|
CN:
NA:
|
Operator Impact: Medium/High
Meta Use: Low
Explanation: Initially, it feels like the extra SP is useless for her S1, which already have a fantastic uptime. In practice, making the criminally short window where Firewatch is vulnerable even shorter has a lot more value than it sounds. If you were to put Firewatch near danger and had S1 to protect her, this module will be amazing. For S2, the module has a higher impact in reducing downtime, but the skill will still requires you to time it carefully. The module simply gives you a larger margin of error, which is great because that 50SP cost can feel really awful at time. The damage module wouldn't be doing much for her because the enemies shouldn't be that far away from her, especially with her S1. And S1 should be her primary use, but with either skill, the module is doing some solid works for her. (for more info see this article)

Waai Fu
|

The Classic of Hung Mei Wing Chun
|
Refunds a large portion of the current DP Cost when retreated
|
CN:
NA:
|
Operator Impact: High/Medium
Meta Use: Low
Explanation: The increase in DP refund on retreat can make it a LOT easier to deploy her early and often, especially if you only have her at Potential-1 and don't have the DP cost reduction of higher potentials. For a description of exactly how this Module works, see Phantom's Explanation above.
The less often you want/ need to deploy her, and the lower her DP Cost is due to Potential increases, the less benefit you'll see. If you just need a cheap Fast-Redeploy Operator, though, Gravel is a cheaper development option, and of all the fast-redeploy Operators Waai Fu's utility is one of the weakest, so be sure you personally want to use her before investing here.

Projekt Red
|
Mystery Prop Pack
|
When there are no allied units in the four adjacent tiles, ATK +10%
|
CN:
NA:
|
Operator Impact: Low
Meta Use: Low
Explanation: With relatively low ATK and ATK modifiers, the small ATK modifier from this Module won't make a noticeable difference in most cases, even if you are using her for her damage or an assassination role. With so many better 1v1 damage options available in the current game, her primary use is typically for the AoE Stun, which this Module doesn't affect.
|
Kafka
|

Rubik's Cube Pendant
|
When there are no allied units in the four adjacent tiles, ATK +10%
|
CN:
NA:
|
Operator Impact: No
Meta Use: Low
Explanation: Kafka's primary use is the 5-second Sleep of her S1. Skill Level increases do not increase the duration of the Sleep, so it is best to keep Kafka at E0 to keep her DP cost cheaper. The ATK increase of this Module does absolutely nothing for her if using her this way.

Leizi
|

'All the Thunderlight'
|
Attacks deal Arts damage and jump between 4 enemies. Each jump deals 10% less damage and inflicts a short Slow
|
CN:
NA:
|
Operator Impact: Low/No
Meta Use: Low
Explanation: The Slow improvement brings it in line with Slower Supporters, which is nice, but her longer ASPD reduces her Slowing effectiveness and there is nothing in her kit to take better advantage of it. Leizi's S2 already eliminates the jump damage reduction, rendering that part of the Module useless during Skill duration.

Bibeak
|

A Well-Made Shirt
|
Deals 10% more damage with skills
|
CN:
NA:
|
Operator Impact: Medium / High
Meta Use: Medium / Low
Explanation: The majority of Bibeak's damage comes from her Skills, and although her Stun tends to get most of the attention, her DPS is no slouch, so the increased Skill damage is welcome. The ASPD bonus is also welcome, since with on-attack Skill charging, it allows her to use her Skills more frequently.

Tachanka
|
Machinegun Rack
|
Deals 10% more damage with skills
|
CN:
NA:
|
Operator Impact: Medium / High
Meta Use: Low
Explanation: Tachanka's damage potential comes primarily from S2, so the boost in Skill damage is welcome.

Grani
|

Cavalry Policeman Suit
|
Generates 2 DP after this unit defeats an enemy; Refunds the current DP Cost when retreated
|
CN:
NA:
|
Operator Impact: Low
Meta Use: Low
Explanation: The extra DP on kill can be a nice bonus, but it really won't make much difference most of the time since she will still need to be paired with a DP-generating Vanguard. The DP-generating Vanguards are usually able to generate enough DP on their own where Grani's DP-on-Kill doesn't end up being a make-or-break factor.
Since Grani is a defense-oriented Operator, she not only isn't set up as well to get kills for the first part of this Module, she also isn't a strong candidate to take advantage of the second part of the Module, which makes it cheaper to redeploy her later in stages (for a full description of how it works, see the Bagpipe entry above).

Wild Mane
|
Spear Replacement Suit
|
Generates 2 DP after this unit defeats an enemy; Refunds the current DP Cost when retreated
|
CN:
NA:
|
Operator Impact: Medium/Low
Meta Use: Low
Explanation: The extra DP on kill can be a nice bonus, but it really won't make much difference most of the time since she will still need to be paired with a DP-generating Vanguard. The DP-generating Vanguards are usually able to generate enough DP on their own where Wild Mane's DP-on-Kill doesn't end up being a make-or-break factor.
The second part of the Module increases the DP refunded on retreat after multiple deploys (see Bagpipe description above for more detail), and can potentially be useful to Wild Mane, especially if trying to leverage her Talent's DP reduction for Guards using multiple deploys. That being said, with her relatively low DP costs, and with DP in general typically not being an issue in mid/late game because of the strong DP generation of Standard Bearers, the impact of the Module generally won't be very noticeable.

Reed
|

Spear Clean Suit
|
When attacking enemies with less than 40% of their max HP, increase ATK to 115%
|
CN:
NA:
|
Operator Impact: Medium
Meta Use: Medium / Low
Explanation: A decent multiplicative ATK modifier to enemies below 40%. If you are using Charger Vanguards, you are using them to kill things, whether it be typically easy to kill small fry at the beginning of a battle, or for assassination attempts later. Since they will typically be finishing off what they are attacking, and since you WANT them to get the killing blow for the DP, the bonus from this module is welcome and will be likely to take effect.
4★ Modules

Dobermann
|

Military Telescope
|
Can also be deployed on Ranged tiles
|
CN:
NA:
|
Operator Impact: Low/NO
Meta Use: Low
Explanation: This module neither addresses her weaknesses nor accentuates her strengths. Her Archetype is already rather forgiving with placement due to the extended attack range, and if you are using Dobermann at all it is likely with a 3★ team, so Midnight is the only ranged melee that could potentially compete for a deployment spot (and since his range is longer, both can be used in the same lane if there are enough spots). The damage increase from the stat boost is small, so this Module will usually make no difference at all.

Deepcolor
|

Weird Palette
|
Can hold +3 additional summoned units and summoned unit deployment costs are reduced
|
CN:
NA:
|
Operator Impact: High/Medium
Meta Use: Low
Explanation: Deepcolor's challenge as a Summoner is that she has no way to gain additional summons, nor any way to reclaim (recycle) summons she has already placed. This Module helps that problem immensely by almost doubling her summon total (from 4 to 7). This makes losing a summon or two far more forgiving and also massively enhances her solo coverage capabilities. The deploy costs of summons are already cheap, so the decrease in their deploy cost from this Module (from 5 to 3) is nice but should rarely make any difference.
It should be noted, however, that the Module doesn't completely address her core issue: she still can't generate more summons or recycle the existing ones. This makes pre-planning with her very important, and it makes her a poor choice if many independent summon deployments are needed or if they need to be repositioned.

Perfumer
|

'Aegean's Kiss'
|
Restores the HP of 4 allied units simultaneously
|
CN:
NA:
|
Operator Impact: High/Medium
Meta Use: Medium/Low
Explanation: AoE Medics are the best choice for handling group-wide damage, and because of her Talent, Perfumer specifically is a great choice for "poison mist" type stages where every deployed Operator is taking damage. This Module plays right into that strength, enabling her to heal an extra Operator with each heal. This can greatly increase her healing output in times of heavy damage, or add some useful top-offs when damage is smaller but steadier.

Ambriel
|

Portable Radar Equipment
|
The further away the enemy, the higher the damage dealt (up to an increase of 15%)
|
CN:
NA:
|
Operator Impact: Medium
Meta Use: Low
Explanation: HG designed the module with Ambriel's S2 in mind, so the impact from it is high (for further info see this article). And you should use Ambriel to occasionally snipe enemies outside of your front line as well. Technically, Ambriel would use her module's effect more, but Andreana gains a little more damage because of the massive ATK she can get as well as not getting any -ASPD.

Gravel
|
Covert Action Toolkit
|
Refunds a large portion of the current DP Cost when retreated
|
CN:
NA:
|
Operator Impact: Low/ No
Meta Use: Medium
Explanation: Gravel's DP cost is already dirt cheap at 5 DP. This means her DP cost with multiple deployments maxes out at 10 DP. A normal retreat would refund 5 DP, where with the Module it would refund 8, for a net gain of 3 DP for each retreat (at the third and subsequent retreats). Although this isn't nothing, it also isn't enough to matter in the vast majority of situations, especially if you consider that the first 2 retreats gain even less, and the only place where that extra DP will matter is early in the stage while you are still deploying your team.
On top of that, Gravel's kit is defensive, so the player is likely using her to delay enemy advancement or to damage soak at specific times. This will typically mean fewer deployments and also that she is more likely to die. Since no DP is refunded at all on death, this further reduces the Module's usefulness.

Pudding
|
Portable Electrical Measuring Equipment
|
Attacks deal Arts damage and jump between 4 enemies. Each jump no longer deals less damage and inflicts a brief Slow
|
CN:
NA:
|
Operator Impact: High
Meta Use: Low
Explanation: Removes the jump damage reduction entirely, which increases damage by 20%, 40%, and 60% for the 1st, 2nd, and 3rd jump respectively. Given her S2 allows bounces to hit previously hit enemies, she is more likely to get the full benefit from the module.

Cutter
|
Replaceable Tool Set
|
Attacks ignore 70 DEF
|
CN:
NA:
|
Operator Impact: Medium/Low
Meta Use: Low
Explanation: Cutter's DPS primarily comes from her Skills and their high ATK modifiers, so a small amount of DEF ignore isn't going to impact her Skill DPS much. The Module does represent a small normal-attack DPS increase for low-/ mid-DEF enemies, so it isn't worthless if you use her a lot, but it isn't likely to change her actual performance much.

Vigna
|

The Greatrock
|
When attacking enemies with less than 40% of their max HP, increase ATK to 115%
|
CN:
NA:
|
Operator Impact: High / Medium
Meta Use: Low
Explanation: A decent multiplicative ATK modifier to enemies below 40%. If you are using Charger Vanguards, you are using them to kill things, whether it be typically easy to kill small fry at the beginning of a battle, or for assassination attempts later. Since they will typically be finishing off what they are attacking, and since you WANT them to get the killing blow for the DP, the bonus from this Module is welcome and will be likely to take effect, and Vigna already has nice ATK modifiers to make even greater use of it.