CB-EX8 Challenge and Normal Mode
This guide will step through a strategy for clearing CB-EX8 that will work for the Challenge and Normal Mode. For other Guides and event info, see the following pages:

Map Information and Strategy
| Stage | Sanity | Rec. Lvl & Unlock Cond. | First Time Drops | Additional Drops | Challenge Reward |
|---|---|---|---|---|---|
| CB-EX8 | 20 |
Elite 2 Lv. 30
|

|

|
Challenge Condition: The maximum cost of Control Terminal skills is increased by 50%
- The Challenge Condition makes it take much longer to charge the Control Terminals. This means that for most of the stage we will be limited to only 5 Operators, and the terminals will not have their protective buffs.
- The key to this stage will be proper placement of the blocks to get the enemies to path the way we want, and to kite the enemies to give our dps more time to bring them down. Block placement will be discussed in the walkthrough below.
- The Ergate Leaders cannot be blocked, so slows and stuns can be helpful to give us enough time to take them out. They have higher RES than DEF.
- The Bulldozers and Bullies required Block-3 and have high offensive and Defensive capabilities.
- The Marksmen and the Fanatics will target our Control Terminals, and if any of them are destroyed we lose, so we have to keep them away or kill them before they get to them.
Recommended Team Composition
- 2 Skill-DP-Recovery Vanguard, V1,V2
- 1 ST Medic, M1
- 1 Defender, D1
- 1 Slower Supporter, Su1
- 1 Caster, whichever is your strongest, AoE is probably better but strong ST can potentially work.
- 1 Melee Operator, Me1, with at least 1 block. We need this Operator to hold a lane by themselves, so high survivability is a must. Arts Damage is also welcome. Arts Guards are a good choice.
- ---------- The Above Operators are the ones we will use for the first part of the Stage, before we can activate the Command Centers. The ones below will be for after they are activated
- 1 Defender, D2
- 1 Slower Supporter, Su2, If you don't have a second Slower Supporter, try a different Ranged Arts Damage
- 1 Control Specialist, Sp1. if you don't have a control Specialist, you can try a Ranged Guard, Caster or Supporter along the kite path.
- 3 backup, I'd recommend a Defender in case you need to stop bulldozer, or a backup for your Melee
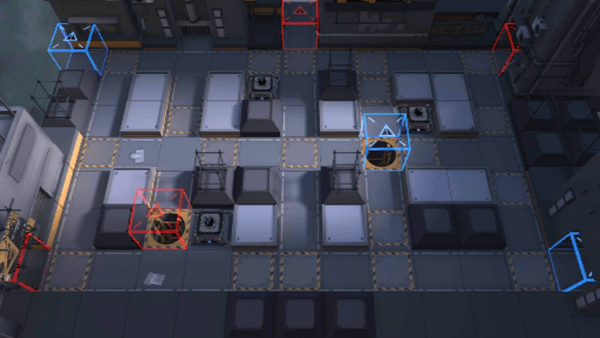
Here is an example of the team I used:
Deployment
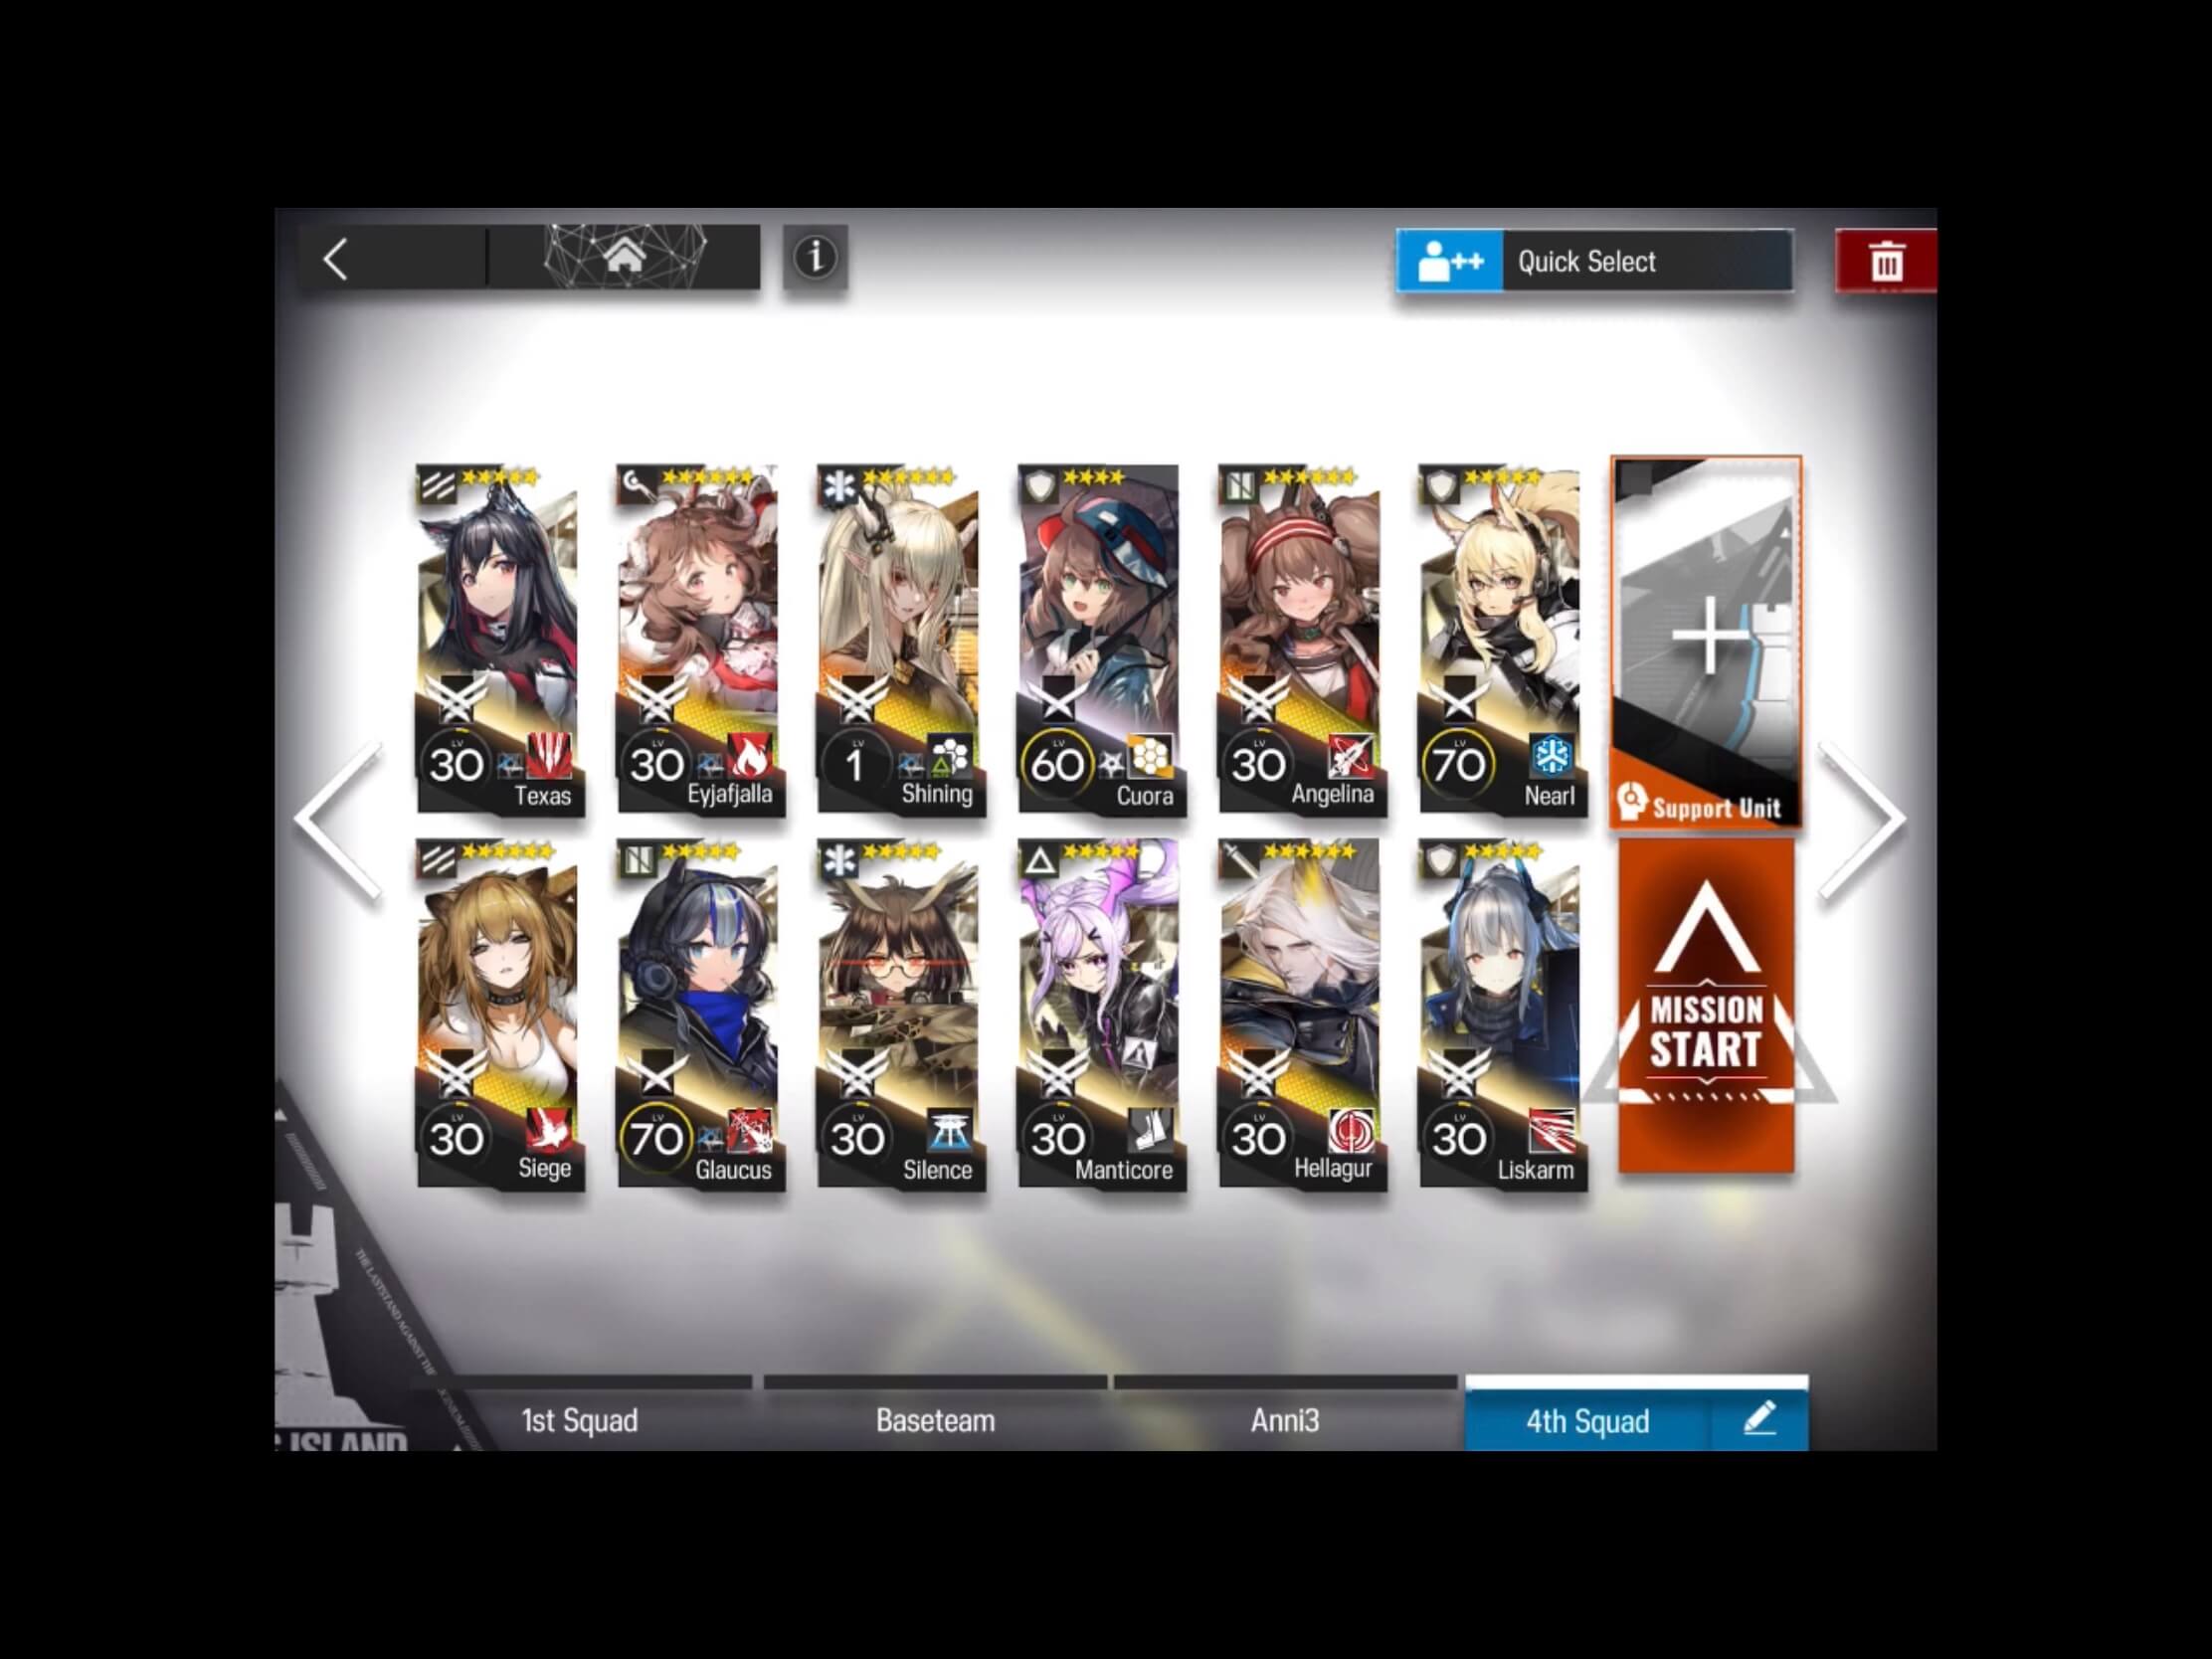
Unit placement can be seen in the image below, and deployment order should be done exactly as presented. Each Operator can be placed as soon as there is sufficient DP.
Deployment Order:
- V1: Texas - Skill-DP-Recovery Vanguard
- M1: Shining - ST Medic
- V2: Siege - Skill-DP-Recovery Vanguard
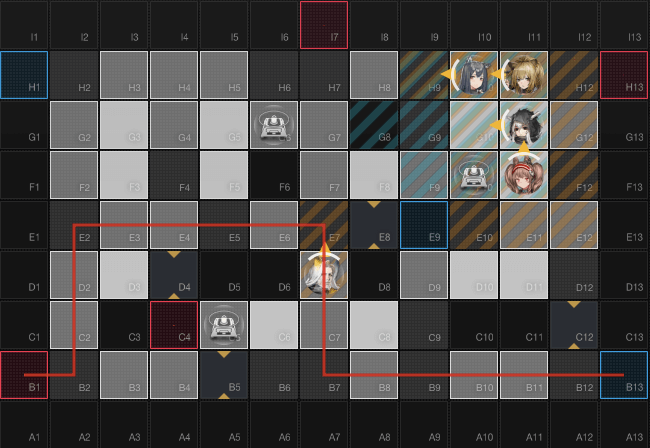
- Place blockade at B5
- Place blockade at E6
- Su1: Slower Supporter - Angelina
This will cause the first wave of Elite Brawlers (red caps) from the left to path along the top, and it should look like this:
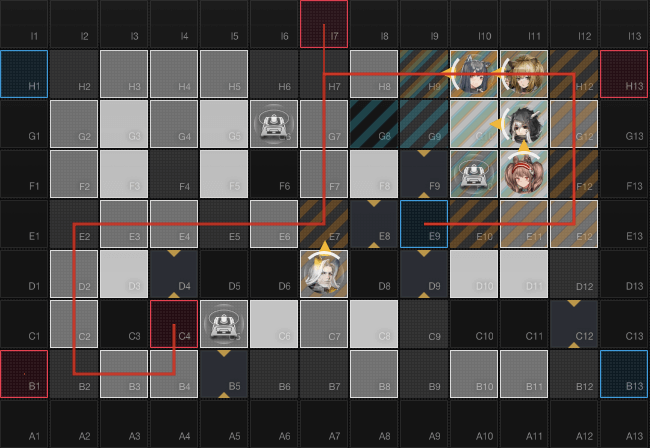
- Deploy Me1: Hellagur - Enmity Guard
- Place blockade at D4
- Remove blockade at E6
- Place blockade at E8
After this, make sure your Vanguards have engaged all the red caps before placing the next block.
- place blockade at C12
This placement will now cause the red hats and the threats to our Command Terminals (marksmen and Fanatics) to take the following path: through our Me1 and not past any Terminals:
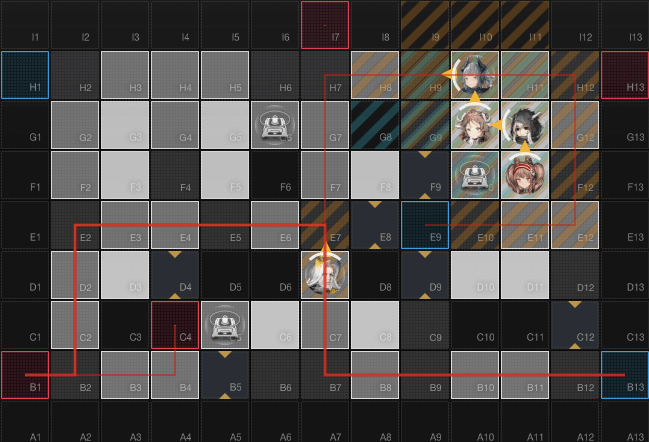
- Place a blockade at F9
- Place a blockade at D9
This will now cause the Ergate Leaders, the Bulldozers, and the GreyTails (bubble dudes), to take the top path around. It will look like this:
- Retreat V1 and deploy C1: Eyjafjalla - Caster
- Retreat V2 and deploy D2: Liskarm - Defender
The Formation will look like this:
This will be our formation until we can activate our Command Terminals. Use your Skills wisely. There is a way to kite each of the paths mentioned above.
- If any of the Brawlers, Marksmen, or Fanatics get past your Me1, remove the blockade from C12, and place one at B11. They will turn around and path clockwise. When they have returned to the loving embrace of your Me1, remove the blockade from B11 and place it back on C12. Just be careful that when the path is reversed, new enemies will move up toward the Command Center at G6.
- If any of the Ergates, Bulldozers, or Bubble men get past your group in the upper right, remove the blockade on D9 and place a blockade on E10. This will cause them to reverse direction and head around the circle counter-clockwise (through where your Me1 is standing). Before the reach D9, removed the blockade on E10, and place the blockade on D9
- For examples of this kiting, you can see it in the companion video linked below.
Repeat the kiting as necessary until your Command Terminals can be activated. Then:
- Activate the Command Terminal at G6
- Deploy D3: Nearl - Defender
- Activate any Command Terminal
- Deploy Sp1: Manitcore - Control Specialist
- Activate any Command Terminal
- Deploy Su2: Glaucus - Slower Supporter
Your formation now looks like this:
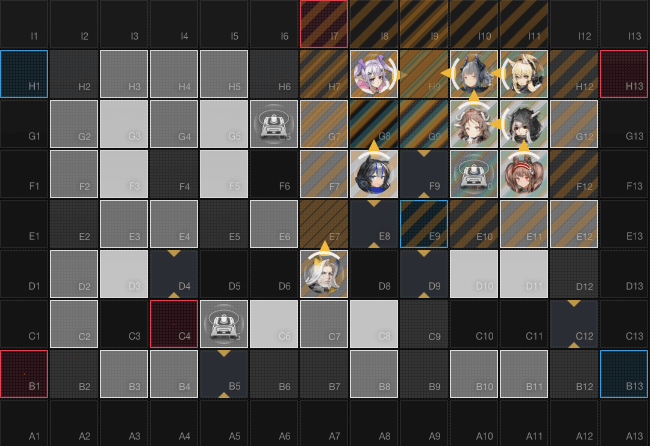
This is our final formation. Reverse courses again as necessary with block juggling.
Enjoy your OP!