OF-EX6 Normal And Challenge Mode
This guide will step through a strategy for clearing OF-EX6 that will work for both the normal and Challenge mode, as it uses less than 6 blocks.
If you are looking for other Event information or Operation clear guides, see the following:


Map Information
- <Lava Fountains> erupt periodically, destroying any blockades and doing large damage to any Operators in the 8 tiles around. Most of the map is covered in lava fountain range, which means your block tile options are limited, and most of your Operators will need to be covered by a healer.
- For most players the main challenge of this map will be killing the Ergate Leaders quickly enough while also handling everything else that is happening. The Ergate Leader spawn point is quite close to the friendly exit gate that they use. Thus, your choices are either to create a longer path for them that goes around the edge of the map, or use control and DPS to nuke them before they can arrive. They have VERY high DEF for this map, so you'll be using Arts Damage to bring them down.
- The second annoying enemy is the Sniper Leader, whom we know well by now, and who stuns every third hit. The player will need to plan how to handle these, either by planting a permanent soak or deploying Operators at specific times.
- The third annoying enemy is the Agent with the purple light-sabers. They emerge toward the end of the map in pairs, and reduce your block by 1. This can allow enemies to quickly pass your defensive line, especially if you are funneling to a single Defender.
- The enemies that emerge from the top left are mostly high DEF low RES units, so using Arts damage is effective.
- The enemies that emerge from the bottom left are low DEF high-ish RES units + the Snipers.
- The purple light-sabers emerge from the lower right and are low DEF high RES.
Pros/Cons of the kite-around the edge method:
Pros:
- DPS and control requirements are lower for the Ergate Leaders since there is more time to kill them.
- Ifrit can be used to greatly simplify the DPS requirements.
Cons:
- Multiple bait Operators must be used to soak the enemy Sniper Stuns
- Usually uses Ifrit.
- More roadblock juggling is required.
Pros/Cons of the nuke method:
Pros
- Only a single Operator is needed for Sniper baiting.
- less roadblock juggling
Cons:
- higher DPS and control requirements, especially with the double-Ergate Leader spawns.
In this guide, I'm going to be showing a nuke method I used to clear, but here is what a deployment might look like for the kite method, with the main block placements being F5 and D5. Other blocks are then used to re-route the Ergates or Agents as needed to bring them down.
If you are interested in finding more information on the kiting method, you can see an example in the PeaceCow video linked in Video Companions at the bottom. Next I'll describe in detail the nuke clear strategy.
Recommended Team Composition
- 2 Skill-DP-Recovery Vanguards.
-
1 multi-target Slower Supporter. Angelina shines. Istina can probably also work (in a place where she isn't getting hit by a lava fountain)
-
2 Casters, AoE or multi-target is preferable, though 1 strong ST might be enough. This is the main source of the DPS we need to clear the double-Ergates. Eyja with S2 and Skyfre with S2 are both great choices here.
-
1 ST Medic
-
1 Healing Defender.
-
1 Ranged Guard. SilverAsh with Truesilver Slash will make this considerably easier.
-
1 melee Operator to soak the Sniper Stuns. Doesn't really matter who. Liskarm is a great choice, as every time she is hit she gives SP to the surrounding Operators. FEater is a decent option, as she may get lucky with dodges and can push back and slow the Ergates.
-
1 Arts Guard (or if you don't have an Arts Guard, an AoE Sniper or Platinum or BP)
-
1 final Melee Operator, preferably Control, or low block count. Manticore with S1 is the best option by far. FEater with S2 is a decent choice, or a 1 block physical Guard.
-
2 Flex Operators. If your final Melee Operator is not Manticore, then I suggest bringing replacements, as it is the most likely to die.
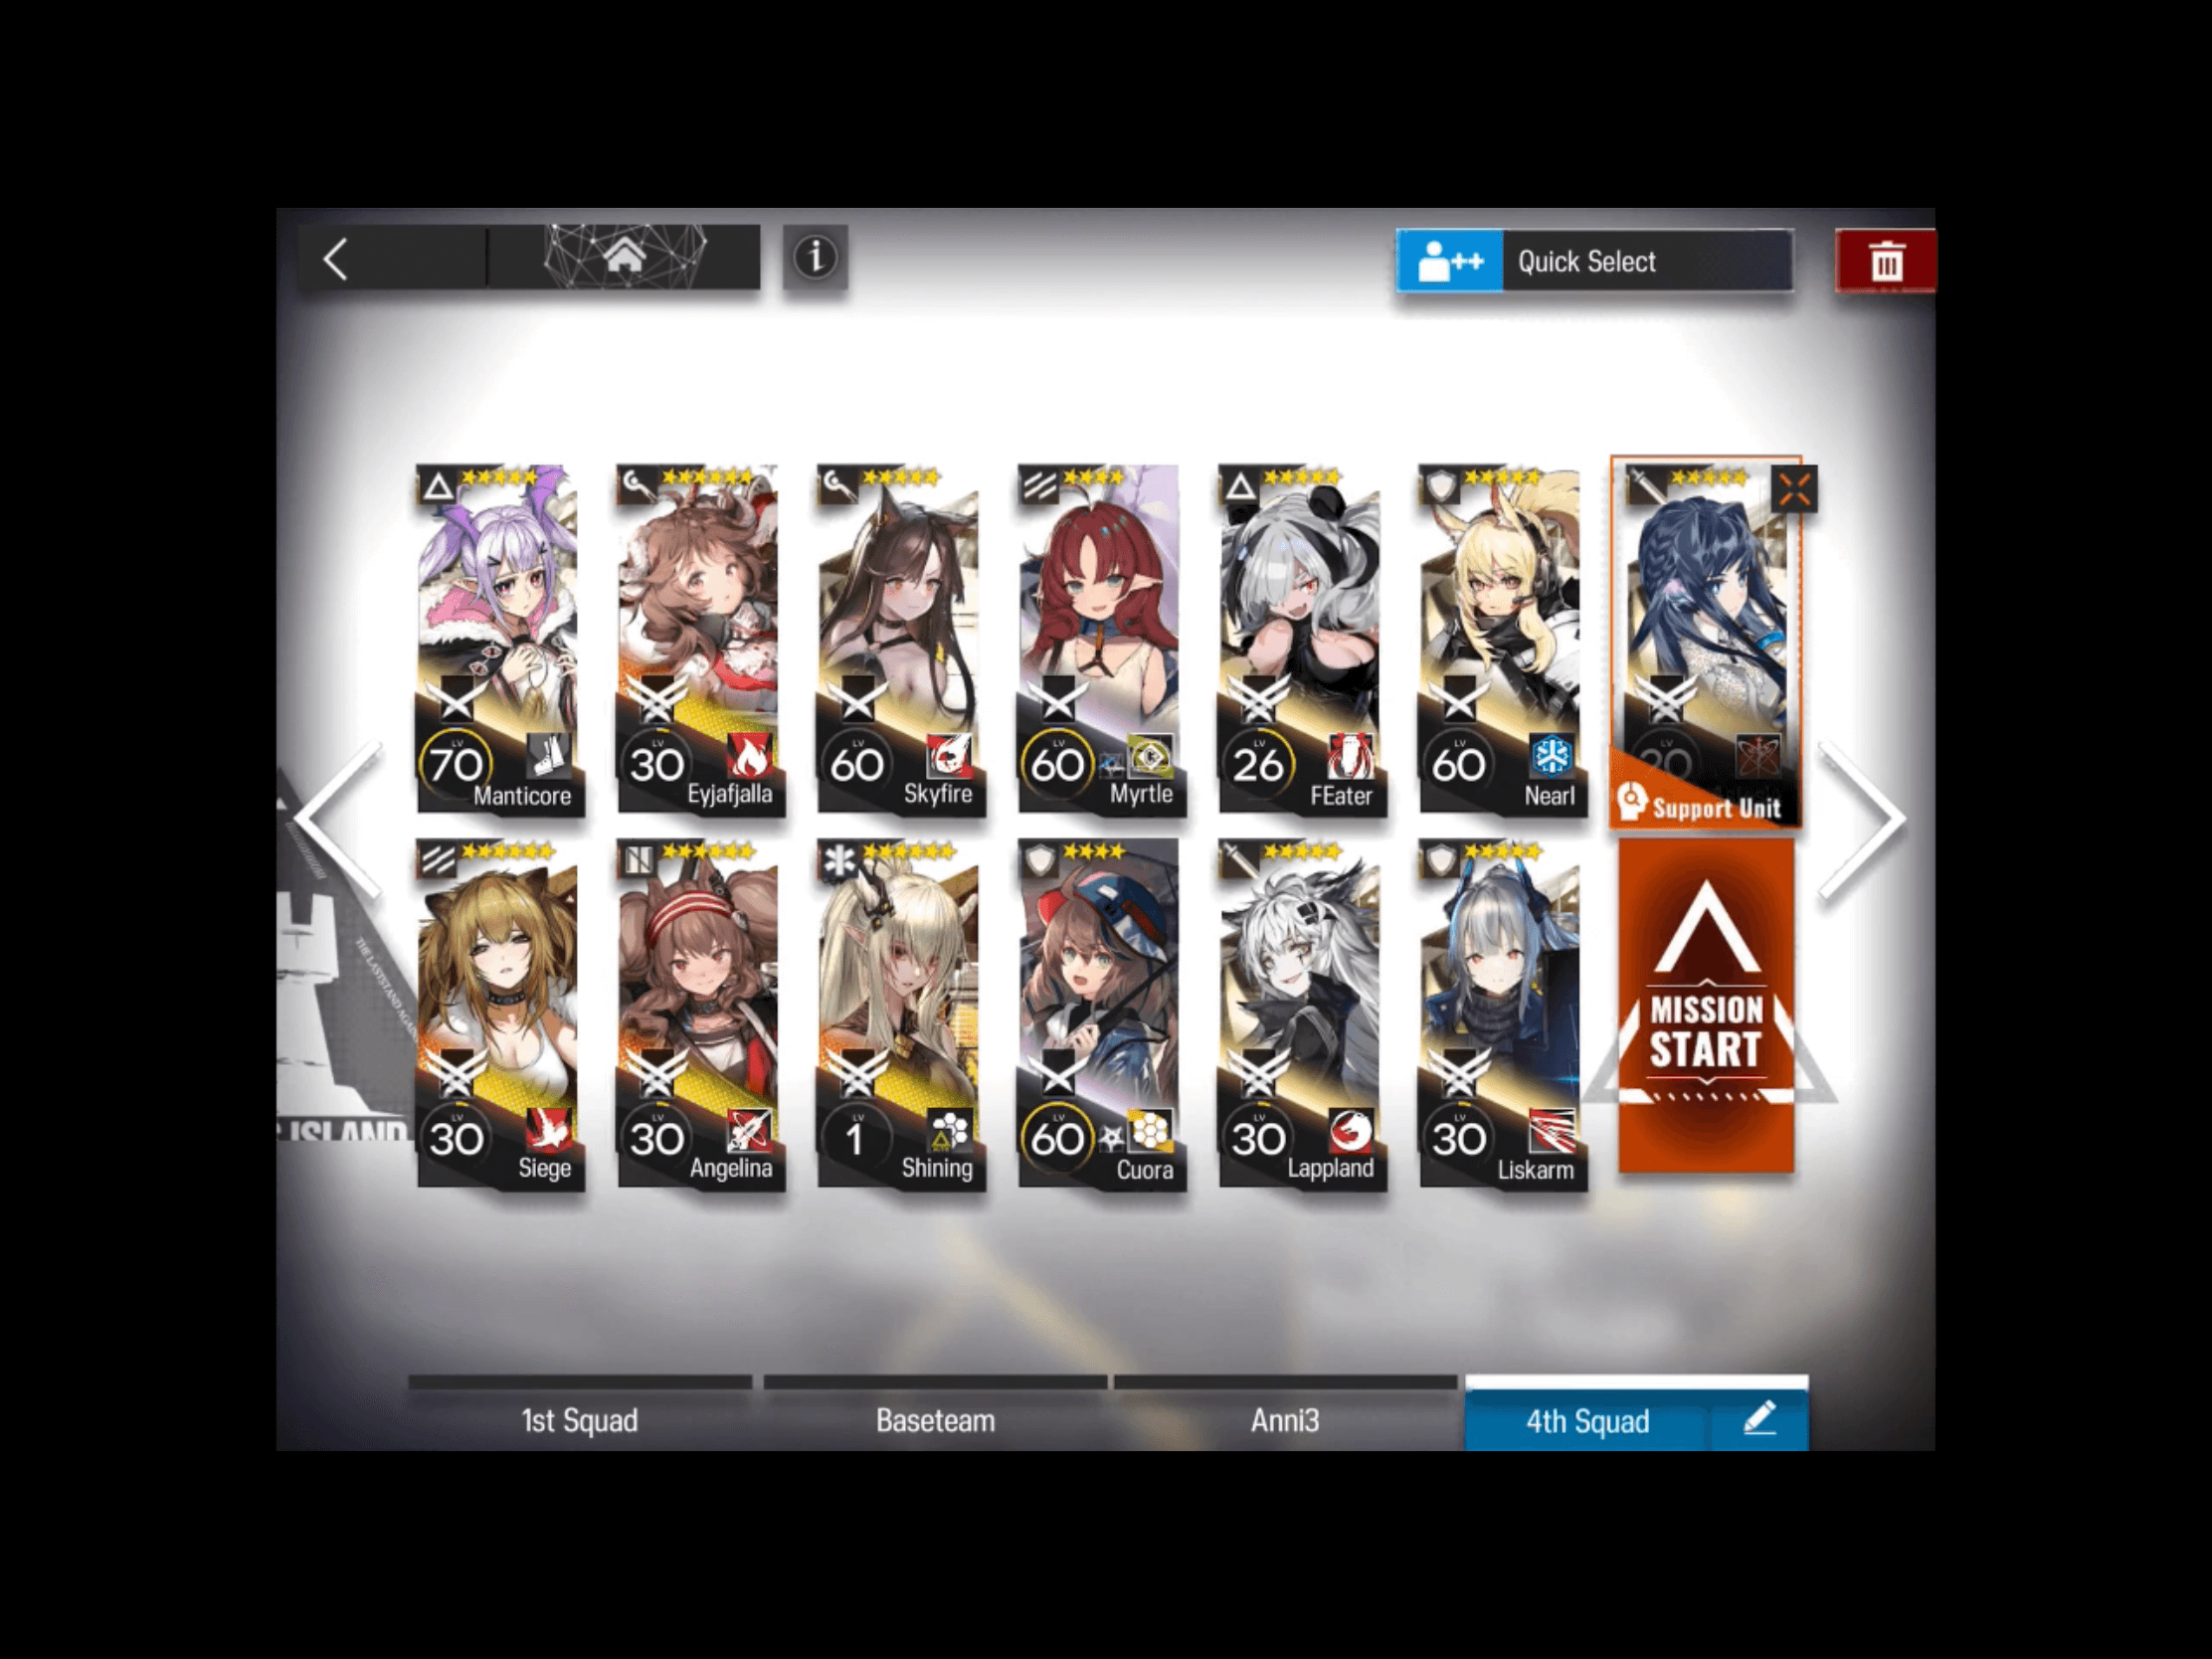
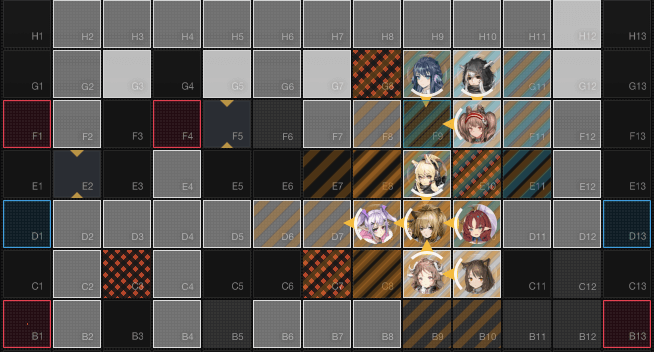
Here is an example of the team I used:
Deployment
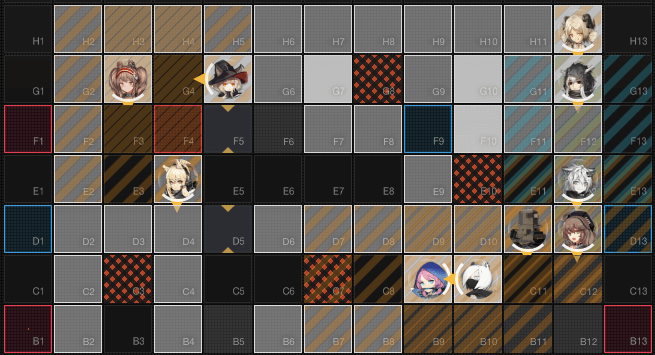
Unit placement can be seen in the image below, and deployment order should be done as presented. Each Operator can be placed as soon as there is sufficient DP.
Deployment Order:
- 1. Myrtle - Skill-DP-Recovery Vanguard
- 2. Siege - Skill-DP-Recovery Vanguard
- 3. Shining - ST Medic - the lava fountains are slow to erupt, so our vanguards will still be alive when she is placed.
- 4. Eyja - Multi-Target/ST Caster - The ST caster range reaches into the exit tile, which can still catch Ergats at the last moment.
- 5. Skyfire - AoE Caster
- 6. Nearl - Healing Defender - will be relied upon to keep our extended melee Operator alive.
- 7. Angelina - Multi-Target Slower Supporter - If trying to use Istina, this lava fountain might kill her, so you might have to swap her with one of the other Casters.
- 8. Manticore - Controller - If using someone other than Manticore, you might want to wait to deploy until later, you might have to experiment to find what works for you.
- 9. Astesia - Arts Guard - If you don't have an Arts Guard, deploy an AoE Sniper, Platinum, or BP on G12 facing left
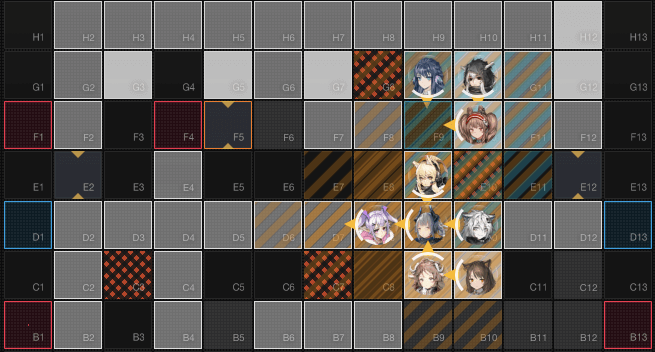
Block Placement
- During this time we will be placing 2 blocks. The first will be placed at around kill 18, right after the first Rockbreaker Leader emerges from the lower left. We place it at F5 to prevent the Ergate Leader from having a straight shot to the goal.
- The second block will be place at about kill 25, when the second Rockbreaker Leader emerges from the lower left. We place it at E2 to force the Heavy Defenders and other enemies along the upper path.
After the deployments above, our formation should look like this:
When we have sufficient DP, we will retreat our Vanguards and deploy our Ranged Guard and LAST our Stun soak (in this case it is Liskarm).
Block Placement
- Before the top row enemies can reach the goal, we will place a block at E12 to force them through our tunnel of Death.
Here is our formation:
This will be the formation the remainder of the fight. Some things to keep in mind:
- Block Placement: If we need to buy our upper lane some more time, at any point we can remove the block at E12 to send enemies toward the goal, or E2 to send enemies down the middle lane, then replace when we want those flows to stop. We can do this 3 times.
- Timing cooldowns properly will be a big help. for example, I alternated Skyfire and Angelina S2 to make sure at least 1 of them was active almost the entire time. Time them according to the double-Ergate Leaders if necessary.
- At around kill 57 the Agents start emerging from the lower right. Keep an eye on them, and if any slip past, that is a good time to use a cooldown, your Truesilver Slash, or deploy an emergency block Operator.
Enjoy the OP!
* This site was used to create and share the map formations.