
Introduction


Hello. It's been a long while.
Alright, since the Deadeye Snipers just got their modules, it's fine time to talk about them. In this post, I'll tell you how they work, how I did the testing, and my final thoughts on them. And to save you time, I'll just tell you the result quickly first, then the rest later.
I'll start with the module's description: The further away the enemy, the higher the damage dealt (up to 15%)
This damage multiplier calculated AFTER defense, and supposedly scale according to the distance from the sniper to the enemy. I decided to go with Ambriel for testing purposes because she can attack enemy globally as well, not just in her base range. (and also because, you know, she has the module)
So the question is, how does the damage amplifier scale with distance? That is to say, what is the rate at which the damage amplifier increases as the distance increase?
TL;DR: The result
Here is a general damage scale based on tile, assuming the enemy is on the center of the tile.
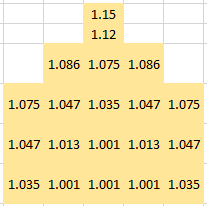
I'll explain the 1.12 and 1.15 at the top of the picture first.
When I do the experiment, it was against the Defenders in CE-5, who stand in the middle of his tile. At the center of the furthest tile, he only takes 12% extra multiplier, hence 1.12. When I nudge him ever so slightly that he's at the literal maximum range, he then takes the proper 1.15 multiplier. This mean that the enemy need to be at the very edge of their range, at the furthest point. (picture proof in Result section)
I could repeat that nudging process for every other tile too but I can already get a general scaling out of this already. (plus I got lazy, sorry)
The 1.001 around her own tile is due to rounding. Proper damage she should dealt is 176.8, but the game rounded the number to 177, which introduce the error margin – the first of many.

The scaling is based on true distance from Ambriel/Andreana to the target, their own direction has nothing to do with it. If an enemy is 1 tile directly behind Ambriel using S2, the module is still doing nothing.
You can head straight to the conclusion here.
Experiments
I need to be able to see the damage for the experiment. To get a red number damage that is shown clearly on the screen, the actual damage dealt need to be 1.5x or higher than the raw ATK-DEF. So I need either ATK multiplier – which multiply the ATK stats and not affecting it directly – or Damage multiplier – which as said, multiply the damage after ATK-DEF. However, as the test subject is Ambriel, who has no ATK Multiplier, I can only proceed using Damage multiplier.
To set up the experiment, I picked CE-5, where it has 3 defenders (but I only need 1) with 1000 DEF that stand still, right in the middle of their tile, for a very long time. Ambriel at max pot max level with module has 1107 ATK, so she deal 107 damage to them. I need to get a damage multiplier higher than 1.5x for the game to show red number cleanly
I proposed Suzuran S3, which gives 1.4x multiplier and does not damage the enemy. I preferred the non-damaging aspect because it can obscure the observation otherwise.
Then I proceeded with Sesa, who has a 1.14x multiplier to all blocked enemies. He is great because he affects all enemies, regarding if they are in his range or not. This remove even more outside damage. However, now I need someone to block the defender. This promptly ruins the baseline experiment as the major reason that I picked these lab rats defenders is because they stand perfectly on the center of their tile. Fortunately, this is not completely ruined, as I can then use that to test other non-centered distance later on, which will be needed (as you might have guessed in the TL;DR).
So W was picked, who has 1.18x multiplier to all stunned enemies in her range. W might attack and ruins the observation since the enemy is in her range, but I have managed to circumvent that by carefully placed her in a specific order so that her attack came later. As for the stun source, it's an easy choice: Ash. Ash works best for 3 reasons: she has a 4s stun, which is long enough for 2 Ambriel's attack cycle; and it's a non-damaging stun, which has been discussed multiple times by now; and it's on-deploy, so I can just drop Ash down and immediately retreat her, further removing another source of damage.
So the base team is set, I will be using Suzuran, W, and Ash. Multiple Damage multiplier stacks multiplicatively (wow that's a lot of multiple), so Suzu and W together will gives 1.4 * 1.18 = 1.652 multiplier, which is what I wanted.
The volunteer (ahem) of the experiment is the bottom defender for a couple reason: he's at the bottom most of the 3, so the red number that will appear above him will be shown in the middle of the screen; and his position along with the map layout allows him to be in every tile relating to Ambriel's range.
The other 2 defenders is then removed (they were asked nicely by Surtr, relax). This further removed more obstruction to the observation.
Method
-
Deploy Suzuran so that her S3 range will hit the target while her base range does not.
-
Activate Suzuran S3 to prepare.
-
Deploy Ambriel at a set distance from the defender.
-
Deploy Ash and immediately retreat.
-
Deploy W immediately pointing her toward the defender.
-
Repeat Step 2-5 but having her face a different direction but keeping the same distance. If there is no different in the result, we can safely skip this step for the rest of the experiment.
-
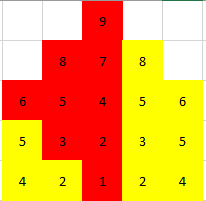
Repeat Step 2-5 at a different distance. We will be using all tiles in her range that have different distances, following this picture.
Step 3 to 5 can be cleanly executed using a bit of pausing and quick deploy. Then W and Ambriel attack will never overlap, while Ambriel will be able to get 2 attacks during Ash's stun duration.
Result
First I need a baseline number to begin, our control group. Namely, when the module has 0% extra multiplier. Ambriel is placed right on top of the defender to achieve this. The theoretical damage is as follow: 107 * 1.4 * 1.18 = 176.8 rounding up to 177. Actual result:

With the math being correct, I proceed to 1 tile distance, one time facing down, so that the target is to the right of Ambriel (her right, our left), and one time facing left, so that the target is right in front of her (her front, still our left):


The damage remains the same in all three cases so far. I can concluded these following: that 1 tile distance is not enough for the multiplier to kick in, and direction doesn't matter.
Note that, there is a chance that 1 tile distance is already enough to kick in some multiplier, as 177.4 can still be rounded down to 177 in the number shown. This will be further discussed later on.
Next up is 1 diagonal tile:


Again, same damage regardless of direction. I can definitely assume that direction has no impact now.
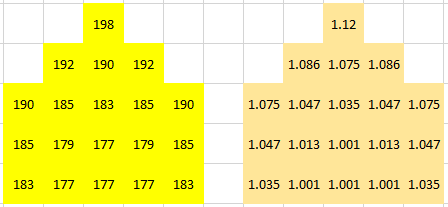
The damage multiplier also began to pick up noticeably now. Next up, I'm going to dump the results before any further analyses.


As of tile 9, I have already covered all non-repeating-distance inside Ambriel's range.
The math astute among you might have noticed something...
If the module is working at maximum, Ambriel should deal 107 * 1.4 * 1.18 * 1.15 = 203.3 damage. But even at the "maximum" tile, it's still only 198 damage, which is 198 / (107 * 1.4 * 1.18) = 1.12 multiplier. I have to go a little further – to the actual maximum range – to get this 1.15 multiplier

With this, I can have a quick result laid out
Of course, as you have seen, I needed to go a little further to get that maximum range. But this is good enough to get the rate I need. I also tested the extra tile with Ambriel S1, thankfully that skill gives no damage boost.
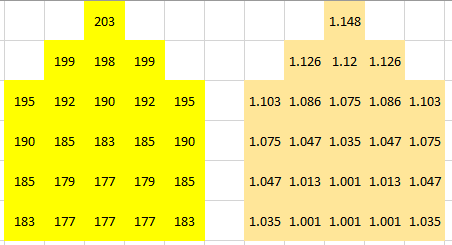
However, note that tile #6 and tile #7 has the same damage. Again, this is because the number is rounded to the nearest integer. Tile #6 true distance is 2.83 tiles, while tile #7 true distance is 3, they are very close in distance, so the scaling has not been enough to properly shifted 1 integer yet.
In the game's eyes, any number between 189.5 and 190.5 will all be equal to 190. (189.5 < x < 190.5)
Now I need to check if Ambriel's global range can affect it or having any special effect. First I have to calculate a new baseline because her global skill, S2, gives her +100% ATK. Her new ATK is 2214. The damage dealt to the defender then is 1214. When the module is not working, we can expect 1214 * 1.4 * 1.18 = 2006 damage, which is exactly what we see below

Earlier, I said that there might be a chance that 1 tile distance is enough to have some small multiplier. However, even as the number go this high, the damage remains the same for both theory and practice at 2006. Therefore, I can definitely concluded that the module gives nothing at 1 tile distance.
Well, here's when it went slightly off because of all the rounding the game has been doing. I have already calculated the damage multiplier using the first experiment. At 2 tiles away (tile #4), she has 1.035 multiplier, putting her damage output to 1214 * 1.4 * 1.18 * 1.035 = 2076. The actual result?

Despite the slightly different result, I can safely assume that direction has no bearing to this module, not even enemies outside the base range.
I also did the same testing for Andreana, because, so far, the conclusion from testing with Ambriel looks pretty grim for her if the same scaling is applied. Turn out, the same scaling is applied for Andreana.
Finally, this is the graph for the rate of the damage multiplier.
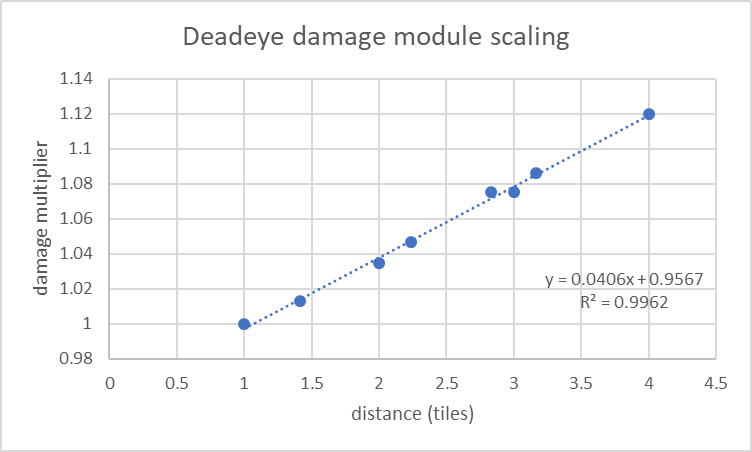
Seems like it scale by 4% per tile. My R^2 is 0.996 which is pretty hopeful.
Conclusion
The module scaling is okay but the maximum is achieved when the enemy is at the furthest possible distance away from the owner. That rarely happen unless you have range extension ability like Ambriel and future operator Fartooth. Andreana on the other hand, get just a little bit worse off with the module scaling. I said a little bit worse off because, while she cannot use the maximum damage multiplier all the time, her damage is already maximum... sorry I mean high enough that just a little more scaling would be really huge.
Optimistically, the module gives Andreana +65 ATK by itself, which is massively boosted by her S2. Furthermore, even if she can't use the module's maximum effect, just half of that could be massive to her 4k ATK. But the module calculates after defense, so maybe it's not that nice. Realistically, if you get the module, the primary reason is for the stats.
With that conclusion, my feeling regarding Firewatch module just went from "well it's not detrimental and it gives stats" to "holy shit praise the Lord". The damage module then barely affect her skills because it's not like the enemies should be far away from her, especially her S1. (I have used her S2 to reach enemies outside of her range a lot, so there's that. But since only the true distance matter, again, it's not as nice on the side range).
Not to mention, ever since I posted the Firewatch guide saying ""slightly"" negative feeling about the module, I repeatedly encounter situations where the extra SP would have been great. This is either because I frequently push the limit of my skill rotation (probably subconsciously) or because having a large margin of error when using a skill is by itself a great thing. And being able to hide faster is always a good thing as well. Basically, all the small arguments I used to defend it still applies and is working really hard to make the module looks good.
Anyway, thank you for reading and I'll see you next time.