Note From Notte
With the release of the higher difficulties for High Brunhilda's Trial, the strategy outlined in this guide will not work for Expert and Master modes. What a bummer!
Introduction
The release of Fjorm during the Fire Emblem: Lost Heroes collaboration caught the attention of many players. In particular, Fjorm’s second Skill, Ice Mirror, appeared to be ripe for abuse, and it did not take long before veteran players started optimizing her kit and began using her to speedrun difficult content, including High Brunhilda’s Trial.
On May 25, 2019, YouTuber KIRA posted a video of a successful 24 second speedrun of High Brunhilda’s Trial with all players piloting Fjorm, inspiring players around the world to investigate the requirements needed.
Preparing Your Fjorm
Unfortunately, to pull off successful speedruns for High Brunhilda’s Trial, the requirements are fairly high, especially for the faster variant. They are as follows, depending on the completion time that the party is aiming for:
| Sub-30 Seconds | 30-55 Seconds | |
|---|---|---|
| Mana Circle | 50 | 45-50 |
| HP | 2200+ | 2200+ |
| Strength | 2600+ | 2560-2590+ |
| Weapon: Strohm Mare | Max Unbound (lv100) | Max Unbound (lv100) |
| Dragon: Leviathan | Max Unbound (lv100) | Max Unbound (lv90+) |
| Water Dracolith | 20 | 17-19 |
In terms of needed Strength, another way of determining the amount needed for sub-30 second clears is to see if the combined party Strength reaches 10275-10300 or higher. With three players in the 2600 Strength range, this will provide a bit of leeway for the 4th party member to have 2500+ Strength and be carried. HP is required to be in the 2200 range (before factoring in HP co-abilities) to prevent death from High Brunhilda’s opening blast.
Facility level requirements depend on the stat baselines that can be achieved above. In summary, maxed to near-maxed facilities help tremendously, and additional Water Fafnir levels and bonuses from the augments upgrade system, particularly in Strength, also aid in reaching the stats needed for sub-30 second runs.
Water Dracolith levels are non-negotiable, as Leviathan’s DPS is crucial in making these runs possible.
Wyrmprint Selection
There are three Wyrmprints that are used for this run: Tough Love, The Bridal Dragon, and Valiant Crown. All Wyrmprints are assumed to be max Unbound at level 100.
-
Tough Love: This is the primary print of choice for all Fjorm players, as it synergizes with her Last Bravery passive for massive boosts after High Brunhilda’s initial blast.
-
The Bridal Dragon: With a combination of Dragon Damage and Shapeshift Prep, this is needed so that the party can Shapeshift in time and to maximize Leviathan’s DPS.
-
Valiant Crown: While a slightly inferior choice compared to Tough Love, this can be used as an alternative in the first slot.
The party composition is as follows:
-
One player must run Tough Love and Valiant Crown.
-
The rest of the players must run The Bridal Dragon and either Tough Love or Valiant Crown, with a higher preference for Tough Love.
Weapon and Dragon Selection
Due to the aforementioned Wyrmprint requirements, the only weapon used for this run is Strohm Mare, as it carries both High Brunhilda’s Bane and a Defense passive that allows the party to survive the initial blast. This is crafted with materials gained from the Void Agni Strike battle, and it must be max Unbound to maximize the party’s DPS.
Leviathan is required for every player, and it must be max Unbound. While Dragonyule Jeanne and Siren are strong offensive choices in normal play, their DPS in Dragon form are unfortunately lacking compared to Leviathan's optimal combo rotation (two attacks, followed by a dodge). Parties that do not mind slower runs can afford to have one player that uses Dragonyule Jeanne or Siren.
Run Sequence
Opening Blast
-
Roll up to High Brunhilda so that you are closer to her, and to ensure target lock.
-
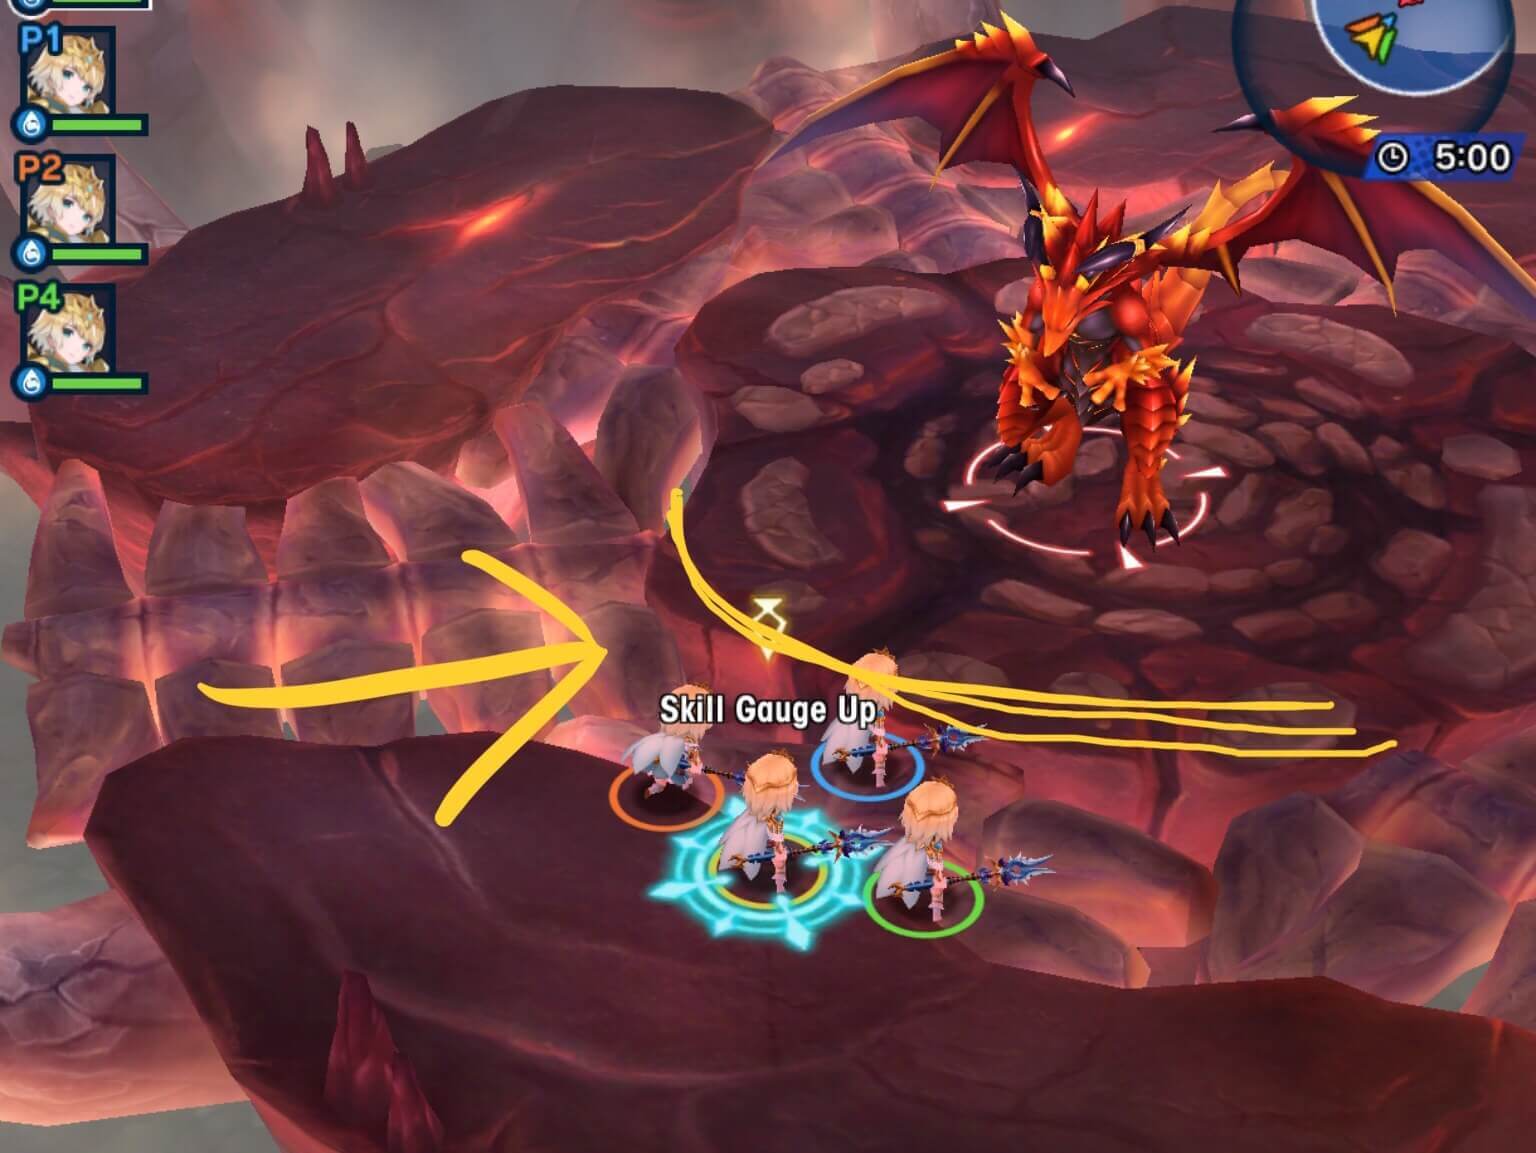
Tap your regular combo attacks a few times if possible, then once the radius of the opening blast reaches the perimeter outlined below, use Ice Mirror (S2).

Source: vintage#4989 via Discord
-
After you are pushed back, with proper S2 timing earlier, you will initiate the damage reflect. Use Frigid Smash (S1) as soon as possible afterwards.
Dragon Phase
-
At this point, your Dragon gauge will allow you to Shapeshift; do so as soon as possible.
-
As Leviathan, perform two regular combo attacks, then use Tidal Stream (S1) to iframe High Brunhilda’s breath attack. The player with Tough Love and Valiant Crown will need to dodge to the left after the initial two combo attacks, followed by two additional combo attacks and Tidal Stream.
-
High Brunhilda should reach Break state at this point. As Leviathan, players will need to perform its optimal combo rotation (two combo attacks, dodge, and repeat) to maximize damage output, as proceeding into the “laser beam” attack of the combo chain will lower overall DPS.
-
If the party is strong enough, High Brunhilda will be defeated shortly after Dragon form is finished (or earlier).
Fjorm Phase
-
For slower runs, players will need to defeat High Brunhilda as Fjorm. The goal is to finish the battle before the first Hellfire starts.
-
Players will need to avoid High Brunhilda’s Charge, Swipe, and Dive. Frigid Smash may be used when available, but players should take care not to be hit by her Dive.
-
The Volcano phase will start afterwards. Ice Mirror may be used against Volcano drops if the player has sufficient HP remaining.
Troubleshooting
Is your party running into problems, even though everyone is properly geared? Check the list below for possible causes:
-
A player may sometimes be left with too much HP remaining after High Brunhilda’s opening blast (known as “green bar”). This prevents Last Bravery from triggering and will ruin the run, and this is attributed to client desync. If the party continues to experience this over several runs, the “green bar” player may opt to host instead.
-
Ice Mirror may sometimes not home in to High Brunhilda properly. This indicates that the affected player was not close enough to High Brunhilda, even if she was initially targeted. Be sure to roll towards her at the beginning of the run, even if it comes at the expense of a few combo attacks.
-
Delayed Ice Mirror activations will result in failed runs, as players will need to fit as much damage as possible during the Last Bravery activation window, including the subsequent Dragon form DPS.
Closing Notes
As with all content that require a high level of investment, it’s never a bad idea to be over-prepared and over-geared. Faster runs benefit everyone involved and leads to a smaller margin of error, especially for this particular speedrun.
When grouping up for speedruns, be sure that everyone’s expectations align. As noted by vintage#4989 on Discord:
“Some people are happy to struggle through failing a bunch of times while finishing at Hellfire, others get fed up and don’t want to be bothered when they could get clean runs with more stats.
I don’t have judgement for either preference, and I know for a fact people change their preference depending on all sorts of life factors. So a successful group of consistent runs requires just a small effort to make sure people understand the different experiences and have the right expectations about what they are doing.”
Finally, this guide would not have been possible without the wonderful folks over at the Fjorm Speedrun Discord, especially users vintage#4989, Skys#7482, and wat#8711. The community is also exploring other Dragalia Lost content to speedrun as well.
For interested players, the link to this community (not affiliated with GamePress) is located here.


