Preparation
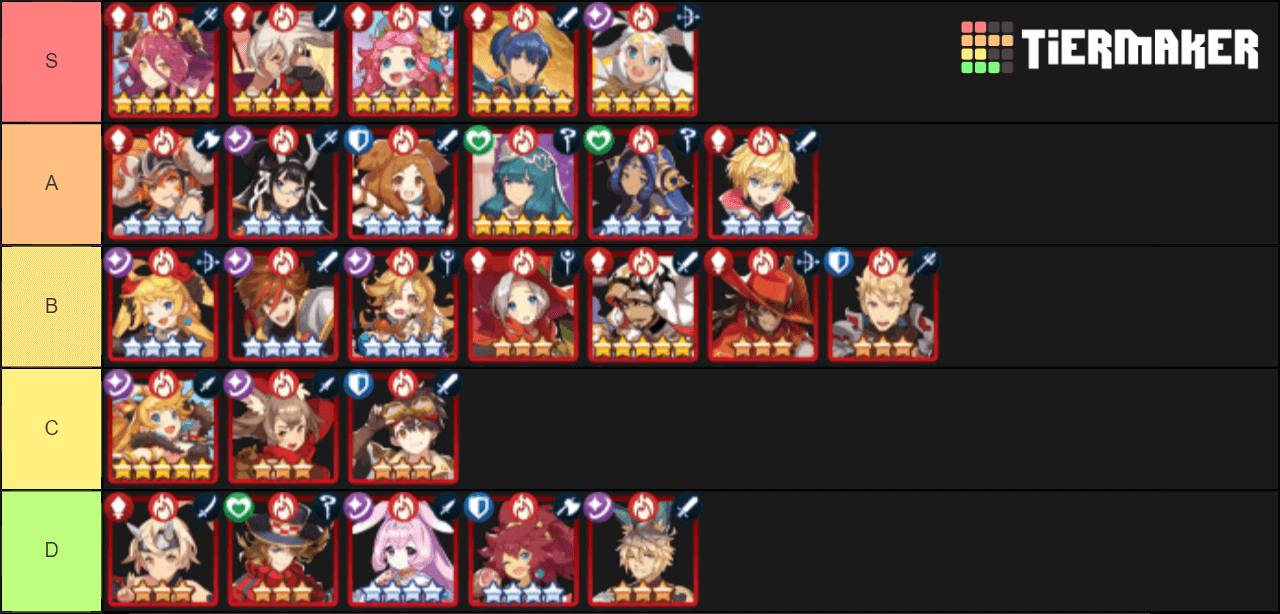
As Qiten Dasheng inflicts Stun, Adventurers geared for High Midgardsormr are going to be excellent picks here as well. Newcomer Gala Mym is a stand out, as her focus on increased time in dragon form pairs exceptionally well with the Dragon Prep most people bring to raids. Other great Adventurers to take are Mikoto, Marth, Gala Sarisse, and the new Student Maribelle. With a little investment, Xuan Zang is also a great choice, thanks to her Demihuman’s Bane and Heaven’s Binding Ability, which increases the whole raid’s DPS by reducing the boss's defense. It can also be viable to bring a healer, though not everyone in the raid needs to bring a Verica or V!Hildegarde. Consider bringing Vanessa instead, as her Defense Co-Ability provides survivability and more DPS than a Staff user.
Off-resistance units are also viable, with Sinoa being a stand out thanks to her phenomenal buffing skills. Karl is also a good pick, though his buffs are not quite as potent. You can also fill out your roster with whatever other 3★ and 4★ Adventurers you have lying around.
In Expert and EX raids, teams that hit the might threshold are plenty, though for Epithet runs you’ll want to have at least 4k Strength and a full DPS squad. Nightmare, on the other hand, is far more challenging. At least a 6k strength total for your team is required to hit the DPS timers in Nightmare consistently.
In Nightmare, your lead Adventurer should not only be your highest strength adventurer, but should ideally either be a sword user who can quickly break the boss with rapid force strikes, or Mym, who gets a huge boost from being able to immediately transform with dragon prep prints and spends the most time in dragon form thanks to her Abilities. If you lack any of those, just use whichever Flame adventurer you have with the highest strength and DPS.
While this raid is a pure DPS race, if you need some emergency recovery, putting Phoenix on one of your Adventurers can rapidly heal up the entire raid party. Just don’t put it on your Lead (or Mym, as she transforms into Brunhilda), as you’ll want a Strength dragon to maximise your DPS even when not transformed. Aside from a Phoenix emergency heal, your best options are to use the highest Strength Dragons you have available and then-- as my raid leader always said-- high the boss very hard.
Cerberus and Agni are the stand out picks, but Ifrit, Prometheus, and the new Konohana Sakuya are also good choices. Prometheus is a real stand out if you have a more fragile Adventurer who needs just that extra bit of survivability. If you have a MUB High Brunhilda, she’s also a good choice for your squishier companions.
On your player controlled Adventurer, equip strong damage dealing prints like Resounding Rendition and Steller Show to maximise your DPS. A good Force Strike print is really valuable in Nightmare especially, because you’ll want to Break the boss ASAP.
On everyone else, you’ll want one DPS print and a Dragon Prep print. King’s Countenance and Dragon’s Nest give 8/10% Dragon Prep, while Dragon Arcanum gives 6/8%. If the whole raid brings their Dragon Prep, you can all start the fight off with a full Dragon gauge which gives a large head start on the boss's enormous health pool.
The Fight: Expert

Normal Difficulty
The raid opens with the boss doing a forward Dash attack, telegraphed by a red line.
After this, Qitain does a red circle telegraph around himself, that can be dodged using dragon form or a skill.
Now he uses his Jingu Bang, which is a single purple in front of him that will send you flying and deal moderate damage. After this, he will leave his staff on the ground for a few seconds, leaving it open to attack. Quickly burst this down, as destroying the staff will net you some Dragon Gage and additional item drops when you clear the quest.
Next the boss does another dash attack, this time to the center of the arena.
After landing, Qitain begins charging up a Spatial Distortion chi attack, which he unleashes in a wide arch before him. You can damage the weak point to interrupt Qitain, which is important as it provides some much needed dragon gage filler. If this attack is not stopped, Qitain casts Spatial Destruction in a wide arc before himself.
After this, the boss cycles through his Jingu Bang, Dash, charge attack, circle attacks.
Normal Difficulty: Overdrive
Once entering the Overdrive state, Qitain immediately summons two circles around himself, the inner an undodgeable purple and the outer a red circle. If this attack connects, you’ll be knocked back to outside of the circles.
After this, Qitain begins charging up Erratic Chi. This attack affects the whole arena and does heavy damage, so interrupt him quickly by damaging his chi sphere's Weak Point.
Next, Qitain summons his adds with Altered Ego, then performs a dash attack into a Jingu Bang. This Jingu Bang attack is a trident attack in front of him, with undodgeable purple circles. If the staff has not yet been broken you can attack it in the Overdrive state, but if it has been shattered the attack hits slightly weaker.
Qitain also will cast Explosive Fissure, where he will form a large purple circle and four purple lines that radiate out form him. If this attack is not dodged, you will take moderate damage and be sent flying back.
Once broken, Qitain will revert back to his normal state, and start with Altered Egos.

Nightmare and EX Difficulties
The Nightmare EX raids have identical attack cycles, but EX is less challenging. Note that Nightmare has the same rewards as EX, but does offer a daily bounty that has a chance to contain valuable items. For both of these more challenging raids, make sure to bring at least three dragon prep prints and your highest strength Flame team.
Both modes open with a Jingu Bang attack, which is a purple trident before him. Quickly run behind him to dodge the attack and transform if you can, then run out and burst down the staff as quickly as possible to destroy it.
Next the boss performs a double ring attack, with the inner ring being undodgeable purple and the outer a red one. If hit, this will knock you back and deal moderate damage.
Now Qitain begins charging Spatial Distortion, a frontal arc attack. This can be interrupted by destroying the Weak Point, a sphere of green chi. It is vital to interupt as many of these attacks as possible, since they provide dragon gage fill and save you from heavy damage.
After Spatial Distortion, Qitain does two quick Dash Attacks, one out, then one back in towards the center of the arena. They can be dodged or iFramed with abilities and will knock you back if hit. He then casts Spatial Distortion again, which can be interrupted once more.
After the distortion Qitain dashes out, then leaps back in with Explosive Fissure, a purple ring at the center of the stage with four wide wedges radiating out of it. If this attack hits, it deals heavy damage and knocks you up.
Now the boss cycles through his Jingu Bang and the rest of his attacks, until he hits the Overdrive state.
Nightmare and EX: Overdrive
Use Force Strikes to break the boss as quickly as possible, as Overdrive can easily decimate teams and lead to failed runs if not controlled.
Upon reaching Overdrive, the boss casts Altered Egos, summoning four Mini Dasheng to heal him. They will attack with red circles around themselves when you approach them, but should be killed to prevent the boss from healing.
After Altered Egos he begins to charge Erratic Chi, an undodgeable stage wide attack that deals heavy damage. It can be interrupted by attacking the Weak Point, a green chi sphere. This is vital as the damage can be lethal, and it provides dragon gage fill.
The boss does two more dash attacks, out and then back in to the center of the arena, then channels a red circle around himself that will knock you back and deal moderate damage if it hits. Then he channels Erractic Chi again. Break his weak point to avoid heavy damage.
Now he uses his dash into a Jingu Bang again. If you did not manage to destroy it the first time, do so now to gain dragon gage fill and cause the boss to flinch for a few seconds.
After this he dashes once more, then leaps back in with Explosive Fissure, which is a purple circle and four wide radiating wedges.
Once the boss is Broken, he will cast Altered Egos again to heal himself, then return to his normal attack cycle.
EX has a chance to drop a Golden Key or fragments, twinkling grains, and even Single Summon Tickets.
Rewards
Expert awards Blazons and Emblems, as well as having a low chance to drop Golden Fragments and Twinkling Grains, as well as Succulent Dragonfruit.
Nightmare Grand Bounty awards Twinking Grains, Golden key fragments, Sunlight Ore, Damascus Crystal, Dragon Fruit, Four-Leaf Clover, and Eldwater. This can be obtained once a day.
EX has a chance to drop a Golden Key or fragments, Twinkling Grains, Four-Leaf Clover, and even Single Summon Tickets.
Note that this time around, Blazon Summons have a chance to drop Wyrmprints, ranging form various 3★ or 4★ prints, to the excellent Flash of Genius 5★ print.