


Event History
| Start | End |
|---|---|
Map
- Normal
- Infernal
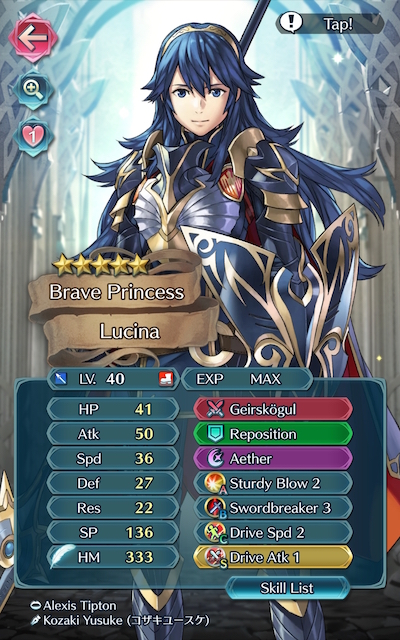
Bound Hero Battle: Leo and Elise
Another pair of siblings yet again graces us in a Bound Hero Battle, this time hailing from the kingdom of Nohr! Leo and Elise gallop onto the stage, thankfully featuring no reinforcements. The most difficult part of this map is definitely getting started; Leo has Blazing Light charged and ready to go, and will put even your bulkiest blue units in a world of pain if they are hit by him. Starting off strong and playing with flexibility will be key -- if you are able to avoid Leo’s Special proc and KO him before he’s able to attack you, then the rest of his allies shouldn’t give you too much trouble.
Who to Use
As is generally true of Bound Hero Battles, the individual units used is very important as they will primarily inform your strategy. There are a few routes one can take depending on what units are available to you, and, of course, adjustment based on the units one possesses is always a possibility.
Baiters
Since the enemies on this map won’t move unless baited or struck, you’ll likely want to include at least one baiter in your team. Units with high Defense are preferable here, as the only magical threats are Elise (who won’t deal much damage due to her not carrying Wrathful Staff) and Leo, who likely should not be baited anyways.
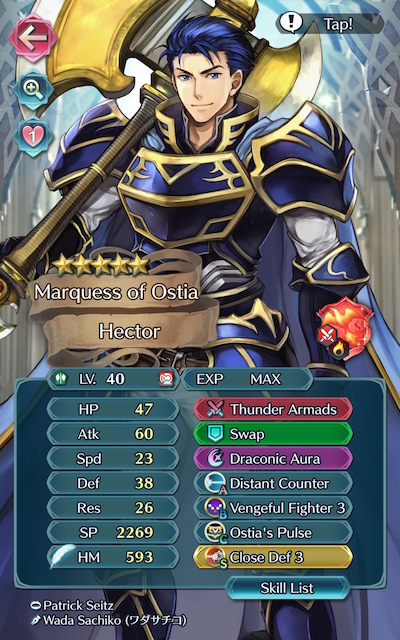
Armors such as Zelgius, Black Knight, Winter Tharja, Fallen Hardin, Hector, LA Hector, Legendary Hector, and Fallen Robin are able to hit hard very upon counterattacking, especially if they’re making use of Quick Riposte or Vengeful Fighter. An amazing F2P option is Fjorm, who is able to tank ranged foes extremely well with her exclusive Special, Ice Mirror, and Legendary Ike, whose native Warding Breath grants him accelerated cooldown and extra Resistance.
Dragons are also very strong tanks, especially when they’re equipped with Lightning Breath (or another Breath and Distant Counter, if you’re feeling fancy). Nowi, Female Corrin, Male Kana, Fae, Myrrh, Legendary Robin, Female Kana, Adult Tiki, Young Tiki, and Summer Young Tiki will all likely be able to do the job and do it well.
Strikers
Whether you want to use a striker on this map is entirely up to you -- as per usual, their ability to overpower most foes will no doubt serve useful. The layout of this map isn’t the most conducive to a strike and retreat method, though, so you’ll likely have to employ at least one tank to get your foes moving.
In particular, archers can be incredibly potent strikers due to their ability to overpower and/or finish off any enemies your tank may otherwise struggle with, especially if they are equipped with a Brave Bow. Brave Lyn, WF Hinoka, Bridal Cordelia, Summer Takumi, and Klein are potential strikers you may want to use, with a special mention going to Brave Lyn given her F2P status.
Alternatively, melee Brave users are able to hit foes twice without retaliation, and may even quad hit if they outspeed an enemy. Cherche, Cordelia, Elincia, and WT Reinhardt are all great Brave users who can make excellent use of class-specific buffs. Finn is an F2P option who would work particularly well in an all-cavalry team.
Brave and Blade tome wielders can also serve to be useful if your team composition provides them with the appropriate buffs, though speedy mages can also be powerful strikers. Tharja, Bridal Tharja, Reinhardt, Tailtiu, Ishtar, Linde, WT Olwen, SF Nino, and Nino are potential options here, especially if they are equipped with a Breaker skill to add to their coverage.
Refreshers
Refreshers help provide support, may even have a decent offensive presence themselves, and can usually tank a hit or two, if need be. Lene, Olivia, Performing Olivia, YT Olivia, Performing Inigo, Performing Shigure, Performing Azura, Azura, New Year Azura, Bridal Ninian, and Ninian all give the refreshment that high-firepower units need while also possessing the ability to provide an assist to KO an enemy.
Buffers
As units that offer extra utility, buffers typically fit one of the above roles while also supporting your other units. A well-composed team with enough dedicated buffers can sometimes allow you to beat certain maps with ease while only one unit does most of the heavy lifting.
Because of Skill Inheritance, any unit can be a buffer with enough investment -- many Drives, Spurs, Hones, Fortifies, and Dual Rallies are readily accessible on 4 star units, and can be further stacked with seals for maximum coverage. Class-specific buffs (which offer +6 to Atk/Spd or Def/Res), Goads, and Wards are also excellent ways to break many maps wide open. Notable options who natively provide buffs through their exclusive weapons include YT Olivia, Performing Azura, Eirika, and Ephraim, while Brave Lucina and New Year Corrin are able to stack Drives through theirs.
Strategy
Strategizing for this Bound Hero Battle shouldn’t be too difficult as there are no reinforcements. While it can be difficult to exactly predict what will happen due to IV / Merge variance, here’s some general tips to get you started.
Tomato Surprise
Like most Bound Hero and Grand Hero Battle guides advocate, most of these maps are won or lost before they even start. While it may be tempting to jump right in, knowing (and loving!) your enemy will help you not only choose your units, but also figure out where to begin.
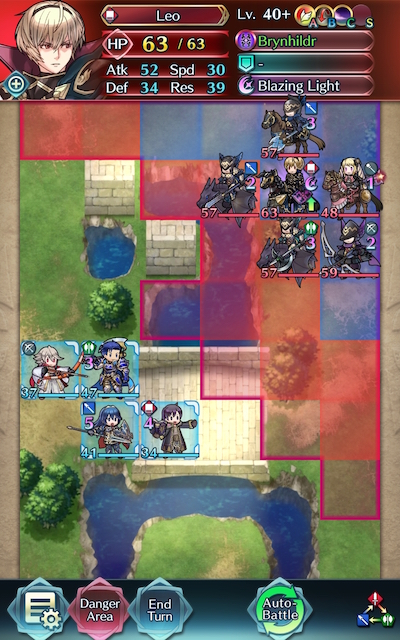
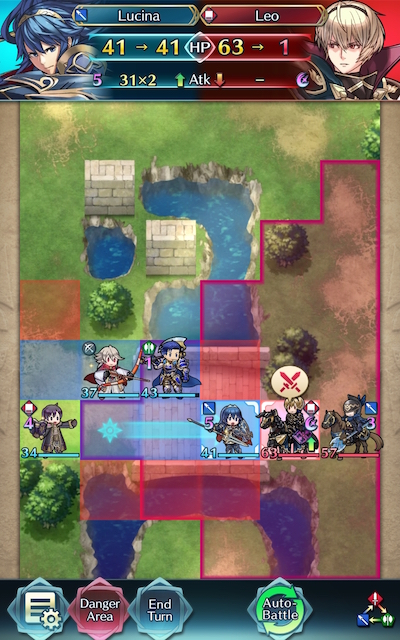
The biggest threat on this map is Leo -- while his stats aren’t that much of an issue unbuffed, he has Blazing Light already charged, will be under the effects of Hone and Fortify Cavalry when he attacks, carries Quick Riposte, and will deny follow-ups from any unit with less than 34 Defense. Even the tankiest of blue tanks will struggle to survive this onslaught, so it is likely a good idea to avoid having Leo attack your units if you can.
Starting Strong
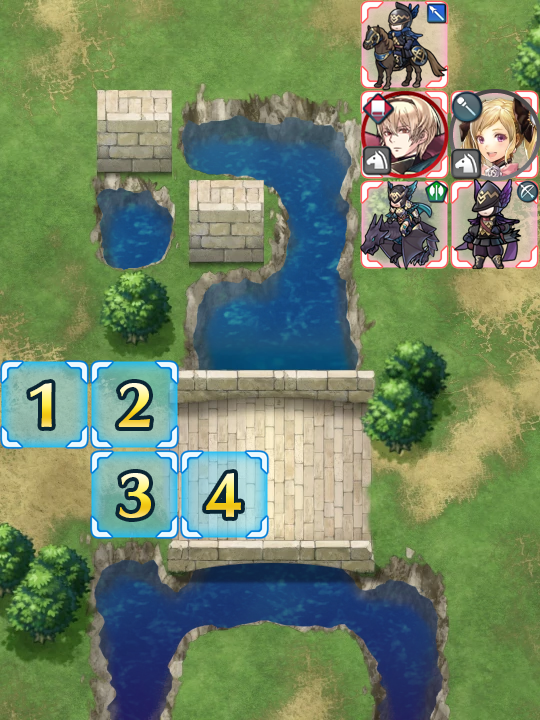
Of course, this presents the question of where you should start. Since we’ve established that baiting anywhere Leo can reach probably isn’t a good idea, you essentially have two options.
Option one is the easiest of the two -- it doesn’t require you to split your forces, only baits relatively weak enemies, and is easily accessible regardless of your team composition. It also allows you to easily buff, Spur, or Drive your tank as well. If you can use this space, it is recommended that you do. Just make sure you bring a green tank (that can preferably counterattack at-distance); otherwise you’ll have to deal with a Weapons Triangle Advantage being used against you.
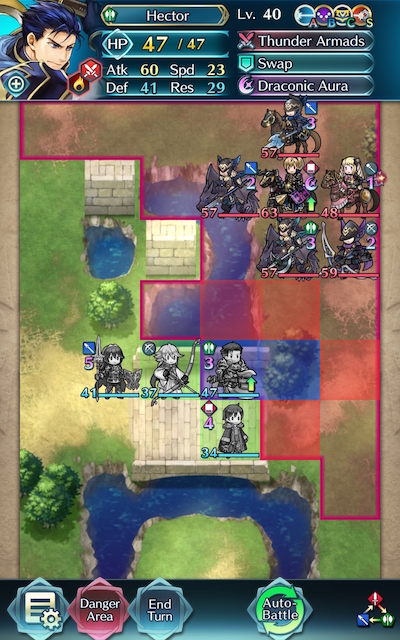
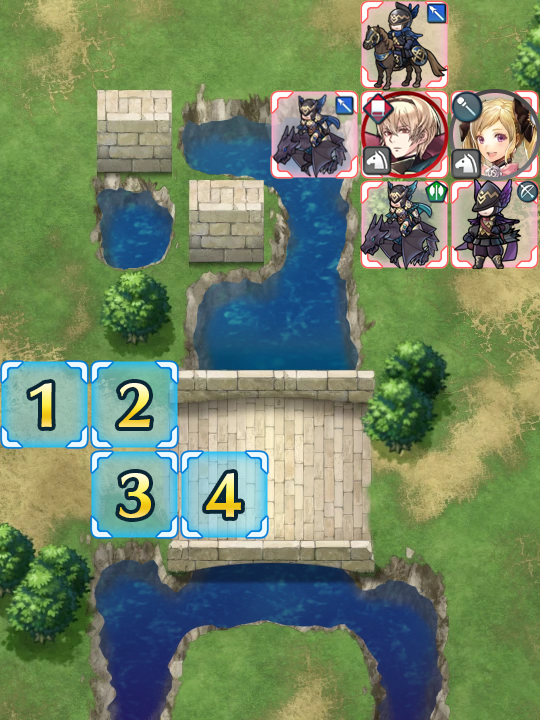
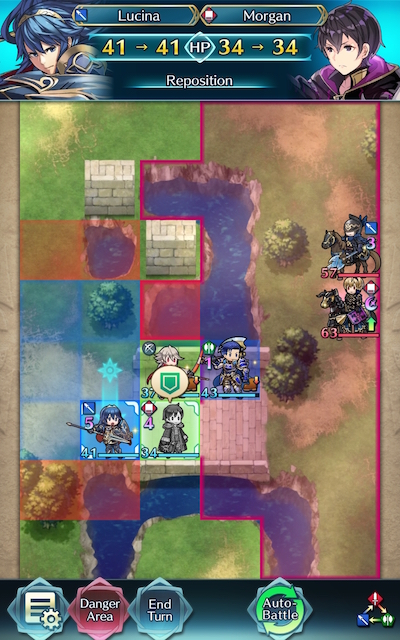
Another option requires a flier making use of Reposition. You can ferry a unit across to the island, then Reposition them again to the strip of land to the far right -- here, you’ll only be attacked by the archer and Elise (or only the archer if you can’t KO them). Since this causes you to split your forces, it may not be your best bet, but if you’re having trouble weathering too many attacks in a row, it may help you get through.
Defying Gravity
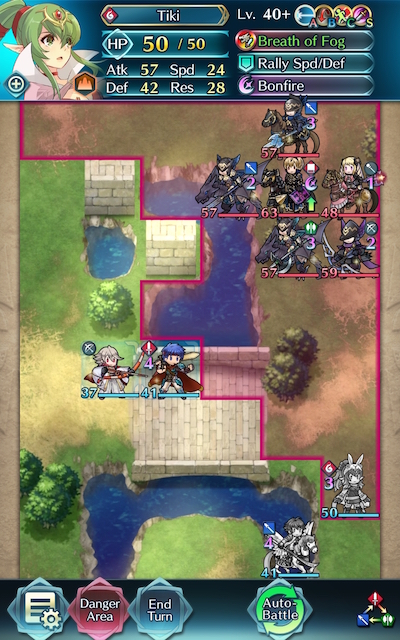
Assuming you’re able to cut through enough foes to finally get to Elise, get prepared for another curveball -- since she carries the Gravity staff, your units’ movement will be limited to only one space (like armor movement) once she attacks them. This is the most threatening part about Elise and can prove to be hard to maneuver around, but there are a few ways to get around it (Leo’s Brynhildr has the same effect, but your unit most likely won’t have to worry about being KO’d if they can’t survive his attack in the first place).
Movement Skills once again prove handy here; Reposition, Swap, and even Pivot can allow your units to move farther than usual even while under the effects of Gravity. Reposition chains (having one unit Reposition another, then having that unit Reposition the first unit) can cover an incredible amount of ground, and another option is a refresher.
Super Seals
If you miss out on defeating a foe by only one or two points of damage, don’t panic! Seals can be a great way to net a key KO. Hone, Spur, and Drive seals can make a big difference even when they’re not fully upgraded, but other notable options include Fortress Def, Fortress Res, Close/Distant Def, Iote’s Shield, and Quickened Pulse. If you’re depending on a seal to ensure a KO earlier in the map, see if you can equip them to another unit and still get the same effect (after adjusting your positioning, if necessary).
If At First You Don’t Succeed
Don’t be fooled by video walkthroughs of any Bound Hero Battle that you watch -- it’s very rare for anyone to beat high-difficulty content (or record a video of themselves doing so!) on their first try. Additionally, the potential variance in unit builds that Skill Inheritance brought along with the random nature of summoning has resulted in pretty much every single summoner having different building blocks to work with. This, when combined with the high difficulty level of Infernal, may prove frustrating while someone is trying to find the right combination of units and moves. The key thing to keep in mind is that it may take some light Skill Inheritance and seal shuffling as well as multiple tries of the map to find a strategy that works for you. Every single turn you complete gets you one step closer to completing the puzzle. Finally, reading about or watching videos of successful strategies may also help you break through a particularly difficult turn that you can’t complete, or may give you ideas of a new unit to use.
Map Enemies
- Hard
- Lunatic
- Infernal
| HP | ATK | SPD | DEF | RES | |
|---|---|---|---|---|---|
| 40 | 36 | 16 | 18 | 23 | |
| Weapon | Brynhildr | A | Atk/Def Bond 3 | ||
| Support | B | Quick Riposte 3 | |||
| Special | Blazing Light | C | Savage Blow 3 | ||
| HP | ATK | SPD | DEF | RES | |
|---|---|---|---|---|---|
| 31 | 34 | 24 | 13 | 23 | |
| Weapon | Gravity+ | A | Spd/Def Bond 3 | ||
| Support | Recover+ | B | Live to Serve 3 | ||
| Special | Kindled-Fire Balm | C | Fortify Cavalry | ||
| HP | ATK | SPD | DEF | RES | |
|---|---|---|---|---|---|
| 36 | 34 | 17 | 18 | 23 | |
| Weapon | Sapphire Lance | A | Swift Stance 1 | ||
| Support | B | Pass 2 | |||
| Special | Iceberg | C | Hone Cavalry | ||
| HP | ATK | SPD | DEF | RES | |
|---|---|---|---|---|---|
| 37 | 28 | 17 | 21 | 11 | |
| Weapon | Brave Bow | A | Atk/Spd Push 3 | ||
| Support | B | Guard 2 | |||
| Special | Noontime | C | Spd Smoke 2 | ||
| HP | ATK | SPD | DEF | RES | |
|---|---|---|---|---|---|
| 36 | 37 | 19 | 28 | 13 | |
| Weapon | Poleaxe | A | Steady Blow 1 | ||
| Support | B | Lunge | |||
| Special | Bonfire | C | Spur Def/Res 2 | ||
| HP | ATK | SPD | DEF | RES | |
|---|---|---|---|---|---|
| 54 | 43 | 22 | 25 | 30 | |
| Weapon | Brynhildr | A | Atk/Def Bond 3 | ||
| Support | B | Quick Riposte 3 | |||
| Special | Blazing Light | C | Savage Blow 3 | ||
| HP | ATK | SPD | DEF | RES | |
|---|---|---|---|---|---|
| 42 | 42 | 32 | 19 | 32 | |
| Weapon | Gravity+ | A | Spd/Def Bond 3 | ||
| Support | Recover+ | B | Live to Serve 3 | ||
| Special | Kindled-Fire Balm | C | Fortify Cavalry | ||
| HP | ATK | SPD | DEF | RES | |
|---|---|---|---|---|---|
| 49 | 46 | 24 | 25 | 30 | |
| Weapon | Sapphire Lance+ | A | Swift Stance 2 | ||
| Support | B | Pass 3 | |||
| Special | Iceberg | C | Hone Cavalry | ||
| HP | ATK | SPD | DEF | RES | |
|---|---|---|---|---|---|
| 51 | 39 | 24 | 29 | 16 | |
| Weapon | Brave Bow+ | A | Atk/Spd Push 3 | ||
| Support | B | Guard 3 | |||
| Special | Noontime | C | Spd Smoke 3 | ||
| HP | ATK | SPD | DEF | RES | |
|---|---|---|---|---|---|
| 49 | 49 | 27 | 36 | 19 | |
| Weapon | Poleaxe+ | A | Steady Blow 2 | ||
| Support | B | Lunge | |||
| Special | Bonfire | C | Spur Def/Res 2 | ||
| HP | ATK | SPD | DEF | RES | |
|---|---|---|---|---|---|
| 63 | 46 | 24 | 28 | 33 | |
| Weapon | Brynhildr | A | Atk/Def Bond 3 | ||
| Support | B | Quick Riposte 3 | |||
| Special | Blazing Light | C | Savage Blow 3 | ||
| HP | ATK | SPD | DEF | RES | |
|---|---|---|---|---|---|
| 48 | 45 | 35 | 21 | 35 | |
| Weapon | Gravity+ | A | Spd/Def Bond 3 | ||
| Support | Recover+ | B | Live to Serve 3 | ||
| Special | Kindled-Fire Balm | C | Fortify Cavalry | ||
| HP | ATK | SPD | DEF | RES | |
|---|---|---|---|---|---|
| 57 | 49 | 27 | 28 | 33 | |
| Weapon | Sapphire Lance+ | A | Swift Stance 2 | ||
| Support | B | Pass 3 | |||
| Special | Iceberg | C | Hone Cavalry | ||
| HP | ATK | SPD | DEF | RES | |
|---|---|---|---|---|---|
| 59 | 42 | 27 | 32 | 17 | |
| Weapon | Brave Bow+ | A | Atk/Spd Push 3 | ||
| Support | B | Guard 3 | |||
| Special | Noontime | C | Spd Smoke 3 | ||
| HP | ATK | SPD | DEF | RES | |
|---|---|---|---|---|---|
| 57 | 52 | 30 | 39 | 21 | |
| Weapon | Poleaxe+ | A | Steady Blow 2 | ||
| Support | B | Lunge | |||
| Special | Bonfire | C | Spur Def/Res 2 | ||
| HP | ATK | SPD | DEF | RES | |
|---|---|---|---|---|---|
| 57 | 52 | 30 | 39 | 21 | |
| Weapon | Slaying Lance+ | A | Heavy Blade 3 | ||
| Support | B | Flier Formation 3 | |||
| Special | Aegis | C | Drive Def 2 | ||
User Submitted Teams
Aversa and Grima did everything more or less
Vanilla Grima Atk/Res SSupport Nowi
Vanilla Nowi Spd/Res DriveAtk1 Seal
Blade Camilla + Fortify Flier Res/Atk SSupport Corrin
Blade Corrin HP/Spd
Map position
1-Nowi, 2-Grima, 3-Camilla, 4-Corrin
1st turn-Move Tiki + Grima up right & move Camilla + Corrin up. Leo & lance cavalry will move left.
2nd turn-Kill archer w/ Camilla & Elise w/ Grima. Position Nowi to give Corrin Hone buff.
3rd turn-Kill lance cavalry w/ Corrin. Move everyone else out of Leo range, make sure Nowi can repos Grima to kill Leo next turn
4th turn-Grima kill Leo
Gerome (non-merged)
-Poleaxe+
-Rally Atk/Def
-Ignis
-Fortress Def 3
-Hit & Run
-(No C Passive)
Seal - Guidance 2
NY Azura (+HP, -Res)
-Hagoita+
-Sing
-(No Special)
-Triangle Adept 2
-Earth Dance 3
-Hone Fliers
Seal- Drive Defense 2
LA! Lyn (+Def, -Res)
-Blarraven+
-Draw Back
-Glacies
-Atk/Spd Bond 3
-Guard 3
-Armored March 3
Seal - Atk Smoke 2
Black Knight (Merged +1)
-Alondite
-Pivot
-Black Luna
-Steady Stance 3
-Vantage 3
-Threaten Spd 3
Seal - Quick Riposte 3
Precision and positioning is Key. One false step could result in a Game Over.
Starting Positions: BK closest to the opposing army. Lyn is beside BK and below Gerome. Azura should be the farthest from the army.
Turn 1: Move BK two spaces forward into the danger area. (He should be the only unit in range of the enemy). Move Lyn right behind him. Move Gerome and Azura to the right one space.
Enemy Phase: BK will be hit by the archer first, then the axe dragon. Black Luna will not proc because of the archers guard. Lunge will come into play here, switching BK with the ace dragon. Elise will heal the archer and Leo will ditch the crowd going on the little strip of land at the top of the map (probably to brood or something). You want this, Leo can’t get buffed from Elise or the lance cavalier which are things he needs to be threatening.
Turn 2: This is is the most crutial turn, you will be KOing half of the army here. Have BK kill the archer. Next have Lyn attack the lance dragon and finish him off with Gerome. Have Azura sing a pretty melody to BK, so he can kill the ace dragon.
Enemy Phase: Elise will attack Azura and the lance cavalier will attack BK. Leo will come up from the rear, but still isn’t close enough to attack anyone.
Turn 3: Have Gerome decimate the lance cavalier (Poleaxe + gem weapon = overkill). Due to Hit & Run, Gerome will move into Leo’s range. This is bad. Have Azura sing to Gerome so he can get out of Leo’s fury. Azura MUST do this over the river to the right of Gerome. Move Gerome to the right of Azura between the two trees. Have Lyn attack Elise and finish her off with BK.
Enemy Phase: Leo moves ever closer and dies inside knowing he is doomed.
Turn 4: Take down Leo with Lyn. Sing will be needed.
Everybody has a role they need to fulfill. BK is the instigator as he starts the action and KO’s many units, Gerome is the cleanup man who takes down the lance units, Lyn is the Leo counter and Azura is the dancer. Not many of these units are interchangeable and can’t be replaced with other units to receive the same results.
https://youtu.be/3Oieeu5-uQc
Spring Camilla [+HP, -Def]
Gronnraven+, Reposition, Triangle Adept 3, Lancebreaker 3, Goad Fliers, Iote's Shield seal
5* Camilla +9 [+Spd, -HP]
Camilla's Axe (Eff), Reposition, Goad Fliers, Drive Atk 2 seal
New Year Camilla [+Def, -Res]: Summoner Support (S)
Kadomatsu+ (Def), Reposition, Ward Fliers, Drive Def 2 seal
Summer Camilla +1 [+Atk, -Res]
Juicy Wave+ (Atk), Reposition, Hone Fliers, Atk+2 seal
Ally Support:
S - Summer Camilla : Camilla
A - Spring Camilla : New Year Camilla


