


Event History
| Start | End |
|---|---|
Map
- Normal
- Infernal

Bound Hero Battle: Ninian and Hawkeye
If you tend to find Grand and Bound Hero Battles a bit too difficult for your liking and the presence of dancers on a map makes you cringe, have no fear -- finally making a return is the dynamic (and not-so-dangerous) duo of Ninian and Hawkeye! This map features some tricky foes that can catch you by surprise, but don’t panic. Since none of them are particularly overspecialized, you can easily answer them with well-rounded units of your own, and the fact that there are no reinforcements means that what you see is what you get.
That’s not, however, the only factor you have going in your favour. The layout of this map allows for you to easily establish a chokepoint and pick off foes with ranged allies from the safety of behind the walls. Even the the eponymous dancer herself, Ninian, doesn’t present much of a threat; she struggles to KO units she even has a color advantage against, and really poses more of a nuisance than an actual danger. All and all, if you’re willing to use some trial and error and adjust your strategy when necessary, this Bound Hero Battle shouldn’t prove to be too frustrating. Patience (as per usual) is key, and being willing to burn a few stamina potions can’t hurt the situation either.
Before you begin teambuilding, it’s completely possible you already possess everything you need to beat this map. Created by Gamepress staff member RedFerrari1998, the video guide below uses only F2P units, one instance of Skill Inheritance, and seals -- see the description for more details. If it doesn’t work for you, though, then read on!
Who to Choose
As is generally true of Bound Hero Battles, the individual units used is very important as they will primarily inform a strategy. There are a few routes one can take depending on what units are personally available, and, of course, adjustment based on the units one possesses is always a possibility.
Baiters
Since the enemies on this map won’t start moving unless they are damaged or baited and there’s no immediate opportunity to strike and retreat, you’ll want to bring at least one unit that can bait on this map. While it is possible to use a dancer like Olivia, it’s far more effective to use a unit who can net a KO or two in Enemy Phase.
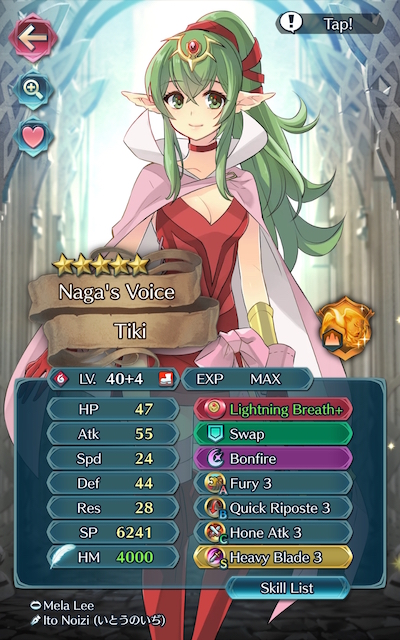
Dragons like Nowi, Adult Tiki, and Fallen Robin are particularly useful due to being able to counterattack regardless of range and their ability to take a fair deal of punishment before falling in battle. Armors such as Hector, Valentine Hector, Fallen Hardin, Winter Tharja, and Zelgius are able to easily withstand hits and hit hard upon counterattacking. Great F2P options include Legendary Ike, Black Knight, Xander, and Fjorm.
Strikers
Although decidedly less useful than baiters, ranged strikers can prove useful in this Bound Hero Battle by targeting enemies from the safety of behind the wall once a tank establishes a chokepoint. In particular, Brave Bow users can be incredibly potent on this map due to their ability to overpower finish off any foes your tanks may otherwise struggle with. Brave Lyn, Bridal Cordelia, Klein, and Setsuna are potential strikers you may want to use, with a special mention going to Brave Lyn given her F2P status.
Alternatively, Brave and Blade weapon wielders can also serve to be useful if your team composition provides them with the appropriate buffs. Tharja, Reinhardt, Tailtiu, and Nino are potential options here, especially if they are equipped with a Breaker skill to add to their coverage.

Dancers
Dancers help provide support, may even have a decent offensive presence themselves, and can usually tank a hit or two, if need be. Olivia, Performing Olivia, Performing Inigo, Performing Shigure, Performing Azura, Azura, New Year Azura, and Ninian all give the refreshment that high-firepower units need while also possessing the ability to provide an assist to KO an enemy.
Healers
While not generally a great choice over units who can deal heavy damage or dancers, Healers can be incredibly useful in this Bound Hero Battle due to their ability to provide valuable healing to your tanks. Genny, Elise, Wrys, and Lissa are potential additions to a team that may serve you well on this map, though any healer who possesses Rehabilitate will likely do the trick.
Strategy
Strategizing for this Bound Hero Battle shouldn’t be too challenging due to the absence of reinforcements. While it can be difficult to exactly predict what will happen due to IV / Merge variance, here’s some general tips to get you started.
Casting Out Your Line
Since this isn’t a map where you can just wait for the enemy to come to you, you’re going to have to bait to get these foes moving. The archetypical strike, dance, and retreat strategy won’t work here unless your striker can take a hit. Or two. Or three.
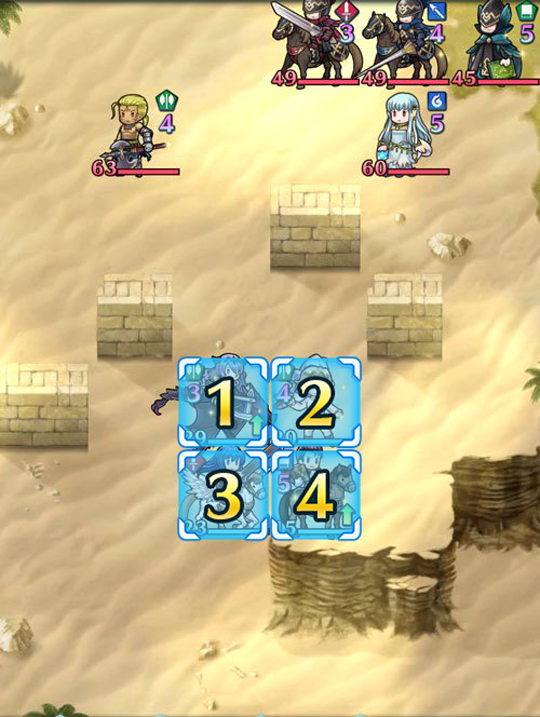
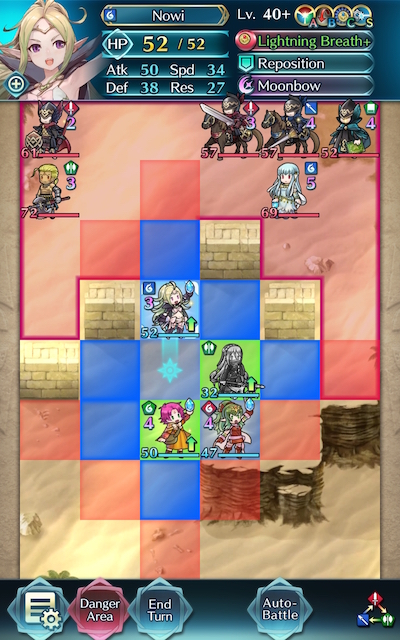
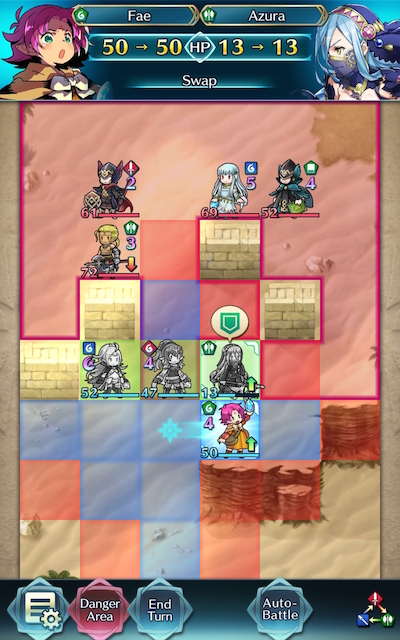
Because of this, you’ll have to choose where to bait, but luckily, there’s really only two options -- the chokepoint in the middle of the map, and the chokepoint to the right. Both of these options are pretty compelling, but the middle chokepoint may be easier to use depending on AI movement. In my case, the blue lance cavalry was danced by Ninian instead of Hawkeye; this saves Nowi from being KO’d.
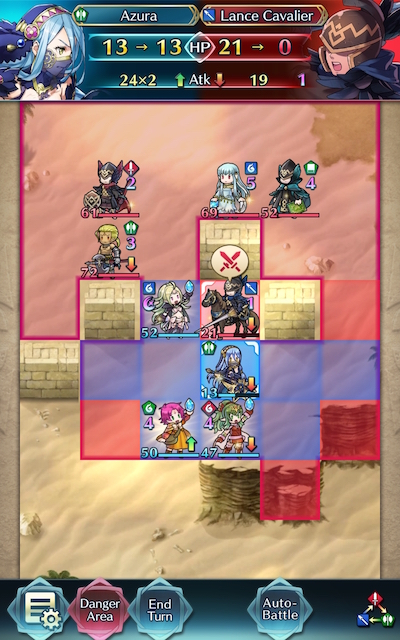
Before you commit to baiting, though, it’s always a good idea to size up the foes you’ll be facing. At a glance, you may recognize that the sword cavalry unit is carrying Zanbato and the lance cavalry unit is carrying Ridersbane. Both of these weapons deal effective damage to cavalry, so if you’re trying to bait with your own horse-rider, you’ll have to start on the right.
Passing Off The Torch
If you’re unprepared for the lance cavalry foe with Pass, it can be a nasty surprise -- especially if you left your red or blue dancer in its post-danced range. This problem can easily be fixed by being careful with your positioning (which may take you a bit of trial and error to figure out) and/or ensuring your tank is bulky enough to comfortably withstand this foe. Remember: when it comes to a map with a dancer, it’s always better to be safe than sorry.
Trembling With Antici...pation!
Although the AI can be downright unruly on this map due to Ninian’s dancing ability, you’ll likely be a lot more successful if you always anticipate the worst case scenario. Assume that if a foe can be danced and charge forward to KO one of your weakened units, it will do so, and make sure to act accordingly.
All Aboard The Daisy Train
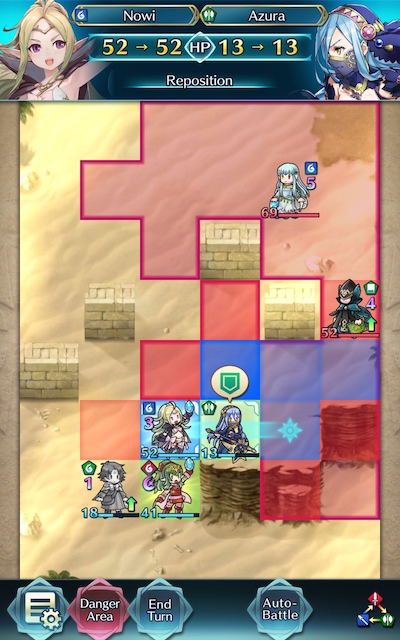
Once there’s only a few foes left, you can afford to play more conservatively and take less risks. If you find that you need your dancer and another unit to retreat as far as possible, using a Reposition and dance combo can move these two units across the map in a hurry. The benefits of this are very clear: the further your units are out of the danger zone, the less likely they are to get ambushed by a danced foe. From there, you can bait with a unit that you know for a fact can handle the enemy... and maybe even manipulate the AI with your positioning.
If At First You Don’t Succeed
Don’t be fooled by video walkthroughs of any Bound Hero Battle that you watch -- it’s very rare for anyone to beat high-difficulty content (or record a video of themselves doing so!) on their first try. Additionally, the potential variance in unit builds that Skill Inheritance brought along with the random nature of summoning has resulted in pretty much every single summoner having different “building blocks” to work with. This, when combined with the high difficulty level of Infernal, may prove frustrating while someone is trying to find the right combination of units and moves. The key thing to keep in mind is that it may take some light Skill Inheritance and seal shuffling, multiple tries of the map, and a few stamina potions to find a strategy that works for you. Every single turn you complete gets you one step closer to completing the puzzle. Finally, reading about or watching videos of successful strategies may also help you break through a particularly difficult turn that you can’t complete, or may give you ideas of a new unit to use.
Map Enemies
- Hard
- Lunatic
- Infernal
| HP | ATK | SPD | DEF | RES | |
|---|---|---|---|---|---|
| 36 | 37 | 18 | 19 | 23 | |
| Weapon | Zanbato | A | Armored Blow 3 | ||
| Support | B | Pass 2 | |||
| Special | Luna | C | Atk Ploy 2 | ||
| HP | ATK | SPD | DEF | RES | |
|---|---|---|---|---|---|
| 36 | 37 | 18 | 19 | 23 | |
| Weapon | Ridersbane | A | Armored Blow 3 | ||
| Support | B | Pass 2 | |||
| Special | Dragon Fang | C | Spur Def/Res 1 | ||
| HP | ATK | SPD | DEF | RES | |
|---|---|---|---|---|---|
| 34 | 34 | 28 | 18 | 23 | |
| Weapon | Gronnraven | A | Fury 3 | ||
| Support | B | Seal Res 2 | |||
| Special | Blazing Wind | C | Savage Blow 2 | ||
| HP | ATK | SPD | DEF | RES | |
|---|---|---|---|---|---|
| 48 | 37 | 16 | 21 | 22 | |
| Weapon | Killer Axe+ | A | Death Blow 3 | ||
| Support | B | Wings of Mercy 3 | |||
| Special | Growing Light | C | Threaten Atk 3 | ||
| HP | ATK | SPD | DEF | RES | |
|---|---|---|---|---|---|
| 44 | 31 | 26 | 18 | 19 | |
| Weapon | Light Breath+ | A | Distant Def 3 | ||
| Support | Dance | B | Escape Route 3 | ||
| Special | Miracle | C | Fortify Def 3 | ||
| HP | ATK | SPD | DEF | RES | |
|---|---|---|---|---|---|
| 49 | 49 | 25 | 26 | 30 | |
| Weapon | Zanbato+ | A | Armored Blow 3 | ||
| Support | B | Pass 3 | |||
| Special | Luna | C | Atk Ploy 3 | ||
| HP | ATK | SPD | DEF | RES | |
|---|---|---|---|---|---|
| 49 | 49 | 25 | 26 | 30 | |
| Weapon | Ridersbane+ | A | Armored Blow 3 | ||
| Support | B | Pass 3 | |||
| Special | Dragon Fang | C | Spur Def/Res 2 | ||
| HP | ATK | SPD | DEF | RES | |
|---|---|---|---|---|---|
| 45 | 45 | 35 | 23 | 31 | |
| Weapon | Gronnraven+ | A | Fury 3 | ||
| Support | B | Seal Res 3 | |||
| Special | Blazing Wind | C | Savage Blow 3 | ||
| HP | ATK | SPD | DEF | RES | |
|---|---|---|---|---|---|
| 63 | 44 | 23 | 28 | 30 | |
| Weapon | Killer Axe+ | A | Death Blow 3 | ||
| Support | B | Wings of Mercy 3 | |||
| Special | Growing Light | C | Threaten Atk 3 | ||
| HP | ATK | SPD | DEF | RES | |
|---|---|---|---|---|---|
| 60 | 38 | 34 | 24 | 27 | |
| Weapon | Light Breath+ | A | Distant Def 3 | ||
| Support | Dance | B | Escape Route 3 | ||
| Special | Miracle | C | Fortify Def 3 | ||
| HP | ATK | SPD | DEF | RES | |
|---|---|---|---|---|---|
| 61 | 50 | 37 | 36 | 28 | |
| Weapon | Wo Dao+ | A | Fury 3 | ||
| Support | B | Seal Spd 3 | |||
| Special | Reprisal | C | Spur Res 3 | ||
| HP | ATK | SPD | DEF | RES | |
|---|---|---|---|---|---|
| 57 | 52 | 27 | 28 | 33 | |
| Weapon | Zanbato+ | A | Armored Blow 3 | ||
| Support | B | Pass 3 | |||
| Special | Luna | C | Atk Ploy 3 | ||
| HP | ATK | SPD | DEF | RES | |
|---|---|---|---|---|---|
| 57 | 52 | 27 | 28 | 33 | |
| Weapon | Ridersbane+ | A | Armored Blow 3 | ||
| Support | B | Pass 3 | |||
| Special | Dragon Fang | C | Spur Def/Res 2 | ||
| HP | ATK | SPD | DEF | RES | |
|---|---|---|---|---|---|
| 52 | 48 | 38 | 25 | 34 | |
| Weapon | Gronnraven+ | A | Fury 3 | ||
| Support | B | Seal Res 3 | |||
| Special | Blazing Wind | C | Savage Blow 3 | ||
| HP | ATK | SPD | DEF | RES | |
|---|---|---|---|---|---|
| 72 | 47 | 25 | 31 | 33 | |
| Weapon | Killer Axe+ | A | Death Blow 3 | ||
| Support | B | Wings of Mercy 3 | |||
| Special | Growing Light | C | Threaten Atk 3 | ||
| HP | ATK | SPD | DEF | RES | |
|---|---|---|---|---|---|
| 69 | 40 | 37 | 26 | 30 | |
| Weapon | Light Breath+ | A | Distant Def 3 | ||
| Support | Dance | B | Escape Route 3 | ||
| Special | Miracle | C | Fortify Def 3 | ||
User Submitted Teams
Please see the link for the video:
https://www.youtube.com/watch?v=FDWNKBTCLaE
F!Corrin:(+atk -HP) (47 HP with summoner support)
Dark Breath+(spd bonus)
Pivot
Growing Wind
Distant Counter
Quick Riposte 3
Savage Blow 3
Deflect Magic 3 SS
Marth:(-HP +Res) (40 HP)
Falchon (effect bonus)
Reposition
Luna
Close Def 3
Swordbreaker 3
Drive Speed 2
Drive Def 1 SS (yeah yeah, I'll upgrade it someday, I swear)
+1 Bridal Lyn (-atk +HP) (48 HP) (Not the best IVs but I needed the 48 HP)
Candlelight+ (Wrathful bonus)
Rehabilitate+
Swift-Winds Balm
HP+5
Dazzling Staff 3
Infantry Pulse 3
Panic Ploy 3 SS
Azura:(-spd +res) (41 HP)
Slaying Lance (res bonus)
Sing
Sol
Spd+3
Geyser Dance 2
Spur Atk 3
Spur Spd 3 SS
You probably recognize the team, it's the same as last time, only with Reposition on Marth now that I finally got another Reposition fodder.
As said by the title, the revamped positioning of the enemies makes this team easier on Infernal than on Hard, simply because it allows me to put corrin in the middle of the fray without being attacked by Hawkeye. Guess IntSys knows how much I love the stupid AI of this game...
As usual, this is the budget version:
Distant Counter and Deflect Magic are just there to look pretty, as Marth will take on the only mage. Quick Riposte can be used on a lesser version, and Savage Blow damage is not needed. Growing Wind is recommended but again unneded. As Corrin will be attacked twice, Infantry Pulse won't be required to trigger Growing Wind immediately. And if you are paranoid about it, you can just give her Quickened Pulse seal.
Only Marth's Reposition, Luna, and Refined Falchion are needed. But come on, those Drive skills are just too good not to give them to him.
Azura will only sing, and thus can be replaced. The defense buffs are unneded.
Lyn will only heal, and her Rehabilitate+ only heals 7 due to her attack being awfull, so it can be replaced by any 3-4 star healer with the good old Rehabilitate.
Most speed boost and all the defense buffs are unneded, but again make it easier.
Most of the speed buffs are in general overkill. But keep in mind, i have Lyn and MArth and Azura and Corrin supported, and Corrin has the summoner support, so as usual, even tough I made sure no ene my unit is barely killed nor any ally barely survives, results may still vary.
now the starting formation will be:
(wall) Corrin
Marth (dancer)
------- (healer)
Just let Corrin get attacked by the sword cavalier. It will do negligible to no damage and should KO back with ease. Afterwards, Ninian will dance the lance cavalier and attack. He will survive.
Turn 2: finish off the cavalier and sing corrin.
now move the healer one space to the left, and have Corrin use Pivot on the healer. Now use Reposition to move (dancer) out of range.
Now that is the most tight part. The healer will get hit by Hawkeye. He should be debuffed and pose no direct threat, but depending on the healer, in that moment the speed buffs from the Falchion and Drive Speed might be needed.
Turn 3: have Marth kill Hawkeye. Have (dancer) sing him, and use Reposition to move (dancer) TO THE RIGHT.
Now the Wao Dao user should attack Marth. He has enough base speed to not get doubled by him, but any grade of Swordbreaker will make things easier.
Turn 4:
Corrin takes out the Wao Dao fighter, and have Marth defeat the green mage. Use sing if necessary. Now Marth should be able to take Ninian's attack and take her out in the next round.


