


Event History
| Start | End |
|---|---|
Map
- Normal
- Infernal

Grand Hero Battle: Naesala
It’s time to unleash the beast within! On the tail of the Rulers of the Laguz banner comes yet another Grand Hero Battle – this time featuring our first-ever beast opponent, Naesala. Thankfully, this map unto itself is far from the worst we’ve encountered, featuring no reinforcements and relatively few tricky foes to deal with. Aside from the king of Kilvas himself, who has a charged Special and can potentially have 3 movement, the enemies you’re facing are pretty straightforward. As always, careful use of buffs, stringent positioning, and taking initiative to deal the first blow will serve you well.
Before you begin teambuilding, it’s completely possible you already possess everything you need to beat this map. Created by Gamepress staff member RedFerrari1998, the video guide below uses only F2P units – see the description for more details. If it doesn’t work for you, though, then read on!
Who to Use
As is generally true of Grand Hero Battles, the individual units used is very important as they will primarily inform your strategy. There are a few routes you can take depending on what units are available to you, and, of course, adjustment based on the units you possess is always a possibility.
Tanks
As per usual, even if you’re making use of a striker, you’ll likely want to employ tanks in order to establish chokepoints and KO foes on Enemy Phase. While a multi-striker/refresher approach can work here, tanks are also an option that can help you keep your higher firepower units safe in the back lines.
Since they simply have more stat points to work with, armors are almost always effective tanks. Zelgius, Winter Tharja, Halloween Myrrh, Legendary Tiki, Brave Hector, Surtr, and Winter Fae are able to hit hard very upon attacking and counterattacking, especially if they’re making use of Bold Fighter, Quick Riposte, or Vengeful Fighter, but really, any sufficiently buffed armor will likely do the trick. Black Knight is a powerful F2P option due to his powerful semi-exclusive Special, Black Luna.
Infantry F2P options really are functionally limited to Legendary Ike, whose native Warding Breath grants him accelerated cooldown and extra Resistance, and Fjorm, who can easily tank ranged damage due to her exclusive Special, Ice Mirror. Calvary tanks are similarly limited -- Xander and Camus may struggle, but may survive if under the effects of Ward Cavalry.
Dragons are also very strong tanks, especially when they’re equipped with Lightning Breath (or another Breath and Distant Counter, if you’re feeling fancy). They are also incredibly useful due to their damage-seeking effect against ranged foes.
Strikers
Since Naesala represents one of the biggest threats on this map, taking advantage of his status as a flier is a great idea – but archers are almost always a good choice of striker, especially if they make use of a Brave Bow. Their ability to overpower most foes and deal hefty damage with a timely Special activation means they’ll serve you well in breaking through enemy lines. Do note that since Naesala and the red dragon flier are only reachable by flying over the mountains yourself, flying archers like WF Hinoka, Summer Takumi, and NY Fjorm will be particularly useful here. Otherwise, Brave Lyn, Halloween Jakob, Setsuna, and Klein are potential strikers you may want to use, with a special mention going to Brave Lyn given her potential F2P status. Really, any Brave Bow archer with adequate support or Skill investment should do the trick though. Colored archers like Legendary Lucina, Legendary Lyn, and Halloween Niles may perform well, but will have to watch out for the Weapons Triangle; which is a distinct disadvantage when compared to their colorless counterparts.
Alternatively, melee Brave users are able to hit foes twice without retaliation, and may even quad hit if they outspeed an enemy. Cherche, Cordelia, and Elincia are all great melee Brave users who can make excellent use of class-specific buffs, and when equipped with Hit and Run or Drag Back they are able to retreat once attacking. WT Reinhardt may also prove useful due to his weapon granting him follow-ups regardless of phase.
Brave and Blade tome wielders can also serve to be useful if your team composition provides them with the appropriate buffs, though other mages can also be powerful strikers. Tharja, Reinhardt, Tailtiu, Ishtar, Ophelia, WT Olwen, Lewyn, SF Nino, and Nino are potential options here, especially if they are equipped with a Breaker skill to add to their coverage. Julia and Deirdre are also very useful due to their ability to OHKO the blue dragon (with or without support), though most green mages equipped with Triangle Adept should be able to do the same.
Refreshers
Refreshers help provide support, may even have a decent offensive presence themselves, and can usually tank a hit or two, if need be. Any of them will work, since they really shouldn’t be battling too many foes anyways – though Legendary Azura is particularly notable due to her ability to grant her flying and infantry allies 1 extra movement when she sings for them.
Healers
Due to every healer having access to the Wrathful Staff refinement, they can serve as incredibly potent colorless pseudo-mages – who can heal to boot! Brave Veronica is known as the scourge of Aether Raids for good reason: her excellent exclusive weapon prevents counterattacks, buffs allies, and debuffs foes after she attacks, and her access to Wrathful Staff makes her a potent offensive force in her own right. If you don’t have her, though, other healers like Genny, Loki, Ethlyn, Wrys, and Lissa are potential additions to a team that may serve you well.
Supporters
As units that offer extra utility, supporters typically fit one of the above roles while also providing some sort of assist to your other units. Buffers, debuffers, and drivers all can play a valuable role in your team composition by making use of their incredible utility.
Because of Skill Inheritance, any unit can be a buffer with enough investment -- many Drives, Spurs, Hones, Fortifies, and Dual Rallies are readily accessible on 4 star units, and can be further stacked with seals for maximum coverage. Tactics seals are also easily accessible and provide a hefty +6 boost to one stat. Notable options who natively provide buffs through their exclusive weapons include YT Olivia, Performing Azura, Brave Veronica, Eirika, and Ephraim, while Brave Lucina, New Year Corrin, and New Year Azura are able to stack Drives through theirs.
That isn’t to say that offensive juggernauts can’t provide team support, though -- class specific buffs (like Hone Cavalry or Fortify Fliers) are easily accessible and incredibly potent. Considering that most offensive units don’t make heavy use of their C-slot Skill anyways, they can inherit these Skills to boost the team’s firepower.
Some units are able to support both themselves or their allies at the same time. Legendary Tiki, Helbindi, and Brave Veronica are examples of units who buff both themselves and their allies when fulfilling certain conditions.
Debuffers can make use of weaponry, Skills, or Seals to help de-fang the enemy team and make them significantly less threatening. Ploys, Chills, and Smokes especially are wide-reaching and potent debuffs that can easily turn the tide of the battle at a pivotal moment. Lilina and Soren have a Chill effect on their refined weapons, while Male Morgan has a unique buff/debuff dual effect on his.
Dagger units also inflict debuffs when they attack, which can be very useful to cut through an Infernal foes’ inflated HP. Among Daggers, however, Eir is particularly unique – her status as a flier grants her excellent mobility and access to unique support Skills like Guidance, plus her kit perfectly synergizes with her unique weapon to grant her both offensive prowess and excellent support utility. Not only does she debuff foes within 2 spaces of the target she attacks (and the target itself if she does not KO them), her C-slot Skill Sparkling Boost provides some much-needed healing at the start of every turn to the most damaged unit on your team – excluding Eir herself. She’s a great option if you’re finding the mages a little tough to deal with or just generally aren’t sure how to fill a slot on your team.
Strategy
Strategizing for this Grand Hero Battle should be reasonably uncomplicated due to the absence of reinforcements. While it can be difficult to exactly predict what will happen due to IV / Merge variance, here’s some general tips to get you started.
Absolutely Beastly
Before you even consider your opening moves, it’s important to understand how beast units function. If Naesala starts the turn next to a beast (not an issue) or dragon ally, he’ll transform into his beast form and gain 1 extra movement. Because of this, it’s a good idea to be acutely aware of the unit Naesala is beside at all times – otherwise he may transform and target a unit you thought was safely outside of his range.
Starting Without Stumbles
If you’re a dedicated reader of these guides, you’ll know by now that most of these maps are won or lost before they even start. While it may be tempting to jump right in, knowing (and loving!) your enemy will help you not only choose your units, but also figure out where to begin.
If you don’t have a flying archer to attack Naesala or the red dragon flier over the mountains, you really only have one avenue to get this map moving – tanking Naesala himself isn’t a great idea considering his charged AOE Special. That means your best bet is targeting the blue dragon with a striker and Repositioning/refreshing them so they’re out of danger, or potentially tanking red physical damage, blue magic damage, and green magic damage all within the span of one turn. This will be a difficult feat for most units (barring Fjorm), though with enough buffs a tank may perform decently well here. Colorless units who can counterattack regardless of range (either through weaponry like Legendary Robin or Skills like Close Counter) may be a good choice here, but will need support to overcome their lack of color advantage.

That doesn’t mean that taking down the blue dragon will be particularly easy, however. Due to their kit of Distant Defense and Dull Ranged, you won’t be able to rely on visible buffs from Hone and Wave Skills to power through this foe’s inflated HP – so you’ll have to seek to KO them through other means. Julia and Deirdre are great choices for this role due to their color advantage and the effective damage to dragons they deal, but any green mage will likely do the trick, especially if they’re speedy and/or make use of Triangle Adept.
From there, your best bet to complete this map as painlessly as possible is establishing a chokepoint with a tank that can counterattack regardless of range. Bulky reds perform exceptionally well here, as the red sword cavalry isn’t particularly threatening and the green mage cavalry possesses a color disadvantage against them.
Stacking the Odds
Even if one of your units has middling Speed, oftentimes you’ll find that with a bit of support, they’re able to perform follow-up attacks and KO foes they would otherwise have to deal with later. In Ike’s case, Lene’s Drive seal when combined with Julia’s Hone actually grants him enough Speed to KO the red sword calvary on Enemy Phase – though Lene must be positioned carefully in order to ensure Ike is under her Drive’s effects.
Daisy Chaining
Even though Dual Rallies have become the assists of choice in the Arena, movement assists are still valuable tools that can help you circumvent a variety of different positioning issues. Chaining movement assists together results in you being able to move your units in a variety of new and interesting ways, and can often result in the difference between victory and defeat.


Ranged Rover
Because Naesala’s charged AOE Special will lay down the pain on whomever it activates against, the easiest way to avoid it is to simply attack him with a ranged unit. If you can’t net the KO due to not being able to follow-up and not having a refresher handy, than consider attacking him once with a ranged unit then once with a melee unit. He’ll still activate Blazing Wind, but since AOE Specials deal non-lethal damage, you should be able to finish him off.
If At First You Don’t Succeed
Don’t be fooled by video walkthroughs of any Grand Hero Battle that you watch -- it’s very rare for anyone to beat high-difficulty content (or record a video of themselves doing so!) on their first try. Additionally, the potential variance in unit builds that Skill Inheritance brought along with the random nature of summoning has resulted in pretty much every single summoner having different building blocks to work with. This, when combined with the high difficulty level of Infernal, may prove frustrating while someone is trying to find the right combination of units and moves. The key thing to keep in mind is that it may take some light Skill Inheritance and seal shuffling as well as multiple tries of the map to find a strategy that works for you. Every single turn you complete gets you one step closer to completing the puzzle. Finally, reading about or watching videos of successful strategies may also help you break through a particularly difficult turn that you can’t complete, or may give you ideas of a new unit to use.
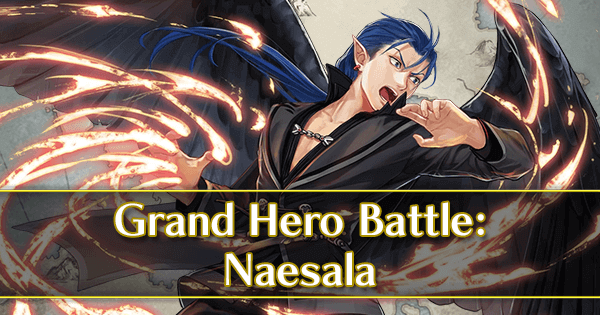
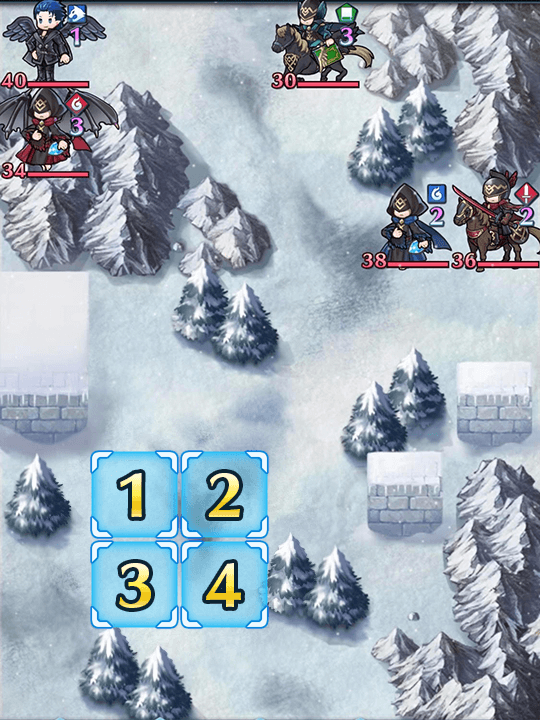
Map Enemies
- Hard
- Lunatic
- Infernal
| HP | ATK | SPD | DEF | RES | |
|---|---|---|---|---|---|
| 40 | 38 | 33 | 17 | 21 | |
| Weapon | Raven King Beak | A | Swift Sparrow 2 | ||
| Support | B | Guard 3 | |||
| Special | Blazing Wind | C | Flier Guidance 3 | ||
| HP | ATK | SPD | DEF | RES | |
|---|---|---|---|---|---|
| 34 | 28 | 28 | 24 | 19 | |
| Weapon | Lightning Breath | A | Fierce Stance 2 | ||
| Support | B | Hit and Run | |||
| Special | Moonbow | C | Goad Fliers | ||
| HP | ATK | SPD | DEF | RES | |
|---|---|---|---|---|---|
| 30 | 27 | 29 | 11 | 24 | |
| Weapon | Gronnowl | A | Steady Blow 1 | ||
| Support | B | Aerobatics 2 | |||
| Special | Iceberg | C | Drive Spd 2 | ||
| HP | ATK | SPD | DEF | RES | |
|---|---|---|---|---|---|
| 38 | 33 | 23 | 21 | 20 | |
| Weapon | Dark Breath | A | Distant Def 2 | ||
| Support | B | Dull Ranged 2 | |||
| Special | Sacred Cowl | C | Drive Atk 2 | ||
| HP | ATK | SPD | DEF | RES | |
|---|---|---|---|---|---|
| 36 | 38 | 20 | 21 | 26 | |
| Weapon | Wo Dao | A | Fury 3 | ||
| Support | Reciprocal Aid | B | Poison Strike 2 | ||
| Special | Noontime | C | Savage Blow 2 | ||
| HP | ATK | SPD | DEF | RES | |
|---|---|---|---|---|---|
| 54 | 46 | 41 | 24 | 29 | |
| Weapon | Raven King Beak | A | Swift Sparrow 2 | ||
| Support | B | Guard 3 | |||
| Special | Blazing Wind | C | Flier Guidance 3 | ||
| HP | ATK | SPD | DEF | RES | |
|---|---|---|---|---|---|
| 46 | 40 | 36 | 32 | 27 | |
| Weapon | Lightning Breath+ | A | Fierce Stance 3 | ||
| Support | B | Hit and Run | |||
| Special | Moonbow | C | Goad Fliers | ||
| HP | ATK | SPD | DEF | RES | |
|---|---|---|---|---|---|
| 40 | 39 | 37 | 16 | 32 | |
| Weapon | Gronnowl+ | A | Steady Blow 2 | ||
| Support | B | Aerobatics 2 | |||
| Special | Iceberg | C | Drive Spd 2 | ||
| HP | ATK | SPD | DEF | RES | |
|---|---|---|---|---|---|
| 52 | 45 | 30 | 29 | 28 | |
| Weapon | Dark Breath+ | A | Distant Def 3 | ||
| Support | B | Dull Ranged 3 | |||
| Special | Sacred Cowl | C | Drive Atk 2 | ||
| HP | ATK | SPD | DEF | RES | |
|---|---|---|---|---|---|
| 49 | 50 | 27 | 28 | 33 | |
| Weapon | Wo Dao+ | A | Fury 3 | ||
| Support | Reciprocal Aid | B | Poison Strike 3 | ||
| Special | Noontime | C | Savage Blow 3 | ||
| HP | ATK | SPD | DEF | RES | |
|---|---|---|---|---|---|
| 63 | 49 | 45 | 27 | 32 | |
| Weapon | Raven King Beak | A | Swift Sparrow 2 | ||
| Support | B | Guard 3 | |||
| Special | Blazing Wind | C | Flier Guidance 3 | ||
| HP | ATK | SPD | DEF | RES | |
|---|---|---|---|---|---|
| 54 | 43 | 39 | 35 | 30 | |
| Weapon | Lightning Breath+ | A | Fierce Stance 3 | ||
| Support | B | Hit and Run | |||
| Special | Moonbow | C | Goad Fliers | ||
| HP | ATK | SPD | DEF | RES | |
|---|---|---|---|---|---|
| 57 | 45 | 22 | 28 | 33 | |
| Weapon | Brave Lance+ | A | Heavy Blade 3 | ||
| Support | B | Renewal 3 | |||
| Special | Miracle | C | |||
| HP | ATK | SPD | DEF | RES | |
|---|---|---|---|---|---|
| 46 | 42 | 41 | 17 | 35 | |
| Weapon | Gronnowl+ | A | Steady Blow 2 | ||
| Support | B | Aerobatics 3 | |||
| Special | Iceberg | C | Drive Spd 2 | ||
| HP | ATK | SPD | DEF | RES | |
|---|---|---|---|---|---|
| 61 | 48 | 33 | 32 | 31 | |
| Weapon | Dark Breath+ | A | Distant Def 3 | ||
| Support | B | Dull Ranged 3 | |||
| Special | Sacred Cowl | C | Drive Atk 2 | ||
| HP | ATK | SPD | DEF | RES | |
|---|---|---|---|---|---|
| 57 | 53 | 30 | 31 | 36 | |
| Weapon | Wo Dao+ | A | Fury 3 | ||
| Support | Reciprocal Aid | B | Poison Strike 3 | ||
| Special | Noontime | C | Savage Blow 3 | ||
User Submitted Teams
https://www.youtube.com/watch?v=2L_uBWEcWD0
Hector is your baiter and your tank but cannot handle a hit from a green foe so christmas tharja is there to deal with the only threat to him u then use summer robin with reposition to get her outta there and veronica is your healer. I did this a while ago but no matter what the ai on lunatic will always follow this procedure so just follow the video THIS IS ALL F2P BTW
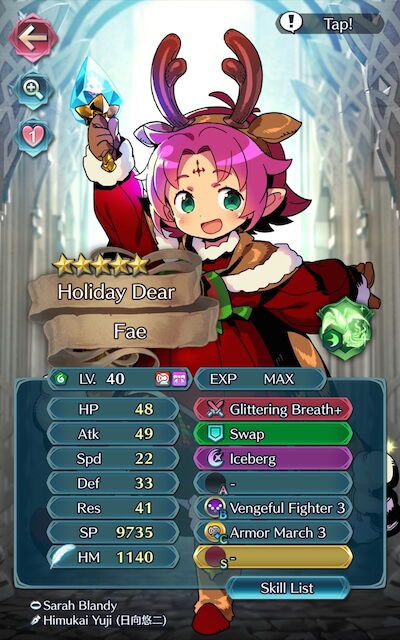
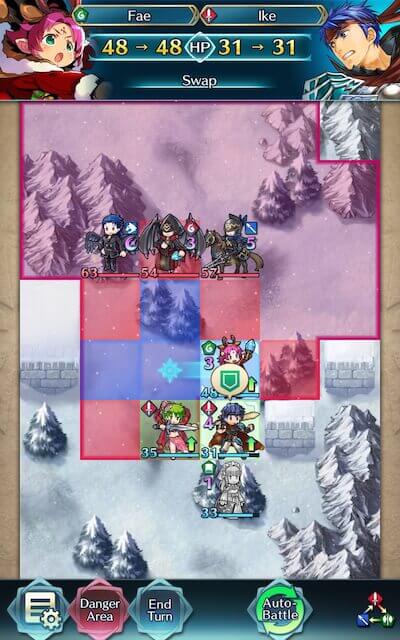
Winter Fae is a complete tank with her Glittering Breath+, moreso once Def refined. She must be protected so she can go "Stompy! Stompy!" at all times.
Eirika is the key supporter with Joyous Lantern+, Atk Bond 3, staying next to W!Fae to activate Def/Res Bond on her, AND even tanks the Green Flier on Phase 2.
Black Knight is there just for Ward Armor support for Fae. Anyone with Ward Armor will work.
Ophelia's just there because stars.


