


Event History
| Start | End |
|---|---|
Map
- Normal
- Infernal
Ursula: Blue Crow
The map that coined the phrase “Just use Hector”, Ursula’s GHB features no reinforcements, but does have a somewhat difficult to manage layout, dagger users that can deal effective damage to your infantry units and carry Savage Blow, armors that slowly advance, cavalry that rushes forward, and, of course, the eponymous Ursula herself. It’s a strange mix for sure, albeit one that definitely does not prove as challenging as later GHBs.
The biggest advantage that you will have over your foes is that almost every aspect of this map has a clear and reasonably accessible answer. Don’t have Hector to bait the dagger user? Black Knight and Xander can be used instead. Don’t have a mage that’s fast enough to perform follow-ups on Ursula to ORKO her? Robin (F) should do the trick. The key is don't panic -- if you’ve been lucky with your pulls or have been playing for a while, you should be able to beat this GHB without a hail mary summon for a specific unit.
Before you begin teambuilding, it’s completely possible you already possess everything you need to beat this map. Created by Gamepress staff member RedFerrari1998, the video guide below uses only F2P units, seals, and light, accessible Skill Inheritance -- see the description for more details. If it doesn’t work for you, though, then read on!
Who To Choose
As is generally true of GHBs, the individual units you will use is very important as they will primarily inform your strategy. There are a few routes you can take depending on what units you have available to you, and, of course, adjustment based on the units you possess is always a possibility.
Baiters
Being able to bait enemies to get this map moving is going to be your primary strategy, and in this GHB due to the presence of a healthy mix of melee and ranged attackers it may be worthwhile to bring a unit who can counterattack no matter what. You’ll likely want to avoid infantry DC users like dragons for baiting the dagger users because they can deal effective damage to infantry. Hector, LA!Hector, Black Knight, Zelgius, Xander, and Camus don’t have this issue and can all use class-specific buffs to pad their defenses, but take care to keep Xander and Camus out of the line of fire when Ursula and the green cavalry mage advance, or have them KO these enemies outright.
Alternatively, since the biggest threat on this map is Ursula herself, Robin (F) and Rhajat are particularly notable for completely checking her. If they also carry G Tomebreaker, then they can also deal with the green calvary mage as well. High RES Green units like Julia, Deirdre, and Fae are also options, albeit slightly less effective ones.
Strikers
Although slightly less useful when compared to maps that require a more offensive touch, Brave Bows still prove useful in this GHB due to the neutral damage they deal and the possibility to quad slow but tough opponents. Brave Lyn, Bridal Cordelia, Klein, and Setsuna are potential strikers you may want to use.
Alternatively, Brave and Blade Weapon users can also serve to be useful. Blade weapons are particularly potent if your team composition provides them with the appropriate buffs. Reinhardt is nearly always effective, and Blade S!Corrin, S!Camilla, Cecilia, L'Arachel, Olwen, SM!Eirika, LA!Lilina, Nino, Tharja, and Tailtiu will all deal heavy damage if they are supported properly.
Dancers
Dancers help support units with high firepower, may even have a decent offensive presence themselves, and can usually tank a hit or two, if need be. Olivia, PA!Azura, PA!Inigo, PA!Olivia, Azura, NY!Azura, and Ninian all give the support that high-firepower units need while also possessing the ability to provide an assist to KO an enemy. NY!Azura is a particularly good choice since she is not vulnerable to the effective weaponry present on this map, but any dancer should work given that they likely won’t be seeing combat.
Healers
While not generally a great choice for GHBs over units who can deal heavy damage or dancers, Healers will generally be prioritized by the enemy AI, can now deal full value colourless damage due to Wrathful staff refinement, and can also heal your primary damage dealing units when they’re low on health -- some common strategies in this GHB in particular involve a healer.
Strategy
Strategizing for this GHB is made much simpler by the fact that there are no reinforcements. While it’s difficult to exactly predict what will happen due to IV / Merge variance, here’s some general tips to get you started.
Every Journey Starts With The First Step
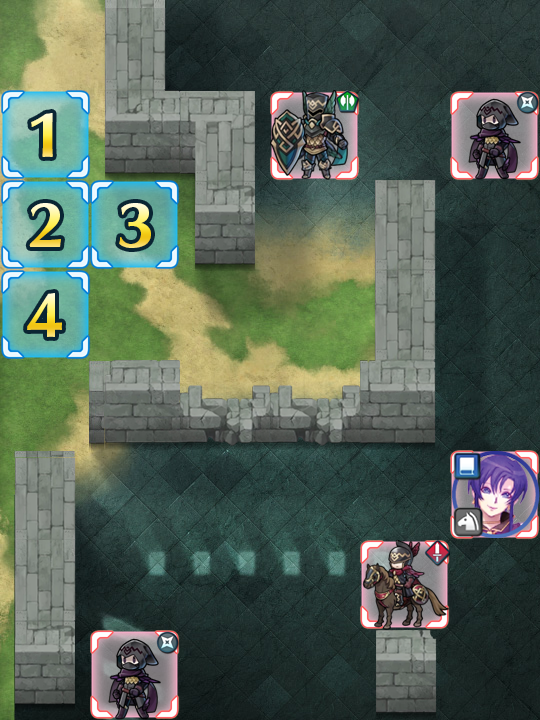
As is customary for most GHBs, the enemies on Ursula’s map will not start to move unless they are baited, damaged, or KO’d. Since this map layout does not lend itself well to any attack + dance + draw back / reposition strategies, your only option is to bait, and the question of the day is “Where?”
Essentially, you have three options: a) the space directly below the bottomost starting space (4), b) the space two spaces directly across from the middle starting space (3), or c) a combination of the two. If you choose option b or c and fail to KO the green cavalry mage, the red cavalier should draw it back and allow Ursula to attack. This can allow you to net an early KO or, barring that, deal some damage that will allow you to easily KO her later.
Preferably, you’ll want to net all three KOs in this turn, although that may not be possible. If you’re missing out on finishing off the dagger user, try the Quick Riposte seal or inherit the 2nd level of the skill onto your chosen baiter (which can be found on a 4 star Subaki). Due to their relatively high RES, KOing Ursula and the green cavalry mage may prove to be more difficult. G and B Tomebreaker skills, Blade weapons, and effective weaponry will prove to be your saviour here and will help you power through.
Bait and Switch
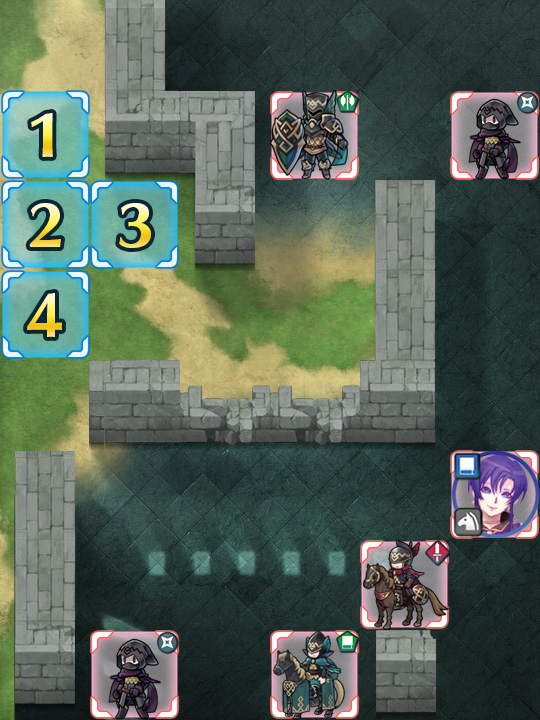
Although the dagger user at the bottom of the map is pretty easy to take care of, the one near the top of the map may prove to be annoying while you’re dealing with more pressing matters. If the chip damage from Savage Blow is proving difficult, try using a dedicated armor / cavalry bait unit at the very top of the starting area. This will keep that dagger user occupied while the rest of your forces are duking it out at the chokepoint, which is located directly across from starting space (3).
Use Dancers
Because of the tight maneuvering quarters of this GHB, dancers serve a valuable role of refreshing your units and allowing them to get some KOs they cannot net outright. Moreover, the narrow corridors allows you to keep your dancers out of danger, and the chip damage the daggers cause with Savage Blow can either allow them to utilize Wings of Mercy to teleport to damaged units or activate Escape Route when their own HP falls.
Death Before Retreat
Retreating too far on this map will not serve you well, given the ranged cavalry units’ extended range. If you bunch your units too close together, you’ll quickly be overwhelmed. Use the chokepoint to your advantage to limit how close enemies can get to your other units. A healer may be useful here, especially if they tote Physic+ -- they’ll be able to heal at-range or provide an assist with a Wrathful attack, if need be.
Be Methodical
The main danger in this GHB is becoming overwhelmed by enemies you can’t handle. Your main indicator of this is the slowly advancing green armor; you’ll want an answer for it by the time it reaches your units. So when you bait, try to kill. If you can’t do that, bring a dancer and use Quick Riposte so you can. The more KOs you’re able to get within one round of combat, the better off you’ll be. For units that hard counter your wall, bring a specific counter to deal with them. Once again, if Usula is giving you trouble, Robin (F) is an excellent choice here.
If At First You Don’t Succeed
As is true of all high-difficulty content, the potential variance in unit builds that Skill Inheritance brought along with the random nature of summoning has resulted in pretty much every single player having different “building blocks” to work with. This, when combined with the high difficulty level of Infernal, may prove frustrating while someone is trying to find the right combination of units and moves. The key thing to keep in mind is that it may take some light skill inheritance, seals, multiple tries of the map, and a few stamina potions for you to find a strategy that works for you. Every single turn you complete gets you one step closer to completing the puzzle. Reading about or watching videos of successful strategies may also help you break through a particularly difficult turn that you can’t complete, or may give you ideas of a new unit to use.
Map Enemies
- Hard
- Lunatic
- Infernal
| HP | ATK | SPD | DEF | RES | |
|---|---|---|---|---|---|
| 49 | 41 | 11 | 32 | 14 | |
| Weapon | Silver Axe | A | |||
| Support | B | Wings of Mercy 2 | |||
| Special | Aegis | C | Threaten Def 3 | ||
| HP | ATK | SPD | DEF | RES | |
|---|---|---|---|---|---|
| 33 | 22 | 30 | 10 | 25 | |
| Weapon | Poison Dagger | A | |||
| Support | Reciprocal Aid | B | Escape Route 3 | ||
| Special | C | Savage Blow 2 | |||
| HP | ATK | SPD | DEF | RES | |
|---|---|---|---|---|---|
| 36 | 38 | 18 | 19 | 23 | |
| Weapon | Silver Sword | A | |||
| Support | Draw Back | B | Obstruct 3 | ||
| Special | Aegis | C | Threaten Spd 2 | ||
| HP | ATK | SPD | DEF | RES | |
|---|---|---|---|---|---|
| 33 | 22 | 30 | 10 | 25 | |
| Weapon | Poison Dagger | A | |||
| Support | Reciprocal Aid | B | Seal Atk 2 | ||
| Special | C | Savage Blow 3 | |||
| HP | ATK | SPD | DEF | RES | |
|---|---|---|---|---|---|
| 37 | 31 | 25 | 14 | 23 | |
| Weapon | Blárwolf+ | A | Death Blow 3 | ||
| Support | B | ||||
| Special | Growing Thunder | C | Threaten Res 3 | ||
| HP | ATK | SPD | DEF | RES | |
|---|---|---|---|---|---|
| 67 | 54 | 16 | 41 | 19 | |
| Weapon | Silver Axe+ | A | |||
| Support | B | Wings of Mercy 3 | |||
| Special | Aegis | C | Threaten Def 3 | ||
| HP | ATK | SPD | DEF | RES | |
|---|---|---|---|---|---|
| 44 | 33 | 39 | 14 | 32 | |
| Weapon | Poison Dagger+ | A | |||
| Support | Reciprocal Aid | B | Escape Route 3 | ||
| Special | C | Savage Blow 3 | |||
| HP | ATK | SPD | DEF | RES | |
|---|---|---|---|---|---|
| 49 | 50 | 25 | 26 | 30 | |
| Weapon | Silver Sword+ | A | |||
| Support | Draw Back | B | Obstruct 3 | ||
| Special | Aegis | C | Threaten Spd 3 | ||
| HP | ATK | SPD | DEF | RES | |
|---|---|---|---|---|---|
| 44 | 33 | 39 | 14 | 32 | |
| Weapon | Poison Dagger+ | A | |||
| Support | Reciprocal Aid | B | Seal Atk 3 | ||
| Special | C | Savage Blow 3 | |||
| HP | ATK | SPD | DEF | RES | |
|---|---|---|---|---|---|
| 50 | 39 | 32 | 19 | 30 | |
| Weapon | Blárwolf+ | A | Death Blow 3 | ||
| Support | B | ||||
| Special | Growing Thunder | C | Threaten Res 3 | ||
| HP | ATK | SPD | DEF | RES | |
|---|---|---|---|---|---|
| 78 | 58 | 18 | 45 | 21 | |
| Weapon | Silver Axe+ | A | Defiant Atk 3 | ||
| Support | B | Wings of Mercy 3 | |||
| Special | Aegis | C | Threaten Def 3 | ||
| HP | ATK | SPD | DEF | RES | |
|---|---|---|---|---|---|
| 50 | 39 | 46 | 18 | 38 | |
| Weapon | Poison Dagger+ | A | Fury 3 | ||
| Support | Reciprocal Aid | B | Escape Route 3 | ||
| Special | C | Savage Blow 3 | |||
| HP | ATK | SPD | DEF | RES | |
|---|---|---|---|---|---|
| 57 | 53 | 27 | 28 | 33 | |
| Weapon | Silver Sword+ | A | Defiant Def 3 | ||
| Support | Draw Back | B | Obstruct 3 | ||
| Special | Aegis | C | Goad Cavalry | ||
| HP | ATK | SPD | DEF | RES | |
|---|---|---|---|---|---|
| 50 | 36 | 43 | 15 | 35 | |
| Weapon | Poison Dagger+ | A | Death Blow 3 | ||
| Support | Reciprocal Aid | B | Seal Atk 3 | ||
| Special | C | Savage Blow 3 | |||
| HP | ATK | SPD | DEF | RES | |
|---|---|---|---|---|---|
| 57 | 42 | 35 | 21 | 33 | |
| Weapon | Blárwolf+ | A | Death Blow 3 | ||
| Support | B | Guard 3 | |||
| Special | Growing Thunder | C | Threaten Res 3 | ||
| HP | ATK | SPD | DEF | RES | |
|---|---|---|---|---|---|
| 46 | 49 | 28 | 19 | 38 | |
| Weapon | Gronnwolf+ | A | Mirror Strike 2 | ||
| Support | B | Seal Res 3 | |||
| Special | Growing Wind | C | Ward Cavalry | ||
User Submitted Teams
https://www.youtube.com/watch?v=inkcDqXeeYg
Bless your soul, Legendary Hector, for preserving my sanity on this map.
This is a team I used for the Flier mission.
Reqs:
* A unit with Flier Formation, Goad Fliers, and if necessary, a Spur Atk seal. Elincia fills this role.
* Anyone with Fortify Fliers and possibly a Drive Atk seal. They can even be level 1, since they won't be doing much. Cordelia fills this role.
* A Ranged flier who can survive the Poison dagger; as it's effective against Infantry, this won't be hard. Needs QR or Daggerbreaker and must one round the dagger. Originally I used Morgan, but WoF Hinoka with Atk Smoke worked a lot better. Alternatively, a DC unit can be used; they'll have an easier time with the dagger as they'll be targeting its Def.
* DC Myrrh with QR, DD seal, and neutral or better Def IV. Alternatively you could use a green tome flier. May need Goad Fliers, and must one round both magic users.
Turn one: Position the last two units so they can lure the enemy. Don't break any walls. The green must lure Ursula, while the other must lure the dagger. Place the first unit next to the dagger baiting unit. The dagger and both tomes will SD during enemy phase, then the sword cav will break the wall.
Turn two: This is where you need Flier Guidance. Have the unit take out the sword cav. This is where you will also wall the axe armor, preferably with a non-blue close unit. You are allowed to attack the axe armor with a ranged unit, even KO them. The dagger will then attack. Once turn three hits--unless if the dagger and armor SD--clean up.
Dorcas in front of the the first breakable wall, Black Night Behind him. Dorc kills Mage and Ursala... Pull him out, Black Night fills the gap. After enemy round Elise finishes off the rest
The first thing:Fallen Robin can distract and kill the thief,so the units will start to move.Alfonse can do something with the knight and the Green Mage only whit Wo Dao(Boosted or not),Brave Sword or,if you wanna Try hard, a Rubin Sword.Matilda can easily kill the two horses.Olivia can be used over all the units for make them counter or finish the other enemies


