


Event History
| Start | End |
|---|---|
Map
- Normal
- Infernal
Grand Hero Battle: Gharnef
Gharnef descends from the shadows, showing us what someone with the moniker of the Dark Pontifex can do! Featuring Gharnef himself along with his unique tome, Imhullu, this reinforcement-laden battle will no doubt prove to be challenging -- it will likely take time and patience to find a successful strategy, so don’t lose heart if you find this map to be on the more difficult side. Don’t be afraid to use what works, and experimentation is key; the space where you attack from or how you position your units can make all the difference.
Who to Use
As is generally true of Grand Hero Battles, the individual units used is very important as they will primarily inform your strategy. There are a few routes you can take depending on what units are available to you, and, of course, adjustment based on the units you possess is always a possibility.
Tanks
The two entryways on this map make for easy choices of places to put a baiter. On the right, you’ll want to go blue in order to better tank the red flier and survive the blue mage, while on the left, a red unit is a better choice in order to take neutral damage from the red dragon and better tank the green flier. Either way, any color tank can be useful to block off foes and establish chokepoints.
Armors such as Zelgius, Winter Tharja, and Halloween Myrrh able to hit hard very upon attacking and counterattacking, especially if they’re making use of Bold Fighter, Quick Riposte, or Vengeful Fighter. Brave Hector, Fallen Hardin, and Legendary Tiki can all counterattack-at range, and Black Knight is a powerful F2P option due to his powerful exclusive Special, Black Luna.
Infantry F2P options really are functionally limited to Legendary Ike, whose native Warding Breath grants him accelerated cooldown and extra Resistance, and Fjorm, who can easily tank magic damage due to her exclusive Special, Ice Mirror. Calvary tanks are similarly limited -- Xander and Camus may struggle, but may survive if under the effects of Ward Cavalry.
Dragons are also very strong tanks, especially when they’re equipped with Lightning Breath (or another Breath and Distant Counter, if you’re feeling fancy). Nowi, Corrin (f), Kana (m), Adrift Corrin (m), Adrift Corrin (f), Fae, Myrrh, Kana (f), Adult Tiki, Young Tiki, Summer Young Tiki, and Legendary Robin will all likely be able to do the job and do it well, but do note that Myrrh, both Kanas, both Corrins, and Summer Young Tiki are particularly wanting of Lightning Breath / Distant Counter. They are also incredibly useful due to their damage-seeking effect against ranged foes, which is precisely the kind of foe they will need to tank.
Strikers
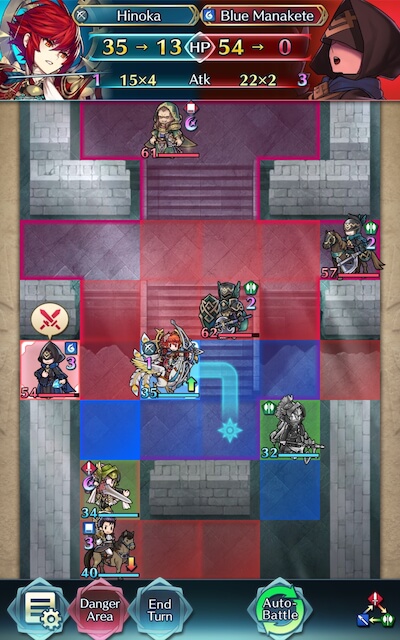
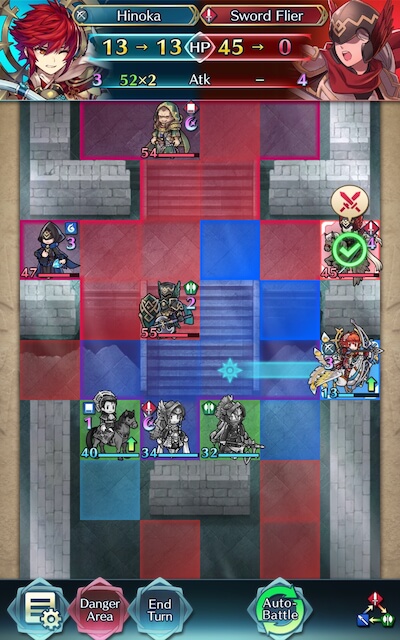
The presence of quite a few fliers on this map means that a dedicated bow-wielding striker is a good choice -- especially if they make use of a Brave Bow. Their ability to overpower most foes and deal hefty damage with a timely Special activation means they’ll serve you well in battling through the throngs of enemies you’ll be facing. Brave Lyn, WF Hinoka, Halloween Jakob, Summer Takumi, and Klein are potential strikers you may want to use, with a special mention going to Brave Lyn given her potential F2P status. Really, any Brave Bow archer should do the trick though. Colored archers like Legendary Lucina, Legendary Lyn, and Halloween Niles may perform well, but will have to watch out for the Weapons Triangle; which is a distinct disadvantage when compared to their colorless counterparts.
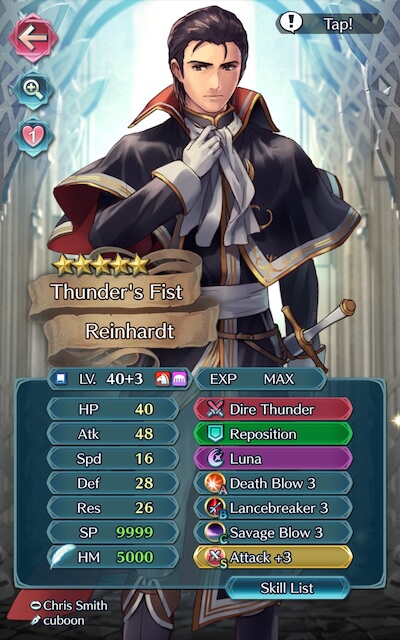
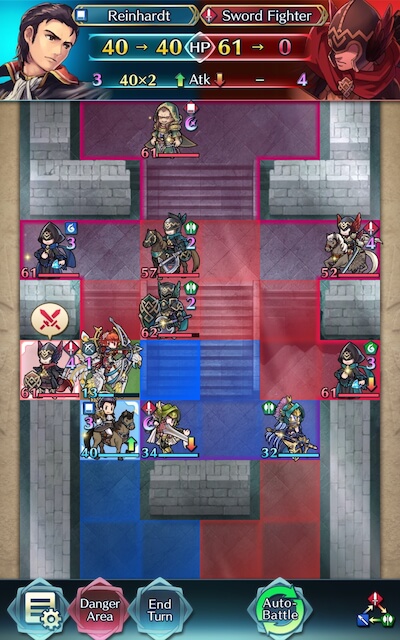
Alternatively, melee Brave users are able to hit foes twice without retaliation, and may even quad hit if they outspeed an enemy. Cherche, Cordelia, and Elincia are all great melee Brave users who can make excellent use of class-specific buffs, and when equipped with Hit and Run or Drag Back they are able to retreat once attacking. WT Reinhardt may also prove useful due to his weapon granting him follow-ups regardless of phase.
Brave and Blade tome wielders can also serve to be useful if your team composition provides them with the appropriate buffs, though other mages can also be powerful strikers. Lilina, Tharja, Reinhardt, Tailtiu, Ishtar, Linde, Ophelia, WT Olwen, Lewyn, SF Nino, and Nino are potential options here, especially if they are equipped with a Breaker skill to add to their coverage.
Refreshers
Refreshers help provide support, may even have a decent offensive presence themselves, and can usually tank a hit or two, if need be. Any of them will work, since they really shouldn’t be battling too many foes anyways.
Healers
Due to every healer having access to the Wrathful Staff refinement, they can serve as incredibly potent colorless pseudo-mages -- who can heal to boot! Brave Veronica is particularly notable due to her excellent exclusive weapon that prevents counterattacks (among other things), access to the Wrathful Staff Skill, and great support unity, but other healers like Genny, Loki, Elise, Maribelle, Ethlyn, Wrys, and Lissa are potential additions to a team that may serve you well.
Supporters
As units that offer extra utility, supporters typically fit one of the above roles while also providing some sort of assist to your other units. Buffers, debuffers, and drivers all can play a valuable role in your team composition by making use of their incredible utility.
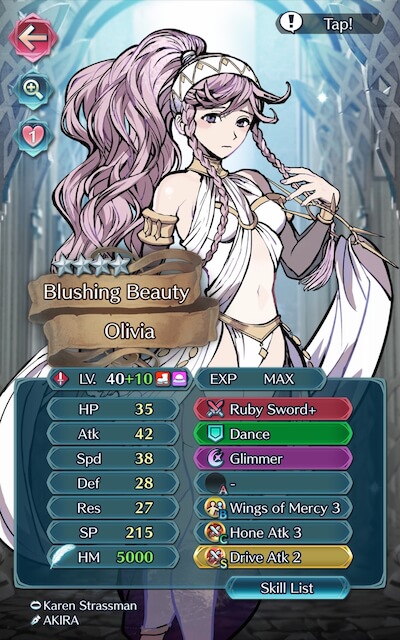
Because of Skill Inheritance, any unit can be a buffer with enough investment -- many Drives, Spurs, Hones, Fortifies, and Dual Rallies are readily accessible on 4 star units, and can be further stacked with seals for maximum coverage. Tactics seals are also easily accessible and provide a hefty +6 boost to one stat. Notable options who natively provide buffs through their exclusive weapons include YT Olivia, Performing Azura, Brave Veronica, Eirika, and Ephraim, while Brave Lucina, New Year Corrin, and New Year Azura are able to stack Drives through theirs.
That isn’t to say that offensive juggernauts can’t provide team support, though -- class specific buffs (like Hone Cavalry or Fortify Fliers) are easily accessible and incredibly potent. Considering that most offensive units don’t make heavy use of their C-slot Skill anyways, they can inherit these Skills to boost the team’s firepower.
Some units are even able to support both themselves or their allies at the same time. Legendary Tiki, Helbindi, and Brave Veronica are examples of units who buff both themselves and their allies when fulfilling certain conditions.
Debuffers can make use of weaponry, Skills, or Seals to help de-fang the enemy team and make them significantly less threatening. Ploys, Chills, and Smokes especially are wide-reaching and potent debuffs that can easily turn the tide of the battle at a pivotal moment. Lilina and Soren have a Chill effect on their refined weapons, while Morgan (m) has a unique buff/debuff dual effect on his. Dagger units also inflict debuffs when they attack, which can be very useful to cut through an Infernal foes’ inflated HP.
Strategy
Strategizing for this Grand Hero Battle may be a bit complicated due to the presence of reinforcements. While it can be difficult to exactly predict what will happen due to IV / Merge variance, here’s some general tips to get you started.
Ready to Rumble?
If you’re a dedicated reader of these guides, you’ll know by now that most of these maps are won or lost before they even start. While it may be tempting to jump right in, knowing (and loving!) your enemy will help you not only choose your units, but also figure out where to begin.
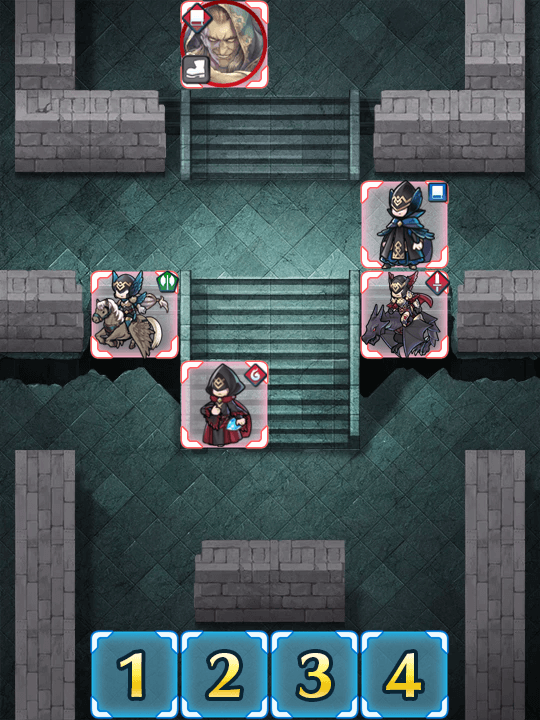
As per usual, there’s a few things to look out for here. To the right, you’ll see a sword flier and a blue mage, with an axe armor just hanging out -- surely, this shouldn’t be too difficult, no? You couldn’t be blamed for thinking that… aside from the fact that since the sword flier carries Guidance, the mage and the armor have extended range. Oof. Also further complicating matters is the mage possessing Odd Atk Wave as a C-Skill as well as a Blade tome as a weapon -- effectively granting them +12 Attack on odd-numbered turns. This can really throw a wrench into your plans if you’re trying to bait them, so if you want to KO them in Enemy Phase of turn 1, be prepared for things to not go exactly according to plan.
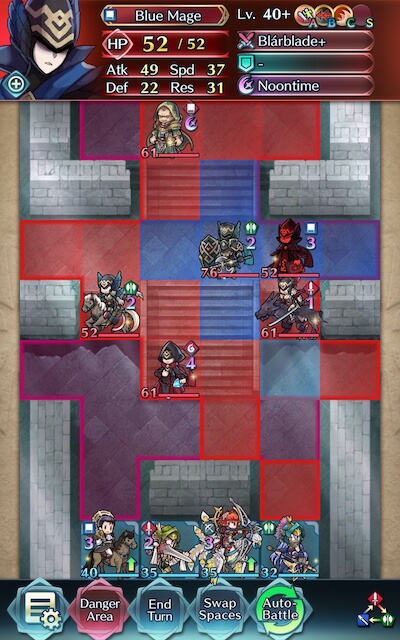
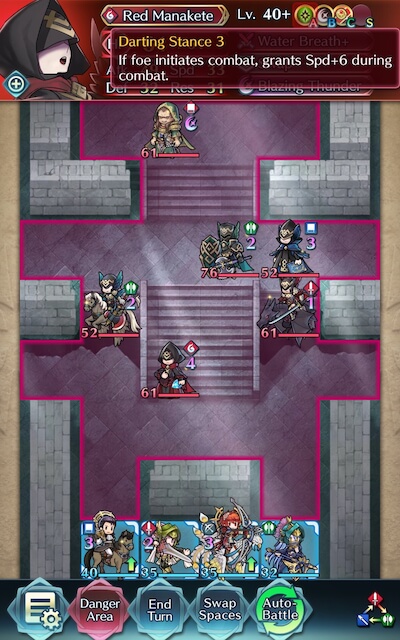
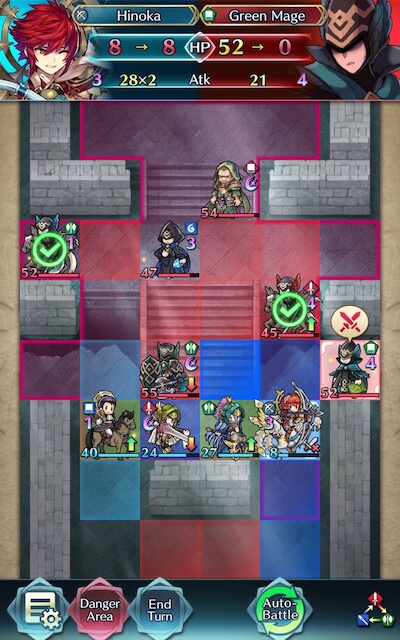
The left is a bit less complicated, though there are still a few tricky Skills to deal with. While the flier is not particularly of note, the red dragon possesses Darting Stance -- effectively boosting their Speed up to 39 when they’re attacked, meaning you’ll need 44 Speed or more to naturally double them -- Guard, and Water Breath, which boosts their mixed defenses when you initiate. If you can, KOing this foe outright will save your patience in the long run; the last thing you want is for them to proc a Blazing Thunder.
#Savage
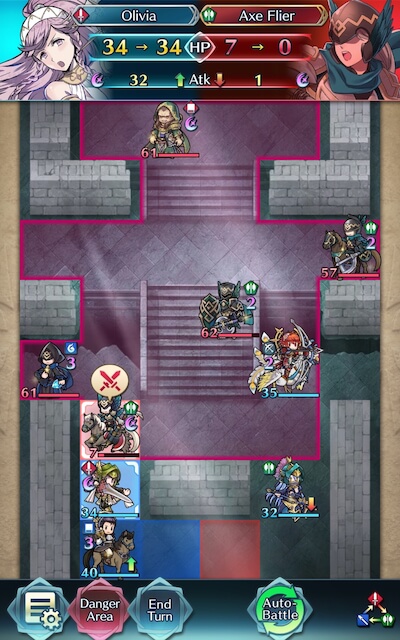
Because so many of the foes on this map feature inflated HP, you may want to consider making use of Savage Blow in both its Skill and Seal form. Double Savage Blow will take a hefty 14 damage out of in-range foes whenever you attack, but even the regular 7 damage that one Savage Blow deals can make the difference when you’re trying to net a tricky KO. If you don’t have a clear answer to the axe armor, this is even more true -- its low movement combined with your superior mobility (assuming you’re using infantry, cavalry, or fliers) means that you can chip down its HP without even having to engage it in combat.
The Most Obvious Solution...
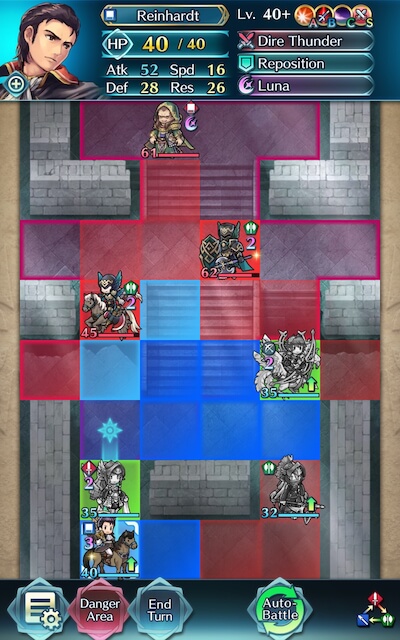
Is not always the best one. Even though KOing an enemy unit may seem like a simple numbers game, there’s other factors to consider -- positioning, cooldown timing, and where reinforcements are going to spawn are particularly notable examples.
Olivia is more than able to KO this flier, but since Reinhardt struggles with the blue dragon, going this route might not be the best idea.

Trial… and Trial… and Trial...
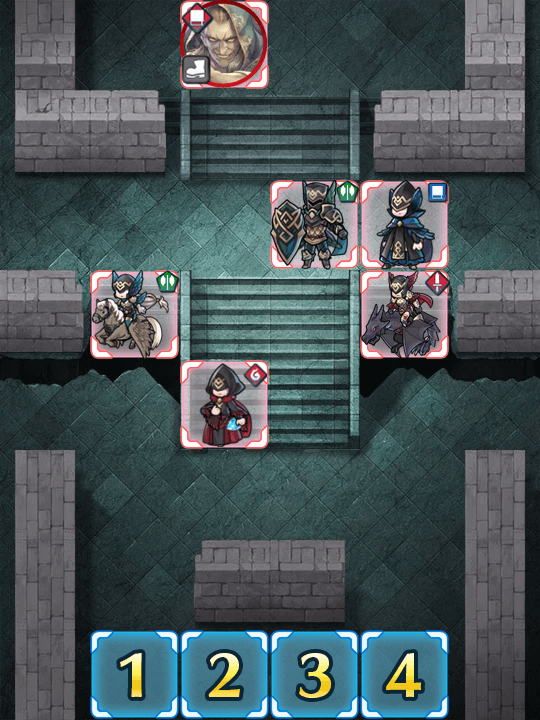
Part of the reason reinforcement maps are so challenging is definitely because it can be difficult to anticipate where and when reinforcements will appear -- and the best way to gain this knowledge is really through trial and error. Once you become accustomed to the foes that appear in the small gaps between walls that overlooks the upper level of this map, you can try to anticipate foes appearing to cut them off at the pass.
Position Perfect
Once the end is in sight, be sure to not lose your nerve. Attacking recklessly can easily spell out defeat, so it’ll be important to take things slow and steady, anticipating future moves so you can finish off your foes in one decisive blow.

If At First You Don’t Succeed
Don’t be fooled by video walkthroughs of any Grand Hero Battle that you watch -- it’s very rare for anyone to beat high-difficulty content (or record a video of themselves doing so!) on their first try. Additionally, the potential variance in unit builds that Skill Inheritance brought along with the random nature of summoning has resulted in pretty much every single summoner having different building blocks to work with. This, when combined with the high difficulty level of Infernal, may prove frustrating while someone is trying to find the right combination of units and moves. The key thing to keep in mind is that it may take some light Skill Inheritance and seal shuffling as well as multiple tries of the map to find a strategy that works for you. Every single turn you complete gets you one step closer to completing the puzzle. Finally, reading about or watching videos of successful strategies may also help you break through a particularly difficult turn that you can’t complete, or may give you ideas of a new unit to use.
Map Enemies
- Hard
- Lunatic
- Infernal
| HP | ATK | SPD | DEF | RES | |
|---|---|---|---|---|---|
| 39 | 37 | 26 | 19 | 20 | |
| Weapon | Imhullu | A | Mirror Stance 2 | ||
| Support | B | Chill Atk 3 | |||
| Special | Ignis | C | Res Ploy 3 | ||
| HP | ATK | SPD | DEF | RES | |
|---|---|---|---|---|---|
| 33 | 31 | 29 | 17 | 30 | |
| Weapon | Wo Gùn | A | Fury 2 | ||
| Support | B | Obstruct 2 | |||
| Special | Moonbow | C | Drive Res 2 | ||
| HP | ATK | SPD | DEF | RES | |
|---|---|---|---|---|---|
| 38 | 34 | 23 | 21 | 20 | |
| Weapon | Water Breath | A | Darting Stance 2 | ||
| Support | Swap | B | Guard 2 | ||
| Special | Blazing Thunder | C | Drive Def 2 | ||
| HP | ATK | SPD | DEF | RES | |
|---|---|---|---|---|---|
| 39 | 37 | 20 | 28 | 13 | |
| Weapon | Slaying Edge | A | HP/Spd 1 | ||
| Support | Draw Back | B | Cancel Affinity 3 | ||
| Special | Glimmer | C | Guidance 2 | ||
| HP | ATK | SPD | DEF | RES | |
|---|---|---|---|---|---|
| 33 | 34 | 26 | 14 | 20 | |
| Weapon | Blárblade | A | Atk/Spd 2 | ||
| Support | B | Desperation 2 | |||
| Special | Noontime | C | Odd Atk Wave 2 | ||
| HP | ATK | SPD | DEF | RES | |
|---|---|---|---|---|---|
| 53 | 44 | 34 | 27 | 26 | |
| Weapon | Imhullu | A | Mirror Stance 2 | ||
| Support | B | Chill Atk 3 | |||
| Special | Ignis | C | Res Ploy 3 | ||
| HP | ATK | SPD | DEF | RES | |
|---|---|---|---|---|---|
| 44 | 44 | 38 | 24 | 39 | |
| Weapon | Wo Gùn+ | A | Fury 3 | ||
| Support | B | Obstruct 3 | |||
| Special | Moonbow | C | Drive Res 2 | ||
| HP | ATK | SPD | DEF | RES | |
|---|---|---|---|---|---|
| 52 | 46 | 30 | 29 | 28 | |
| Weapon | Water Breath+ | A | Darting Stance 3 | ||
| Support | Swap | B | Guard 3 | ||
| Special | Blazing Thunder | C | Drive Def 2 | ||
| HP | ATK | SPD | DEF | RES | |
|---|---|---|---|---|---|
| 53 | 49 | 29 | 36 | 19 | |
| Weapon | Slaying Edge+ | A | HP/Spd 2 | ||
| Support | Draw Back | B | Cancel Affinity 3 | ||
| Special | Glimmer | C | Guidance 3 | ||
| HP | ATK | SPD | DEF | RES | |
|---|---|---|---|---|---|
| 44 | 46 | 34 | 20 | 28 | |
| Weapon | Blárblade+ | A | Atk/Spd 2 | ||
| Support | B | Desperation 3 | |||
| Special | Noontime | C | Odd Atk Wave 3 | ||
| HP | ATK | SPD | DEF | RES | |
|---|---|---|---|---|---|
| 61 | 47 | 37 | 30 | 28 | |
| Weapon | Imhullu | A | Mirror Stance 2 | ||
| Support | B | Chill Atk 3 | |||
| Special | Ignis | C | Res Ploy 3 | ||
| HP | ATK | SPD | DEF | RES | |
|---|---|---|---|---|---|
| 52 | 47 | 41 | 26 | 42 | |
| Weapon | Wo Gùn | A | Fury 3 | ||
| Support | B | Obstruct 3 | |||
| Special | Moonbow | C | Drive Res 2 | ||
| HP | ATK | SPD | DEF | RES | |
|---|---|---|---|---|---|
| 61 | 49 | 33 | 32 | 31 | |
| Weapon | Water Breath+ | A | Darting Stance 3 | ||
| Support | Swap | B | Guard 3 | ||
| Special | Blazing Thunder | C | Drive Def 2 | ||
| HP | ATK | SPD | DEF | RES | |
|---|---|---|---|---|---|
| 61 | 52 | 32 | 39 | 21 | |
| Weapon | Slaying Edge+ | A | HP/Spd 2 | ||
| Support | Draw Back | B | Cancel Affinity 3 | ||
| Special | Glimmer | C | Guidance 3 | ||
| HP | ATK | SPD | DEF | RES | |
|---|---|---|---|---|---|
| 52 | 49 | 37 | 22 | 31 | |
| Weapon | Blárblade | A | Atk/Spd 2 | ||
| Support | B | Desperation 3 | |||
| Special | Noontime | C | Odd Atk Wave 3 | ||
| HP | ATK | SPD | DEF | RES | |
|---|---|---|---|---|---|
| 76 | 54 | 17 | 50 | 27 | |
| Weapon | Slaying Axe+ | A | Fort. Def/Res 3 | ||
| Support | Harsh Command | B | Special Fighter 3 | ||
| Special | Bonfire | C | Distant Guard 3 | ||
User Submitted Teams
https://youtu.be/Dy5rUMP4eKs
Legendary Marth: 5* +DEF -RES
Reinhardt: 5* +ATK -SPD
Brave Veronica: 5* Neutral
Olivia: 4*+4 Neutral
https://twitter.com/13s_hion/status/1066053781081767937?s=21
Quite an easy map. Many greens and manaketes, so Marth shines here. Veronica’s buffs will help a lot too. She will need a +3 speed to double though. The only real problem I had was the blue mage but once he’s dead the map is just super easy.
Equip Ike with Quick Riposte in B slot, seal Atk/Def Bond and you’re good to go. With his Randiant Aether, Veronica doesn’t even need to heal him. Reinhardt can pick up any KOs that Ike can’t
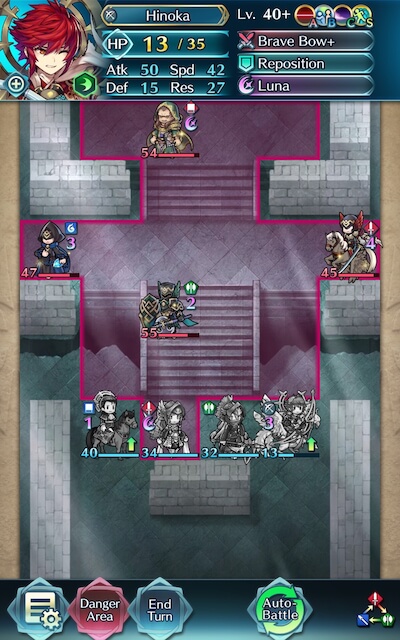
- Hinoka (WF) - +0, +Atk -Def w/ Brave Bow+, Luna. LaD 3, and Savage Blow 3 for chip dmg. Other BB+ users will work as well (B!Lyn is a good one).
- Azura (NY) - +Spd -HP w/ TA and Hone Fliers, if you don't plan to use Hinoka / any other flier striker, plan your buffs accordingly with Tactics, Atk Wave skills, or a regular hone+drive combination.
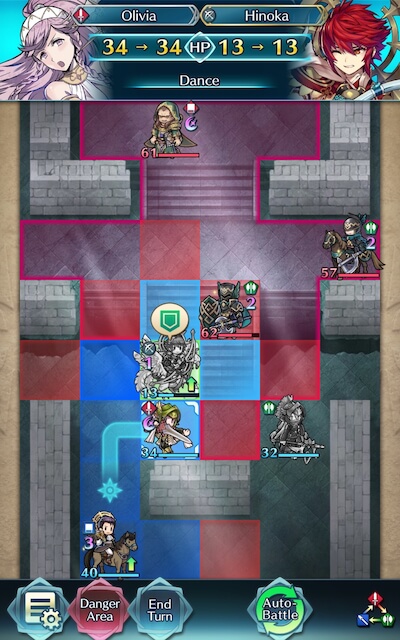
- Lene - +Spd -HP w/ Safeguard (+Spd), Fury, Gale Dance and Hone Atk + Drive Atk (S). Can be substituted with other sword dancers (Olivia, the holy F2P dancer deity before Lolizura came out, is a good choice. Her flier version works as well). I had to put Pavise so she doesn't get yeeted by that first red dragon.
- Lilina - +6, +Atk -Def. You can basically use any red (or blue mages) with a good AOE skill (and if possible, CD reduction skills like HB/FB). The AOEs will be used during the mid-section when the enemies converge (Growing Wind and Flame is recommended). My Lilina is invested to a waifu tier (SS, Forblaze (+Eff), DB4 + Special Spiral 3, Odd Atk Wave 3, and HB3 on seal), but you don't really need to do the same. As long as your mage of your choice can hit hard, he/she will work wonders. My top picks would be Lilina (Even a regular DB3 Swordbreaker would be ok), Reinhardt for your best F2P option, regular Micaiah with atk investment, Ishtar, and Celica. Green mages like Nino, Sonya, and Olwen, would work, especially against one particular run-ender blue dragon on the left side later on, but needs proper positioning, as they crumble like paper in the face of the red units of this map.
First of all, try to manage your left side with the mage you brought. Depending on who you brought, you should choose who to strike first. Reds can hit the green axe flier, get danced, and step back, while Blues can give your dancer a better time by KO-ing the red dragon. The bow starts on the right, kills the sword flier and steps back. If it's possible, strike the blue mage as well, but don't push it if it's relatively unsafe for your bow-supporting dancer, as you could get sandwiched between the new dragon reinforcement.
The blue dragon that comes next turn on the left is the most troublesome one; try tanking it with your sword dancer and hope for the best, but if you can't, try to hit multiple times with both your bow and the mage, danced. Use your AOE special if it's also ready.
The rest should be ok, as long as you keep going with these in mind :
- The armor Axe should be left for the last, even better if you could use it as a chip damage-taker for the rest of your enemies. If you brought a blue mage with you, try to cripple it first slowly, then finish it with an AOE special.
- Gharnef's Imhullu will give you a Thokk-kind of buff, so watch out for that. If you're confident in your bow/mage's magic tanking abilites, then try baiting him, but it's generally not recommended, because that ignis is kinda b******t.
- Make sure your dancers are not in an awkward positions. Sometimes retreating far back is a good option to reposition your units. Make use of B skills like Wings of Mercy or Escape route.
Make sure to improvise as needed. Now go ahead and rekt this guy. My Lolilina shall wish you luck.


