


Event History
| Start | End |
|---|---|
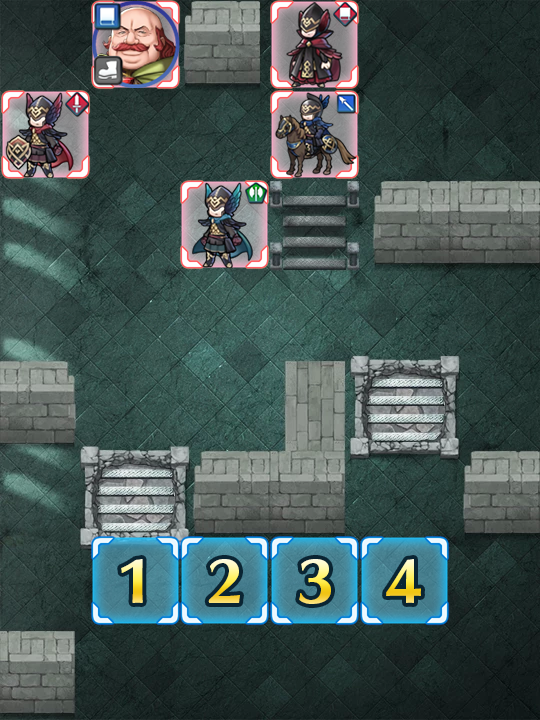
Map
- Normal
- Infernal

Oliver: Admirer of Beauty
Unsightly ruffians beware -- Oliver, the champion of beauty, comes onto the stage in a Grand Hero Battle re-run! Featuring no reinforcements, easily usable Defense Tiles, and not a particularly threatening motley crew of foes, Oliver and his brigand shouldn’t give you too much trouble, but there are still some skills to watch out for; Drive Spd on the lance cavalier, Cancel Affinity on the infantry sword, and Lightning Breath on the green dragon can still serve to make your day a little worse.
Also of note is that fact that Oliver has his Special charged, and it’s an AOE Special at that. Although he’s far from the strongest unit featured in an Infernal map, Blazing Light can chip down your units’ HP a surprising amount if it procs and you’re not expecting it.
Who to Choose
As is generally true of Grand Hero Battles, the individual units used is very important as they will primarily inform a strategy. There are a few routes one can take depending on what units are personally available, and, of course, adjustment based on the units one possesses is always a possibility.
Baiters
This is one of those maps which won’t start unless you strike or bait -- though trenches can complicate using cavalry tanks somewhat, these obstacles aren’t that hard to navigate around, thankfully. If you do decide to go with the baiting route, though, be aware that the sword infantry is carrying Cancel Affinity, meaning that any blue baiter you decide to use should unequip Triangle Adept if that is what they normally run.
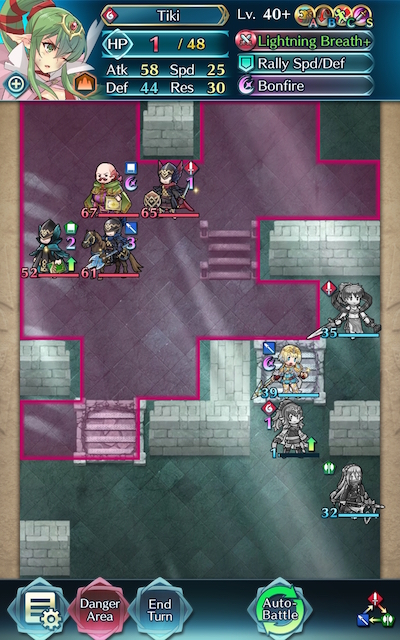
Since baiting at the further right passage requires tanking the green dragon and red mage, you’re likely going to want to go red here to ensure they always have the Weapons Triangle Advantage or are receiving neutral damage. Black Knight and Zelgius are amazing armored options that can take advantage of class-specific buffs, but may find it hard to retreat due to their limited movement. Xander and Sigurd can similarly take advantage of calvary buffs -- though Sigurd cannot attack the mage unless he has inherited Distant Counter, he still takes greatly reduced damage from them. Legendary Ryoma can also utilize flier buffs and can counterattack at-range. Adult Tiki and Young Tiki can use damage-seeking Lightning Breath to hit hard, and can also use dragon buffs. Other choices include Legendary Ike, Ike, and Ryoma.
Starting at the left necessitates tanking the green dragon as well as a Blazing Light proc from Oliver, which may be difficult. If that’s what you wish to do, though, go green. Hector, LA Hector, Fae, Myrrh, Female Kana, and Fallen Robin may work here.
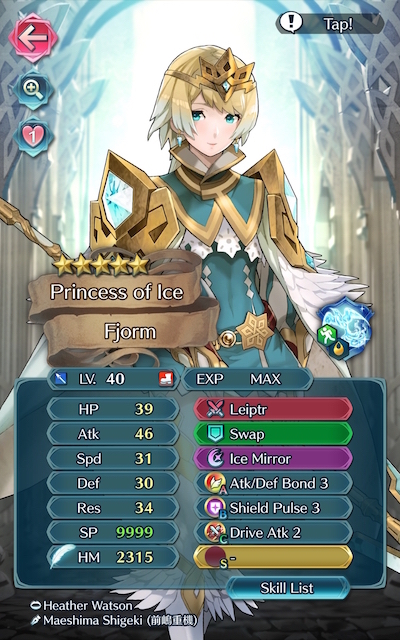
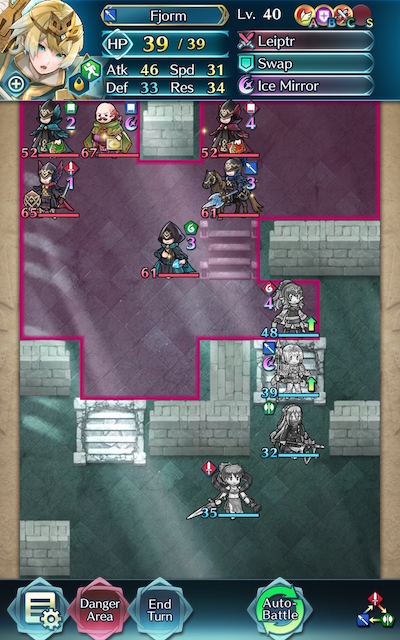
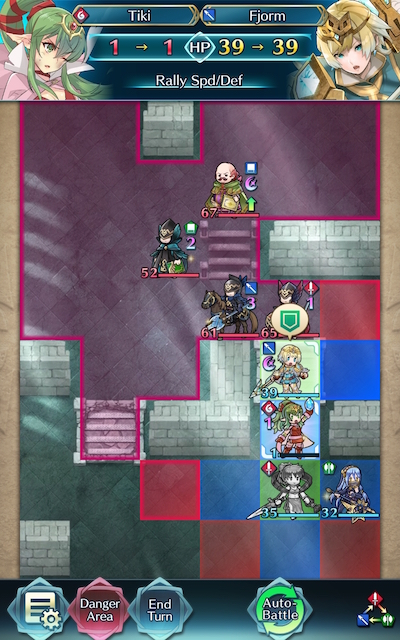
You may also want to use the Defense Tiles to tank the remaining enemies once the map has started. Armors such as Fallen Hardin and Distant Counter Effie are able to hit hard very upon counterattacking, especially if they’re making use of Quick Riposte or Vengeful Fighter. Camus performs particularly well with buffs. Nowi, Female Corrin, and Male Kana all boast decent mixed defenses. Legendary Robin is also a potential choice, but may struggle due to her lack of color advantage. An amazing F2P option is Fjorm, who is able to tank the mages with her high Resistance and her exclusive Special, Ice Mirror.
Strikers
Alternatively, you may want to start this map with a strike + retreat method. With a powerful striker and a dancer, you can potentially KO the green dragon in the first turn, then quickly get all your units to safety.
Archers are powerful strikers that can either finish off foes on their own or provide an assist. In particular, however, Brave Bow users can be incredibly potent on this map due to their ability to overpower and finish off any foes your tanks may otherwise struggle with. New Year Corrin, Brave Lyn, WF Hinoka, Bridal Cordelia, Klein, and Setsuna are potential strikers you may want to use, with a special mention going to New Year Corrin and Brave Lyn given their F2P status.
Alternatively, melee Brave users are able to hit foes twice without retaliation, and may even quad hit if they outspeed an enemy. Cherche, Cordelia, Hinoka, Elincia, and WT Reinhardt are all great Brave users who can make excellent use of class-specific buffs. Finn is a great F2P unit who would work particularly well in a cavalry team.
Brave and Blade tome wielders can also serve to be useful if your team composition provides them with the appropriate buffs, though speedy mages can also be effective strikers. Tharja, Reinhardt, Tailtiu, Linde, Ishtar, Nino, SF Nino, and WT Olwen are potential options here, especially if they are equipped with a Breaker skill to add to their coverage and are accompanied by a buffbot like Eirika or Ephraim.
Refreshers
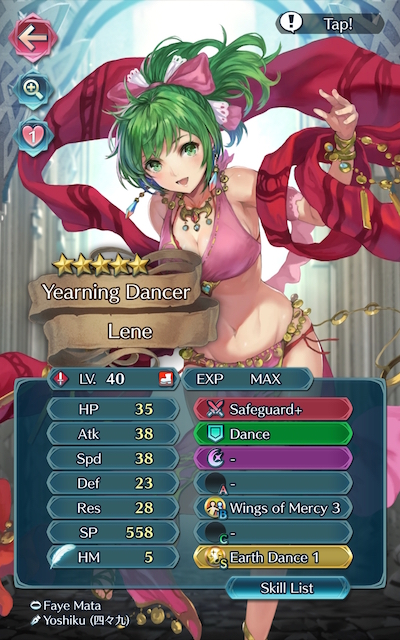
Dancers and Singers help provide support, may even have a decent offensive presence themselves, and can usually tank a hit or two, if need be. Lene, Olivia, Performing Olivia, Performing Inigo, Performing Shigure, Performing Azura, Azura, New Year Azura, Bridal Ninian, Ninian all give the refreshment that units need while also possessing the ability to provide an assist to KO an enemy.
Healers
While not generally a great choice over units who can deal heavy damage or refreshers, Healers can be incredibly useful in this Grand Hero Battle due to their ability to provide valuable healing to your tanks. Genny, Priscilla, Elise, Nanna, Wrys, and Lissa are potential additions to a team that may serve you well on this map.
Strategy
Strategizing for this Grand Hero Battle shouldn’t generally give you too much trouble after some practice due to the absence of reinforcements. While it can be difficult to exactly predict what will happen due to IV / Merge variance, here’s some general tips to get you started.
Boldly Baiting
So you’ve chosen to bait -- where should you start? The right passage comes more highly recommended, as the foes you’ll have to withstand here do not have a charged Special, unlike the proc of Raging Light you’ll have to tank from Oliver on the left. If you do start from the left passage, though, make sure to go green -- the dragon isn’t that speedy, and you’ll need the weapons triangle on your side to survive the onslaught.
Dangerous Drives
Be wary of the blue cavalry lancer -- they carry Drive Spd, which can cause you to miss out on some important follow-ups if you’re not careful. Thankfully, it’s not as if use of Drives is limited to your foes; you can use them as well.
Try to keep an eye on your positioning in order to use all the buffs you have available to your advantage. Drives have less stringent positioning requirements as they’re effective to allies within 2 spaces, but Spurs are very easily accessible. Either one of these skill families can grant your unit the few extra points of damage they need to net a KO, or help them survive an attack they’d be KO’d by otherwise.
Mercy! Have Mercy!
Anyone who reads these guides regularly likely knows about the incredible utility Wings of Mercy offers refreshers on Infernal maps, and this map is no different than the other ones. Escape Route can also prove to be an understatedly useful skill for Grand Hero and Bound Hero Battles, allowing your heavily damaged units to retreat all the way across the map -- assuming one of their allies are there.
Delightful Defense
Once you’ve gotten the map started, you’ve gotten through the worst part. From here, you can set up a tanky unit on a Defense Tile -- preferably one that can counterattack regardless of range -- and laugh your way to a four star copy of Oliver.
Healer support can be key here, depending on the color of your tank. Blue tanks with decent Resistance shouldn’t struggle too much (even with the green mage) unless they’re carrying Triangle Adept, but if you don’t need an additional refresher, being able to restore HP is rarely -- if ever -- a bad thing.
Rally Resting
Assuming you’re not asleep already, Rallies can serve to patch up any and all of your tank’s potential weaknesses. None of the foes on this map are particularly speedy, so units with middling Speed can net some follow-ups (or deny follow-ups being performed on them) with an extra Speed boost. Dual Rallies are an excellent choice here, boosting two stats in exchange for the buff being +3 instead of +4.
If At First You Don’t Succeed
Don’t be fooled by video walkthroughs of any Grand Hero Battle that you watch -- it’s very rare for anyone to beat high-difficulty content (or record a video of themselves doing so!) on their first try. Additionally, the potential variance in unit builds that Skill Inheritance brought along with the random nature of summoning has resulted in pretty much every single summoner having different “building blocks” to work with. This, when combined with the high difficulty level of Infernal, may prove frustrating while someone is trying to find the right combination of units and moves. The key thing to keep in mind is that it may take some light Skill Inheritance and Seal shuffling as well as multiple tries of the map to find a strategy that works for you. Every single turn you complete gets you one step closer to completing the puzzle. Finally, reading about or watching videos of successful strategies may also help you break through a particularly difficult turn that you can’t complete, or may give you ideas of a new unit to use.
Map Enemies
- Hard
- Lunatic
- Infernal
| HP | ATK | SPD | DEF | RES | |
|---|---|---|---|---|---|
| 42 | 37 | 13 | 17 | 26 | |
| Weapon | Shine+ | A | Mirror Strike 2 | ||
| Support | B | ||||
| Special | Blazing Light | C | Atk Ploy 3 | ||
| HP | ATK | SPD | DEF | RES | |
|---|---|---|---|---|---|
| 33 | 29 | 24 | 14 | 20 | |
| Weapon | Rauðrowl | A | Atk/Res Bond 3 | ||
| Support | B | Swordbreaker 2 | |||
| Special | Growing Flame | C | Spur Def 2 | ||
| HP | ATK | SPD | DEF | RES | |
|---|---|---|---|---|---|
| 39 | 34 | 17 | 19 | 23 | |
| Weapon | Sapphire Lance | A | HP/Def 1 | ||
| Support | B | Bowbreaker 2 | |||
| Special | Draconic Aura | C | Drive Spd 2 | ||
| HP | ATK | SPD | DEF | RES | |
|---|---|---|---|---|---|
| 41 | 33 | 23 | 23 | 16 | |
| Weapon | Slaying Edge | A | HP/Spd 1 | ||
| Support | Pivot | B | Cancel Affinity 3 | ||
| Special | Moonbow | C | Hone Atk 2 | ||
| HP | ATK | SPD | DEF | RES | |
|---|---|---|---|---|---|
| 38 | 34 | 24 | 23 | 16 | |
| Weapon | Silver Axe | A | Speed +2 | ||
| Support | B | Guard 2 | |||
| Special | Reprisal | C | Spur Atk 3 | ||
| HP | ATK | SPD | DEF | RES | |
|---|---|---|---|---|---|
| 58 | 45 | 20 | 23 | 34 | |
| Weapon | Shine+ | A | Mirror Strike 2 | ||
| Support | B | ||||
| Special | Blazing Light | C | Atk Ploy 3 | ||
| HP | ATK | SPD | DEF | RES | |
|---|---|---|---|---|---|
| 44 | 41 | 32 | 20 | 28 | |
| Weapon | Rauðrwolf+ | A | Atk/Res Bond 3 | ||
| Support | B | Swordbreaker 3 | |||
| Special | Growing Flame | C | Spur Def 3 | ||
| HP | ATK | SPD | DEF | RES | |
|---|---|---|---|---|---|
| 56 | 45 | 33 | 30 | 22 | |
| Weapon | Slaying Edge+ | A | HP/Spd 2 | ||
| Support | Pivot | B | Cancel Affinity 3 | ||
| Special | Moonbow | C | Hone Atk 3 | ||
| HP | ATK | SPD | DEF | RES | |
|---|---|---|---|---|---|
| 53 | 46 | 24 | 27 | 30 | |
| Weapon | Sapphire Lance+ | A | HP/Def 2 | ||
| Support | B | Bowbreaker 3 | |||
| Special | Draconic Aura | C | Drive Spd 2 | ||
| HP | ATK | SPD | DEF | RES | |
|---|---|---|---|---|---|
| 52 | 46 | 34 | 30 | 22 | |
| Weapon | Silver Axe+ | A | Speed +3 | ||
| Support | B | Guard 3 | |||
| Special | Reprisal | C | Spur Atk 3 | ||
| HP | ATK | SPD | DEF | RES | |
|---|---|---|---|---|---|
| 67 | 48 | 22 | 25 | 37 | |
| Weapon | Shine+ | A | Mirror Strike 2 | ||
| Support | B | Quick Riposte 3 | |||
| Special | Blazing Light | C | Atk Ploy 3 | ||
| HP | ATK | SPD | DEF | RES | |
|---|---|---|---|---|---|
| 52 | 44 | 35 | 22 | 31 | |
| Weapon | Gronnowl+ | A | Atk/Def Bond 3 | ||
| Support | B | G Tomebreaker 3 | |||
| Special | Glimmer | C | Spur Res 3 | ||
| HP | ATK | SPD | DEF | RES | |
|---|---|---|---|---|---|
| 52 | 44 | 35 | 22 | 31 | |
| Weapon | Rauðrowl+ | A | Atk/Res Bond 3 | ||
| Support | B | Swordbreaker 3 | |||
| Special | Growing Flame | C | Spur Def 3 | ||
| HP | ATK | SPD | DEF | RES | |
|---|---|---|---|---|---|
| 65 | 48 | 36 | 33 | 24 | |
| Weapon | Slaying Edge+ | A | HP/Spd 2 | ||
| Support | Pivot | B | Cancel Affinity 3 | ||
| Special | Moonbow | C | Hone Atk 3 | ||
| HP | ATK | SPD | DEF | RES | |
|---|---|---|---|---|---|
| 61 | 49 | 27 | 30 | 33 | |
| Weapon | Sapphire Lance+ | A | HP/Def 2 | ||
| Support | B | Bowbreaker 3 | |||
| Special | Draconic Aura | C | Drive Spd 2 | ||
| HP | ATK | SPD | DEF | RES | |
|---|---|---|---|---|---|
| 61 | 46 | 36 | 32 | 31 | |
| Weapon | Lightning Breath+ | A | Speed +3 | ||
| Support | B | Guard 3 | |||
| Special | Reprisal | C | Spur Atk 3 | ||
User Submitted Teams
Morgan walls everything while Lissa keeps her healthy 10/10 works every time
Used to mimic PM1's YT video for *Lunatic* level battle. Fjorm Lvl 40 does all the dirty work. The rest of the team should consists of someone with Hone Spd 1, ,a singer/dancer, and a healer with high Res (and Rehabilitate if not using Azura as your singer/dancer). PM1 used Matthew (with Hone Spd 3), Wrys, and Olivia-all at 4* Lvl 40. I subbed Matthew with 3* Laslow Lvl 38 (with Hone Spd 1) because my 3* Lvl 19 Matthew (with Hone Spd 2) gets targeted by the Red Mage. Subbed Wrys with Priscilla 4* Lvl 38. Subbed Olivia with performing Azura Lvl 35. I didn't train Olivia that much after getting the PA girls. All characters used have no SI. No seals were necessary.
**Lunatic Level**Same team as shown in PM1's YT *Infernal* video except not all the players are 4* Lvl 40. Wrys was 4* Lvl 37. Olivia was 4* Lvl 31. Nino was 4* Lvl 36. No seals were used. Fjorm, Wrys, and Olivia were vanilla. Probably not the bare minimum. Dunno at what point the players' IVs would affect the AI movement at initiation. Initiated the battle the same way as in the video, however had to finish the battle differently.


