


Event History
| Start | End |
|---|---|
Map
- Normal
- Infernal
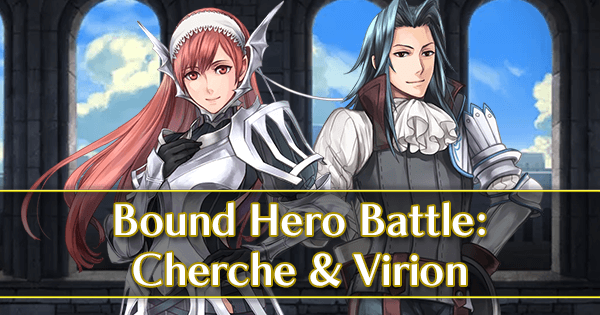
Bound Hero Battle: Cherche and Virion
For those of you whose orb count have been running a bit low, here comes another Bound Hero Battle to bolster your stash, this time featuring Cherche and her liege, Virion! The former duke of Rosanne brings class and style to the battlefield – or so he’d like to believe, anyways – while his vassal hits hard with her exclusive axe, but there’s a few things that will work to your favour here; the lack of reinforcements along with the relatively forgiving map layout should give you a good amount of room to maneuver. As always, there’s plenty annoying foes to deal with, but hitting hard and fast should help you power through the enemy’s forces. If you employ patience, seal shuffling, and some light skill inheritance (if need be), this map shouldn’t prove to be exceptionally difficult.
Who to Choose
As is generally true of Bound Hero Battles, the individual units used is very important as they will primarily inform your strategy. There are a few routes you can take depending on what units are available to you, and, of course, adjustment based on the units you possess is always a possibility.
Tanks
Even though you’ll likely want to make use of a striker to get this map started, making use of a tank is rarely – if ever – a bad idea. Distant Counter tanks are, as per usual, useful, but probably are not strictly necessary if you’re using a striker. If you’re not, though, being able to counterattack at-range while possessing the bulk typical of Distant Counter units will help your unit survive their first baiting engagement.
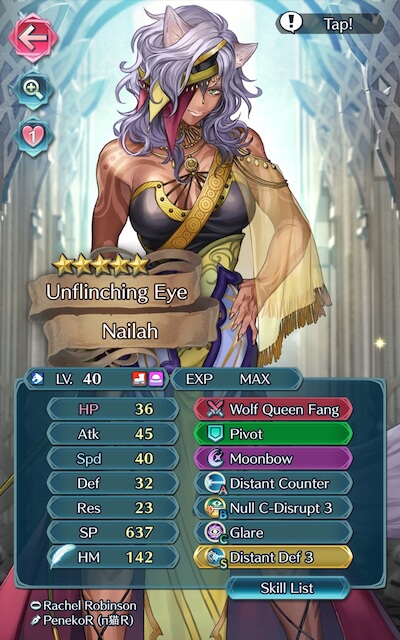
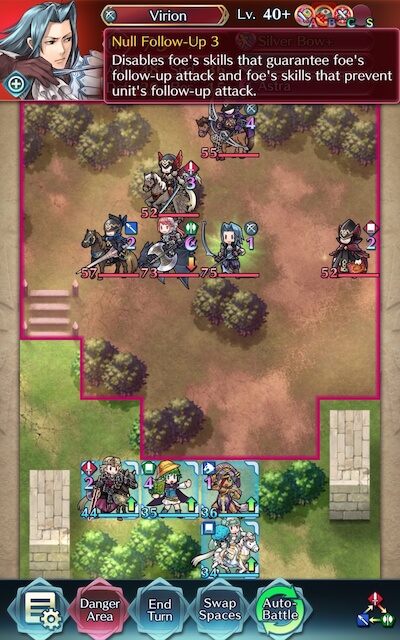
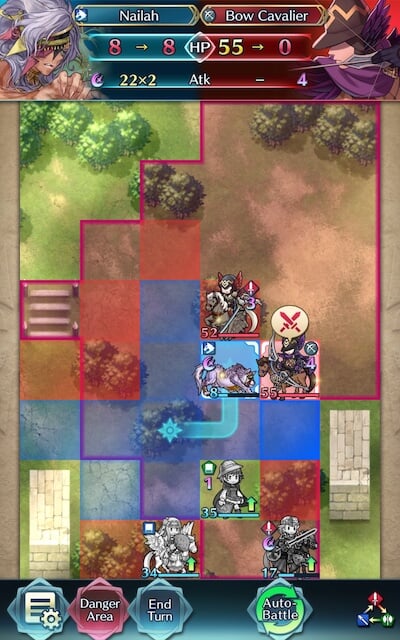
Armors such as Zelgius, Winter Tharja, Legendary Tiki, and Legendary Hector are able to hit hard very upon attacking and counterattacking. Black Knight is a powerful F2P option due to his powerful semi-exclusive Special, Black Luna, with Xander and Camus following close behind in utility. If you don’t make use of an archer or powerful magic user to KO Cherche, a bulky red like Sigurd will prove to be particularly valuable. Armors will have to be careful of the blue cavalier, though, since his lance will deal effective damage against them. Moreover, Virion’s Null Follow-Up will seriously limit the damage output of tanks that rely Quick Riposte and Vengeful Fighter when they’re attacked by him. Exceptionally speedy tanks like Nailah may be able to overcome this limitation by sheer Speed stacking, but otherwise, Defense stacking along with relying on a well-timed Special (or Bold Fighter) to KO Virion might be your best bet.
Similarly, infantry F2P options really are functionally limited to Legendary Ike, whose native Warding Breath grants him accelerated cooldown and extra Resistance, and Fjorm, who can easily tank ranged damage due to her exclusive Special, Ice Mirror. Fjorm’s ability to tank most ranged foes makes her a particularly good choice (as per usual), especially since she can fairly comfortably live through Virion's Special proc.
Dragons are also very strong tanks, especially when they’re equipped with Lightning Breath (or another Breath and Distant Counter, if you’re feeling fancy). They are also incredibly useful due to their damage-seeking effect against ranged foes, meaning that they’re more likely to net you those tricky KOs. Since they tend to rely on Quick Riposte to secure follow-ups, though, they may struggle with KOing Virion right off the bat if they don’t receive Pulse support.
Strikers
Cherche is one of the most potent offensive forces on this map, and because of her status as a flier, an archer will easily be able to power through her defenses. Given her low Speed, almost any archer should be able to outspeed her, but a Brave Bow archer will likely prove to be more useful given their ability to perform follow-ups upon initiation regardless of Speed checks on any foe.
Brave Lyn, WF Hinoka, Halloween Jakob, Summer Takumi, Setsuna, and Klein are potential strikers you may want to use, with a special mention going to Brave Lyn given her potential F2P status. Colored archers like Legendary Lyn and NY Fjorm may perform well, but will have to watch out for the Weapons Triangle – which is a distinct disadvantage when compared to their colorless counterparts.
Alternatively, melee Brave users are able to hit foes twice without retaliation, and may even quad hit if they outspeed an enemy. Cherche (perhaps a bit ironically…), Cordelia, and Elincia are all great melee Brave users who can make excellent use of class-specific buffs, and when equipped with Hit and Run or Drag Back they are able to retreat once attacking. WT Reinhardt may also prove useful due to his weapon granting him follow-ups regardless of phase, but may have a bit of trouble maneuvering due the the forests and trench.
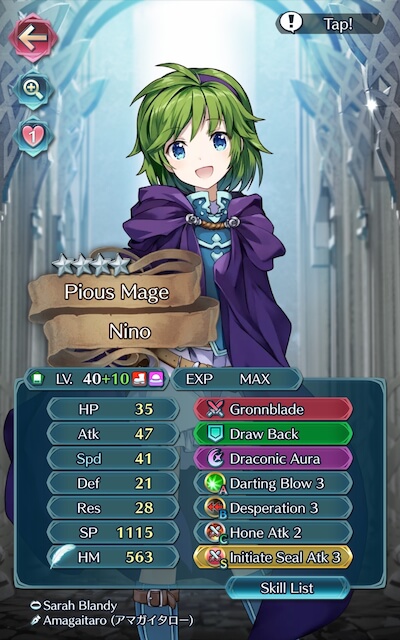
Brave and Blade tome wielders can also serve to be useful if your team composition provides them with the appropriate buffs, though other mages can also be powerful strikers. Tharja, Reinhardt, Tailtiu, Ishtar, Linde, Ophelia, WT Olwen, Lewyn, SF Nino, and Nino are potential options here, especially if they are equipped with a Breaker skill to add to their coverage. Nino, Tharja, and Tailtiu are particularly worth noting because of their refines – not only are they accessible compared to their counterparts, they’ve been made to be even more powerful than they were before!
Refreshers
Refreshers help provide support, may even have a decent offensive presence themselves, and can usually tank a hit or two, if need be. Any of them will work, since they really shouldn’t be battling too many foes anyways – though Legendary Azura is particularly notable due to her ability to grant her flying and infantry allies 1 extra movement when she sings for them, and flying refreshers in general will be more useful given their ability to ignore forests.
Strategy
Strategizing for this Bound Hero Battle shouldn’t be too complicated due to the absence of reinforcements. While it can be difficult to exactly predict what will happen due to IV / Merge variance, here’s some general tips to get you started.
Super Scouting
If you’re a dedicated reader of these guides, you’ll know by now that most of these maps are won or lost before they even start. While it may be tempting to jump right in, knowing (and loving!) your foes will help you not only choose your units, but also figure out where to begin.
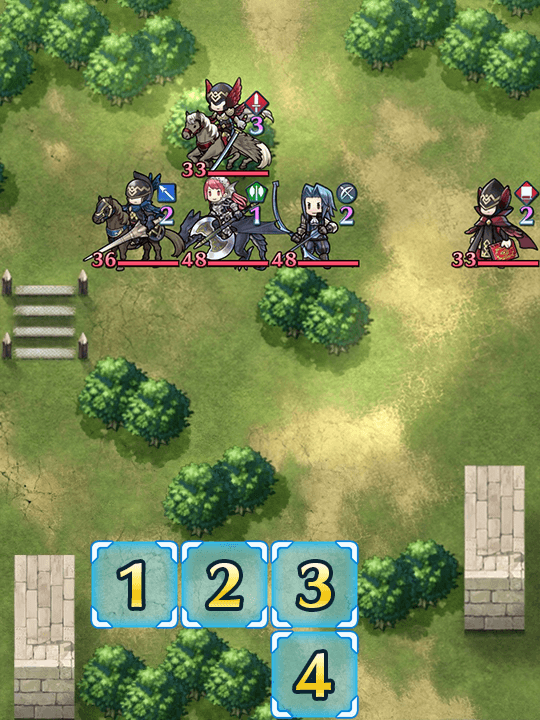
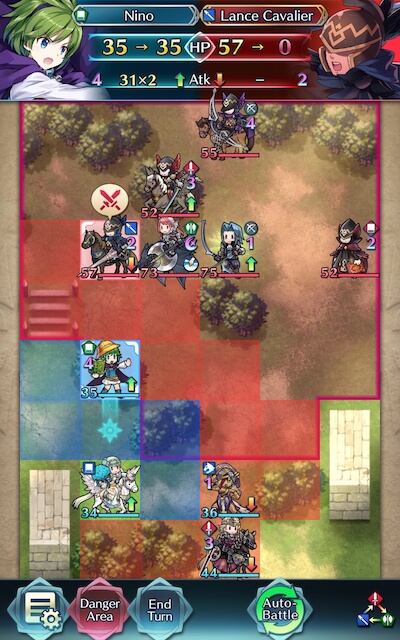
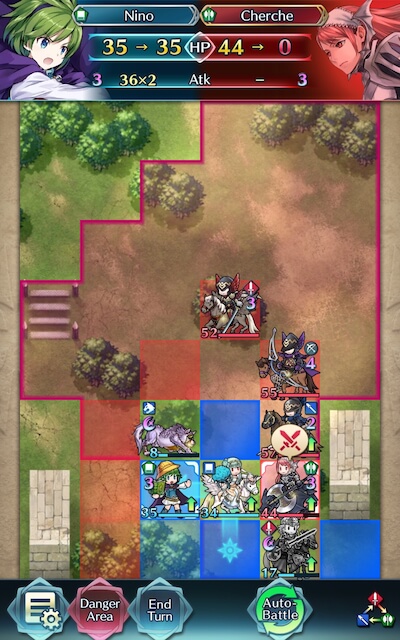
First off, what’s with IS and their obsession with letting fliers move adjacent to their allies? First Elincia, and now this… anyways, all qualms aside, Cherche is going to be a foe you’ll need to be careful of, given her extended range granted to her by the Air Orders status. Because of this, baiting in the bottomost space directly in front of Virion is probably a bad idea – assuming your unit survives the onslaught and Virion is not KO’d, Cherche will swoop in to surely ruin your day.
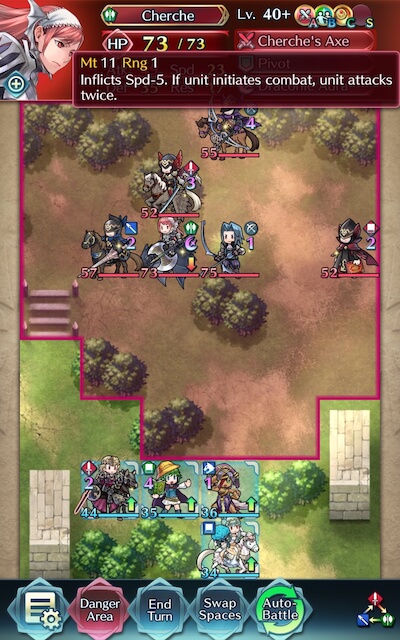
Speaking of Virion, he’s quite possibly the most annoying unit to deal with on this map, which coincidentally perfectly suits his personality! Though his weapon and A-slot Skill aren’t anything stellar, the fact that he carries Null Follow-Up means that Quick Riposte (or Vengeful Fighter!) tanks need not apply – Virion will laugh in the face of their single attack. Furthermore, his decent Speed with the red mage’s Drive Speed support means a unit will need at least 45 Speed to follow-up on him. This, when combined with his inflated HP and almost fully-charged Astra, means KOing him outright with a striker or a tank will be quite difficult.
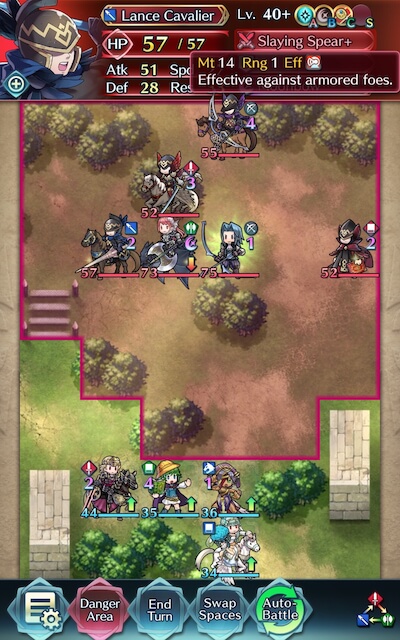
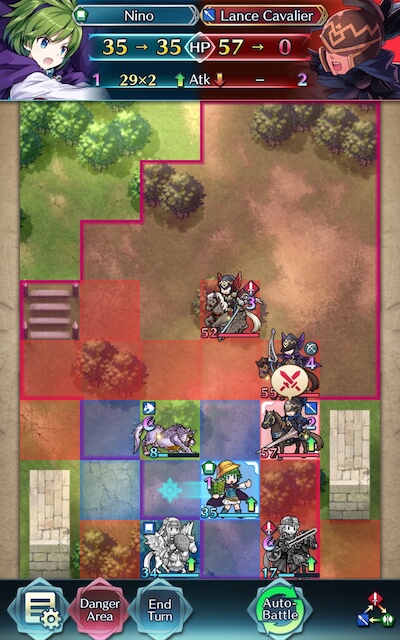
Other foes to watch out for are the blue lance cavalier and the cavalier archer. The former carries a weapon effective against armoured foes while the latter has a Brave Bow, meaning he’ll attack your unit twice no matter their Speed (or four times, if he outspeeds them by five).
The Right Foot
So now that you’ve sized up your foes, it’s time to figure out where you’ll be starting your assault on the enemy’s lines. Do note that this guide will assume you’re not using Reinhardt: he’s easily able to target Virion’s low Resistance, ignore Null Follow-Up, and all but trivializes the rest of the map.
Your two main options are, as per usual, on the right or the left – with one representing the archetypical strike/retreat method, and the other a tanking method. If you’re making use of a striker (that’s not a cavalier), you’ll likely want to target the blue cavalier lancer on the left – it’s not particularly bulky or speedy, so it shouldn’t be too difficult to ORKO it. From there, you can figure out the best way to pick off the rest of the foes on this map.
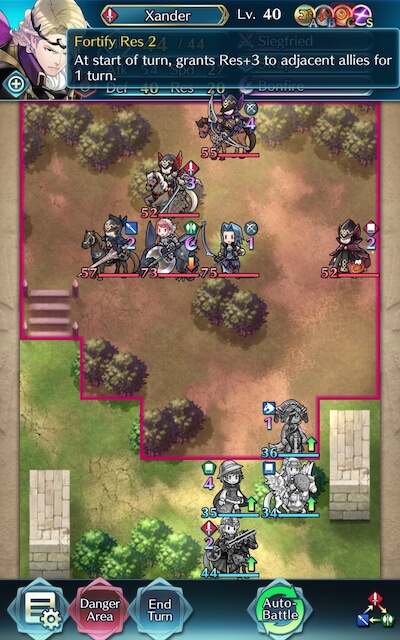
Alternatively, you can start on the right with a tank – though if you use this method, there’s a few things to keep in mind. First off, you’ll likely want to use a blue unit in order to better soak up damage from the red mage, and second, it may actually suit you if your tank doesn’t have the highest Defense stat on your team. Since one of the foes you’ll be facing carries Chill Def, if your tank is the most physically bulky unit in your line-up, you may find them to not perform as well due to the hefty debuff. If you really don’t have room in your team for an even more bulky unit to deflect the Chill, though, you can mitigate it through buffs, Drives, and Spurs, or completely negate it through use of Def Tactic. Finally, don’t expect to KO Virion on this turn using this method – short a very hefty Special proc, it’ll be hard to break through his inflated HP without a follow-up.
Striking While the Iron Is Hot
Assuming your striker can’t automatically make consecutive attacks, Virion might prove to be an issue if he’s able to counterattack between your unit’s blows. Of course, the easiest way to deal with this is to simply OHKO him! This can be done in many ways – Blade tomes have ludicrous damage output, Special procs (hastened with seals like Quickened Pulse or Pulse support) can give you the raw damage you need, or simply maximizing the chip damage you deal can help.
Pivot Potential
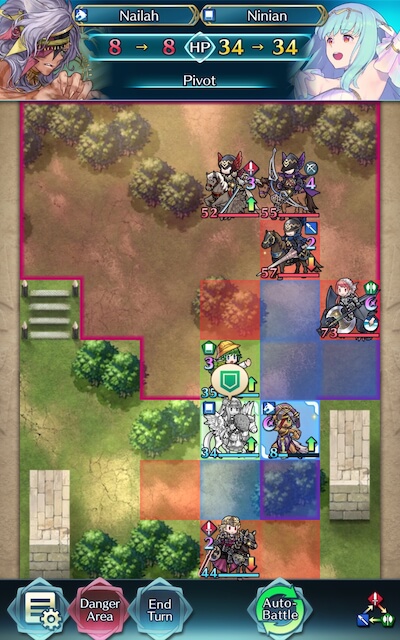
Although it’s quite an underutilized Assist Skill, Pivot can be a great way to get your damaged units out of a sticky situation by extending their range. It’s particularly useful on armors as it allows them to leapfrog over your other units out of danger, but can be great on infantry and fliers as well.
Resistance is Futile!
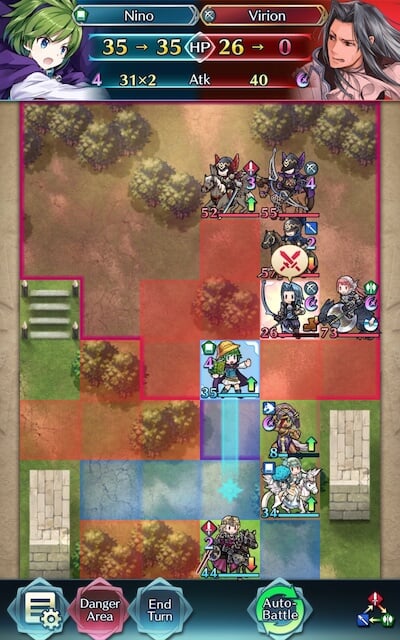
Cherche’s low Resistance makes he a prime target for magic users, so if you’ve got them in your team composition, don’t be afraid to use them! If they don’t ORKO, some chip damage may be necessary – and though her Special proc may hurt, it shouldn’t prove to be too overwhelming if she can’t attack you twice.
Guarding Goliath
If you don’t have a Special charged and ready to proc and you’re targeting the lance cavalier, be aware that since he carries Guard, you won’t gain Special cooldown while attacking him if he’s above the 80% HP threshold. Any green should be able to handle this foe pretty handily, but colorless and blue units will need to pay special attention to cooldown management if they’re the ones that need to KO this enemy.
Initiation Initiative
While baiting the Brave Bow archer can be a bit problematic since he hits pretty hard, his low Speed makes him a prime target to attack and KO on Player Phase. If you take initiative and attack him before he attacks you, he shouldn’t prove to be much of a problem – especially if you attack him with a melee unit so he can’t fight back.
If At First You Don’t Succeed
Don’t be fooled by video walkthroughs of any Bound Hero Battle that you watch -- it’s very rare for anyone to beat high-difficulty content (or record a video of themselves doing so!) on their first try. Additionally, the potential variance in unit builds that Skill Inheritance brought along with the random nature of summoning has resulted in pretty much every single summoner having different building blocks to work with. This, when combined with the high difficulty level of Infernal, may prove frustrating while someone is trying to find the right combination of units and moves. The key thing to keep in mind is that it may take some light Skill Inheritance and seal shuffling as well as multiple tries of the map to find a strategy that works for you. Every single turn you complete gets you one step closer to completing the puzzle. Finally, reading about or watching videos of successful strategies may also help you break through a particularly difficult turn that you can’t complete, or may give you ideas of a new unit to use.
Map Enemies
- Hard
- Lunatic
- Infernal
| HP | ATK | SPD | DEF | RES | |
|---|---|---|---|---|---|
| 48 | 44 | 13 | 24 | 11 | |
| Weapon | Cherche's Axe | A | Attack +3 | ||
| Support | Pivot | B | Spd/Res Link 3 | ||
| Special | Draconic Aura | C | Fortify Def 3 | ||
| HP | ATK | SPD | DEF | RES | |
|---|---|---|---|---|---|
| 48 | 36 | 23 | 19 | 9 | |
| Weapon | Silver Bow+ | A | Brazen Atk/Res 3 | ||
| Support | B | Null Follow-Up 3 | |||
| Special | Astra | C | Atk Opening 3 | ||
| HP | ATK | SPD | DEF | RES | |
|---|---|---|---|---|---|
| 36 | 36 | 17 | 18 | 23 | |
| Weapon | Slaying Spear | A | Warding Stance 2 | ||
| Support | B | Guard 2 | |||
| Special | Moonbow | C | Drive Res 2 | ||
| HP | ATK | SPD | DEF | RES | |
|---|---|---|---|---|---|
| 33 | 30 | 27 | 15 | 28 | |
| Weapon | Slaying Edge | A | Brazen Def/Res 2 | ||
| Support | Rally Atk/Spd | B | Chill Def 3 | ||
| Special | Glacies | C | Air Orders 2 | ||
| HP | ATK | SPD | DEF | RES | |
|---|---|---|---|---|---|
| 33 | 30 | 24 | 14 | 20 | |
| Weapon | Rauðrraven | A | Death Blow 2 | ||
| Support | B | Vantage 2 | |||
| Special | Glimmer | C | Drive Spd 2 | ||
| HP | ATK | SPD | DEF | RES | |
|---|---|---|---|---|---|
| 64 | 52 | 20 | 32 | 16 | |
| Weapon | Cherche's Axe | A | Attack +3 | ||
| Support | Pivot | B | Spd/Res Link 3 | ||
| Special | Draconic Aura | C | Fortify Def 3 | ||
| HP | ATK | SPD | DEF | RES | |
|---|---|---|---|---|---|
| 66 | 45 | 33 | 26 | 13 | |
| Weapon | Silver Bow+ | A | Brazen Atk/Res 3 | ||
| Support | B | Null Follow-Up 3 | |||
| Special | Astra | C | Atk Opening 3 | ||
| HP | ATK | SPD | DEF | RES | |
|---|---|---|---|---|---|
| 49 | 48 | 24 | 25 | 30 | |
| Weapon | Slaying Spear+ | A | Warding Stance 3 | ||
| Support | B | Guard 3 | |||
| Special | Moonbow | C | Drive Res 2 | ||
| HP | ATK | SPD | DEF | RES | |
|---|---|---|---|---|---|
| 44 | 42 | 35 | 21 | 36 | |
| Weapon | Slaying Edge+ | A | Brazen Def/Res 3 | ||
| Support | Rally Atk/Spd+ | B | Chill Def 3 | ||
| Special | Glacies | C | Air Orders 3 | ||
| HP | ATK | SPD | DEF | RES | |
|---|---|---|---|---|---|
| 44 | 42 | 32 | 20 | 28 | |
| Weapon | Rauðrraven+ | A | Death Blow 3 | ||
| Support | B | Vantage 3 | |||
| Special | Glimmer | C | Drive Spd 2 | ||
| HP | ATK | SPD | DEF | RES | |
|---|---|---|---|---|---|
| 73 | 56 | 23 | 35 | 17 | |
| Weapon | Cherche's Axe | A | Attack +3 | ||
| Support | Pivot | B | Spd/Res Link 3 | ||
| Special | Draconic Aura | C | Fortify Def 3 | ||
| HP | ATK | SPD | DEF | RES | |
|---|---|---|---|---|---|
| 75 | 48 | 36 | 29 | 15 | |
| Weapon | Silver Bow+ | A | Brazen Atk/Res 3 | ||
| Support | B | Null Follow-Up 3 | |||
| Special | Astra | C | Atk Opening 3 | ||
| HP | ATK | SPD | DEF | RES | |
|---|---|---|---|---|---|
| 57 | 51 | 27 | 28 | 33 | |
| Weapon | Slaying Spear+ | A | Warding Stance 3 | ||
| Support | B | Guard 3 | |||
| Special | Moonbow | C | Drive Res 2 | ||
| HP | ATK | SPD | DEF | RES | |
|---|---|---|---|---|---|
| 52 | 45 | 38 | 23 | 39 | |
| Weapon | Slaying Edge+ | A | Brazen Def/Res 3 | ||
| Support | Rally Atk/Spd+ | B | Chill Def 3 | ||
| Special | Glacies | C | Air Orders 3 | ||
| HP | ATK | SPD | DEF | RES | |
|---|---|---|---|---|---|
| 52 | 45 | 35 | 22 | 31 | |
| Weapon | Rauðrraven+ | A | Death Blow 3 | ||
| Support | B | Vantage 3 | |||
| Special | Glimmer | C | Drive Spd 2 | ||
| HP | ATK | SPD | DEF | RES | |
|---|---|---|---|---|---|
| 55 | 48 | 19 | 27 | 27 | |
| Weapon | Brave Bow+ | A | Attack/Res 2 | ||
| Support | Harsh Command | B | Bowbreaker 3 | ||
| Special | Growing Flame | C | Def Ploy 3 | ||
User Submitted Teams
https://www.youtube.com/watch?v=4gMvpcMvf9Q
5*+10 summoner supported
Notes:
* A raventome user is recommended. Whatever you do, though, don't give that user smoke skills. The bow cav has Harsh Command!
* Virion will have 39 spd (including the Drive) in combat. If your raventome can't reach 44 even with a buff and cannot oneshot, you'll need a means to decrease Virion's speed. Valentine Soren's Spd Feint does the trick. Note that if you'll be using him, you may want a more practical C skill; his Res Opening will be meaningless. Otherwise, his base kit's good.
* Your red unit must be able to handle Cherche, have Reposition, and not be armored unless if there's AM and either of the above is also armored. Use CD and spurs/other buffs as needed.
* Veronica is recommended, but any staff is fine.
* Avoid using Chill skills.
Turn one: Soren rallies Robin, debuffing Virion and the bow cav. Robin takes out Virion, and Ike will reposition her. Veronica will stay put. If you have Physic on your staff user, no harm in using that. On enemy phase, Cherche may SD depending on Ike's attack. If she doesn't, don't worry.
Turn two: Veronica will attack the lance cav. Use Soren to finish. Note: If Cherche wasn't eliminated, use Robin to finish her; otherwise, just move her behind him. If using Robin to take out the cav, pull Soren back to the bottom right corner, and move Ike out of the way. Enemy will advance.
Turn three onward: Robin takes out bow, The two guys take out red mage. Move Veronica away. Finally, take out the flier.
Mostly centered around getting all of the enemies on Valentine’s Ike and letting him burn them down. Assuming it is earth season and you give V Ike and Lucina Earth blessings you can clear it no sweat (I also had Lucina and legendary Ike at S rank and Lucina at S summoner support but with a couple tweaks to strategy you can get around not having that) Edit: Interestingly enough this team only works on Infernal because in lunatic V Ike kills Virion on the first enemy phase so Cherche goes to Lucina and kills her


