


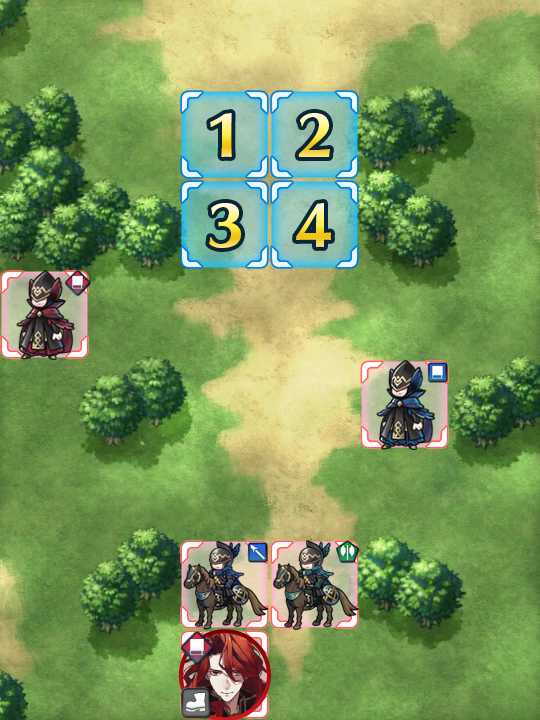
Map
Arvis: Emperor of Flame
Though somewhat of a reprieve compared to more recent Grand Hero Battles that feature tight quarters and trickier enemies, Arvis’ map contains reinforcements and effective weaponry that may prove challenging to newer summoners. The greatest curveball of this puzzle is definitely Arvis himself -- although he is stationary during earlier turns, the Ploy debuffs from his weapon and skills may prove frustrating, especially because they can be inflicted on your units from all the way across the map!
That is not to say, though, that Arvis is as formidable a foe as he appears to be. Beating this map is simply a matter of being methodical, striking when the time is right, and not overextending while going on the offensive. If you do that, then Arvis’ forces (and Arvis himself!) very quickly begin to falter.
Before you begin teambuilding, it’s completely possible you already possess everything you need to beat this map. Created by Gamepress staff member RedFerrari1998, the video guide below uses only F2P units, seals, and light, accessible Skill Inheritance -- see the description for more details. If it doesn’t work for you, though, then read on!
Who to Choose
As is generally true of GHBs, the individual units used is very important as they will primarily inform a strategy. There are a few routes one can take depending on what units are personally available, and, of course, adjustment based on the units one possesses is always a possibility.
Baiters
Although starting this map is much easier when the two mages are KO’d, the two cavalry units here are readily dealt with by a tanky unit who is able to bait them.
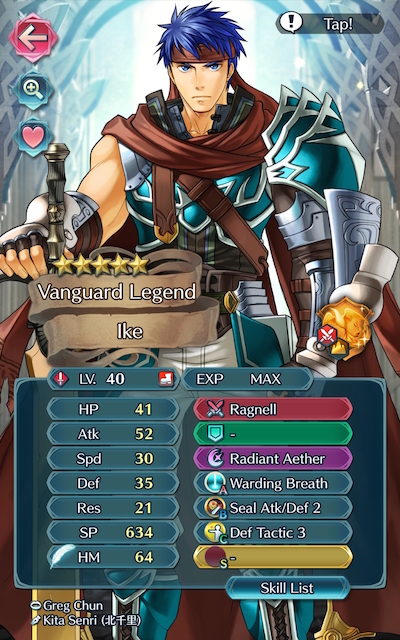
Ideally, you’ll also want to use a Distant Counter or Close Counter user utilizing the Quick Riposte skill or seal who can withstand the assault of both melee enemies and mages. Alternatively, if your tank possesses enough Speed they can double the cavalry units with a Speed buff from the Hone Spd skill or seal. Self-sustaining tanks who tote Aether, Radiant Aether, or Sol / Noontime can potentially forego healer support as well. Nowi, Adult Tiki, Lightning Breath Young Tiki, Fae, and Zelgius are all good choices who are able to counterattack regardless of distance. F2P options include Fjorm, Xander, Black Knight, and Legendary Ike. Legendary Ike is a particularly good choice due to his excellent stat spread, ability to self-sustain with Radiant Aether and access to Warding Breath.
Strikers
Brave Bow users once again prove to be incredibly potent strikers in this Grand Hero Battle due to their ability to overpower enemies that other units may otherwise struggle with. Alternatively, Speedy archers with the Desperation skill (which can be found on a 4 star Shanna or Navarre) along with the Brash Assault 2 seal are able to effectively gain a Brave effect against enemies who can counter when their HP hits the prerequisite threshold. . Brave Lyn, Bridal Cordelia, Klein, and Setsuna are Strikers you may want to use, with a special mention going to Brave Lyn given her F2P status and her ability to utilize the Desperation/Brash Assault combo to great effect in this map.
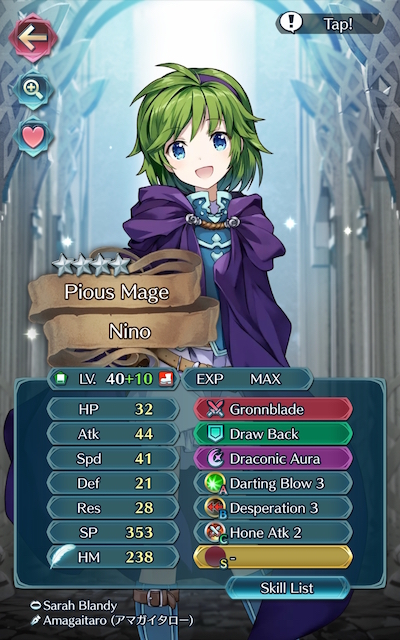
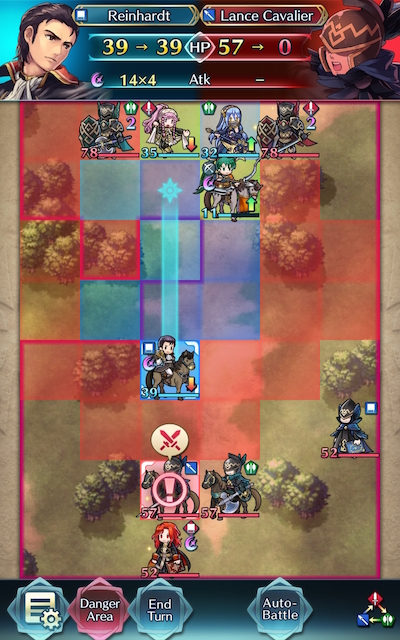
Alternatively, Brave and Blade weapon wielders can also serve to be useful if your team composition provides them with the appropriate buffs. Reinhardt, Cordelia, Donnel, and Nino are potential options here, especially if they are equipped with a Breaker skill to add to their coverage. Green mages in general can prove useful on this map, but if they are slow they may need Lancebreaker to net some important KOs.
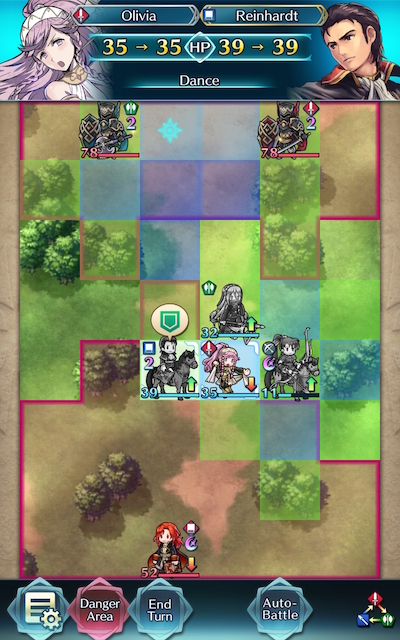
Dancers
Dancers help support units with high firepower, may even have a decent offensive presence themselves, and can usually tank a hit or two, if need be. They can also abuse Wings of Mercy or Escape Route very easily on this map. Olivia, Olivia, Performing Olivia, Performing Inigo, Performing Shigure, Performing Azura, Azura, New Year Azura, and Ninian all give the support that high-firepower units need while also possessing the ability to provide an assist to KO an enemy. A team with two Strikers and two Dancers is a perfectly viable option.
Strategy
Bringing The Battle To Them
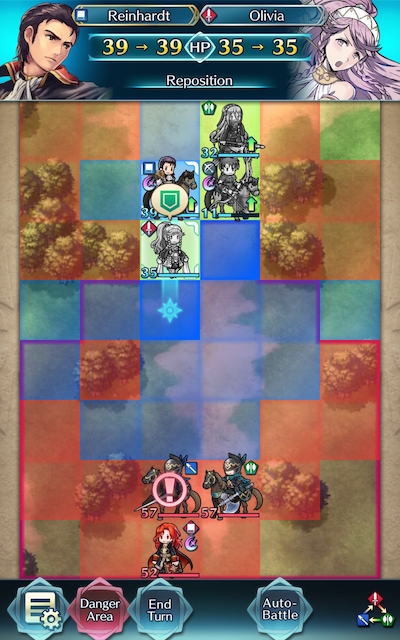
Assuming you’re not attempting a 1-turn clear of this map, the first move you should consider would be KOing the red and blue mage closest to your starting positions. Due to their high Speed, these foes are difficult to safely bait, but since their Defense is rather low you shouldn’t have a problem getting them out of the way, especially if you’re using a Dancer or two.
From there, your strategy will differ depending on if you’re using a Strikers or Tanks. Strikers absolutely do not want to take a hit from a melee foe, and since neither do your Dancers, you’ll likely want to get all your units out of danger using a movement skill like Draw Back or Reposition.
Alternatively, if you’re using a Tank or multiple Tanks, you can allow them to bait one of the cavalry units once they’ve finished off a mage, provided they don’t possess a weapons triangle disadvantage against the enemy of choice.
Checks and Balances
Because you can only bring a limited number of units with you to any battle, it will be important that your chosen team is able to handle a variety of threats. Breaker skills can be invaluable in allowing your units to surpass their limitations. While normally, a blue like Reinhardt would only be a direct check to red units, Lancebreaker enables him to net a good amount of KOs on this map that he wouldn’t be able to get on his own. The Brash Assault/Desperation combo allows Brave Lyn to check almost every ranged unit on her own once she’s taken enough damage. Slower green mages can also use Lancebreaker to patch up their matchups if you don’t use or don’t have Nino. Low cooldown Specials like Moonbow (found on 4 star Odin and Palla), Glimmer (found on 4 star Peri, Lon’qu, and Beruka) and Draconic Aura (found on 4 star Camilla and Female Corrin) can also prove incredibly useful if they activate at the right time.
Nacho Average Strategy
To follow the age old adage -- don’t get angry, get cheesy. While the wide-open nature of this map may give you trouble at first, the relatively large amount of maneuvering room means that Dancers can use Wings of Mercy (found on a 4 star Cain) or Escape Route (found on a 4 star Marth or Cecilia) to get to your other units when and where you need them. Escape Route has less restrictions given how easy Dancers are to damage, but if you’re using Wings of Mercy and one of your units does not have low HP, you may have to get creative. Consider maneuvering your damaged unit one space away from the unit that needs refreshing -- there is no rule that a Dancer must dance for the unit they teleport to, after all.
They’re Just Standing There… Menacingly!
As you can likely gather, the armors that spawn at the back of this map shouldn’t really prove to be much of a problem given the large amount of room you're given to work with. Although your first instinct may be to KO them as soon as possible, it’s entirely possible (and even advisable) to just ignore them and instead focus your efforts on being prepared for the other reinforcements that spawn. There’s no penalty for allowing them to advance, and their movement is so low that they will struggle to keep up with even infantry units under your control (especially if your team is supported by one or more refreshers). Once you’re finally ready to finish off these foes, magic damage of pretty much any kind will wipe them off the map, but you can also easily kite them with any ranged unit and a Dancer if that’s what you have available.
If At First You Don’t Succeed
Don’t be fooled by video walkthroughs of any Grand Hero Battle that you watch -- it’s very rare for anyone to beat high-difficulty content (or record a video of themselves doing so!) on their first try. Additionally, the potential variance in unit builds that Skill Inheritance brought along with the random nature of summoning has resulted in pretty much every single summoner having different “building blocks” to work with. This, when combined with the high difficulty level of Infernal, may prove frustrating while someone is trying to find the right combination of units and moves. The key thing to keep in mind is that it may take some light Skill Inheritance and seal shuffling (Breaker skills and the Attack +3 seal are your friends!), multiple tries of the map, and a few stamina potions to find a strategy that works for you. Every single turn you complete gets you one step closer to completing the puzzle. Finally, reading about or watching videos of successful strategies may also help you break through a particularly difficult turn that you can’t complete, or may give you ideas of a new unit to use.
Map Enemies
- Hard
- Lunatic
- Infernal
| HP | ATK | SPD | DEF | RES | |
|---|---|---|---|---|---|
| 36 | 41 | 24 | 12 | 25 | |
| Weapon | Valflame | A | |||
| Support | B | Recover Ring | |||
| Special | Growing Flame | C | Def Ploy 3 | ||
| HP | ATK | SPD | DEF | RES | |
|---|---|---|---|---|---|
| 34 | 37 | 29 | 11 | 16 | |
| Weapon | Bolganone | A | Life and Death 2 | ||
| Support | B | Seal Spd 2 | |||
| Special | C | Atk Smoke 3 | |||
| HP | ATK | SPD | DEF | RES | |
|---|---|---|---|---|---|
| 34 | 37 | 29 | 11 | 16 | |
| Weapon | Thoron | A | Life and Death 2 | ||
| Support | B | Seal Atk 2 | |||
| Special | C | Atk Smoke 3 | |||
| HP | ATK | SPD | DEF | RES | |
|---|---|---|---|---|---|
| 36 | 37 | 18 | 19 | 23 | |
| Weapon | Ridersbane | A | Darting Blow 2 | ||
| Support | B | Vantage 2 | |||
| Special | C | Ward Cavalry | |||
| HP | ATK | SPD | DEF | RES | |
|---|---|---|---|---|---|
| 36 | 38 | 18 | 19 | 23 | |
| Weapon | Silver Axe | A | Death Blow 2 | ||
| Support | B | Drag Back | |||
| Special | C | Ward Cavalry | |||
| HP | ATK | SPD | DEF | RES | |
|---|---|---|---|---|---|
| 46 | 49 | 31 | 17 | 34 | |
| Weapon | Valflame | A | |||
| Support | B | Recover Ring | |||
| Special | Growing Flame | C | Def Ploy 3 | ||
| HP | ATK | SPD | DEF | RES | |
|---|---|---|---|---|---|
| 45 | 49 | 37 | 15 | 23 | |
| Weapon | Bolganone+ | A | Life and Death 3 | ||
| Support | B | Seal Spd 3 | |||
| Special | C | Atk Smoke 3 | |||
| HP | ATK | SPD | DEF | RES | |
|---|---|---|---|---|---|
| 45 | 49 | 37 | 15 | 23 | |
| Weapon | Thoron+ | A | Life and Death 3 | ||
| Support | B | Seal Atk 3 | |||
| Special | C | Atk Smoke 3 | |||
| HP | ATK | SPD | DEF | RES | |
|---|---|---|---|---|---|
| 49 | 49 | 25 | 26 | 30 | |
| Weapon | Ridersbane+ | A | Darting Blow 3 | ||
| Support | B | Vantage 3 | |||
| Special | C | Ward Cavalry | |||
| HP | ATK | SPD | DEF | RES | |
|---|---|---|---|---|---|
| 49 | 50 | 25 | 26 | 30 | |
| Weapon | Silver Axe+ | A | Death Blow 3 | ||
| Support | B | Drag Back | |||
| Special | C | Ward Cavalry | |||
| HP | ATK | SPD | DEF | RES | |
|---|---|---|---|---|---|
| 52 | 52 | 34 | 19 | 37 | |
| Weapon | Valflame | A | |||
| Support | B | Recover Ring | |||
| Special | Growing Flame | C | Def Ploy 3 | ||
| HP | ATK | SPD | DEF | RES | |
|---|---|---|---|---|---|
| 52 | 52 | 40 | 17 | 26 | |
| Weapon | Bolganone+ | A | Life and Death 3 | ||
| Support | B | Seal Spd 3 | |||
| Special | C | Atk Smoke 3 | |||
| HP | ATK | SPD | DEF | RES | |
|---|---|---|---|---|---|
| 52 | 52 | 40 | 17 | 26 | |
| Weapon | Thoron+ | A | Life and Death 3 | ||
| Support | B | Seal Atk 3 | |||
| Special | C | Atk Smoke 3 | |||
| HP | ATK | SPD | DEF | RES | |
|---|---|---|---|---|---|
| 57 | 52 | 27 | 28 | 33 | |
| Weapon | Ridersbane+ | A | Darting Blow 3 | ||
| Support | B | Vantage 3 | |||
| Special | C | Ward Cavalry | |||
| HP | ATK | SPD | DEF | RES | |
|---|---|---|---|---|---|
| 57 | 53 | 27 | 28 | 33 | |
| Weapon | Silver Axe+ | A | Death Blow 3 | ||
| Support | B | Drag Back | |||
| Special | C | Ward Cavalry | |||
User Submitted Teams
Blue Blade Mage, a Dancer, Buff Green Mage, and Alfonse/Arvis
You can fill in the rest
This has Lute Azura BH!Lucina Hardin(FH)
https://youtu.be/PLVHZfAsdWQ Just look the video, don't like my voice or accent just cut the audio.
EDIT: It turns out I didn't notice my Blyn had an S rank support with Olivia which gave her the +1 damage needed to kill the cav. Without this or an Atk IV, she wouldn't be able to do it. My apologies. The rest of the strat works fine.
Took me ages to find something I could use to beat this map since I was just starting out and had limited units.
1 - Brave Lyn (or a Tome unit): Default setup (Mulagir, Swift Sparrow 2, Atk Smoke 3, Draconic Aura/Sacae's Blessing both of which aren't needed). Level 40 neutral IV's. If you're choosing another unit, he needs to be able to one shot arvis on counterattack otherwise units will spawn. I'll just use Blyn for this guide.
Function: To kill cavalry/Arvis, survive an Arvis hit
2 - Two Dancers: Any dancers, only one of them needs Hone Attack 2. EVERYTHING ELSE ISN'T NEEDED. You could do this with both dancers at Lv 1 because they don't get hit. The only important thing is the adjacent +3 attack at start of turn for Blyn. Ex: Olivia, Performance Azura, etc.
Function: Give +3 to Blyn at start of turn and dance/sing.
3 - Any unit with dragback or a cavalry unit that has a brave weapon (at least 38 attack on initiate, 35 with Hone Atk 2) or can reliably double the mages (you need 42 speed in that case). Even if using a unit that can get 42 speed, I'll just say Brave for this guide. Ex: Donnel, Abel, etc.
Function: To kill the starting red/blue mages.
Step 1 - Position Dancer 1 so she gives +3 to Blyn at start of the turn otherwise she won't be able to kill the cavalry units. If using a Brave Dragback unit, position him at bottom left so he can kill the red mage. If using a Brave Cavalry unit, position him top left.
Step 2 - Blyn kills right cavalry unit. Dancer 1 dances Blyn. Blyn kills left cavalry unit. It's important that she has Atk Smoke 3 or something that lets her survive Arvis. Order is vital otherwise you'll end on the left side which will debuff Blyn making her not survive the attack.
Step 3 - Dragback/Cav unit kills red mage on left first. Now this is important. If using a Dragback, just dance normally. However, if using a Cav unit, Dancer 2 MUST Dance/Sing by moving to the left into the trees otherwise she'll be in range of Arvis. Dragback/Cav unit kills blue mage on right.
Step 4 - The only one in range will be Blyn or another Tome unit so Arvis will attack her and kill himself making this end on the first turn.
Again, the unit you're using HAS to be able to both survive AND be able to kill Arvis on counterattack otherwise he won't be dead after this turn and more units with spawn. Granted, even if they did, it should be easy at this point. Just finish off Arvis, kill the mages that spawn, then kite the armors with Blyn or just outright kill them with your tome user.
Ninian - Lvl. 37 A) HP +4 B) None C) Fortify Def. 2 +Luna >Light Breath+ + Dance
Brave Lyn - Lvl. 40 A) Swift Sparrow 2 B) Sacae's Blessing C) Atk. Smoke 3 +Draconic Aura >Mulagir
Laslow - Lvl. 40 A) Fortress 2 B) Axe Breaker 3 C) Hone Spd. 2 +Noontime >Silver Sword
Sakura - Lvl. 32 A) None B) None C) Fortify Def. 2 +Imbue >Fear + Mend


