


Map
Map Enemies
- Hard
- Lunatic
- Infernal
| HP | ATK | SPD | DEF | RES | |
|---|---|---|---|---|---|
| 49 | 46 | 31 | 19 | 16 | |
| Weapon | Legion's Axe+ | A | Fury 3 | ||
| Support | B | Seal Spd 3 | |||
| Special | Aegis | C | Savage Blow 3 | ||
| HP | ATK | SPD | DEF | RES | |
|---|---|---|---|---|---|
| 49 | 46 | 31 | 19 | 16 | |
| Weapon | Legion's Axe+ | A | Fury 3 | ||
| Support | B | Axebreaker 3 | |||
| Special | Reprisal | C | Hone Spd 3 | ||
| HP | ATK | SPD | DEF | RES | |
|---|---|---|---|---|---|
| 38 | 29 | 17 | 21 | 11 | |
| Weapon | Brave Bow | A | Death Blow 2 | ||
| Support | B | Guard 2 | |||
| Special | C | Threaten Atk 3 | |||
| HP | ATK | SPD | DEF | RES | |
|---|---|---|---|---|---|
| 34 | 33 | 27 | 15 | 20 | |
| Weapon | Bolganone | A | Speed +2 | ||
| Support | B | Swordbreaker 2 | |||
| Special | C | Atk Ploy 3 | |||
| HP | ATK | SPD | DEF | RES | |
|---|---|---|---|---|---|
| 29 | 37 | 19 | 12 | 27 | |
| Weapon | Thoron | A | Warding Blow 2 | ||
| Support | B | Lancebreaker 2 | |||
| Special | C | Threaten Spd 3 | |||
| HP | ATK | SPD | DEF | RES | |
|---|---|---|---|---|---|
| 65 | 54 | 39 | 26 | 21 | |
| Weapon | Legion's Axe+ | A | Fury 3 | ||
| Support | B | Axebreaker 3 | |||
| Special | Reprisal | C | Hone Spd 3 | ||
| HP | ATK | SPD | DEF | RES | |
|---|---|---|---|---|---|
| 65 | 54 | 39 | 26 | 21 | |
| Weapon | Legion's Axe+ | A | Fury 3 | ||
| Support | B | Seal Spd 3 | |||
| Special | Aegis | C | Savage Blow 3 | ||
| HP | ATK | SPD | DEF | RES | |
|---|---|---|---|---|---|
| 51 | 39 | 24 | 29 | 16 | |
| Weapon | Brave Bow+ | A | Death Blow 3 | ||
| Support | B | Guard 3 | |||
| Special | C | Threaten Atk 3 | |||
| HP | ATK | SPD | DEF | RES | |
|---|---|---|---|---|---|
| 45 | 44 | 35 | 20 | 28 | |
| Weapon | Bolganone+ | A | Speed +3 | ||
| Support | B | Swordbreaker 3 | |||
| Special | C | Atk Ploy 3 | |||
| HP | ATK | SPD | DEF | RES | |
|---|---|---|---|---|---|
| 40 | 49 | 26 | 17 | 35 | |
| Weapon | Thoron+ | A | Warding Blow 3 | ||
| Support | B | Lancebreaker 3 | |||
| Special | C | Threaten Spd 3 | |||
| HP | ATK | SPD | DEF | RES | |
|---|---|---|---|---|---|
| 75 | 57 | 42 | 28 | 23 | |
| Weapon | Legion's Axe+ | A | Fury 3 | ||
| Support | B | Axebreaker 3 | |||
| Special | Reprisal | C | Hone Spd 3 | ||
| HP | ATK | SPD | DEF | RES | |
|---|---|---|---|---|---|
| 75 | 57 | 42 | 28 | 23 | |
| Weapon | Legion's Axe+ | A | Fury 3 | ||
| Support | B | Seal Spd 3 | |||
| Special | Aegis | C | Savage Blow 3 | ||
| HP | ATK | SPD | DEF | RES | |
|---|---|---|---|---|---|
| 59 | 42 | 27 | 32 | 18 | |
| Weapon | Brave Bow+ | A | Death Blow 3 | ||
| Support | B | Guard 3 | |||
| Special | Moonbow | C | Threaten Atk 3 | ||
| HP | ATK | SPD | DEF | RES | |
|---|---|---|---|---|---|
| 52 | 47 | 38 | 22 | 31 | |
| Weapon | Bolganone+ | A | Speed +3 | ||
| Support | B | Swordbreaker 3 | |||
| Special | C | Atk Ploy 3 | |||
| HP | ATK | SPD | DEF | RES | |
|---|---|---|---|---|---|
| 46 | 52 | 28 | 19 | 38 | |
| Weapon | Thoron+ | A | Warding Blow 3 | ||
| Support | B | Lancebreaker 3 | |||
| Special | C | Threaten Spd 3 | |||
User Submitted Teams
Having Klein have Axebreaker, he can OHKO all of the Legions which makes them not a threat. The most threatening unit will be the archer since moonbow is active. Have Klein (with Hone atk by olivia) wipe the legion plus the blue mage on right side (with dance) and then retreat as close to the center as possible on the second turn and wipe out the red cav/mage and stay clear of the legion. on the third turn, the archer and the legion should be wiped out while staying away from the lancer. at this point, it should be easy to 1v1 the rest
The most important person in this team is Olivia. She can be replaced with any singer or dance but you will need that specific dance/sing skill. Klein will be doing most of the killing with the help of Dance. Nino is their to eliminate any blue units and draw back allies. Zephiel will be the clutch savior. Able to actually tank hits from Legion and manage to barely survive red mages even when double hit. With his special weapon lowering defense Klein will be able to kill Legion in 2 hits
Sanaki (axebreaker + Recip Aid)
Hector (Vantage Build + Pivot)
Reinhardt (DB3 + Lancebreaker + reposit)
Azura (Wings of Mercy)
Using this build requires a extremely specific pattern
On Your First turn, you line up the units to the Right side in a single line manner. From Top to bottom (Rein, Hector, Sanaki, and Azura, where the fortification is where rein is, then hector). the Blue tome will attack hector, then will spawn the first legion. Sanaki with azura will destroy the two legions, make sure azura is positioned to the right of sanaki after dance, hector pivots back bottom using sanaki, rein moves backwards to where hector was and break first block. this causes the blue mage spawn and red horse to spawn on top of hector left and right side. sanaki destroy legion, hector, the blue mage, azure destroy the red sword, move rein back beside azura. dance sanaki and move her out of range of the bow, then move in range on red mage. sanaki will barely survive with 8 HP on red but can revenge kill red mage. the next sequence is the blue mage and the blue spear, legion, and the bow. the bow must die to rein because of dumb moonbow. the trick is simply bait the AI out of attack range, and out of the fortification squares. rein should be able to OHKO the bow and lancer, hector should enough HP to vantage the blue mage. use the left side corner to bait them out of corner. hector vantage counters the reinforcement blue mage (has garbage DEF, but rein cannot OHKO due to high res), vice versa for the bow (garbage RES) and Rein should be able to ORKO bow. blue mage and bow will move in first because legion spawns near lancer and the lancer has dumb pathing, taking middle instead. Sanaki must reciporcal AID rein to gain max hp ( or as long as you can trigger Axebreaker). Rein/Azura will take down horse lancer becasue of legion moves slower than it, giving you time to pick them off. once lancer is down, sanaki moves in to OHKO Legion. Congratulations, you just beat Infernal mode.
Sharena (f2p) + Spur Def seal
- 5☆, Spd+3, QR2, Hone Def3, Luna, Swap
Tharja (+Atk/-Spd) + BoL seal
- 5☆, Darting B3, Axebreaker3, Noontime, Reposition
Nino (+Spd/-Res) + HP+3 seal
- 5☆, Darting B3, B Tomebr3, Hone Spd3, Moonbow, Draw Back
Olivia (f2p) + Fortify Res seal
- 4☆, R Tomebr1, Hone Atk3
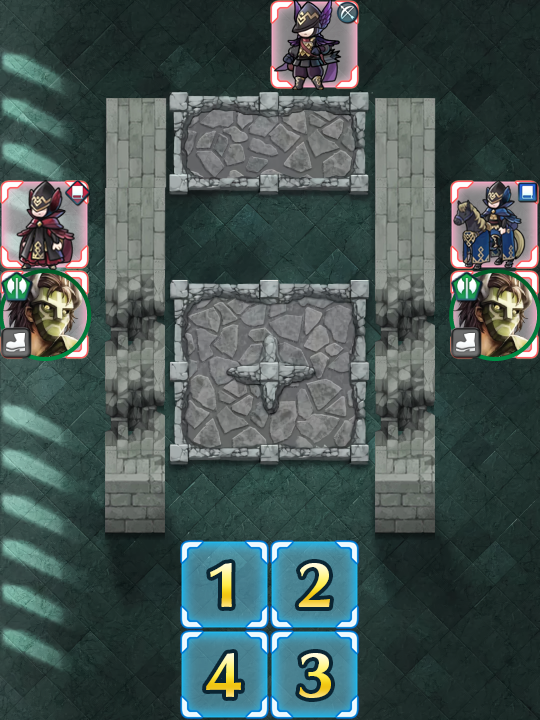
Positioning is essential with this team.
Starting positions (see map above):
1 Olivia
2 Nino
3 Tharja
4 Sharena
1) Have Nino attack the right Legion, dance on Nino's left for her and kill Legion. Reposition Olivia with Tharja from below and set Sharena under Olivia.
2) Kill the new Legion with Tharja. Attack the new blue mage with Sharena, dance from the right, kill him. Set Nino under Tharja/above Olivia.
3) Kill blue lance with Nino, BraveBow with Tharja, and move Sharena 2 up, dance from right and attack with her the red mage.
4) Kill red sword with Sharena and dance for her from above, reposition so Sharena is under left defensive tile with Olivia on her right side. Kill red mage with Nino and have Tharja be on her right above Olivia.
5) Kill left Legion with Tharja.
6) Attack Legion with Tharja, finish him with Nino. Dance for Tharja and move everyone except Nino out of blue mage's range.
Congrats, you did it~


