


Map
- Normal
- Infernal

Lyon: Shadow Prince
As is fitting for a ruler of his calibre, Lyon’s GHB opens with him accompanied by some incredibly strong servants. Like most of the maps that came before this one, the presence of enemy reinforcements definitely complicates the path to victory. Barring a few strategies that require extremely specialized teams, Turn 1 clears on Infernal will be exceedingly difficult here. That does not mean, however, that this map can only be beaten by +10 juggernauts -- as is usually the case with GHBs, the best defense is careful planning, experimentation, and knowing the map.
The best way to deal with this GHB is to methodically chip away at Lyon’s forces, retreating after striking hard and KOing outright when you can. The more time you take carefully positioning your units, baiting when possible, and anticipating reinforcements, the easier it will be for you to complete this map. Movement skills such as Hit and Run and Drag Back will likely help you achieve this goal, and should be considered as options to aid positioning.
Who To Choose
As is generally true of GHBs, the individual units you will use is very important as it will primarily inform your strategy. There are a few routes you can take depending on what units you have available to you, and, of course, adjustment based on the units you possess is always a possibility.
Strikers
Brave weapons once again prove incredibly useful in this GHB. With their ability to power through same color matchups and obliterate units who possess a weapon triangle disadvantage, Brave users are able to provide wide coverage and prevent reinforcements from suddenly overwhelming your units by KOing their targets outright. Melee Brave users even have movement options such as Drag Back and Hit and Run that grant them greater mobility. Reinhardt, Brave Bow B!Lyn, Brave Bow Bridal Cordelia, Brave Lance Cordelia, and Brave Axe Cherche all possess the firepower needed to power through tough enemies.
Performing a similar function to Brave users, high firepower mages and Blade mages are able to often overpower enemy units and be danced or repositioned to safety. This is especially true of speedy Blade mages if they have inherited Desperation, as it essentially turns them into Brave users once they’ve reached low enough health if they outspeed their opponent by five. Nino and Tailtiu would be good options here, as would Blade S!Corrin and Blade S!Camilla. Linde and Delthea also provide additional buffs to melee allies through Dark Aura, while Julia and Deirdre deal effective damage to the dragons who appear in this map.
Distant Counter Users
Being able to counterattack at any distance is always useful, and in this GHB due to the presence of a healthy mix of melee and ranged attackers it may be worthwhile to bring a unit who can counterattack no matter what. Hector, Black Knight, Zelgius, Xander, Camus, Nowi, A!Tiki, Y!Tiki, and Fae can all use class-specific buffs to pad their defenses and heavily damage if not KO anyone who attacks them. Of special note is also Fjorm, whose exclusive special Ice Mirror makes her a great choice for battling mages.
Dancers
Dancers help support units with high firepower, may even have a decent offensive presence themselves, and can usually tank a hit or two if need be. Olivia, PA!Azura, Azura, NY!Azura, and Ninian all provide the support that high-firepower units need while also possessing the ability to net a few KOs themselves.
Healers
While not generally a great choice for GHBs over units who can deal heavy damage or dancers, healers will generally be prioritized by the enemy AI, can now deal full value colourless damage due to Wrathful staff refinement, and can also heal your primary damage dealing units when they’re low on health. When paired with a dancer or an offensively focused unit with reposition / swap who can grant them greater mobility, a healer could be a valuable ally in this GHB. Genny, Priscilla, and Elise are potential additions to your team that may serve useful.
Fliers
Given the layout of this map, Fliers possess the most flexible mobility and baiting potential possible. They are also able to take advantage of class-specific flier buffs. Also of note is that Fliers can use the Guidance skill and seal, which grants infantry and armor units greater mobility as well. Hinoka, Cordelia, H!Nowi, NY!Azura, S!Corrin, S!Camilla, Myrrh, and Cherche can all fill other roles that have been discussed above while also being fliers.
Cavalry
As is usually true, Cavalry units are able to take advantage of their superior movement range to hit hard and then quickly retreat away from danger. They can also, like Fliers, take advantage of class-specific buffs. Reinhardt, B!Lyn, Xander, and Camus are fortunate enough to be cavalry units and also fill other roles that have been discussed above,
Strategy
Due to the variability of the AI depending on your team’s stats and the unpredictability factor that reinforcements provide, it unfortunately isn’t possible to create a strategy that will work for absolutely everyone. There are, however, a few basic tips that may help those who are struggling with this GHB.
Start from the Left
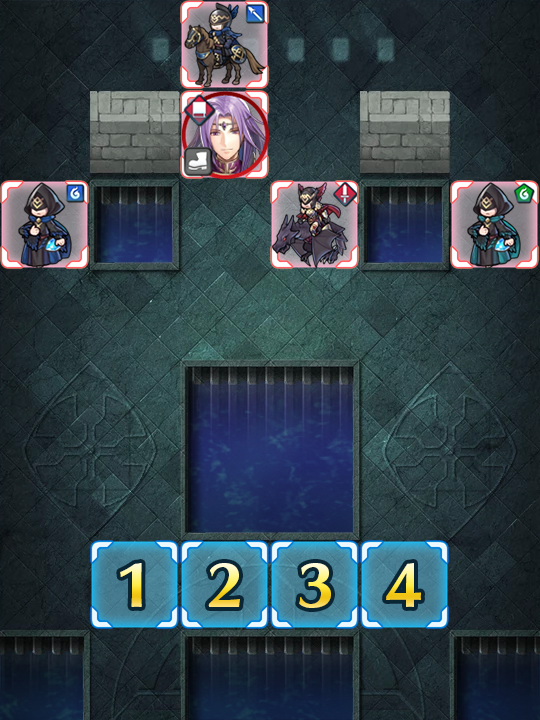
As with most GHBs, the enemy units will not start to move until one of your units is in range or one of the enemy units has been damaged / defeated. Thankfully, the only enemy on the left of this map is a blue dragon who can easily be KO’d by a green unit. If you instead use a ranged blue mage who isn’t quite able to KO this enemy, you can use another unit with reposition to get your dancer over to your mage.
In Combat We Kill
Because enemy reinforcements can quickly overwhelm your team, you generally want to KO the units you attack outright. If your unit won’t take a lot of damage when attacked, finishing off a weakened opposing unit in enemy phase is fine, but having them survive into the next player phase means that you must expend one more attack to KO them, which could be an attack you could use to KO another unit. You may find that the Quick Riposte seal will help you get some one-round kills you would not net otherwise.
Use Fliers
Fliers are able to bypass the annoying space in the middle of this map, and using guidance they can allow infantry and armor units to essentially warp across this space as well. This is an option to ferry a unit who is low on health out of danger, especially if you’ve chosen to use a healer.
Divided We Fall But Four Is a Crowd
Positioning is very important in this GHB, especially because enemy reinforcements. Thankfully, however, they always appear in the same positions on the map, which means that if they catch you by surprise the first time you encounter them, they shouldn’t do the same once you’re retrying the map. Having your units spread out on this map is not advisable, since you’re going to want them to cover matchups that are unfavourable for their allies. Being too bunched together, however, also limits your movement options. Try to strike a careful balance between having your units being close enough to assist each other without them crowding escape routes.
Retreat Is Always an Option
While it may be tempting to KO an enemy unit who is in range, this can often lead to the situation where the unit that you overextended is then swamped by enemies they can’t handle on their own. While sometimes the best defense is a good offense, knowing where and when to retreat to safety in order to attack later from a more favourable position is a judgement call which will help you in this GHB.
Try, Try Again
The first GHBs were more simple, but the potential variance in unit builds that Skill Inheritance brought has resulted in pretty much every single player having different “building blocks” to work with. This, when combined with the high difficulty level of newer GHBs may prove frustrating while someone is trying to find the right combination of units and moves. The key thing to keep in mind is that it may take some Skill Inheritance and multiple tries of the map to find a strategy that works for you. Every single turn you complete gets you one step closer to completing the puzzle. Reading about or watching videos of successful strategies may also help you break through a particularly difficult turn that you can’t complete, or may give you ideas of a new unit to try to use.
Map Enemies
- Hard
- Lunatic
- Infernal
| HP | ATK | SPD | DEF | RES | |
|---|---|---|---|---|---|
| 38 | 33 | 23 | 21 | 20 | |
| Weapon | Dark Breath | A | Sturdy Blow 2 | ||
| Support | B | Lunge | |||
| Special | Escutcheon | C | Savage Blow 2 | ||
| HP | ATK | SPD | DEF | RES | |
|---|---|---|---|---|---|
| 36 | 36 | 17 | 18 | 23 | |
| Weapon | Slaying Lance | A | Brazen Atk/Def 2 | ||
| Support | B | Drag Back | |||
| Special | Moonbow | C | Hone Atk 3 | ||
| HP | ATK | SPD | DEF | RES | |
|---|---|---|---|---|---|
| 42 | 42 | 15 | 18 | 25 | |
| Weapon | Naglfar | A | Attack/Res 2 | ||
| Support | B | ||||
| Special | Vengeance | C | Drive Res 2 | ||
| HP | ATK | SPD | DEF | RES | |
|---|---|---|---|---|---|
| 36 | 37 | 19 | 28 | 13 | |
| Weapon | Zanbato | A | Steady Stance 2 | ||
| Support | B | Hit and Run | |||
| Special | Draconic Aura | C | Drive Def 2 | ||
| HP | ATK | SPD | DEF | RES | |
|---|---|---|---|---|---|
| 38 | 33 | 23 | 21 | 20 | |
| Weapon | Dark Breath | A | Steady Blow 2 | ||
| Support | B | Lunge | |||
| Special | Pavise | C | Savage Blow 2 | ||
| HP | ATK | SPD | DEF | RES | |
|---|---|---|---|---|---|
| 52 | 45 | 30 | 29 | 28 | |
| Weapon | Dark Breath+ | A | Sturdy Blow 2 | ||
| Support | B | Lunge | |||
| Special | Escutcheon | C | Savage Blow 3 | ||
| HP | ATK | SPD | DEF | RES | |
|---|---|---|---|---|---|
| 49 | 48 | 24 | 25 | 30 | |
| Weapon | Slaying Lance+ | A | Brazen Atk/Def 3 | ||
| Support | B | Drag Back | |||
| Special | Moonbow | C | Hone Atk 3 | ||
| HP | ATK | SPD | DEF | RES | |
|---|---|---|---|---|---|
| 57 | 50 | 21 | 26 | 32 | |
| Weapon | Naglfar | A | Attack/Res 2 | ||
| Support | B | ||||
| Special | Vengeance | C | Drive Res 2 | ||
| HP | ATK | SPD | DEF | RES | |
|---|---|---|---|---|---|
| 49 | 49 | 27 | 36 | 19 | |
| Weapon | Zanbato+ | A | Steady Stance 3 | ||
| Support | B | Hit and Run | |||
| Special | Draconic Aura | C | Drive Def 2 | ||
| HP | ATK | SPD | DEF | RES | |
|---|---|---|---|---|---|
| 52 | 45 | 30 | 29 | 28 | |
| Weapon | Dark Breath+ | A | Steady Blow 2 | ||
| Support | B | Lunge | |||
| Special | Pavise | C | Savage Blow 3 | ||
| HP | ATK | SPD | DEF | RES | |
|---|---|---|---|---|---|
| 61 | 48 | 33 | 32 | 31 | |
| Weapon | Dark Breath+ | A | Sturdy Blow 2 | ||
| Support | B | Lunge | |||
| Special | Escutcheon | C | Savage Blow 3 | ||
| HP | ATK | SPD | DEF | RES | |
|---|---|---|---|---|---|
| 57 | 51 | 27 | 28 | 33 | |
| Weapon | Slaying Lance+ | A | Brazen Atk/Def 3 | ||
| Support | B | Drag Back | |||
| Special | Moonbow | C | Hone Atk 3 | ||
| HP | ATK | SPD | DEF | RES | |
|---|---|---|---|---|---|
| 66 | 53 | 23 | 29 | 35 | |
| Weapon | Naglfar | A | Attack/Res 2 | ||
| Support | B | Seal Atk Spd 2 | |||
| Special | Vengeance | C | Drive Res 2 | ||
| HP | ATK | SPD | DEF | RES | |
|---|---|---|---|---|---|
| 57 | 52 | 30 | 39 | 21 | |
| Weapon | Zanbato+ | A | Steady Stance 3 | ||
| Support | B | Hit and Run | |||
| Special | Draconic Aura | C | Drive Def 2 | ||
| HP | ATK | SPD | DEF | RES | |
|---|---|---|---|---|---|
| 52 | 49 | 38 | 25 | 34 | |
| Weapon | Keen Blarwolf+ | A | Fury 3 | ||
| Support | B | Seal Res 3 | |||
| Special | Iceberg | C | Atk Tactic 3 | ||
| HP | ATK | SPD | DEF | RES | |
|---|---|---|---|---|---|
| 61 | 48 | 33 | 32 | 31 | |
| Weapon | Dark Breath+ | A | Steady Blow 2 | ||
| Support | B | Lunge | |||
| Special | Pavise | C | Savage Blow 3 | ||
User Submitted Teams
If hate he lust of reinforcements from red mages, you may want to try this. video at the description.
https://youtu.be/xwwhMhDFl6E
Notes:
5* Reinhardt has an Attack +2 Seal (nothing else)
5* Nino - Life and Death 3, Desperation
5* Olivia - Wings of Mercy, Hone Atk 3, Hone Spd 1 Seal
(It should be known that Olivia’s Star count does not matter, since she will not be dealing damage or tanking. If she has the skills above, a 3 or 4 Star works.)
5* Elincia - Death Blow 3, Hone Atk 3, Iotes Shield Seal
The only prerequisites:
Nino cannot have a speed bane
Elincia cannot have a Defense or HP bane, unless the combination is (+Defense/-Hp)
Low investment team
(Ignoring Nino, but hey, everyone has a Nino)
Contrary to what Gamepress recommends, this team will start off with Elincia in the bottom right corner of the map, with Nino and Reinhardt just outside of attack ranges for setup while receiving Atk/Spd buffs. (This will take a turn to set up).
Once set up, Nino can kill the Green Dragon, be danced, and kill the blue mage, which will put her into desperation range. Reinhardt will also kill the sword drake, and then during enemy phase will get Lyon low enough to kill him in the next player phase. But don’t forget about Elincia, and move her up one space and to the left (this will play out later.)
Next player phase, have Nino kill the Horse Lancer and then dance her so she can retreat NEXT to Olivia (this is required for Bladetome damage output in the next phase). Next have Reinhardt kill Lyon from the furthest right side of the map. For the final step move Elincia to the left of Nino, which should have Elincia on top of flier only terrain.
Next phase have Elincia kill the green tome mage, which will leave her in range of the Bow Horse, but she will survive thanks to Iotes Shield. Then have Nino go for the Green Knight that spawns. Next have Reinhardt attack the blue dragon, then dance him so he can attack the dragon again, but from the spot Nino was occupying before she killed the green knight.
Next player phase, have Elincia kill the bow horse, then have Reinhardt kill the Sword Knight. Move Nino into Reinhardts starting position, then position Olivia in Nino’s spot, use dance to get Reinhardt on the right of Olivia, and watch as your final victims enter your attack range.
From this point all that’s left is a simple color match up. Have Elincia kill the Axe Flier, Have Nino kill the Lance Dragon, and have Reinhardt kill the Sword Horse.
Congrats, you just comepleted infernal mode!
(I would provide images but I don’t know how to, nor do I think Gamepedia has a feature for that.)
I followed this video: https://www.youtube.com/watch?v=GtVwpAx4wBc
But with step by step with these adjustments:
1. Nowi instead of Arvis:
- Atk should be at least 48.
- Slapped on a G tomebreaker and Def Ploy 1 Seal. I don't know if these two changes on Nowi make a difference, but I wanted to be safe.
2. Wyrs has a Spur Spd 1
3. Fjorm has Speed +1
4. Near the last turn, don't let Nowi take the Blue Manakete hit and instead just play it safe.
https://youtu.be/HhZOFz52ZzI
See the description for details
Video coming soon
Use everyone to buff Lyn and keep her moving. Start on the right side, as itll keep you from getting boxed in by reinforcements. With buffs and a Brave Bow, Lyn should be able to kill just about everything onscreen on her own.
Also, give Azura Wings of Mercy 3 for better maneuverability. Lyn will tank a lot of damage, but once you're on a roll you can destroy everything in your path.


