


Event History
| Start | End |
|---|---|
Map
- Normal
- Infernal
Grand Hero Battle: Rutger
This Grand Hero Battle takes place on the continent of Elibe, and sees players face off against the vengeance-seeking swordsman, Rutger! This is a challenging GHB that appears straightforward at first, but will quickly wear down teams with a well-rounded mix of reinforcements.
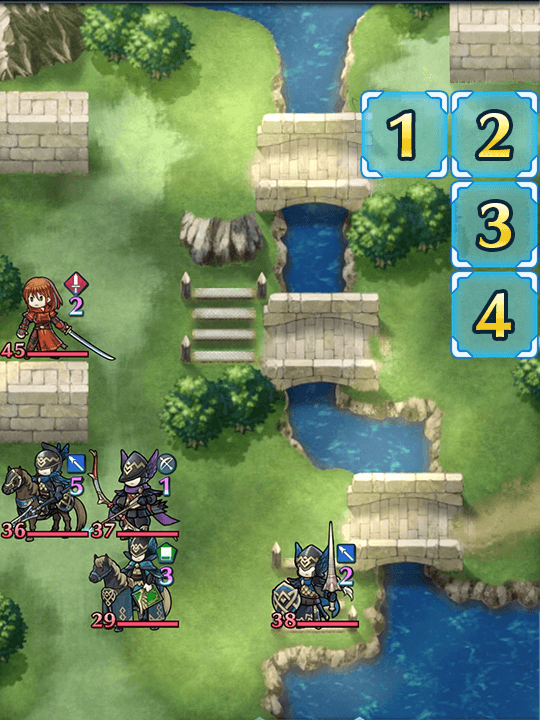
Adding to the challenge is the map, inspired from his (and Clarine’s!) recruitment map. It leaves player teams very little wiggle room, forcing them down a number of preset paths. This can make things challenging for cavaliers and armor looking to wall off the various paths. Enemies will clog the bridges quickly, putting a strong emphasis on defensive units who can hold choke points.
This map also has reinforcements from the rear (a neat throwback to the original). This means that having a rear-guard is required, lest your team has to fight on a new front. Keeping healers and other support units alive is a challenge with these reinforcements.
Who to Choose
As is generally true of Grand Hero Battles, your team’s strategy will be based primarily around the individual units picked for the fight. When it comes to teambuilding, there are a couple of routes one can take depending on which units the player has available. There are also some strong F2P heroes available who are suitable for this fight.
Tanks
The layout of the map forces teams down choke points, making a squad of sturdy tanks the most obvious choice. Enemy units are mainly physical, although there are two cavalry mages which prove hard to deal with. At least two tanks are recommended as the map layout funnels enemies down two major choke points.
Distant Counter is also important, as space is limited, and ranged attackers do not have the space to move around and pick off kills. The best tanks for this map are those with high Defense, some Resistance, and Distant Counter.
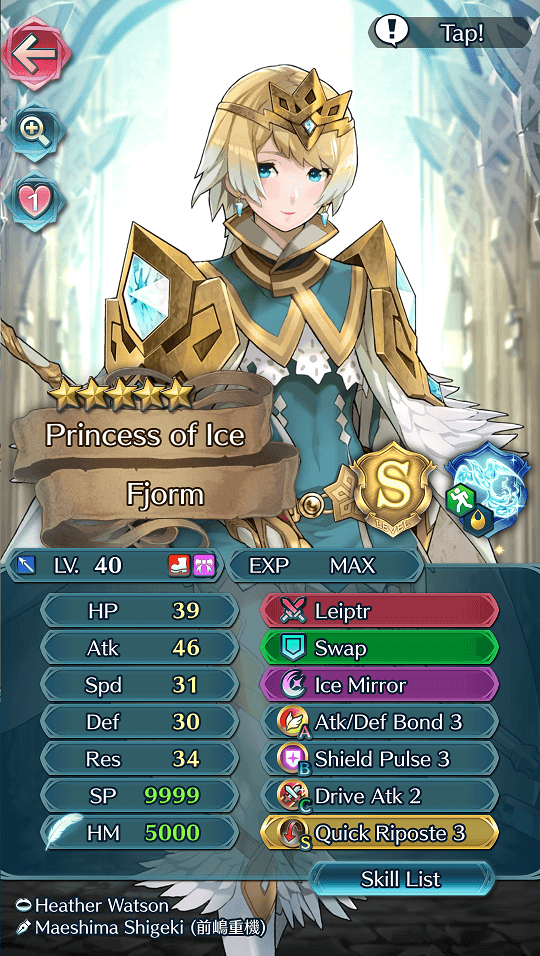
When looking at blue units, Fjorm stands out as an example of a suitable defensive unit. Although she is better at handling ranged threats, she can hold her own against physical units just fine. If using Fjorm, make sure to support her with defensive buffs or healing, as she can’t afford to forgo Ice Mirror for a healing Special. Lance infantry such as Donnel, Ephraim, and Oboro can do Fjorm’s job, but require heavy investment builds.
Blue dragons are also a solid pick, and often come with great statlines that excel in Defense and Resistance. Nowi and Corrin(F) are the most F2P-friendly, although Kana(M) is a good alternative. With Lightning Breath and Fierce, Steady or Warding Breath in their A slot, they will be able to hold the line and hit back against ranged attackers.
Warning: the green mage cavalier has Mystic Boost, preventing breath weapons from hitting the lower of its defensive stats! This cavalier should be handled by a red or green tank. If using a blue tank, be extra careful of their placement as there are many green units on this map, including an axe cavalier with an Emerald Axe.
With only a few red units present on the map, it is highly recommended to have a green armored unit. A strong green armor can hold either choke point and handle the lance infantry with Heavy Spear, although they will likely need to be healed if they do so.
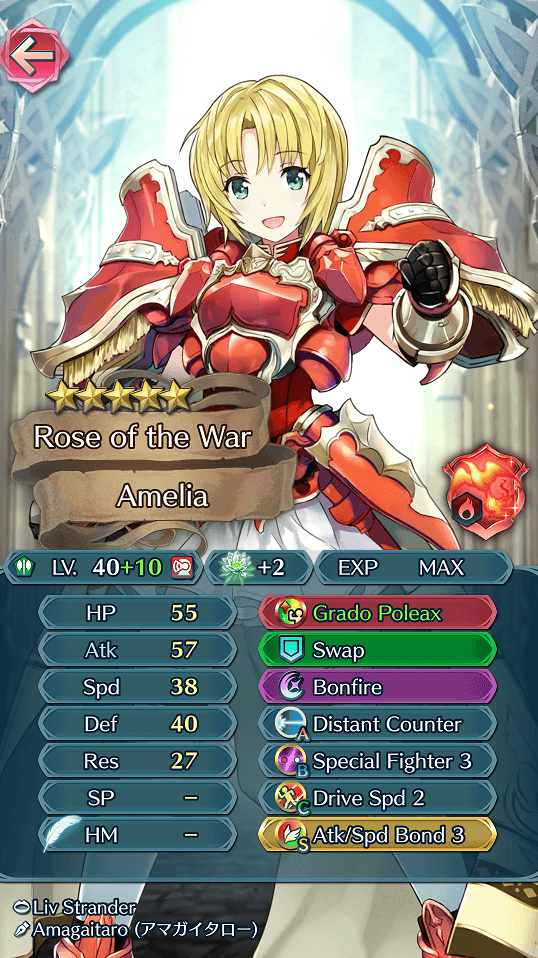
Hector is a good choice, although his low Resistance will mean he’ll need to be kept away from the green mage cavalier. Equipped with a healing special, Hector will be able to keep himself sustained and constantly heal. Sheena, Valentine’s Hector, Surtr, Fallen Robin(M), and Brave Ephraim are solid choices. Amelia is a particularly good choice due to her Speed, which allows her to prevent follow-up attacks consistently.
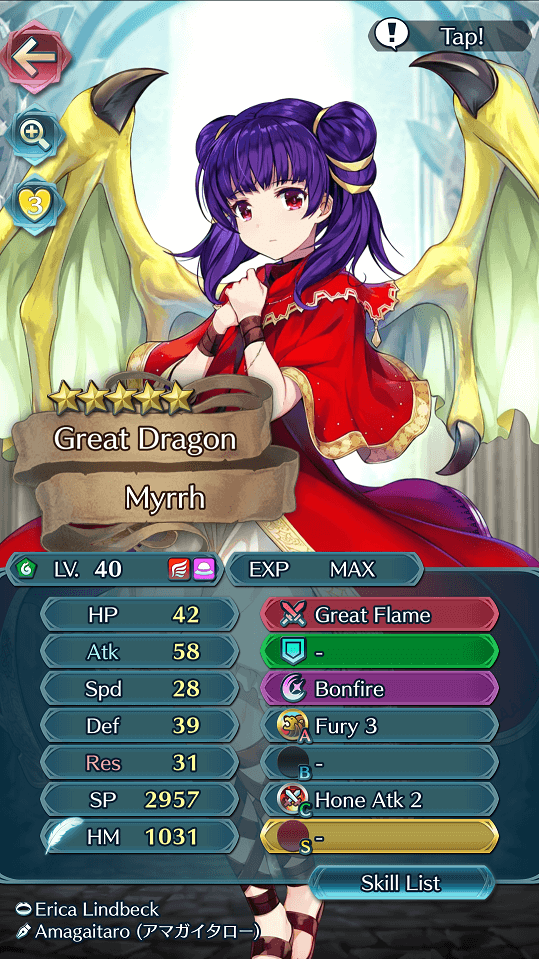
Myrrh is also noteworthy, as she has incredible defenses and can prevent follow-up attacks with the use of her personal weapon. But what makes her a strong choice is her ability to fly, which makes positioning a lot easier. Other miscellaneous choices for a green tank are Fae, Helbindi, Dorcas, Beruka, Brake Ike, Adrift Corrin(F), and Narcian.
With green units being the most common, it is almost essential to have a red tank. And since the three ranged enemies are red, green and colorless, it makes the most sense for this baiter to have Distant Counter.
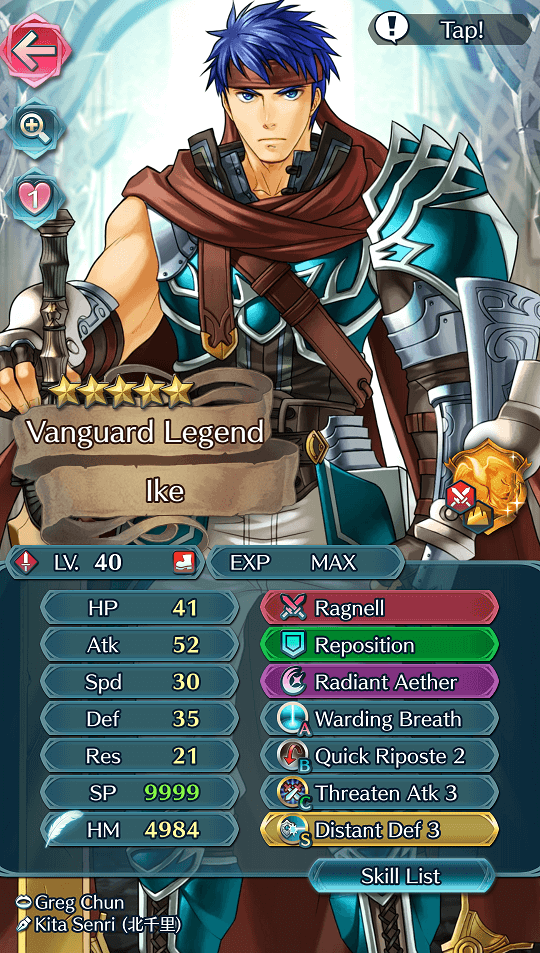
One need not look further than Legendary Ike, as with Warding Breath and Distant Defense, he makes him for his low Resistance. With his base kit he can charge and use a Radiant Aether in one turn, meaning he’s likely to keep himself healed.
Of all the tanks, it is most important for the red one to have Distant Counter. Zelgius, Black Knight, Adult Tiki, Young Tiki, Summer Tiki, Idunn, and (GD)Ike are all exceptional choices when using a healing Special.
Strikers
Strikers are difficult to use due to the layout of the map, but can come in handy during the middle and later parts of the battle. Both physical and magical attackers are useful here, as there are a mix of high-Defense and high-Resistance enemies. However, care should be taken as to not expose the team to the rear reinforcements.
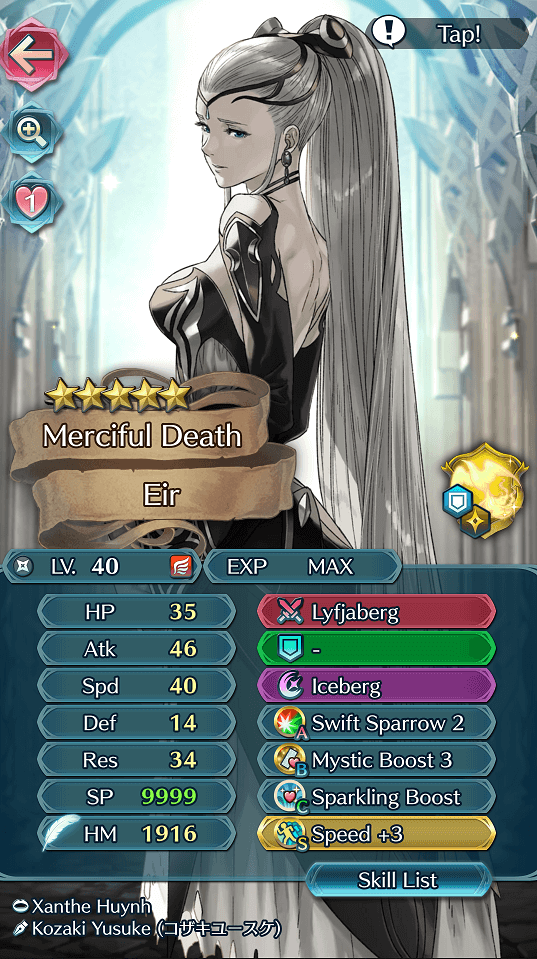
Eir is the strongest choice being a flier with range, solid offenses and stellar Resistance. She can tank the red and green mage cavaliers if needed, and keep her distance by using the water tiles to stay safe while attacking. Its recommended to use a refresher alongside Eir, as that will double her KO output.
Cavalry can be used, although they will need to abuse Reposition to get kills. This is a lot less efficient than Eir with a refresher, so it’s only recommended for novelty or if the cavalry is heavily invested.
Healers
Healers are a decent choice for this battle as they’ll be a huge boost to your frontline fighters. With skills like Rehabilitate and Physic, they can restore great amounts of HP to allies. Just keep in mind that using a healer will be difficult, since the map greatly limits positioning, and they’ll need to be kept safe.
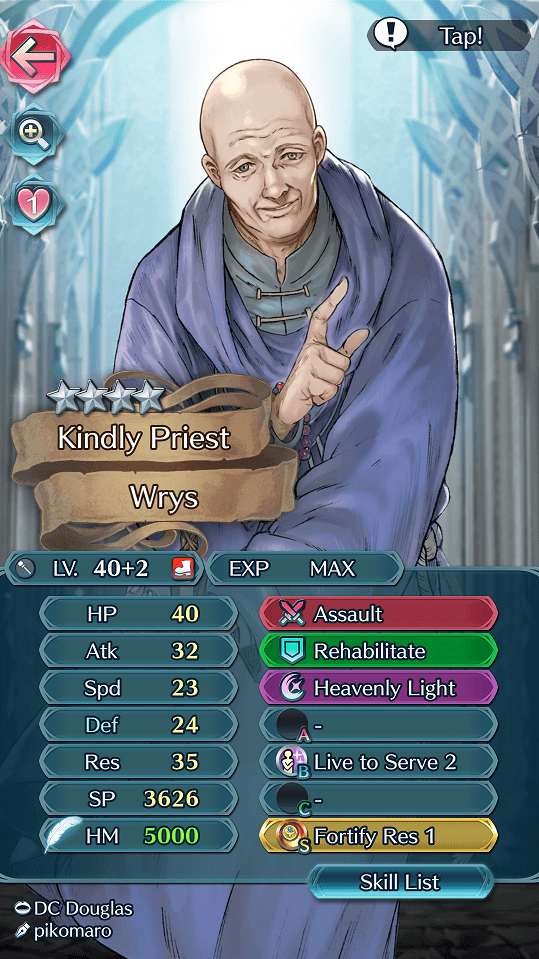
Wrys is a free unit who naturally learns Rehabilitate and works well during this battle. If players chose Brave Veronica in the Choose Your Legends event, she is great despite her movement restrictions and can provide powerful buffs to your team. Clarine is a nice choice who fits the Binding Blade theme!
Strategy
Getting Started
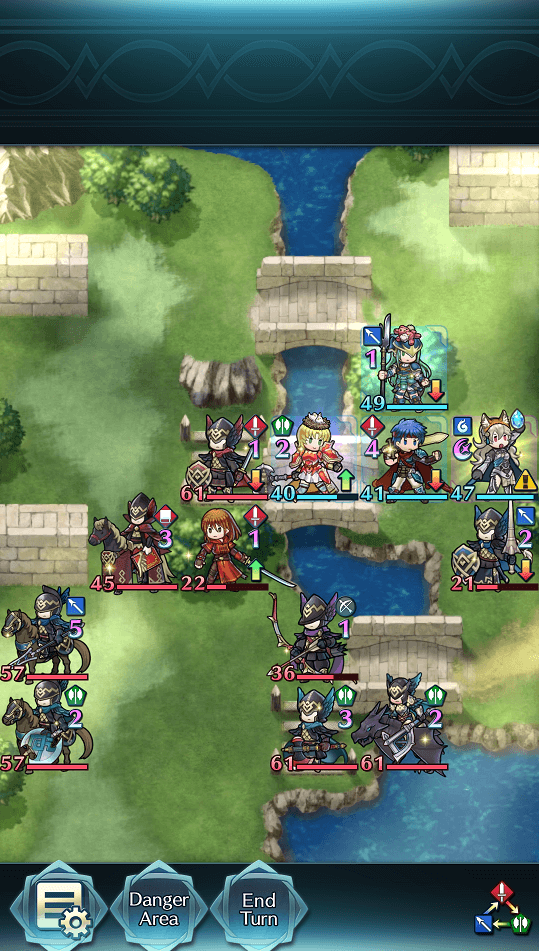
My team for this GHB is comprised of three tanks, plus a rear-guard support. Amelia is the primary tank with the job of KO’ing the green mage cavalier and stalling the western front. Corrin’s job is the handle the bottom side of the map. Legendary Ike offers support with Distant Counter and is useful for handling the green units at map’s end. Nephenee is my rear-guard and buffs Amelia with her dual Tactic skills. (disclaimer: Several of these units are heavily merged and invested, so this clear is meant as a general example of strategy)
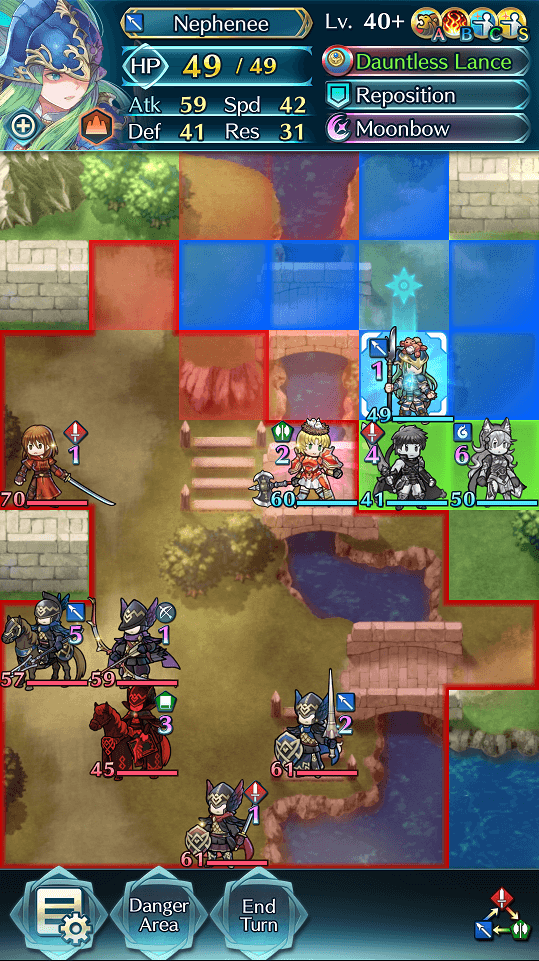
Right off the bat, I want to get my tanks in position to block the choke points. Firstly. Ike uses Reposition to get Amelia in place to lure the green mage cavalier. This is to save Corrin, who will be targeted by the green mage cavalier otherwise, and she'll need to be healthy to handle the onslaught of units soon coming her way. Nephenee sticks close to apply her buffs to Amelia.
Reinforcements Arrive
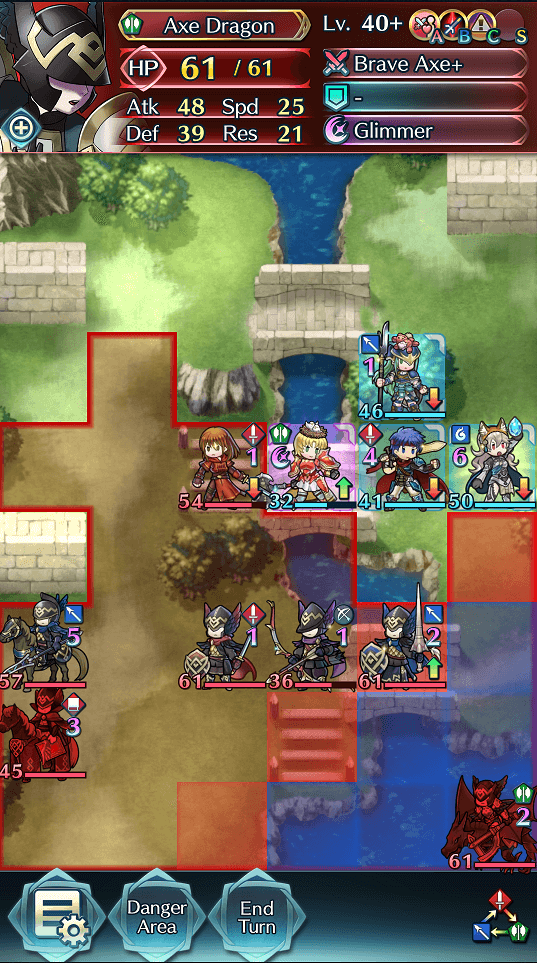
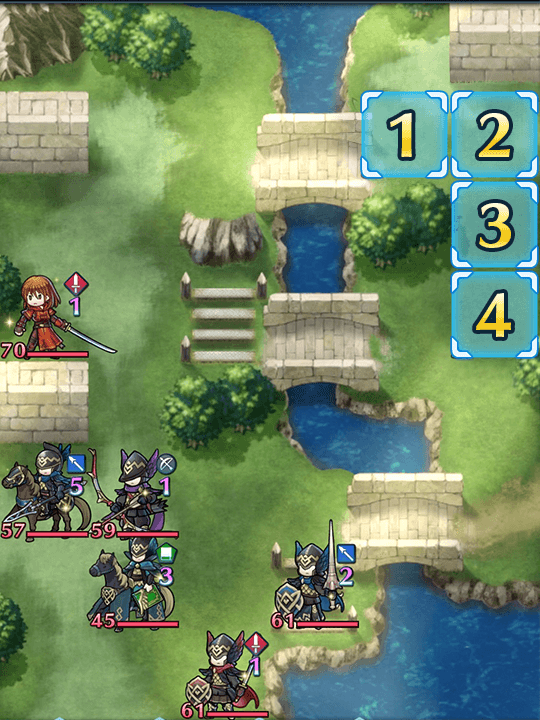
With Amelia in position to hold Rutger, the focus is now on the southern chokepoint. Corrin is ready to handle the lance infantry. Ike’s Threaten Atk is weakening Rutger, while Amelia is bolstered with buffs. Stalling on either the western or southern front is recommended, as it allows enemies to be staggered in a way that makes them more manageable.
Beware of the axe dragon, as they have Panic Ploy which will undo any buffs (assuming your tank has 60 or less HP). Along with the newly spawned red mage cavalier, they are a priority target. The archer has Rally Atk/Spd+ which is annoying, but I can't get to him just yet.
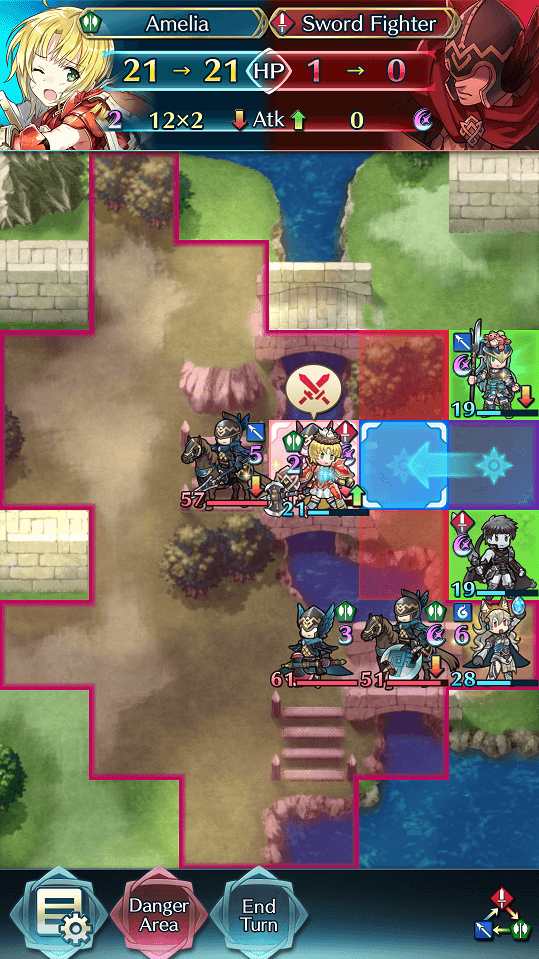
A Bridge Too Far
Amelia is holding nicely, although the red mage cavalier will dent her to the point that she will need to withdraw. The red mage cavalier only has 28 base Speed, but packs Odd Spd Wave and Darting Blow to score surprise follow-ups. This is another reason why the western tank should always have high Speed, as they'll need to prevent follow-ups from both Rutger and the mage.
Corrin can finish off the lance infantry, while Ike is in the perfect spot to handle the axe dragon. However, the real threat is from above, as a red and blue cavalier will soon spawn in the top-right of the map. Make sure your team is ready to engage them in turn four.
The Battle's Climax

The rear reinforcements have arrived, but my rear-guard is in position and ready to do her job. Beware, as the lance cavalier has Pass and the sword cavalier has Lunge. Thankfully, the tree is helpful here, as it allows Nephenee to block both cavaliers from the one space.
The bottom side of the map is starting to get tricky. However, no more reinforcements spawn from here on out. Ike uses Reposition to get Amelia off the frontlines while Corrin walks down to finish the archer and block the red mage cavalier's movement. Because both have Distant Counter, this means the mage will be defeated this turn and the final cleanup can begin.
Post-Rutger Rearrangement
Now begins the final cleanup, although a shuffle is required to get all units in position. With two green units at the bottom, I move my red tank to cover that side. Amelia can knock out the swordsman, leaving only the lance cavalier on that side.
Next turn, only the two green units remain. Ike can easily finish them off, ending the GHB!
If At First You Don’t Succeed
Don’t be fooled by video walkthroughs of any Grand Hero Battle that you watch -- it’s very rare for anyone to beat high-difficulty content (or record a video of themselves doing so!) on their first try. Additionally, the potential variance in unit builds that Skill Inheritance brought along with the random nature of summoning has resulted in pretty much every single summoner having different building blocks to work with. This, when combined with the high difficulty level of Infernal, may prove frustrating while someone is trying to find the right combination of units and moves. The key thing to keep in mind is that it may take some light Skill Inheritance and seal shuffling as well as multiple tries of the map to find a strategy that works for you. Every single turn you complete gets you one step closer to completing the puzzle. Finally, reading about or watching videos of successful strategies may also help you break through a particularly difficult turn that you can’t complete, or may give you ideas of a new unit to use.
Map Enemies
- Hard
- Lunatic
- Infernal
| HP | ATK | SPD | DEF | RES | |
|---|---|---|---|---|---|
| 45 | 38 | 30 | 21 | 17 | |
| Weapon | Slaying Edge+ | A | Atk/Def Bond 3 | ||
| Support | B | Vantage 3 | |||
| Special | Vengeance | C | Atk Smoke 3 | ||
| HP | ATK | SPD | DEF | RES | |
|---|---|---|---|---|---|
| 36 | 31 | 12 | 18 | 23 | |
| Weapon | Brave Lance | A | Sturdy Blow 1 | ||
| Support | B | Lunge | |||
| Special | Miracle | C | Distant Guard 3 | ||
| HP | ATK | SPD | DEF | RES | |
|---|---|---|---|---|---|
| 37 | 32 | 22 | 21 | 11 | |
| Weapon | Slaying Bow | A | Steady Blow 1 | ||
| Support | Rally Atk/Spd | B | Seal Spd/Def 2 | ||
| Special | Moonbow | C | Spur Atk/Def 1 | ||
| HP | ATK | SPD | DEF | RES | |
|---|---|---|---|---|---|
| 29 | 33 | 18 | 12 | 26 | |
| Weapon | Gronnowl | A | Mirror Strike 1 | ||
| Support | B | Mystic Boost 2 | |||
| Special | Iceberg | C | Drive Res 2 | ||
| HP | ATK | SPD | DEF | RES | |
|---|---|---|---|---|---|
| 38 | 33 | 22 | 23 | 16 | |
| Weapon | Slaying Spear | A | Darting Stance 3 | ||
| Support | B | R Tomebreaker 2 | |||
| Special | Escutcheon | C | Odd Atk Wave 2 | ||
| HP | ATK | SPD | DEF | RES | |
|---|---|---|---|---|---|
| 61 | 46 | 39 | 29 | 24 | |
| Weapon | Slaying Edge+ | A | Atk/Def Bond 3 | ||
| Support | B | Vantage 3 | |||
| Special | Vengeance | C | Atk Smoke 3 | ||
| HP | ATK | SPD | DEF | RES | |
|---|---|---|---|---|---|
| 49 | 42 | 19 | 25 | 30 | |
| Weapon | Brave Lance+ | A | Sturdy Blow 2 | ||
| Support | B | Lunge | |||
| Special | Miracle | C | Distant Guard 3 | ||
| HP | ATK | SPD | DEF | RES | |
|---|---|---|---|---|---|
| 51 | 44 | 29 | 29 | 16 | |
| Weapon | Slaying Bow+ | A | Steady Blow 2 | ||
| Support | Rally Atk/Spd+ | B | Seal Spd/Def 2 | ||
| Special | Moonbow | C | Spur Atk/Def 2 | ||
| HP | ATK | SPD | DEF | RES | |
|---|---|---|---|---|---|
| 39 | 45 | 25 | 17 | 34 | |
| Weapon | Gronnowl+ | A | Mirror Strike 2 | ||
| Support | B | Mystic Boost 3 | |||
| Special | Iceberg | C | Drive Res 2 | ||
| HP | ATK | SPD | DEF | RES | |
|---|---|---|---|---|---|
| 52 | 45 | 31 | 30 | 22 | |
| Weapon | Slaying Spear+ | A | Darting Stance 3 | ||
| Support | B | R Tomebreaker 3 | |||
| Special | Escutcheon | C | Odd Atk Wave 3 | ||
| HP | ATK | SPD | DEF | RES | |
|---|---|---|---|---|---|
| 70 | 49 | 43 | 32 | 27 | |
| Weapon | Slaying Edge+ | A | Atk/Def Bond 3 | ||
| Support | B | Vantage 3 | |||
| Special | Vengeance | C | Atk Smoke 3 | ||
| HP | ATK | SPD | DEF | RES | |
|---|---|---|---|---|---|
| 57 | 45 | 22 | 28 | 33 | |
| Weapon | Brave Lance+ | A | Sturdy Blow 2 | ||
| Support | B | Lunge | |||
| Special | Miracle | C | Distant Guard 3 | ||
| HP | ATK | SPD | DEF | RES | |
|---|---|---|---|---|---|
| 59 | 47 | 32 | 32 | 17 | |
| Weapon | Slaying Bow+ | A | Steady Blow 2 | ||
| Support | Rally Atk/Spd+ | B | Seal Spd/Def 2 | ||
| Special | Moonbow | C | Spur Atk/Def 2 | ||
| HP | ATK | SPD | DEF | RES | |
|---|---|---|---|---|---|
| 45 | 48 | 28 | 18 | 37 | |
| Weapon | Gronnowl+ | A | Mirror Strike 2 | ||
| Support | B | Mystic Boost 3 | |||
| Special | Iceberg | C | Drive Res 2 | ||
| HP | ATK | SPD | DEF | RES | |
|---|---|---|---|---|---|
| 61 | 48 | 34 | 33 | 24 | |
| Weapon | Slaying Spear+ | A | Darting Stance 3 | ||
| Support | B | R Tomebreaker 3 | |||
| Special | Escutcheon | C | Odd Atk Wave 3 | ||
| HP | ATK | SPD | DEF | RES | |
|---|---|---|---|---|---|
| 61 | 51 | 37 | 36 | 27 | |
| Weapon | Slaying Edge+ | A | Fury 3 | ||
| Support | Swap | B | Def/Res Link 3 | ||
| Special | Sacred Cowl | C | Drive Atk 2 | ||


