


Map
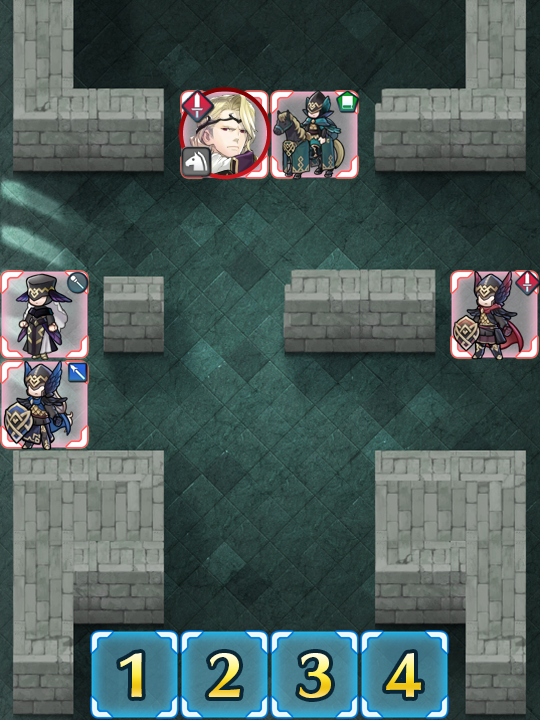
- Normal
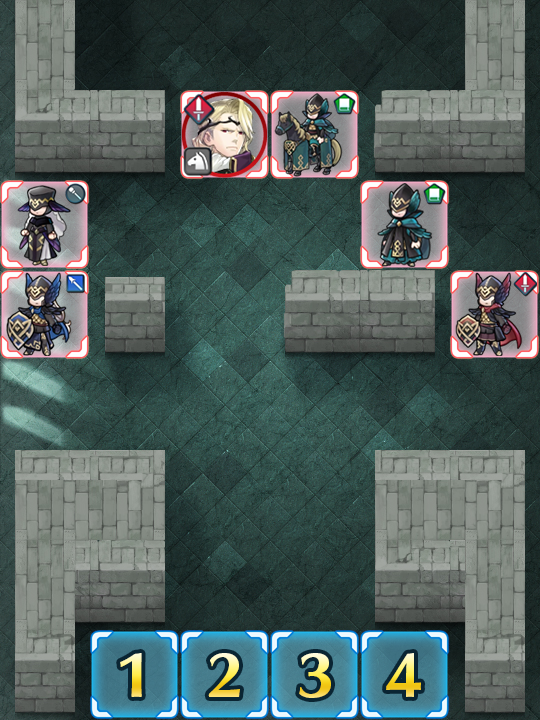
- Infernal
Xander: Paragon Knight
Xander, how we’ve missed thee! Finally, the dark knight of Nohr himself has returned from GHB purgatory, and now sports a new Infernal difficulty mode to boot. The re-run of Xander’s map has been hotly anticipated pretty much since his GHB originally expired, and now he’s back and better than ever -- if only Camus could be given the same treatment...
Originally, this map was so simple to defeat on Lunatic that even the right team of free 3 star units could clear it. The advent of Infernal, however, has somewhat complicated matters, though with the right units you still should be able to complete this GHB with relative ease, especially if you’re sure to have a clear answer to Xander himself.
Before you begin teambuilding, it’s completely possible you already possess everything you need to beat this map. Created by Gamepress staff member RedFerrari1998, the video guide below uses only F2P units, seals, and light, accessible skill inheritance -- see the description for more details. If it doesn’t work for you, though, then read on!
Who To Choose
As is generally true of GHBs, the individual units you will use is very important as they will primarily inform your strategy. There are a few routes you can take depending on what units you have available to you, and, of course, adjustment based on the units you possess is always a possibility.
Strikers
Since the easiest ways of starting this map require a striker, Brave Bows prove useful in this GHB due to their quadding potential, especially when combined with SPD buffs / spurs / drives or a breaker skill. Speedy bow users are an additional option although their damage output may be less depending on their currently active buffs. Brave Lyn, Bridal Cordelia, and Klein are potential strikers you may want to use.
Alternatively, Brave and Blade tome users can also serve to be just as useful if your team composition provides them with the appropriate buffs. Reinhardt, Blade Cecilia, Blade LA!Lilina, Blade S!Corrin, Blade S!Camilla, Nino, Tharja, and Tailtiu are all options here, though Reinhardt is particularly notable for being an effective check to almost half of this map on his own if he’s running Lancebreaker.
Due to Xander’s RES being exceptionally low and his SPD only being marginally better, he is incredibly susceptible to any unit who can target his RES, especially if they can also perform follow-ups on him. Linde, Delthea, Nowi, L’Arachel, Olwen, and even +SPD Robin (M) with the Speed +3 seal can all outspeed Xander and wipe him off the map.
Baiters
Although it’s more effective to use a striker on this map, if you don’t have one, you may attempt to bait instead.
To effectively bait on the right side, you’ll need a red unit. This is because you’ll naturally prefer taking neutral damage to the sword user and less damage from the green tome cavalry -- though you shouldn’t use a cavalry unit yourself, as this enemy totes weaponry effective against horses. Winter Tharja, Ike, VL!Ike, Ryoma, Black Knight, Zelgius, A!Tiki, and Lightning Breath Y!Tiki are all potential baiters that could work in this position. Be warned, however, that if you don’t choose this setup and go to the left instead, then you’ll be forced into a situation where one of the enemies you’re baiting will have a weapons triangle advantage against you. Unless you have a Close Counter colorless unit who can survive the onslaught, baiting on this side of the map is not recommended.
Dancers
Dancers help support units with high firepower, may even have a decent offensive presence themselves, and can usually tank a hit or two, if need be. Olivia, PA!Olivia, PA!Inigo, PA!Azura, Azura, Ninian, and NY!Azura all provide the support that high-firepower units need while also possessing the ability to net a few KOs themselves.
Strategy
Strategizing for this GHB is made much simpler by the fact that there are no reinforcements. While it’s difficult to exactly predict what will happen due to IV / Merge variance, here’s some general tips to get you started.
The Opening Number
The enemies on Xander’s map will not start to move unless they are baited, damaged, or KO’d. Since this map layout allows for a strike and retreat strategy and a baiting strategy, you’ll have to choose between an offensive or defensive opening turn.
As was mentioned in the baiters section above, you really only have one viable option for baiting -- the space directly in front of the infantry sword user on the right side of the map. Unfortunately, similar spaces on the left expose you to all three colors of the weapons triangle, which is something that even a highly buffed unit would have trouble enduring.
The decidedly more viable strategy, however, is to use a ranged unit to attack the infantry sword or lancer, have them be danced, and then Draw Back or Reposition your dancer out of the enemy’s range. The advantages of this strategy are clear and numerous -- since both these foes have rather low RES, it’s likely that you’ll get an easy KO here, especially if you have a fast mage at your disposal, have the weapons triangle on your side, use a breaker skill, or have an inclination towards just using Reinhardt. Brave bow users or particularly speedy archers are also an option, although they’ll hit these enemies in their stronger DEF. A breaker skill is also suggested here along with a low cooldown special like Moonbow or Luna, as when you attack an appropriate unit with a Brave Bow unit, you’ll be able to quad.
Preferably, you’ll want to net as many KOs as you can this turn, although that may not be possible depending on the units you have available to you. If your bait is missing out on finishing off the red sword or green cavalry mage, try the Quick Riposte seal or inherit the 2nd level of the skill onto your chosen baiter (which can be found on a 4 star Subaki). Vantage may also work here as a method of hitting the green cavalry mage hard once you’ve damaged or KO’d the infantry sword. A healer may also be useful, especially if they tote Physic+ -- they’ll be able to heal at-range or provide an assist with a Wrathful / Dazzling attack, if need be.
Knighty Knight
While it’s always a good idea to keep in mind how you’ll handle all the units on this map, your primary threat is, of course, Xander himself. If you lack blue mages or tanks that deal damage to RES, Xander might give you quite a bit of trouble, especially since his stats are so inflated.
Although you may be tempted to duel him with your next best option -- a red unit -- this isn’t the best idea given Xander’s high ATK and ability to counterattack at distance. You’re much better off bringing a dedicated counter for him, which can be found in the form of a 4 star Ursula with her native kit and Swordbreaker 1 or 2. She is able to survive a hit from Xander and KO him with effective damage, though if you decide to use her, take care to keep her away from the green mage cavalier.
Use Dancers
As always, dancers serve a valuable role refreshing your units and allowing them to get some KOs they cannot net outright. Some dancers can even provide valuable buffs that can help a unit either deal greater damage or survive a round of combat they would be KO’d by otherwise.
Hidden Dangers
Of all the units on this map, the healer is perhaps the most understated threat. If you’re using a striker + dancer strategy, then she shouldn’t give you trouble. If you’re forced to tank a hit from her, though, then you may be put in a rather unfavourable position due to her use of the Gravity staff, as your chosen unit may not be able to retreat. Other threats that aren’t immediately apparent include the green cavalry mage, who possesses weaponry that’s effective against cavalry.
The solution to these problems are simple -- know thy enemy, and know them well. Whenever you start a map (whether you’re in the Arena or single player modes) it’s worthwhile to do a quick survey to know what you’re going up against, otherwise enemies like the red infantry sword carrying Quick Riposte on this map may take you by surprise. From there, you can adjust the units you decide to use and your strategy based on the immediate and hidden dangers. For example, you may find that your team composition has an easier time in this GHB if you prioritize KOing the healer first, or that she’s not much of an issue at all.
If At First You Don’t Succeed
As is true of all high difficulty content, the potential variance in unit builds that Skill Inheritance brought along with the random nature of summoning has resulted in pretty much every single player having different “building blocks” to work with. This, when combined with the high difficulty level of Infernal, may prove frustrating while someone is trying to find the right combination of units and moves. The key thing to keep in mind is that it may take multiple tries of the map and a few stamina potions for you to find a strategy that works for you. Every single turn you complete gets you one step closer to completing the puzzle. Reading about or watching videos of successful strategies may also help you break through a particularly difficult turn that you can’t complete, or may give you ideas of a new unit to use.
Map Enemies
- Hard
- Lunatic
- Infernal
| HP | ATK | SPD | DEF | RES | |
|---|---|---|---|---|---|
| 46 | 41 | 18 | 29 | 12 | |
| Weapon | Siegfried | A | Armored Blow 3 | ||
| Support | B | ||||
| Special | Blazing Light | C | Spur Def 3 | ||
| HP | ATK | SPD | DEF | RES | |
|---|---|---|---|---|---|
| 39 | 31 | 23 | 23 | 16 | |
| Weapon | Killer Lance+ | A | Armored Blow 2 | ||
| Support | B | Quick Riposte 3 | |||
| Special | Ignis | C | |||
| HP | ATK | SPD | DEF | RES | |
|---|---|---|---|---|---|
| 30 | 27 | 20 | 17 | 28 | |
| Weapon | Gravity | A | |||
| Support | Recover | B | Wings of Mercy 3 | ||
| Special | Solid-Earth Balm | C | Hone Spd 2 | ||
| HP | ATK | SPD | DEF | RES | |
|---|---|---|---|---|---|
| 39 | 31 | 23 | 23 | 16 | |
| Weapon | Killing Edge | A | Armored Blow 2 | ||
| Support | B | Quick Riposte 3 | |||
| Special | Ignis | C | |||
| HP | ATK | SPD | DEF | RES | |
|---|---|---|---|---|---|
| 29 | 34 | 19 | 12 | 27 | |
| Weapon | Gronnwolf | A | Warding Blow 2 | ||
| Support | B | Vantage 2 | |||
| Special | Glacies | C | Hone Cavalry | ||
| HP | ATK | SPD | DEF | RES | |
|---|---|---|---|---|---|
| 61 | 48 | 25 | 38 | 17 | |
| Weapon | Siegfried | A | Armored Blow 3 | ||
| Support | B | ||||
| Special | Blazing Light | C | Spur Def 3 | ||
| HP | ATK | SPD | DEF | RES | |
|---|---|---|---|---|---|
| 52 | 42 | 31 | 30 | 23 | |
| Weapon | Killer Lance | A | Armored Blow 3 | ||
| Support | B | Quick Riposte 3 | |||
| Special | Ignis | C | |||
| HP | ATK | SPD | DEF | RES | |
|---|---|---|---|---|---|
| 42 | 34 | 28 | 24 | 36 | |
| Weapon | Gravity | A | |||
| Support | Recover | B | Wings of Mercy 3 | ||
| Special | Solid-Earth Balm | C | Hone Spd 3 | ||
| HP | ATK | SPD | DEF | RES | |
|---|---|---|---|---|---|
| 52 | 42 | 31 | 30 | 23 | |
| Weapon | Killing Edge+ | A | Armored Blow 3 | ||
| Support | B | Quick Riposte 3 | |||
| Special | Ignis | C | |||
| HP | ATK | SPD | DEF | RES | |
|---|---|---|---|---|---|
| 40 | 46 | 26 | 17 | 35 | |
| Weapon | Gronnwolf+ | A | Warding Blow 3 | ||
| Support | B | Vantage 3 | |||
| Special | Glacies | C | Hone Cavalry | ||
| HP | ATK | SPD | DEF | RES | |
|---|---|---|---|---|---|
| 70 | 51 | 27 | 42 | 19 | |
| Weapon | Siegfried | A | Water Boost 3 | ||
| Support | B | Guard 3 | |||
| Special | Aegis | C | Panic Ploy 3 | ||
| HP | ATK | SPD | DEF | RES | |
|---|---|---|---|---|---|
| 61 | 48 | 34 | 33 | 25 | |
| Weapon | Slaying Lance+ | A | Sturdy Blow 2 | ||
| Support | Swap | B | Knock Back | ||
| Special | Ignis | C | Drive Spd 2 | ||
| HP | ATK | SPD | DEF | RES | |
|---|---|---|---|---|---|
| 52 | 41 | 33 | 26 | 39 | |
| Weapon | Gravity+ | A | HP/Spd 2 | ||
| Support | Recover+ | B | Wings of Mercy 3 | ||
| Special | Kindled-Fire Balm | C | Hone Spd 3 | ||
| HP | ATK | SPD | DEF | RES | |
|---|---|---|---|---|---|
| 46 | 51 | 28 | 19 | 38 | |
| Weapon | Keen Gronnwolf+ | A | Mirror Strike 2 | ||
| Support | B | Vantage 3 | |||
| Special | Glacies | C | Fortify Cavalry | ||
| HP | ATK | SPD | DEF | RES | |
|---|---|---|---|---|---|
| 52 | 50 | 38 | 25 | 34 | |
| Weapon | Rexcalibur+ | A | Fury 3 | ||
| Support | B | Bowbreaker 2 | |||
| Special | Glimmer | C | Drive Res 2 | ||
| HP | ATK | SPD | DEF | RES | |
|---|---|---|---|---|---|
| 61 | 48 | 34 | 33 | 25 | |
| Weapon | Slaying Edge+ | A | Sturdy Blow 2 | ||
| Support | B | Quick Riposte 3 | |||
| Special | Ignis | C | Drive Atk 2 | ||
User Submitted Teams
This is all made possible by having Ike take the Green Mage on the enemies turn but being out of range of all else except the red unit on the right. There's a spot on the right that you can move Ike too that is out of range of everything but the Green Mage and the red unit on the right if you set it up the turn before by moving him to the edge of their attack zone. Ike will easily handle the the Green Mage on the enemies turn and will survive the red units attack with about 8-10 health while having Aether ready on the next turn to take out the red unit and heal up. Nowi (with Sing from Azura) and Kagero will be set up to take out Xander and the Blue unit on the left after they have moved up into range. Finish the healer off the next turn and you're golden!
Keys to the strat:
Ike must have Vantage 3 and have Aether and Heavy Blade 3 for this to work.
I used Nowi to buff Ike's defense before he went over there as well. My Nowi has Fury 3 and Swordbreaker 3 but that shouldn't affect killing Xander too much with a dancer and a heavy hitting ranged to take the Blue unit down.
I used Kagero but Nino or Julia would work well too. This revolves more around Ike and having a very strong Blue unit who can take Xander down in at least two hits with Sing.
The idea is to buff Tharja up with the Hone Atk from Olivia, to annihilate the Red Infantery at the right from the get-go. Coincidentally, this counters the Green Cavalry Mage near Xander as well, while putting Tharja out of the range of the Blue Infantery unit to the left. It is important to be able to ORKO the red one, lest the Cleric (left) uses Wings of NoMercy, enabling the Red infantery to KO Tharja with the help of the Green Cavalry.
Now, ideally, you already killed the Red Infantery and the Green Cavalry mage, the Blue Infantery can be killed by Tharja, and whatever fourth unit you brought with you, in my case Taco. Should your damage not suffice, use Olivia to attack again, disposing of the Blue Infantery. Xander is easily ORKO'd by Abel, while the Cleric should be of no threat to you at all. Enjoy your 4* Xander^^
Optional units;
-Anything green to kill the Blue infantery in the second Turn. I used Taco, as he is one of my favorites, and I lack mages.
- Azura with Hone Atk (any unit with Hone Atk, tbh)
This team nearly OHKO every enemy they face.
Team:
First team member is Robin (M) with swordbreaker 2. He takes out Xander and the Red Sword User in one hit.
Second team member is Olivia. She is used for Dance and Hone ATK 3.
Third is Lucina. She takes out the Green Tome and the Mage in the end. Plus she helps with Spur ATK 3 (although I don't think its necessary).
Fourth is Nino. She takes out the Lance User and helps to get Olivia out of range and Lucina in range to attack with Draw Back. Important: She has to be at 40 SPD to double the Lance User (mine was +SPD with +1 SPD seal; maybe Fortify SPD will help if you don't have enough)
Positioning:
When you have Danger Area activated Nino has to be on the front left line. Robin right next to her and Olivia behind her. Lucina stays down in the left corner.
Fight:
Nino takes out the Lance User by double him. Then Olivia uses Dance and Nino falls back behind her by draging her back out of the range of Xander. Lucina moves 2 squares left next to Nino. Robin don't move. End Turn. Attackers approach.
Now it's Robins turn. He takes out Xander in one hit so that the way to the Green Tome behind him is free. Nino uses Draw Back to Move Lucina to the left that she is behind Olivia. Then she moves up and get Danced by Olivia to kill the Green Tome. End Turn. The enemies left are no threat anymore. They attack but none of them can kill the units you have in the front line. In the last turn Lucina can kill the Mage while Robin takes out the Red Sword that is left.
Replacements:
Robin can maybe be replaced by a hard hitting Blue Tome which can take a hit from the Red Sword User.
Lucina can maybe be replaced by another strong Sword User that can take a hit from the Mage and maybe the Red Sword User.
Nino is hard to replace thanks to his high SPD and ATK along with his Draw Back which has not to be inherited.
Olivia could be replaced with another Dancer/Singer maybe with Hone SPD/ATK to get your unit upon the threshold.
Hope it helps and good luck.
I got through this battle first try using this team. It is crucial to eliminate the green horse mage so i sent Tharja to defeat the red sword fighter on the right. Tharja later on will be attacked by the green horse mage but fortunately WILL survive the encounter. (At this moment make sure that there are no other units in the danger zone as the mage may choose to differ his attack.) By this point the blue lancer will be between the healer and Xander so use an appropriate archer/mage to finish the blue lancer off. When he is gone position your tank to attack xander. This attack will not defeat him however your tank should be able to survive until it finishes Xander off. Kill the healer afterwards.
This was a first try win for me. The only hero using inheritance is Linde, with desperation 3, fury 3 and moonbow. Start the fight by positioning the girls so that linde can one-shot the red swordsman on the right. This makes it so that only the green mage can get to her, but she'll survive, activating desperation mode. All other enemy units will rush towards your position, so use desperation activated linde to slaughter xander, sanaki to kill the green mage and camilla to kill the lancer and dance her to kill the cleric. If you can't make it in two rounds, make sure that only the cleric survives, cause he won't even be able to deal a single point of dmg to linde who should have 1hp at this point.
Overall, this fight is much easier than many other grand hero battles and definitely can be done with a wide variety of heroes, if you can make it past the first turn and use a hero, which Xander can't counterattack (desperation, brawe weapon).


