


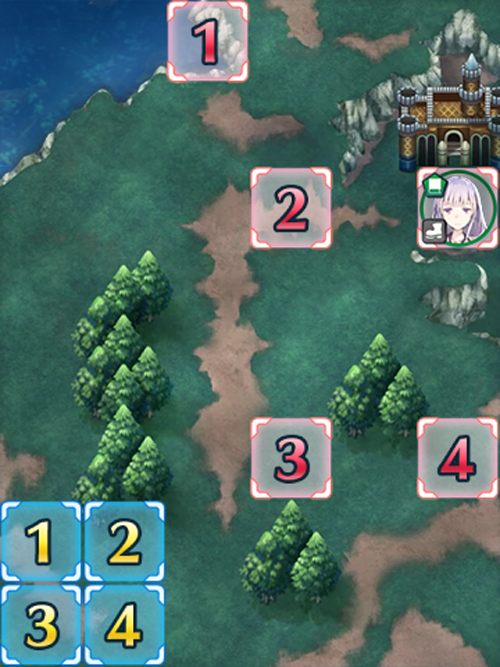
Map
Bonus Allies
|
|
||||
|---|---|---|---|---|
 |
 |
|||
Event Overview
This special event contains a series of maps you must fight your way through from beginning to end. Losing does not mean game over, as you can retry with a second team. At the end of each round, points are received based on clear speed, survivability and bonus units. Your total points are tallied and used to unlock various rewards, many of which are exclusive to the Tempest Trials. Additionally, there is a player ranking with large feather rewards given to those with the highest scores.
Other Rules
- Bonus allies gain significant stat boosts (HP+10, +4 other stats).
- Bonus allies gain double EXP and SP.
- Your first two runs per day earn triple points.
Notable Rewards
Brash Assault 1 seal (12,000 Score)
- Brash Assault is a skill that lets a unit guarantee a follow-up attack when certain conditions are met. Normally obtainable as a B slot skill, Brash Assault isn’t particularly difficult to get, but now it can be paired up with Desperation to let melee units sweep when at low health.
Atk Smoke 1 seal (20,000 Score)
- This Sacred Seal debuffs units in an area, lowering attack by seven after combat once it’s upgraded to level three. This is one of the best rewards from the Tempest Trials, allowing units to extend their survivability beyond normal levels.
5★ Arden (30,000 Score)
- Arden is the reward unit for these Tempest Trials, boasting both an incredible statline and a unique B skill that combines Quick Riposte and Brash Assault. Arden is a standout unit, rivaling even the Black Knight who came before him as a red armored sword-user.
Guidance 1 seal (40,000 Score)
- Previously only available on just one unit, Guidance lets infantry and armored allies gain a Wings of Mercy-style effect when less than two spaces away. It’s easy to use and huge help in maneuvering low-movement allies around, and can even let them cross impassable terrain.
In addition to the normal rewards, there are also a large amount of Sacred Coins available at varying reward tiers!
Preparing for the Trials
There are two approaches to the Tempest Trials: manually playing through higher difficulties, and using auto-battle to clear lower difficulties. A good strategy for players who want to avoid burnout is to manually play twice per day on the highest difficulty, to get the largest possible score from the 3x multiplier. Afterwards, they can simply auto-battle on lower difficulties to use up any spare stamina.
Thanks to the large stat bonuses granted to bonus units, team-building largely revolves around them (although ultimately, only one is ever truly required). The Tempest Trials are a fantastic way to increase a unit's Hero Merit and SP, so some may use sub-optimal teams for this purpose.
Team Building Overview
Without further ado, let us jump into the team-building part of the guide. Instead of talking about just completed teams, I’ll be talking about the elements that make those teams successful, so that players with varying boxes can construct viable teams. Unless otherwise stated, all units from here on out are assumed to be running their recommended builds. A team with the best chance of success will have the following:
- As many bonus units as possible.
- Source of healing.
- Strategy for the final map.
- A unit to combat each colour (As the actual units within each map can vary greatly).
Bonus Units
The first units you’ll want to think about using are of course, the bonus units. With their huge stat bonuses (+10 HP, +4 to all other stats) They will punch far above their normal weight. Ayra is the strongest unit available for this Tempest Trials, and at high merge levels can destroy most of it with ease. Sigurd’s ability to survive vs. magic damage also makes him a great choice, and with some healing, can tank most enemies present. Deirdre and Tailtiu are the ranged options, but fulfil different roles. Deirdre is a magic tank with excellent resistance, and Tailtiu is offensively inclined with great speed and enough resistance to survive most magical-based threats.
Arvis and Arden are the F2P choices, and each excels at their own niche. Arvis is a great counter to Julia, and can provide debuffs, healing and strong magic damage to your team. Arden is nearly unkillable on the physical side and can tank most of the enemies with ease. Eldigan is more than usable and with a simple swordbreaker build will pull his weight. Just keep in mind that Fury’s damage will add up over time, and he will either need solid healing or a different A slot skill. Lastly, Lachesis is a great choice for a team, being the only bonus unit healer.
On the whole, most of the red units here can reliably KO Julia, but must beware of the excessive amounts of Triangle Adept/Sapphire Lance users in the trials, particularly in the final stage.
Healers
Healers are fantastic in the Tempest Trials, and can single-handedly sustain your team throughout the duration of the run. However, running a healer can compromise your team (unless you can get Wrathful/Dazzling Staff). It’s highly recommended to take a healer for safe runs, but keep in mind that they can slow your runs down compared to more offensive teams. There are also many viable alternatives to dedicated healers.
There are a few types of builds which can be used to heal teams without using a valuable team slot on a dedicated healer. The first of these is the “Renewal Medic”, a build type which relies on healing from Renewal and the legendary weapon Falchion. Arvis is a bonus unit with access to the Recover Ring, allowing him to be one of the best healers. Reciprocal Aid is a must-have skill to ensure clean transferral of health to allies.
Breath of Life is another great skill capable of turning a unit into a substitute healer. With the skill itself and the fully upgraded seal, it’s possible to heal 14 health to allies every attack. Dagger-users have access to a dagger to provide further healing, as does Linde with her unique tome Aura. Reciprocal Aid is a must here too, to ensure that Linde herself can remain sustained. Remember that a dancer can potentially double this healing output. Lastly, there is the "sustain tank" build recently popularized with the addition of the Steady Breath skill. With a cooldown -1 weapon, Steady Breath, Quick Riposte and Aether, a unit can charge and fire off their special every round of combat, keeping their health topped up over a long time.
Dancers
These are some of the most potent allies for Tempest Trials, offering both safety and speed to your run. In short, they are great for all the usual reasons, but are affected by their low combat stats, which can hold them back. Due to team limitations, if you choose to field a dancer they must be a respectable combat unit in their own right, with either a full build or something close. However, none are featured as bonus units this time.
Sweepers
One of the easiest ways to clear the Tempest Trials is with a powerful ranged attacker wielding a Brave bow or Blade tome. Combined with a buffer or dancer, they can destroy most units in the trials with ease once they are under the Desperation threshold. Nino, Linde, Tharja and The Reinhardt are all common choices. Cavalry teams are great for this, and can be run with Sigurd or Eldigan. Tailtiu is a natural Blade tome user and can easily clear the maps with proper support.
Autobattle
For those looking to save time, the autobattle feature lets you quickly gain tempest points with minimal effort. When creating an autobattle team, there are a few considerations:
Difficulty
- Hard (5 Battles) is for most people the most suitable difficulty, assuming you can use a whole team of five star characters. With enough bonus units or merges, it may be possible to do the lower infernal difficulty.
Team Building
- Team building considerations are mostly the same for manual teams. The AI tends to play recklessly, making tanky units with well-rounded statlines and Distant Counter fare the best. A dedicated healer is nearly always better unless you have multiple units with Aether or other healing. If you choose a dedicated healer, don’t forget to un-equip their weapon. Otherwise, the AI will treat them like a ranged attacker, and play aggressively with them.
Triangle Adept/Gem Weapons
- Enemies with gem weapons can prove troublesome, as the AI will rush forth headlong into them if you’re in range. Your own units will most likely decimate foes they are strong against, and thanks to the AI, will have many disadvantageous matchups. There are quite a few blue units with either Triangle Adept/Sapphire Lance, so a solid green unit is recommended.
Don’t sweat it!
- At the end of the day, losing a team or two does not affect score by a large margin. Speed is much more important, so building slightly riskier (but much faster) teams is a good idea.
Enemy 1: Melee Flying Units
Enemy 3: Armored Units
Enemy 4: Ranged Infantry Units
Map Enemies
- Normal
- Hard
- Lunatic
| HP | ATK | SPD | DEF | RES | |
|---|---|---|---|---|---|
| 25 | 24 | 14 | 9 | 17 | |
| Weapon | Elwind | A | Resistance +1 | ||
| Support | B | ||||
| Special | Dragon Gaze | C | Breath of Life 1 | ||
| HP | ATK | SPD | DEF | RES | |
|---|---|---|---|---|---|
| 32 | 34 | 19 | 12 | 25 | |
| Weapon | Rexcalibur | A | Resistance +2 | ||
| Support | B | ||||
| Special | Dragon Gaze | C | Breath of Life 1 | ||
| HP | ATK | SPD | DEF | RES | |
|---|---|---|---|---|---|
| 36 | 38 | 21 | 14 | 29 | |
| Weapon | Rexcalibur | A | Resistance +3 | ||
| Support | B | ||||
| Special | Dragon Fang | C | Breath of Life 2 | ||
| HP | ATK | SPD | DEF | RES | |
|---|---|---|---|---|---|
| 45 | 49 | 27 | 18 | 34 | |
| Weapon | Naga | A | Resistance +3 | ||
| Support | B | Poison Strike 2 | |||
| Special | Dragon Fang | C | Breath of Life 3 | ||
| HP | ATK | SPD | DEF | RES | |
|---|---|---|---|---|---|
| 49 | 52 | 30 | 20 | 37 | |
| Weapon | Naga | A | Resistance +3 | ||
| Support | B | Poison Strike 3 | |||
| Special | Dragon Fang | C | Breath of Life 3 | ||
| HP | ATK | SPD | DEF | RES | |
|---|---|---|---|---|---|
| 49 | 52 | 30 | 20 | 37 | |
| Weapon | Naga | A | Resistance +3 | ||
| Support | B | Poison Strike 3 | |||
| Special | Dragon Fang | C | Breath of Life 3 | ||
User Submitted Teams
-Ayra-
swift sparrow2/desperation3/threaten def3/Phantom speed2
-Reinhardt-
DB3/Lance breaker3/goad cav/QP+Luna
-Cecilia-
TA3/B.tome breaker3/hone cav/breath of life seal1
-Priscilla-
HP+5/WoM3/hone cav/spur def or res seal and Rehabilitate
Have fun steamrolling! Except when the pesky Innes shows up. Then, kill it with Fayra!
A/N at -HP (37), Ayra will be boosted to 47 Hp, marking her desperation threshhold at about 35,7 aka 35 and lower. Cecilias Breath of life 1 seal helps to smoothen up the rough healing provided by Rehabilitate, so that Arya keeps at about 34/35 Hp, proccing desperation and OHKO'ing most of the enemy's roster.
This team is mainly range-oriented, with Ayra for close-combat battles.
Arvis serves as a pseudo healer thanks to Reciprocal Aid. He and Deirdre are under an ally support, and both have multiple ploys running (Deirdre has Atk Ploy Seal alongside her Spd Ploy, Arvis has his Valflame and Def Ploy). Deirdre, meanwhile, has Draw Back, which is crucial in various places.
Brave Lyn gets the summoner support for this Tempest and uses her base kit along with Swap. Ayra was incomplete at the start of Tempest, but she still pulls her weight.
The classic horse emblem. Hone cavalry and reposition.
Lyn and Rein are s-ranked with each other. Let azura and hone cavalry boost slow sigurd. Use sigurd defensively or as bait.
This team can clear Lv 40 Lunatic very easily without loss.
Lachesis is turned into a Loli by the DARK POWERS of Vampire Loli Delthea! Will she and her new masters defeat the evil Julia and recruit the ugliest boy in town?
Ayra is simply amazing on this map. As long as she isn't -ATK or -SPD, she will perform amazingly throughout the entire trial.
Ayra (+HP -RES)
Ayra's Blade, Reposition, Regnal Astra, Swift Sparrow 2, Desperation 3, Threaten Spd 3, Squad Ace D 3
Reinhardt (+ATK -DEF)
Dire Thunder, Reposition, Luna, Death Blow 3, Lancebreaker 3, Hone Cavalry, Attack +3
Brave Lyn (Neutral)
Brave Bow+, Reposition, Luna, Life and Death 3, Sacae's Blessing, Hone Cavalry, Speed +1
Performing Azura (+SPD -ATK)
Urdr, Sing, Moonbow, Triangle Adept, Wings of Mercy 3, Hone Atk 3, HP +3
-----
Regarding to team composition, it covers all colors at relative ease.
Ayra can completely wall almost any Axe users on any map that has them. Including Hector -- she will utterly destroy him in two hits. She is also an easy answer to Julia, the trial end boss.
Reinhardt being a Reinhardt as usual. He nukes the hell out of Red units in general and those that lack Resistance in general. He is also a solid answer to Effie if she shows up at any point.
Brave Lyn can easily take care of fliers and those with low Defense in general. With Sacae's Blessing, she can safely attack any unit with Distant Counter weapons without worry,
Performing Azura covers Blue units to a certain degree. Her low Defense does not allow her to take hits physically, but if it's Nowi, Ninian or F.Corrin then P.Azura can easily take out those units since she will tank their hits and hit them back hard. She provides her support to those that need it.
Since I paired P.Azura with Ayra through Ally Support, the latter will have a hard time dying to most units throughout the trial, especially acquiring stat boosts. Making Ayra the ideal damage carry and the best 40% bonus unit.
Additionally, the chosen maps are not very difficult at all. So there is a very good chance that you will not run into any issues at all. Pay close attention to your enemy skills and stats and you will have yourself a clean, deathless run.


