
Event Overview
This special event contains a series of maps you must fight your way through from beginning to end. Losing does not mean game over, as you can retry with a second team. Therefore, teams should try and prioritise for speed as well as survivability. There are a few changes this time around, which make the trials easier. The important ones are as follows:
- Focus units gain significant stat boosts (HP+10, +4 other stats).
- Focus units gain double EXP and SP.
- Your first two runs per day earn triple points.
- There is a new easier difficulty and normal difficulty Trials cost 15 stamina
Bonus Allies
Preparing for the Trials
Before you can attempt the Tempest Trials, it’s assumed that you have a decent pool (at least two of each colour) heroes at five stars, or four stars with a high merge value. It’s also expected that you have a recommended skill build, as some of the fights will be very tough. It’s a lot easier to claim rewards this time around, so although the highest difficulty gives the most points, it is possible to claim the important ones on lower difficulties. Losing a team will not significantly affect your point yield, so don’t stress about losing time. With the triple points bonus at the start of the day, it is very easy to obtain the top seal without excessive grinding.
Notable Rewards
4★ Clive (6000 Score)
- Clive is a blue cavalry unit with great HP and defense, and decent attack. He is comparable to Berkut but has slightly better speed. He comes with the previously-exclusive skill Hit and Run, making him a valuable reward for the trials.
Breath of Life 1 seal (12,000 Score)
- This reward was offered during the first Tempest Trial, but is back. It's a great pickup for units looking for minor healing to offset penalties from skills such as Fury. For those who already obtained this reward during the first trial, it will be converted to 300 feathers instead.
Atk Ploy 1 seal (20,000 Score)
- A seal that can lower the attack of foes, depending on the unit's position and resistance. A very valuable pickup, as it allows units to instead run more powerful buff skills without sacrificing Slot C for threaten. Useful for nearly all types of units.
5★ Clive (30,000 Score)
- A second copy of Clive, coming at five stars. A free 5★ unit is nothing to be sneezed at, and he remains the best F2P choice for a bonus unit.
Hardy Bearing 1 seal (40,000 Score)
- The Hardy Bearing seal nullifies the effects of skills that change attack priority (provided the unit is at max HP). This is a great way to counter users of Desperation and Vantage, two popular B skills that are difficult to deal with. Highly recommended to pick this up.
Units/Teambuilding
Without further ado, let us jump into the team-building part of the guide. Instead of talking about just completed teams, I’ll be talking about the elements that make those teams successful, so that players with varying boxes can construct viable teams. Unless otherwise stated, all units from here on out are assumed to be running their recommended builds. A team with the best chance of success will have the following:
- As many bonus units as possible!
- Source of healing.
- Strategy for Sonya.
- A unit to beat each colour.
Bonus Units
The first units you’ll want to think about using are of course, the bonus units. With their huge stat bonuses (+10 HP, +4 to all other stats) They will punch far above their normal weight. The F2P options this time around are Berkut and Clive. Both are powerful even at four stars, providing powerful blue options for the team. Celica, Delthea and Sonya are all powerful units, Celica in particular being notable for her Ragnarok tome and type advantage against the final boss. Alm can provide valuable healing, but Gray has a better statline and provides a larger bonus. If you can’t find room in your team for a bonus unit, consider starting with a throwaway team that features one. Suffering one defeat with a bonus unit will still give you a higher score than if you never used one.
Official Healers
Healers are fantastic in the Tempest Trials, and can single-handedly sustain your team throughout the duration of the run. However, running a healer can compromise your team (unless you can get Wrathful Staff). It’s highly recommended to take a healer for safe runs, but keep in mind that they will slow your runs down compared to more offensive teams. Genny is the best choice due to her utility as a bonus unit and stat boosts.
Unofficial Healers
There are a few types of builds which can be used to heal teams without using a valuable team slot on a dedicated healer. The first of these is the “Falchion Medic”, a build type which requires a user of the legendary Falchion. With Renewal in B slot and Reciprocal Aid as a support skill, this build can provide healing to allies without sacrificing offensive power. Notable units who can pull this off include: Alm, a bonus unit and Masked Marth, who appeared as a free four/five star reward from the first trials. This is a great option for those with the units, but expect a lower amount of raw healing. If you have Linde, you can run a Breath of Life build. The effects from Aura (Linde’s unique tome), Breath of Life, and the Breath of Life seal stack to provide a whopping 15 health to all units around her when she attacks. Make sure to take Reciprocal Aid along with this build, to ensure that Linde herself can be sustained. If you don’t have Linde, the build can be applied to any character, but will only heal 10 HP. Remember that a dancer can potentially double this healing output!
Dancers
These are some of the most potent allies for Tempest Trials, offering both safety and speed to your run. In short, they are great for all the usual reasons, but are affected by their low combat stats, which can hold them back. Due to team limitations, if you choose to field a dancer they must be a respectable combat unit in their own right, with either a full build or something close.
Triangle Adept + Raven Tomes
This skill build is amazing for the Tempest Trials, granting a significant amount of sturdiness to a team combined with a strong attacker. These units are capable of defeating many foes in a row without losing much HP, which makes them an idea choice for the trials. At least one unit with this build is highly recommended. The most common users are Robin(M), Sophia, Cecilia, Boey and Spring Camilla. Sophia is especially useful, as she can be used to safely KO Sonya, the final boss.
Example Teams
Celica, Delthea, Sonia, (Dancer)
The triple mage core is one of the most potent teams available for the trials. Celica and Delthea have extreme statlines after their stat boosts, and are capable of carrying the trials entirely on their own. Sonia provides a third mage, but can be replaced with Julia or Nino if necessary. The final team slot is best used on a dancer: Azura, Olivia or Ninian. Breath of Life should be the C skill on at least 2/3 mages, to provide heals for the team.
Clive, Xander, Cecilia, Genny
As a surprise to no-one, Cavalry teams are as powerful as ever during the trials and can be built very cheaply and entirely F2P. Clive is the bonus unit of choice thanks to his superior speed compared to Berkut. However, Berkut can be used before Clive is obtained. Xander is recommended due to his Distant Counter weapon, but Eldigan or Eliwood can be used instead. Cecilia provides the team with a raven tome and a valuable resistance tank. Genny is the healer of choice, but can be replaced with any other healer (mounted healers are preferred), or Falchion medic. Running Breath of Life on the fourth slot is a solid option if they aren’t cavalry.
Clive, Hector, Kagero, Masked Marth
Another decent team, Clive and Hector can KO most units with Kagero cleaning up mages and grey units. Kagero is the primary unit slayer, and should be running Breath of Life to give some healing to the team. She can run Green Tomebreaker to combat Sonya in the final round. This is a mostly balanced team, but lacks a dancer. Masked Marth is the flex unit of the team and can be replaced by Olivia or even a dedicated healer. Azama is a great choice in this regard, thanks to his high defense and natural access to Pain and Rehabilitate. Mounted healers are also exceptional choices, to provide even more buffs to Clive.
Stage Map
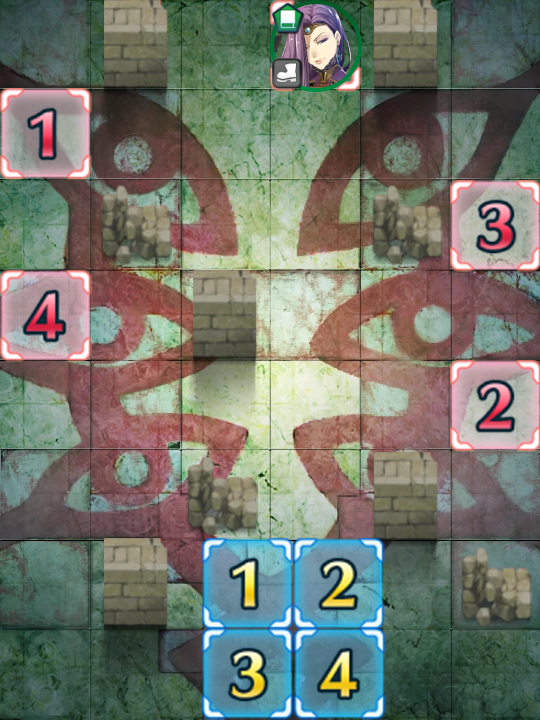
Lunatic Enemy Units
| HP | ATK | SPD | DEF | RES | |
|---|---|---|---|---|---|
| 58 | 54 | 38 | 20 | 38 | |
| Weapon | Dark Excalibur | A | Mirror Strike 2 | ||
| Support | B | Vantage 3 | |||
| Special | Moonbow | C | Res Ploy 3 | ||
Hard Enemy Units
| HP | ATK | SPD | DEF | RES | |
|---|---|---|---|---|---|
| 44 | 36 | 32 | 17 | 33 | |
| Weapon | Dark Excalibur | A | Mirror Strike 2 | ||
| Support | B | Vantage 2 | |||
| Special | Moonbow | C | Res Ploy 3 | ||
Normal Enemy Units
| HP | ATK | SPD | DEF | RES | |
|---|---|---|---|---|---|
| 32 | 32 | 23 | 12 | 23 | |
| Weapon | Rexcalibur | A | Warding Blow 1 | ||
| Support | B | ||||
| Special | New Moon | C | Res Ploy 2 | ||
User Submitted Teams
Eirika with hone Res seal goes on 9 stats buffs for Nino's blade tome. Fury on tanky Ev + Swordbreaker makes her a great buffer and first line unit. Finally stats: 42hp/ 42/38/33/31 on Atk/Spd/Def/Res.
Nino is the main offense unit, desperation on B, and mine has defiant atk on A cause she is -Atk/+Spd, you're doubling all at 38 Speed. With moonbow, you will kill Sonya at once at desperation zone. 33, 43/39/19/26.
Azura is the classic dancer, but ends on a huge blue offense unit. On wings of mercy males a great job with defiant Nino (+7 on blade). 36, 43/39/21/24.
Delthea is the second nuker you have, also heavyly boosts Eirika and Azura with her dark aura placing their attacks at 48/49 respectively. She also gets the focus buffs making her another huge unit, 41 unbuffed Speed with + nature. Drive attack also ups your entire party. 46, 51/38/18/35.
Reposition to everyone gives you huge movility.
This is pretty simple. Sonya on her own is a great unit, but with those buffs she amazing on the hardest difficulty. I myself have a Sonya hp+ and res- so it's not like a had the perfect stats. Anyway then a dancer is needed, hone attack is great on them. Then a falchion healer, preferably Chrom but Alm is nice too. Any off healer is great. Then I guess the next hero is your choice. If you have Celica that's great too, I assume she can be great at taking care off the Sonya at the end of the battle.
SI
Cecilia : requires the most of SI, death blow 3, hone calvary, any position assist skill
Xander : stock specials and abilities with hone calvary and reposition
Camus : stock special and ability and reposition and fortify calvary
4th unit : any bonus unit you want
Cecilia will be OHKO everyone as much as she can while the other units keep her alive with reposition. Use Xander and Camus to bait or tank as you wish. If you have some trouble surviving to round eight, equip Cecilia with Breath of Life or give the other two tanks recovery. Keep Xander's special ready at the last map to kill Sonya in one hit.
If you have a Reinhardt with death blow 3 and fortify calvary, you can swap out Camus for more damage.
So far I have been getting maximum amount for points throughout most of my runs.
Delthea (+atk-spd)
She reaches a whooping 62 atk with hone atk + tempest buff. She can single handedly defeat most of the enemies, save from those on the last map.
Dark aura
Draw back
Death blow
Blue tomebreaker / lance breaker
Her signature C
Cherche (+atk -hp)
Brave axe +
Reposition
Bonfire
Death blow
Hit and run
Hone def
She can kill whatever delthea can't.
With both their repositioning skills, they can dance around the ennemy easily
YTiki
Lightning Breath +
Reposition (to help the dancing)
Moonbow
Fury
Quick Riposte
Breath of Life (+seal)
She shouldn't attack anything, except for revenge killing Hectors and finishing some aweakened enemies to heal the other two.
I won't lie, it doesn't happen much. They rarely leave anything living.
Olivia (neutral, 4stars)
She basically is a dancer, so she shouldn't engage anything. Delthea and Cherche take care of the greens themselves anyway
Just in case she runs
Glimmer
Triangle adept
Swordbreaker
Hone atk
She can help if the last map is too crowded with high res greens
A good rounded team if you have Berkut as the only bonus unit. With the bonus buff Berkut becomes almost unkillable by all units except for Sonya if you are not careful. Maria with Kindled-Fire Balm and Rehabilitate will keep everyone alive on the team. Sanaki will be a good green unit check since with Triangle Adept she will most likely oneshot everyone. Nino instead acts as the nuker of the team getting a buff from Sanaki's Hone Atk and Maria's Fortify Res giving her +8 damage to her weapon that is no small thing
Berkut Lv.40 4*
HP 43
ATK 42
SPD 20
DEF 29
RES 22
Weapon: Berkut's Lance
Support: Pivot
Special: Sacred Cowl
A: Water Boost 2
B: N/A
C: Ward Cavalry
S: HP +3
Sanaki 40 5* + HP - Def
HP 36
ATK 52
SPD 26
DEF 13
RES 34
Weapon: Cymbeline
Support: Harsh Command
Special: Iceberg
A: Triangle Adept 3
B: Axebreaker 2
C: Hone Atk 3
S: Attack +1
Nino 40+1 4* + Spd - Atk
HP 35
ATK 40
SPD 41
DEF 20
RES 27
Weapon: Gronnblade
Support: Draw Back
Special: Moonbow
A: Fury 3
B: Seal Res 3
C: Hone atk 2
S: Squad Ace A 1
Maria 40 5* + Atk -HP
HP 38
ATK 37
SPD 34
DEF 19
RES 32
Weapon: Panic
Support: Rehabilitate
Special: Kindled-Fire Balm
A: HP+5
B: Live to Serve 2
C: Fortify Res 3
S: Breath of Life 1


