Basics
For the vast majority of content in GFL, you will only need to deploy up to 2 combat Echelons. You will also need 4 Echelons constantly running logistics, so unlocking the minimum of 6 Echelon slots is a high priority. Further Echelon slots allow you to deploy additional Dummy Echelons (a level 1 Doll and nothing else) or more combat Echelons as needed, but are not as urgent as the first two additional slots.
For most of the early game, these two Echelons should be a RFHG and an ARSMG. If you end up needing something different, you will usually just replace one of these Echelons with a different one. Having static Echelons sitting around never being used is not useful and pre-building several Echelons that serve no actual purpose is not a good idea. Past the early game, you will sometimes need to pick specific Dolls for specific niches, but this usually just means swapping that niche Doll into another Echelon.
Tierlists are bad and fundamentally clash with how GFL works as a whole.
"tier lists fucking suck" rant by varz
part 1: gfl tier lists make no sense for beginners
in gfl, a player's progression consists of a few distinct stages, and tier lists make no sense for any of them. starting from early game, it is far more important for players to raise the correct echelon types (arsmg first, then rfhg) than to use the best dolls per se. most of the very strong dolls in the game require lots of investment to actually become super strong (think high core cost of raising 5*s, exp and resources for m4 or other strong mods, high skill levels for g11 and grape, etc.). newbies should focus on clearing story to get the career quest rewards, unlocking later logistics and fairies/sf/hocs, and reaching the better maps for levelling; this can all be done with the dolls the game gives you for free (esp. the ar team and 2.09's login/career quest rewards, who also happen to be top-tier), many of which come pre-levelled, saving on the resources spent, allowing the newbie to save their resources for when they actually get the good dolls to raise once they have a solid foundation. giving a newbie a tier list is just confusing and can drastically hamper their progress, give them a starting guide instead.
part 2: gfl tier lists make no sense for casuals
for casual players (casual in the gameplay combat sense) in mid to late game content, tier lists are meaningless because the wide variety of enemies put far more emphasis on teambuilding and matching the correct teams to the enemies than the strength of individual units. using rfhgs against dinergate nodes and arsmgs against heavily armoured nodes is technically possible, but certainly not something the average player is expected to do, nor something they will enjoy. furthermore, the main story, campaigns / major events, and decent ranking/theatre placements (e.g. top 10%) can all be done fairly easily with almost any units, so long as they are of the correct type and have sufficient support (from decent fairies and hocs). excluding units that actually make unique strategies accessible (e.g. grape, parachute) and are actually awful (e.g. flare hgs, claes), there is no point in a tier list; even then, there is no point in a tier list more fine-grained than highly recommended/recommended/optional/not recommended (oh wait that's exactly what all the actually good unit analyses use). for these reasons, trying to encapsulate a doll's overall performance in a single number/tier without any explanation is ill-advisable. the player with teambuilding knowledge but no tier list will always outperform the player with the best tier lists but no teambuilding knowledge.
part 3: gfl tier lists make no sense for tryharders
for ranking tryharders, tier lists are useless because of the specialized teams that often require specific units as opposed to giving a ranking to most/all of the units in the game. just as with the casual players, teambuilding / matching is far more important than the strength of the dolls outside the key players in specialized teams. for the general teams, all of the arguments from the section on casual players is still applicable. also, with more recent rankings becoming more focused on hyper-specialized teams (e.g. hybrid bossing echs, mixed dps echs, etc.) rather than drag-and-drop slots in reasonably generic teams (e.g. multihit/rof ars in doggo/archer campers), teams have become even more restrictive, dragging the utility of tier lists down even more. to add insult to injury, ranking tryharders generally already know who the top dolls are for each role (e.g. kord for mgs, ltlx for sgs, para for fairies, m4/grape for generalists), and for the exceptions (e.g. when a new meta arrives because of a new enemy or map design), a simple tier list isn't informative enough for them to know how to use the top-tier units.
part bonus: gfl tier lists make no sense for theater tryharders
for theatre tryharders, tier lists are useless because ce stacking is an absolute list of numbers, making categorizing dolls into tiers utterly meaningless. just pick the top dolls in your armoury or raise the ideal dolls, there is literally no point in a tier list when this is how you maximize the score. in terms of combat, leaving aside the points made in the previous sections, tryhard theatre is chock-full of hyper-specialized teams because of the stage objectives and the ce stack classes (e.g. 4ar1mg for theatre 7-8's advanced 8 or cms exodia for theatre 7-8's intermediate 8).
Of course this doesn’t mean every unit is good or that strong dolls don’t make things vastly easier, but you need a large variety of options available to deal with all situations you may face and only trying to make a single team will not be able to deal with everything.
We have priorities and very strong dolls, but a large armory of good options is required to tackle all possible situations and the enemy comps present on any maps decide what you should bring.
Yes certain units are absurdly strong and can handle almost everything, but you need to be able to field many echelons that have to tackle different enemy comps.
Just because a single unit is the best ever in certain situations (Grape), they can also be terrible in others and you need to be able to deal with both situations.

Formation menu
To effectively build a team we must first add dolls that work together. For our first two teams, this will be an ARSMG and an RFHG echelon, with dolls being exchanged as we unlock them.
If you already know how this works just skip ahead to the RFHG and ARSMG teambuilding pages.
In the Formation menu, you can select echelon numbers on the left while filling them with whatever is needed at the time on the right.
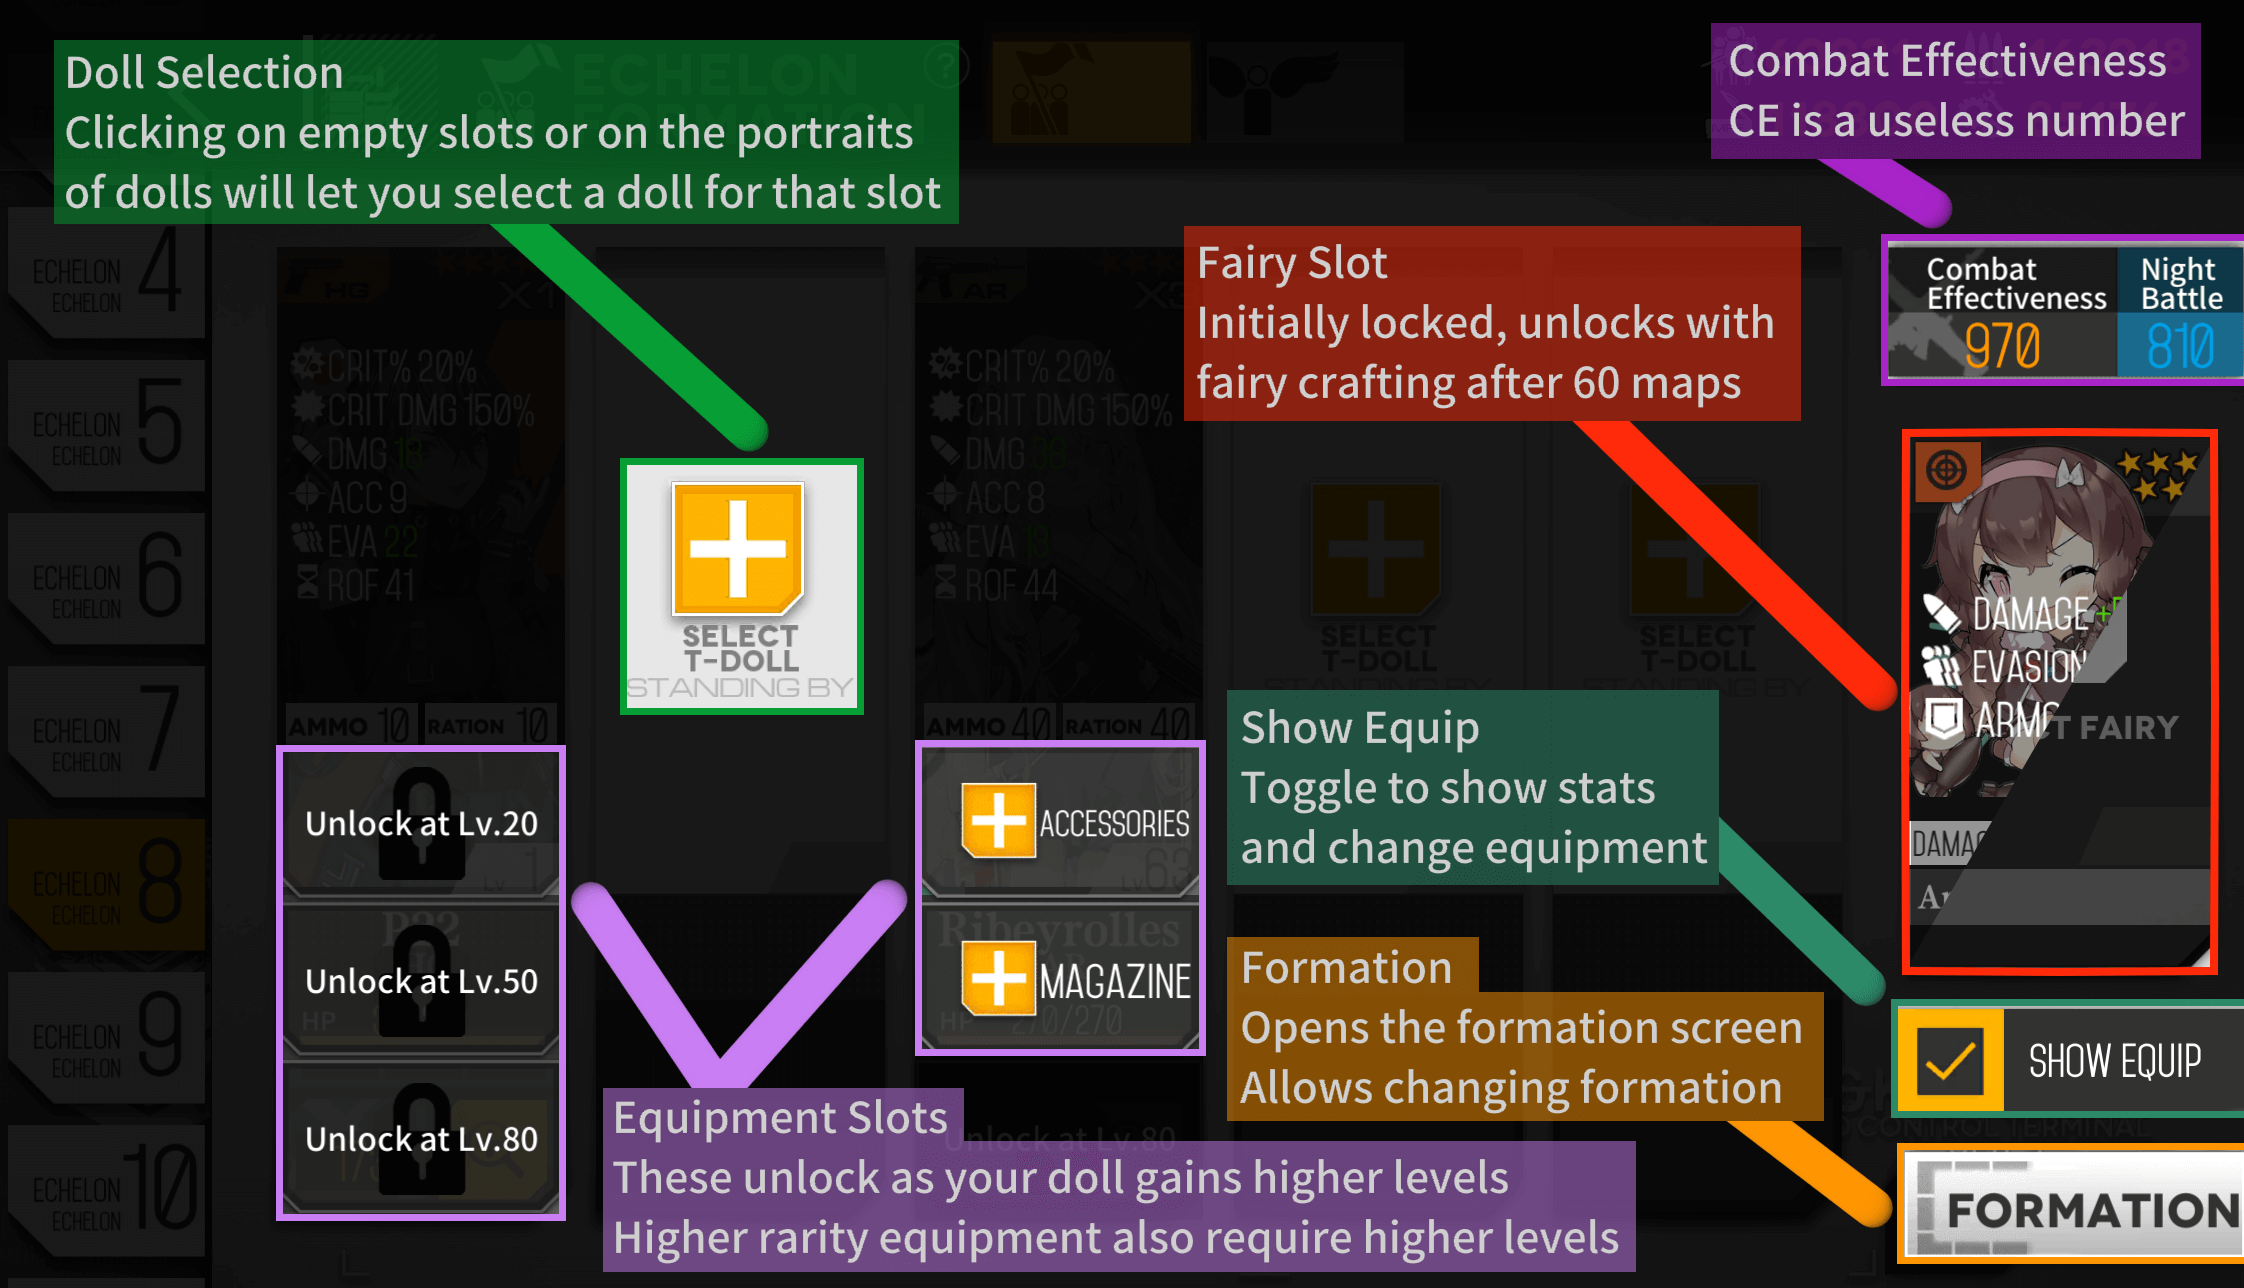
Fairies are extremely important to make any echelon and are unlocked after you clear 60 total unique maps, tutorial missions from Career Quests included.
For more on Fairies see here.
For more details on Career Quests see here.


Equipment
Equipment is a crucial part of getting your echelons ready. Damage dolls especially need to be properly equipped where possible. For more on this see the Equipment Basics page.
Echelon Leader
The leftmost doll is the leader and the slot MUST be filled if there is anyone in the echelon. Additionally echelon 1 must always have a member (and thus a leader).

If no leader is assigned but there are other dolls in the echelon you can automatically take the leftmost doll and put them into leader position while leaving the Formation screen by clicking Auto-Formation.
If you are trying to swap dolls or rearranging your echelon’s leader, make sure the Equip toggle is off. Note that as you progress you may find dolls that interact with the Leader of the echelon in some way. Make sure to read doll skills properly for such situations. Webley is one such example, see her page for more details.
The dolls’ positions need to be fixed each time you make an echelon, as their positions are rarely ever correct without checking it.
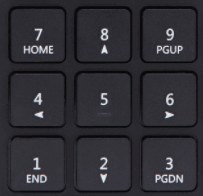
We use the Numpad layout to refer to each position, as such Position 1 is in the bottom left and Position 9 is in the top right.
Note that if you are using foreign resources, they use Phone Numpad notation, which is upside down from the notation we use here (i.e. the top row is 1-2-3).


A typical ARSMG or RFHG will be in Positions 1, 4, 5, 7, and 8. This is what’s known as “F Formation” due to its resemblance with the letter F. Note that all dolls are as far left as possible and the tanks are up front to protect your valuable DPS.
As you first open the echelon’s formation, the positions may be completely out of whack, as such you should try to ensure that you follow the basics:
Place your echelon far left and give tile buffs where possible. DPS should be protected in the back so they do not get shot at and lose links.
For more on how to build a proper team see the ARSMG and RFHG teambuilding pages.
Why RFHG and ARSMG
The DPS in an ARSMG are the ARs, who will target the frontmost enemy and this works great for clearing out large groups of enemies where the order in which you kill them doesn’t matter too much.
On the other hand you have RFs as the main DPS in a RFHG, who target the backline first making them able to pick off higher threat enemies first and leaving the tanky frontline for last. They can also equip AP Ammo, allowing them to deal with Armored enemies, something that ARs cannot do efficiently.
Having both these team types available early on allows you to deal with most enemy teams you will face.
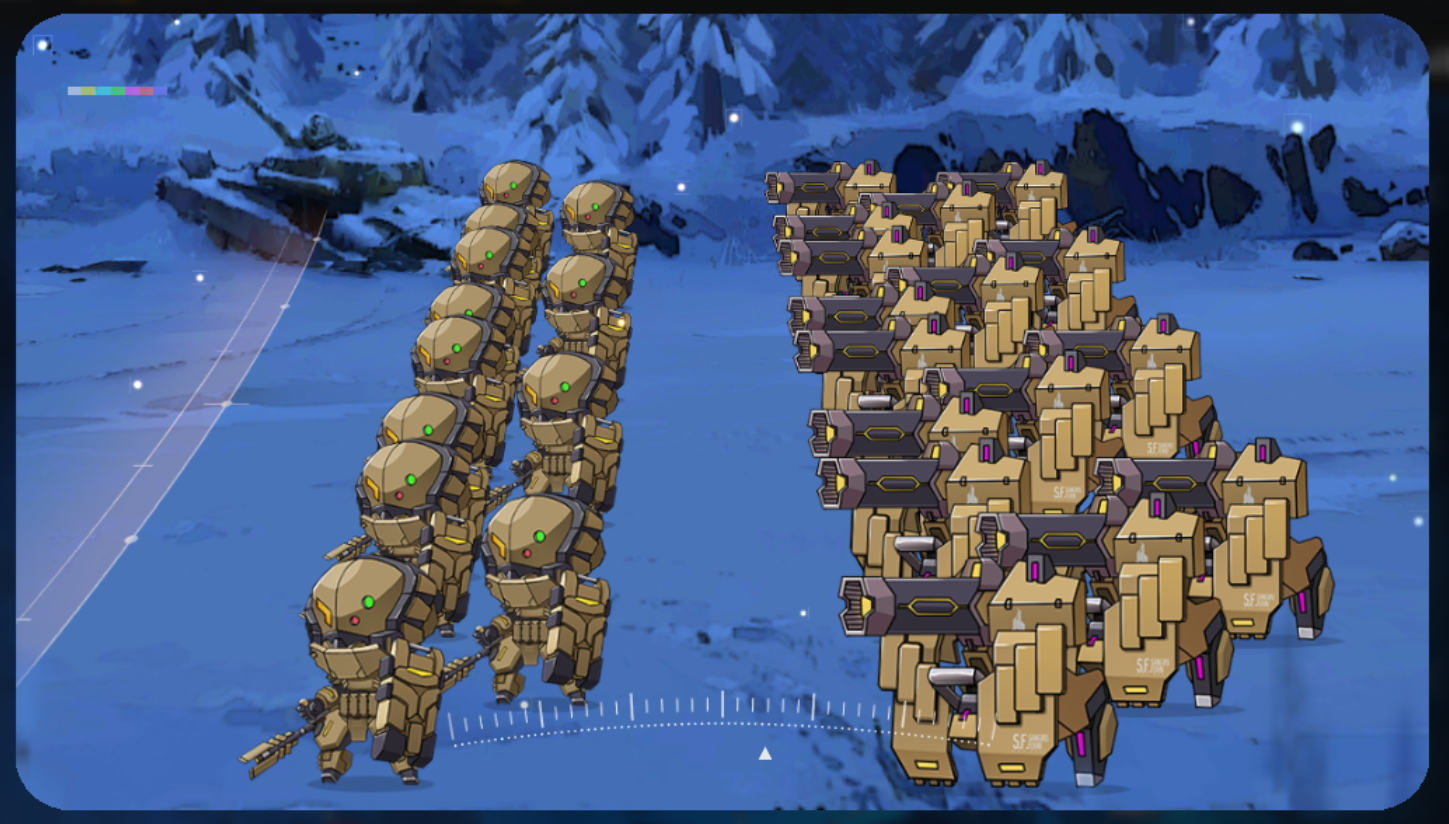
An example of armored enemies where you want to eliminate the backline first.
Getting your first two proper teams
As you start playing you will be handed a ragtag team of dolls, most of which will need replacing as you progress.
Your first two teams should be an ARSMG and a RFHG:
The entirety of the first ARSMG is handled with dolls rewarded for progression through Main Story and the 7-day Login and Career Quests.
The RFHG however needs some serious work, you get handed very few important units, and RFs and especially HGs are more universally useful than ARs and SMGs. Anchoring Grape (Carcano M19/38) is highly recommended as she’s a very rare RF and exceptionally powerful in her niche (which appears almost everywhere). While pulling for Grape you will most likely also find at least one additional acceptable RF to use for your first RFHG. After this it is recommended to pull for HGs to get some better options, being both cheap to craft and widening your armory.
For specific good RFs and HGs see the analytics sheet and look for Recommended or Highly Recommended units in those sections.
For a more thorough look at the sources of early T-Dolls see the following
The following units are given to you for free from various sources, these come at varying levels but are pre-linked if higher level saving many cores:
- AR Team
- M4A1, given from Main Story for clearing 2-6 pre-linked at level 20. Has the strongest mod(neural upgrade) in the game. Has good tiles for other ARs and should be used.
- M4 SOPMOD II, given from Main Story for clearing 3-3, pre-linked at level 30. Replaceable by 416.
- ST AR-15, given from Main Story for clearing 3-6 pre-linked at level 30. Very good doll for beginners and should be used.
- M16A1, given from Main Story for clearing 4-6 pre-linked at level 55. Weird AR tank that has no real use. Should NOT be used in regular ARSMG or any other composition as she’s supposed to be a weird evasion armor tank and ends up being largely irrelevant as this just doesn’t work, she has neither enough armor to reliably tank nor enough evasion to reliably dodge and there just aren't enemies that call for this type of tanking.
- RO635, given from Main Story for clearing 7-6 pre-linked at level 90. Strong main tank SMG. Can replace UMP45 in your first ARSMG.
- 7 Day Login
- UMP45, given from day 2 login. Should be used as the main tank of your first ARSMG.
- Career Quest rewards, all of these require progressing your Career Quests.
- Micro Uzi, given from the quest for 3-4e, pre-linked at level 50. Her tiles do not hit anyone until she gets a mod. Still usable offtank due to her useful mod.
- MP5, given from the quest for 4-3. Has a potentially useful mod later, though is not all that strong until much later due to long ICD.
- M500, given from the quest for 4-3e. Has a strong mod later, should be kept for this but not recommended to use early on.
- SAA, given from the quest for 4-4e. Strong pre-linked HG that should be used in your first RFHG or for night stages. Has a strong mod.
- SPAS-12, given from the quest for 5-2. While not very strong on her own, still a SG with the occasional needs for this and due to coming pre-leveled should be kept. Just send her to logistics.
- The rest of the Career Quest reward dolls should mostly be used for Logistics. They are not especially strong overall. See their individual pages for details.
- Commander Level Rewards
- Skorpion, given once each for reaching levels 15 and 20. Can be used as an early off-tank if so desired, but using Uzi is recommended as she has a mod that is useful for corpse dragging.
- M14, given once each for reaching levels 40, 45 and 50. Recommended RF for use in your early RFHG team.


As your first ARSMG will likely look like the following:
| M4 SOPMOD II | Uzi | |
| M4A1 | UMP45 | |
| ST AR-15 |
There is little need to pull for more SMGs or ARs super early on as all of these are given for free.
Make sure to read the ARSMG teambuilding page for further details.
For your RFHG however you will need additional units and as such you are expected to do your daily pulls for HGs and potentially RFs until you have some good options.
For reference on whether a unit you’ve pulled is good or not see the T-Doll analytics spreadsheet. Recommended and Highly Recommended units are what you should look to get.
An early-game RFHG will likely look somewhat similar to the following:
Note that PPK is a 2☆ HG that is recommended for the early game due to the lack of fully upgraded crit scopes. As you fully equip your RFs she will fall out of favor with other units.
| M14 | Mk23 | |
| SAA | PPK | |
| Grape |
Note that many of these options are replaceable with other options. M14 is highly recommended for the early game due to good base stats and being cheap to raise. Grape is functional for the early game, but her niche does not appear until later chapter 10.
The HGs are all replaceable by other HG options.
Make sure to read the RFHG teambuilding page for further details.
ARSMG and RFHG are both crucial to dealing with the most common enemy formations and types.
ARSMGs have the following characteristics:
- ARs target the frontmost enemy first.
- ARs have good constant damage output.
- SMGs have good evasion tanking.
- The echelon is not expensive to field.
RFHGs have the following characteristics:
- RFs target the backmost enemy first.
- RFs have extreme damage output.
- RFs deal with armor well.
- The echelon is not expensive to field.
These two echelon types can deal with basically anything the game throws at you, as long as you pick the correct echelon for the job.
In opposition MGSG are extremely niche in their use due to their characteristics:
- MGs spend a large amount of time reloading.
- MGs have random targeting, not killing the important targets first.
- MGs struggle with evasive enemies, which most of your enemies early on are.
- SGs are armor tanks and need to be able to nullify the enemy’s damage.
While this is technically possible early on due to low enemy FP, enemy FP and AP values skyrocket as you progress turning them into barrels of fish due to low eva. - The echelon is very expensive to field.
While SGs have use cases much later on where being able to reduce enemy damage through armor is very useful, this is not something you can rely on for all enemies.
In addition MGs are mostly used as Armor tiles for SGs where extra armor is needed, and otherwise you’d often prefer to field RFs or ARs with a SG if a SG needed due to their more reliable damage output.
For more details on MGs and SGs and why MGSGs are not recommended for general use, see the following page:
Further Teambuilding
Building generic echelons will only get you so far and learning how specific enemies work, their weaknesses and what dolls best deal with them are important things to learn to effectively deal with harder content in GFL.
Generic team types exist due to inherent synergies between classes (like ARSMG), but the exact choices of dolls are always dependent on the enemies present, as different enemies require different tools to be dealt with.
When you start pushing into the hardest content (most notably Ranking) you will find that generic teams no longer have the abilities needed to deal with every enemy present, and you will have to start picking specific dolls to deal with each problematic enemy.
As a beginner however, it is important to start with the basics and the synergies between classes such as ARs and SMGs make for a very strong foundation to start with.
Newbie Anchor
Taking in mind which units you get for free and which units you will need, it is highly recommended that your two New Player Anchor targets are Grape (Carcano M91/38) and Suomi, where Grape can be fitted into your first RFHG, while Suomi should be kept in reserve until you can mod her.
Grape is not especially amazing for the early game but is one of the best units as you progress past chapter 10 where she can eliminate big threats in one hit with her skill. It is highly recommended that you pick her up as she is extremely hard to craft and makes a lot of fights ch10 onwards way easier and her performance earlier on doesn’t hold the player back.
While Suomi doesn’t offer any immediate power, her Neural Upgrade is simply one of the absolutely strongest upgrades in the game and she can be used in almost any team where evasion tanking or shield tanking is viable. Picking her up early and ensuring that you have her available for when you gain access to Neural Upgrades would also enable you to no longer need to pull for any SMGs until quite a while later.
For a further rundown of Newbie Anchor dolls consider the following:
- Any HG should not be considered, even if some of these are rare as you will be pulling for more HGs anyway, and they are exceptionally cheap compared to everyone else.
- Any MG should not be considered as none of the strong MGs are available here. In addition MGs are not used outside niche Armor stacking situations and you will not be using these for quite a while.
- Most SMGs should not be considered as killing stuff fast is far more important than tanking.
- ARs have 3 potential targets being 416, AK-15 and G11. As 416 is going to be one of your first mods, picking her and not needing to pull more for ARs super early on is a good idea.
- RFs have a few useful targets, Grape is a very easy to use and strong early option.
If for whatever reason you already have these or want to pick some other strong options;
- AK-15 whose Neural Upgrade is exceptionally strong and she is a good choice.
- Kar98k whose Neural Upgrade (attached to the Longitudinal Strain major event) is extremely strong, giving her multipliers equaling Grape but also works against Elites.
Take note that these alternative options are only really good when they have their Neural Upgrade, and modding 5☆ dolls requires FCCs which are somewhat limited by time, and the only early availability is from old Campaigns.
Night maps
Night maps have a vision range of 0 by default, only increased to 1 (being able to see adjacent nodes) by having a HG in your echelon. As such if you are doing a Night map you should ALWAYS have a HG in every echelon, no matter the type.
For more info on this see the Night section of the Combat page.
Core Masks
Key very strong craftable units can be Core Masked. After clearing Major Events or during the anniversary event you will receive a Core Mask, an item that can be exchanged for any Craftable doll in the Event section of Kalina’s Shop. Link to core mask page.

Other notes
While these notes are not too useful early on, having a reference on what they mean and how it works is quite useful so we’ll include it here.
Exodia
Jesse has made a nice explanation of what this term means:
Exodia is a term stemming from Yu-Gi-Oh of a very powerful card archetype in which 5 cards make up "Exodia the Forbidden One". In GFL terms, it has come to mean one DPS (The main unit of the team) and 4 support units to buff the singular DPS as high as possible.
An Exodia's supports can be broken down into two main categories; Buffers and utility.
A buffers job is what it says on the box. FP and RoF buffs are crucial DPS buffs, and should make up a majority of the team in order to make the DPS as potent as possible.
Utility units on the other hand have a use outside of just buffing. This is often a delay of sorts to allow all other skills to activate at once, or to increase time that the enemy cannot attack. These are not required, and any more than one is wasting buffs on the DPS.
There are many archaic uses for an Exodia, but the primary usage for this team composition is in an "M4 Exodia" (often abbreviated to M4ex or M4x), in which M4A1 MOD is buffed to an extreme level and allowed to activate her MOD skill by retreating two units before activating her skill. The aim of this is to use her powerful cannon to shred through any enemy composition in 1-2 skill activations. Due to her skill 2 debuffing her own RoF, units that can rebuff are highly recommended.
Notable Exodia supports are:
Webley - Made for Exodia teams. Powerful buffs for the leader, and reduces their skill cooldown allowing for a higher skill uptime.
Kolibri - With the skill potential of 2 HGs, she can be treated as both a fourth and fifth support on the team.
Calico - Her MOD has the most powerful RoF buff available out of a single unit, and either a move speed buff for early kiting or a slow AoE field in front of the team to provide delay.
Stechkin - Good RoF buff and extra FP, a second choice pick in most circumstances with no unique element to her skill.
LTLX - Knockback creating a large delay between the enemy and the team, allows for all skills to be activated at once and can also provide armor tanking that HGs cannot.
UMP9 - Her mod provides a powerful FP buff to allies in her row if she can stun her target. Not as prominent in the current meta due to stun immunities, but still viable for older activities.
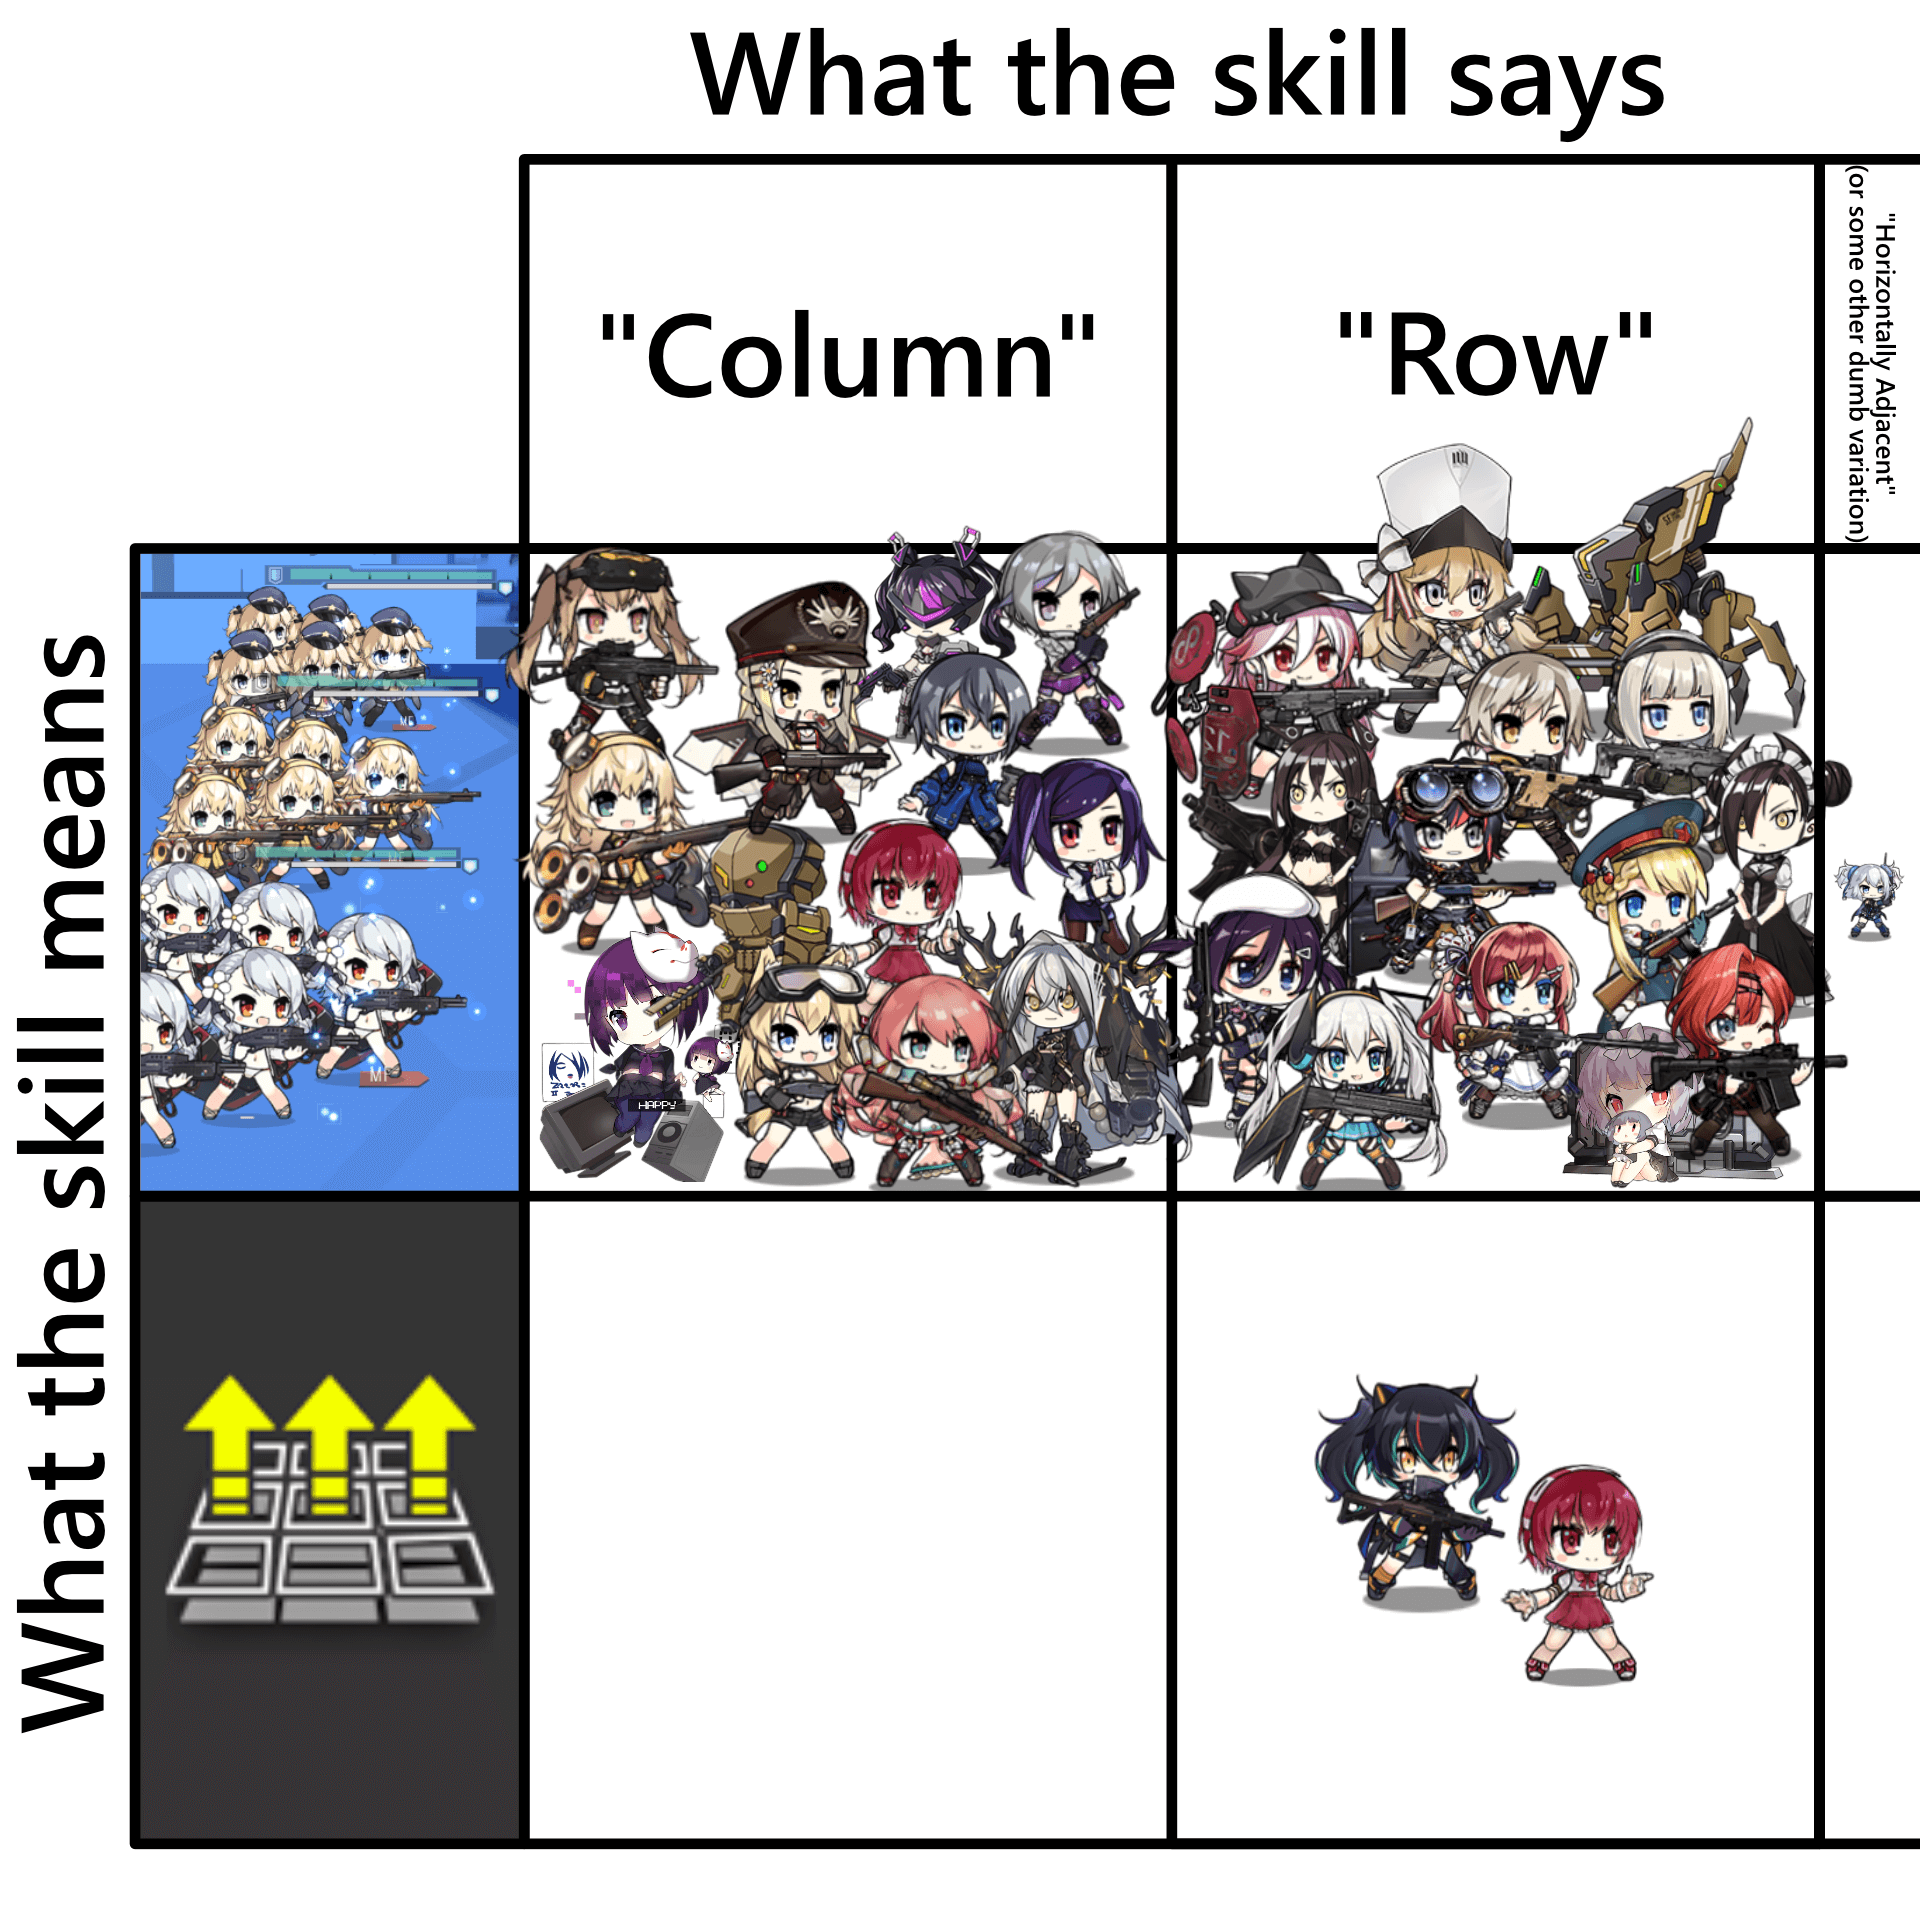
Columns and Rows
Take extra note when reading skill descriptions as Mica frequently misuses these terms.
BSJ made a nice infographic showing this off: