
Introduction
Operation Rabbit Hunt is a collaboration event with Arc System Works that features elements from the Blazblue and Guilty Gear series, as well as camoes from the characters Elphelt Valentine and Noel Vermillion. The main objective of the event is to bring fans of these games to try out Girls Frontline, and because of that the event difficulty is on the lower side.
Event clear rewards and limited drops are as follows:
| Event Map Number | Clear Rewards | Limited Drop |
|---|---|---|
| E-1 | Batteries x300 | None |
| E-2 | Calibration Ticket x200 | None |
| E-3 | 5* Furniture | Noel Vermillion |
| E-4 | Elphelt Valentine | Noel Vermillion |
Rabbit Hunt also features an ‘event gacha’ system with farmable currency called Seithr that can be used to roll for various goodies such as Noel Vermillion, Calibration Tickets, Dummy Cores, Training Data, Basic Resources, Procurement Coins, Instant Repair Tickets, T-Doll Production Contracts, and other items.
Noel will be a guaranteed result after 99 Seithr have been opened. For this reason, it is suggested that players farm the maximum amount of Seithr for at least 10 days during the course of the event.
| Event Map Number | Daily Seithr | Dropped by |
|---|---|---|
| E-1 | 3 | Dragoon (HQ mob) |
| E-2 | 3 | Intruder (Boss) |
| E-3 | 2 | Dragoon (HQ mob) |
| E-4 | 2 | Elphelt Valentine |
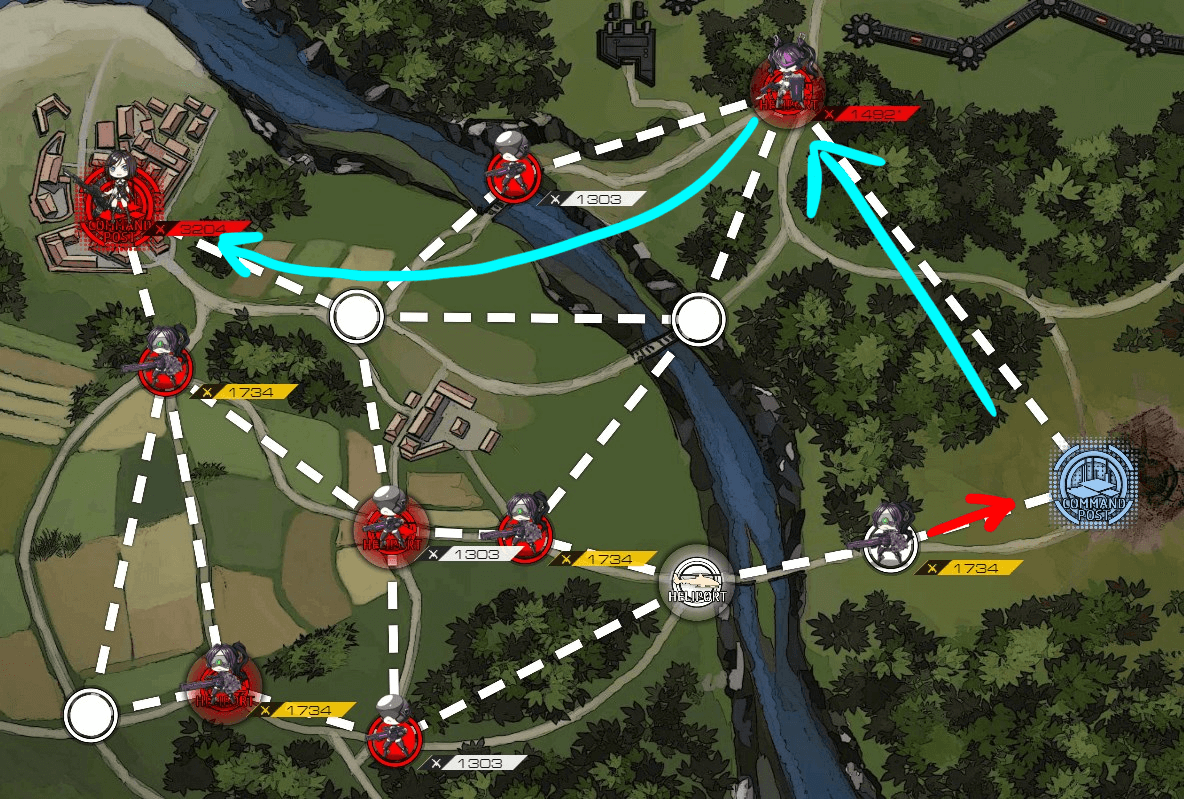
E-1 (St. Elmo)
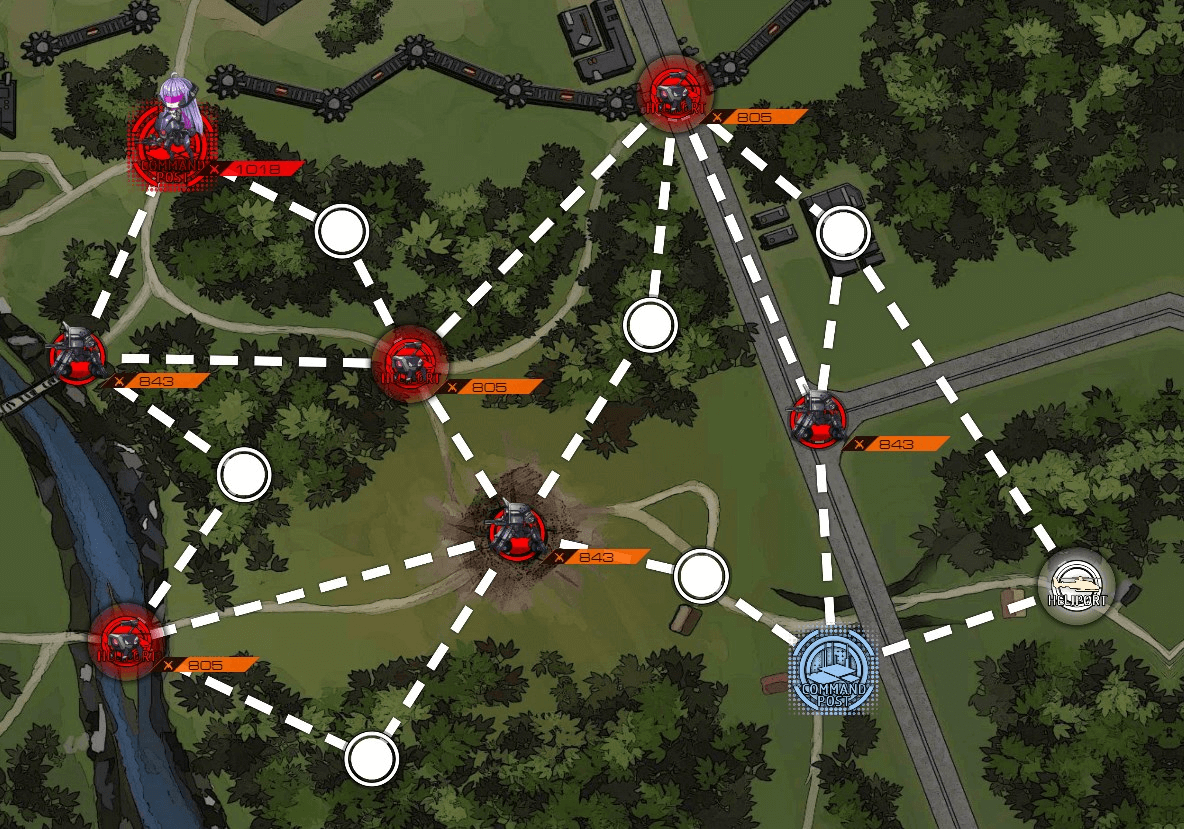
E-1 is a very simple entry-level map with weak enemies that can be cleared with relative ease using any moderately leveled (20~) Echelon.
The main objective is to take the enemy HQ. Since there are no limited drops and medal rewards do not apply, the pursuit of S rank is unnecessary. The Dragoon mob in this map drops Seithr up to 3 times per day.
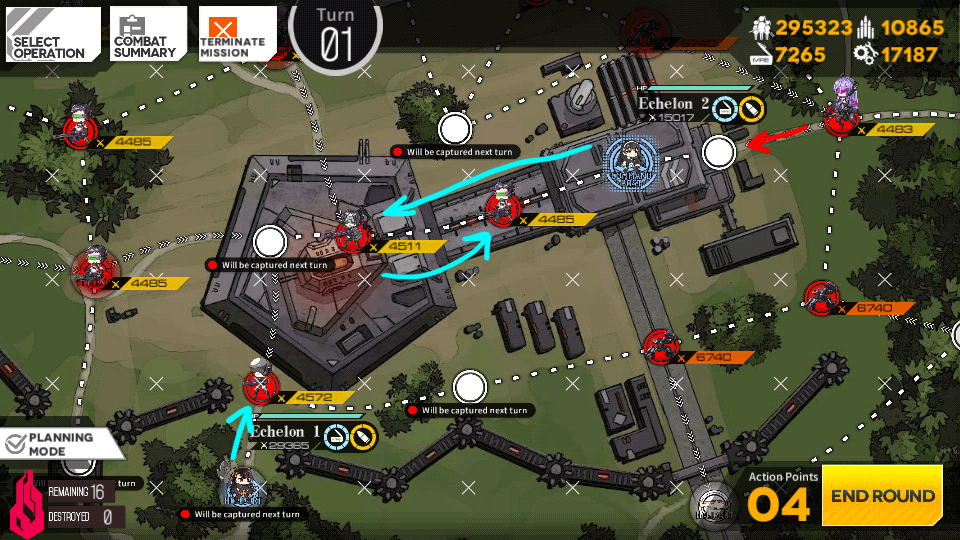
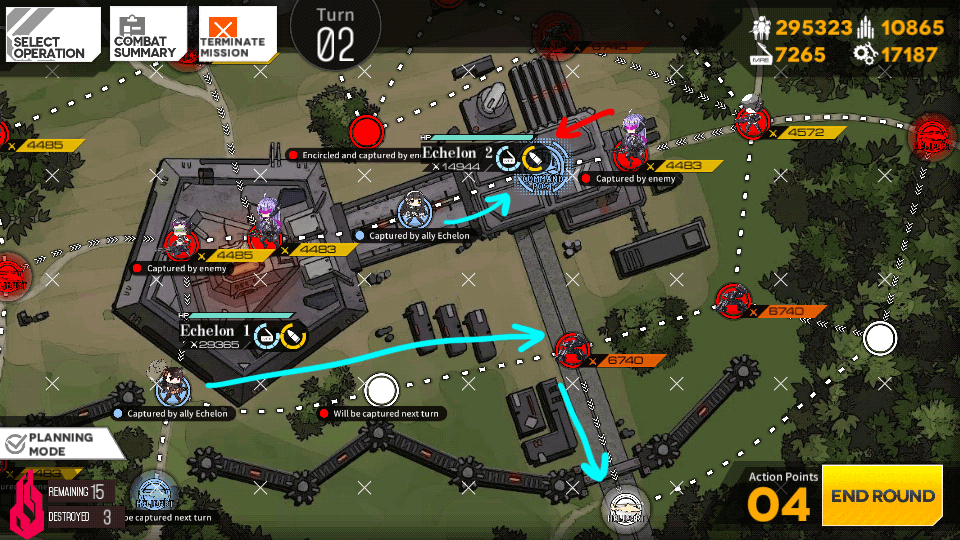
Once your first Echelon is deployed and the map started, seize the Heliport up north and end the turn. On your next turn, follow the path of least resistance towards the enemy Command Post and defeat the Dragoon.
E-2 (T-Doll Annihilation)
E-2 features a small difficulty increase due to the Sangvis Ferri Doll Intruder being present on the map. Just like E-1, though, it is very simple to clear and because of the lack of a limited drop in the map, S rank is unnecessary. The main objective of the map is to eliminate Intruder, who also drops Seithr up to 3 times per day.
Once the main Echelon is deployed and ready, defeat the foe guarding the Heliport and then deploy a second Echelon to safeguard the Command Post. On turn 2, follow the path of least resistance towards the enemy Command Post and defeat Intruder to claim Seithr and clear the map.
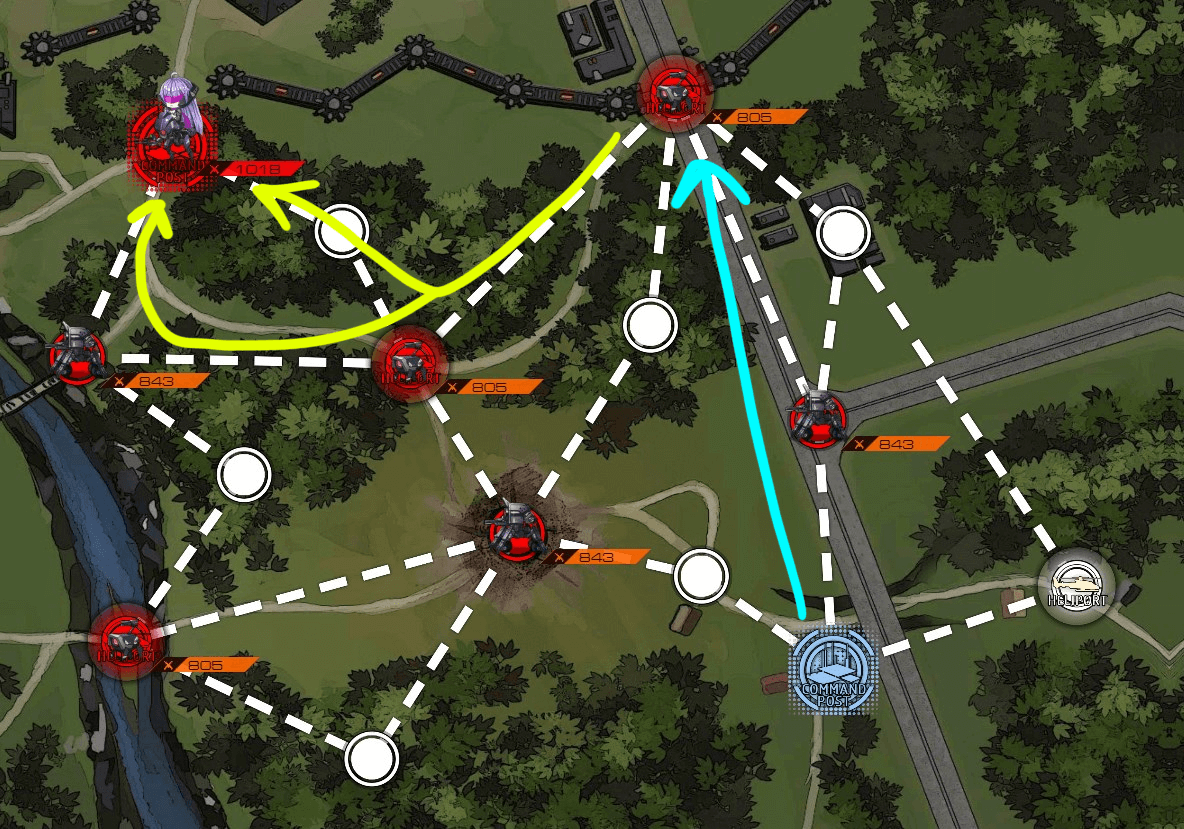
E-3 (Hunting Game)
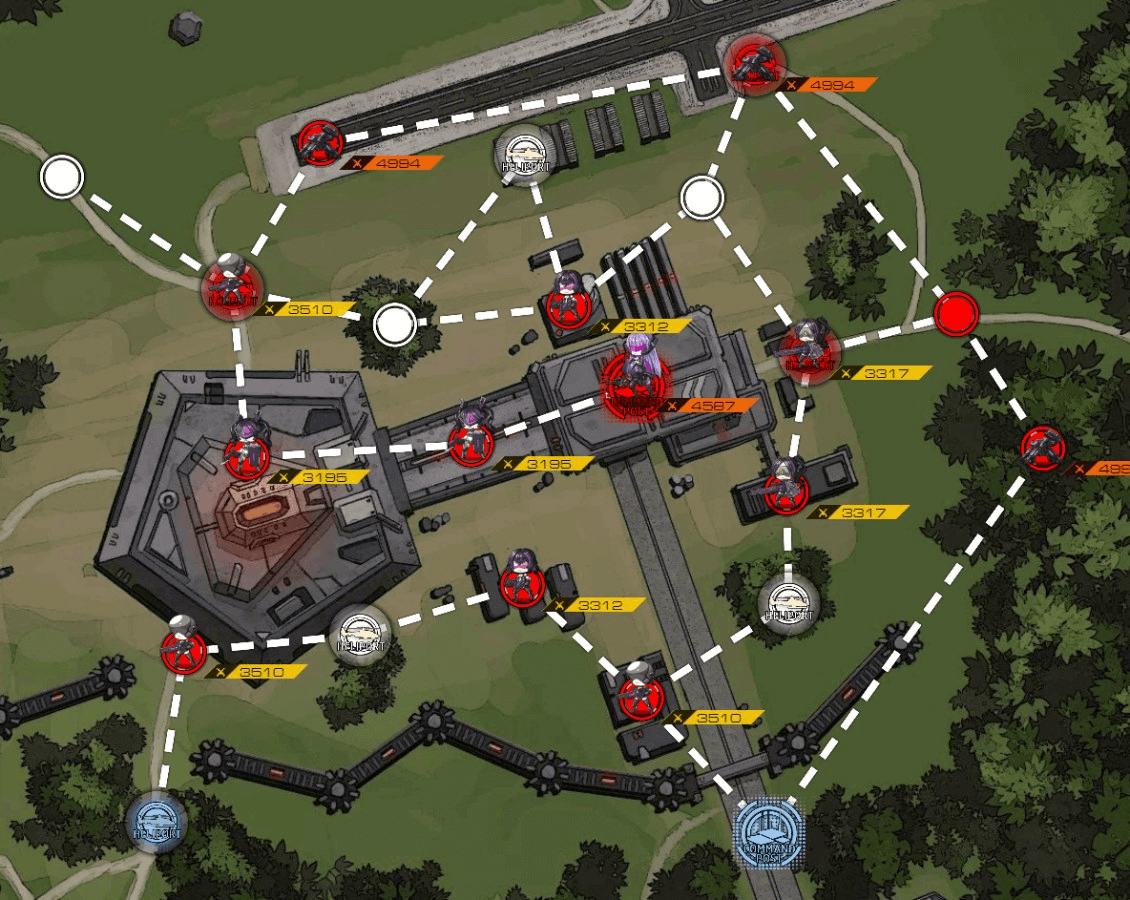
The third map of this event features enemies that are twice as high in Combat Effectiveness on average than the previous map, but luckily for us, Combat Effectiveness is mostly an unreliable measure for difficulty. The real threat in this map are those 4994 CE enemy squads —they have Jaguars (mortar units) to threaten your backline, but these foes are generally easily destroyed before they have a chance to fire.
The 4994 CE squads are composed of Jaguars and Jaegers (RF) which feature low HP, and therefore any ARSMG Echelon will make quick work of them before they get to cause trouble.
Jaguars can be quickly neutralized by moving the main tank forward as soon as the battle starts or by placing a Doll in tile 9 or 3 so that they are targeted first by our Echelon.
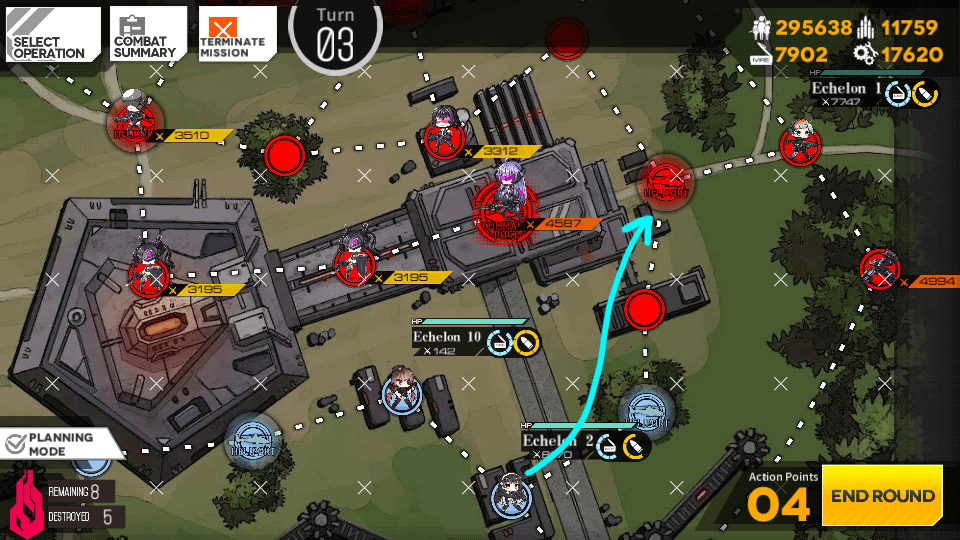
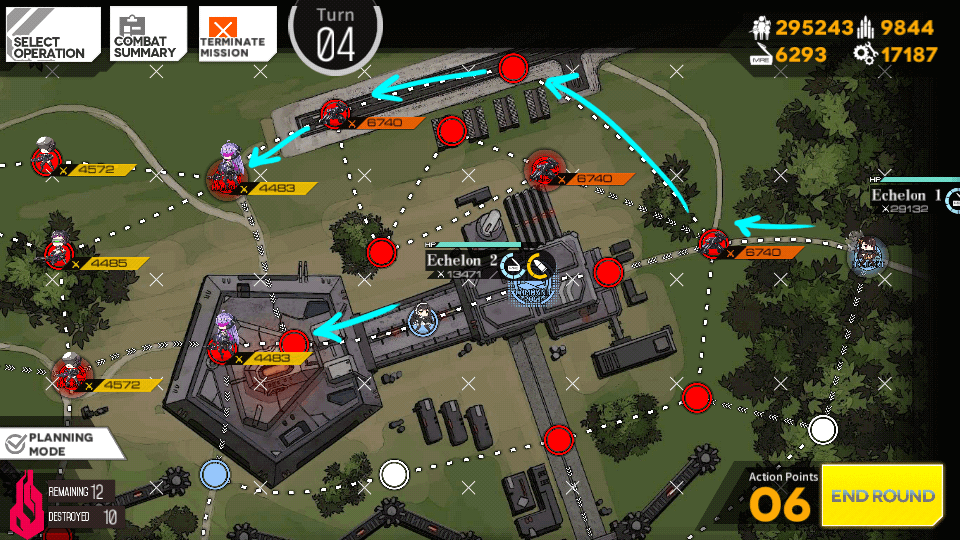
After deploying two squads, capture the two nodes guarded by 3510 Vespids to avoid losing our Heliport and Command Post to encirclement. Then deploy a third Echelon with a single unit to the Command Post — in the screenshots below this one, it will appear as Echelon 10.
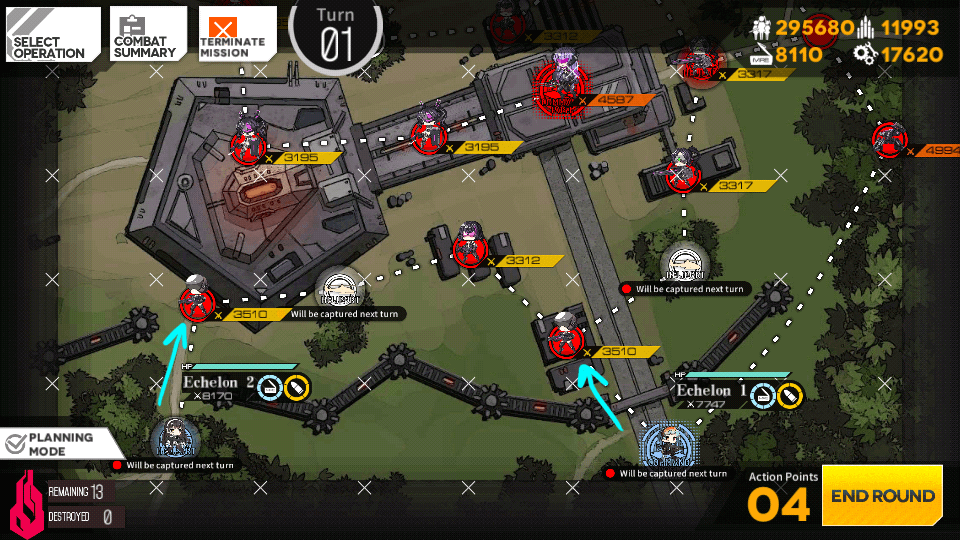
These two Echelons will form your vanguard. A third (deployed after you move as pictured) will grant you extra movement points that will come in handy later.
Use Echelon 1 to capture the Heliport on turn 2 as the picture indicates, and use the spare movements to move Echelon 2 to the right two nodes. Then, move the third single-unit Echelon (or Echelon 10 in my case) up a node, and perform a swap with Echelon 2.

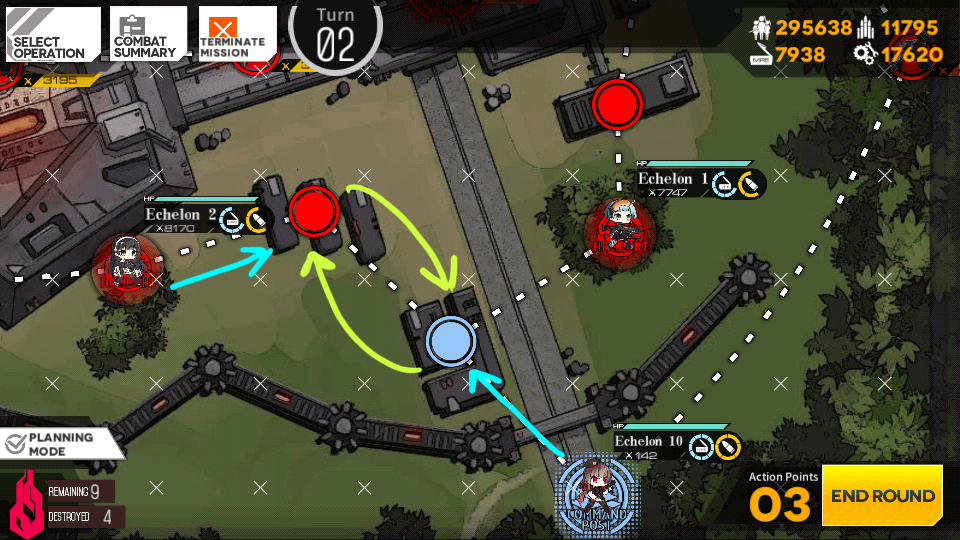
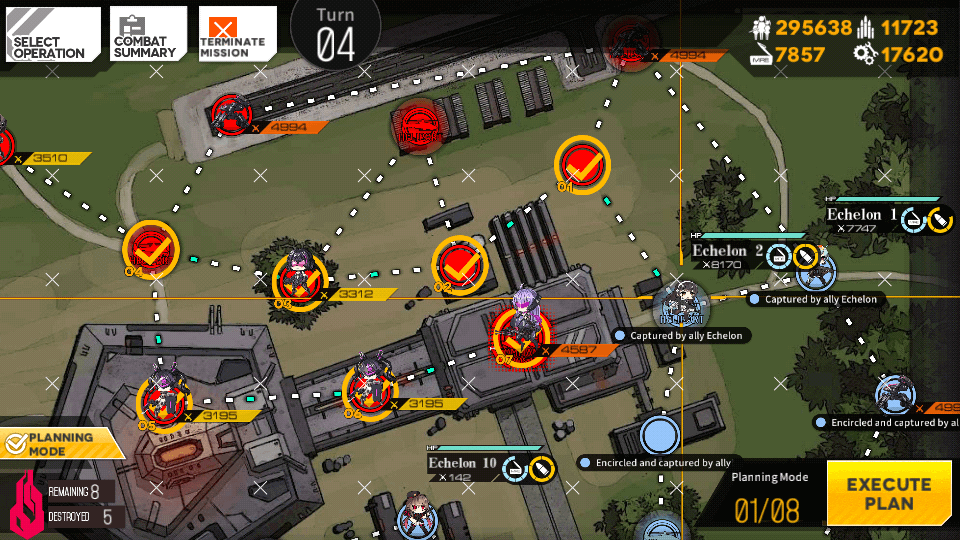
On turn 3 it is necessary to capture both the Heliport and the node next to it as there is no adjacent neutral node to the Heliport. Move Echelon 1 two nodes up and one to the right, and Echelon 2 three nodes up.

If you’ve been following each step properly, we now will have 8 movements — enough to take the enemy Command Post in a single turn.
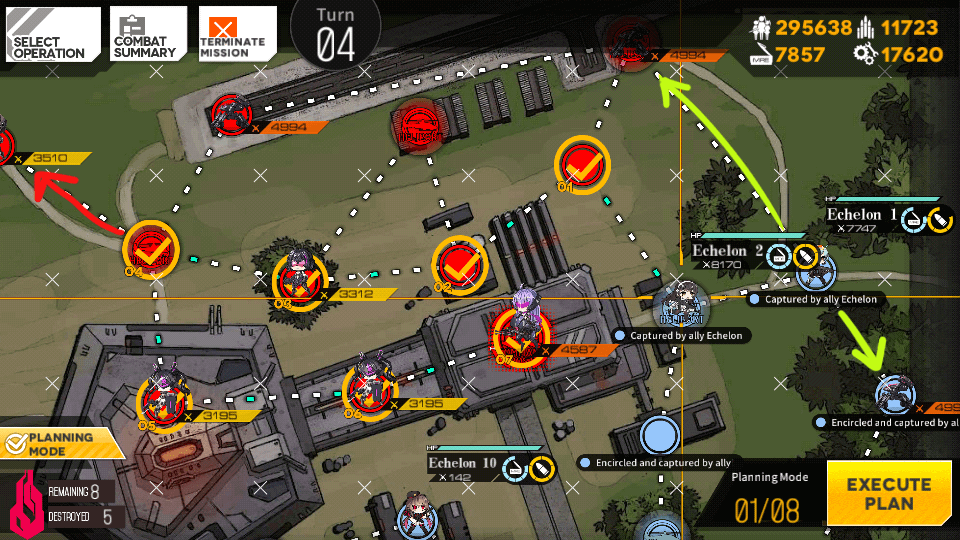
Since the 3510 enemy Vespid decided that it was too good to fight me, I will be missing out on an S rank clear (9 takedowns out of 10). Cases like these can be remedied by engaging one of the 4994 Jaguar squads with the Echelon that stayed behind (Echelon 1 in this case).
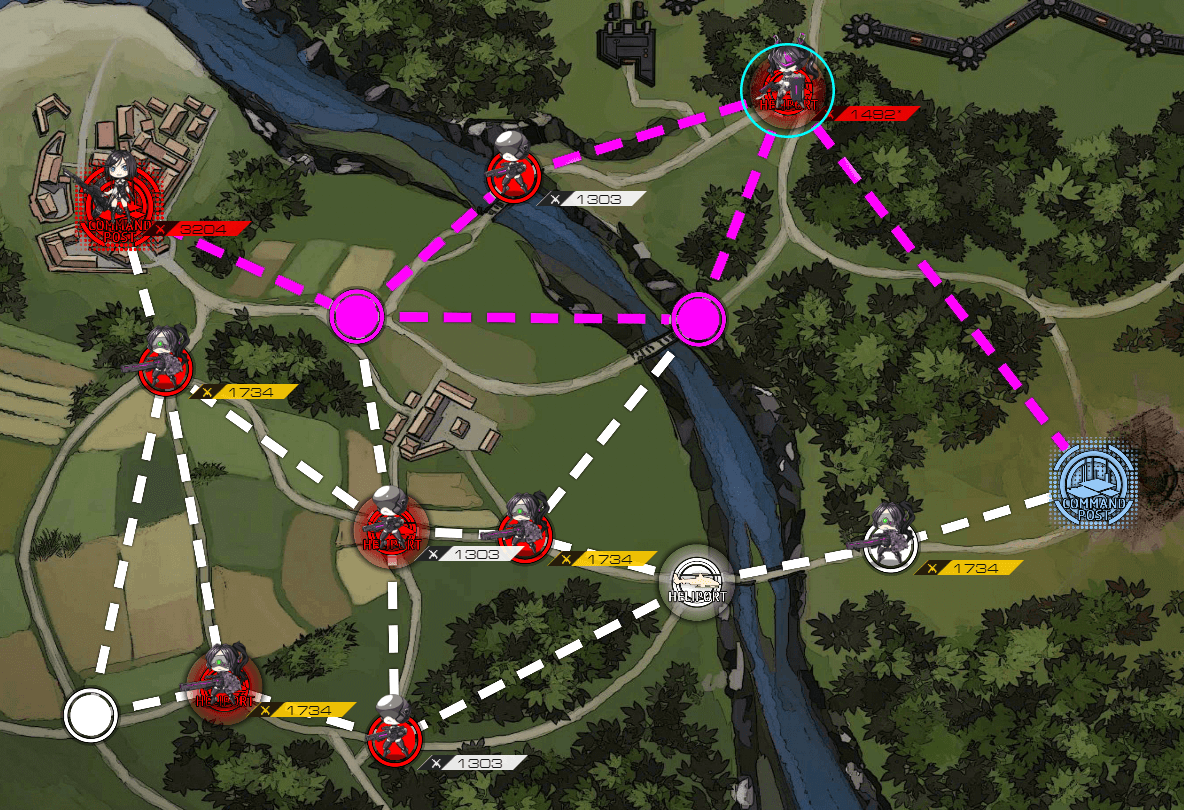
E-4 (Rabbit Hunt)
The fourth and last map of the event, Rabbit Hunt, features Elphelt Valentine as the final boss of the collaboration event. After defeating Elphelt, she will join your ranks as an “extra” rarity SG, for which Dummy Linking costs will act as a five-star.
E-4 is where players might truly see some difficulty, as Elphelt requires a decent amount of micro-management and at least a 4-linked Echelon.
During the fight, when Elphelt’s HP is decreased to 50% and then to 25% she will target one of your dolls and launch a special attack during which she is immune to all damage. To avoid taking collateral damage, after clearing the mobs and before engaging Elphelt it is advised to move your squad into an ‘X’ formation.
Example of ‘X’ formation.
Retreat whoever is targeted by her special attack as it launches too fast and it will cripple whoever is hit.
For this map we will need two Echelons capable of fighting a decent number of SF squads. The Echelon in the Command Post will be tasked with its defense whereas the Heliport Echelon will be the one to eventually fight Elphelt, so place your Echelons accordingly.
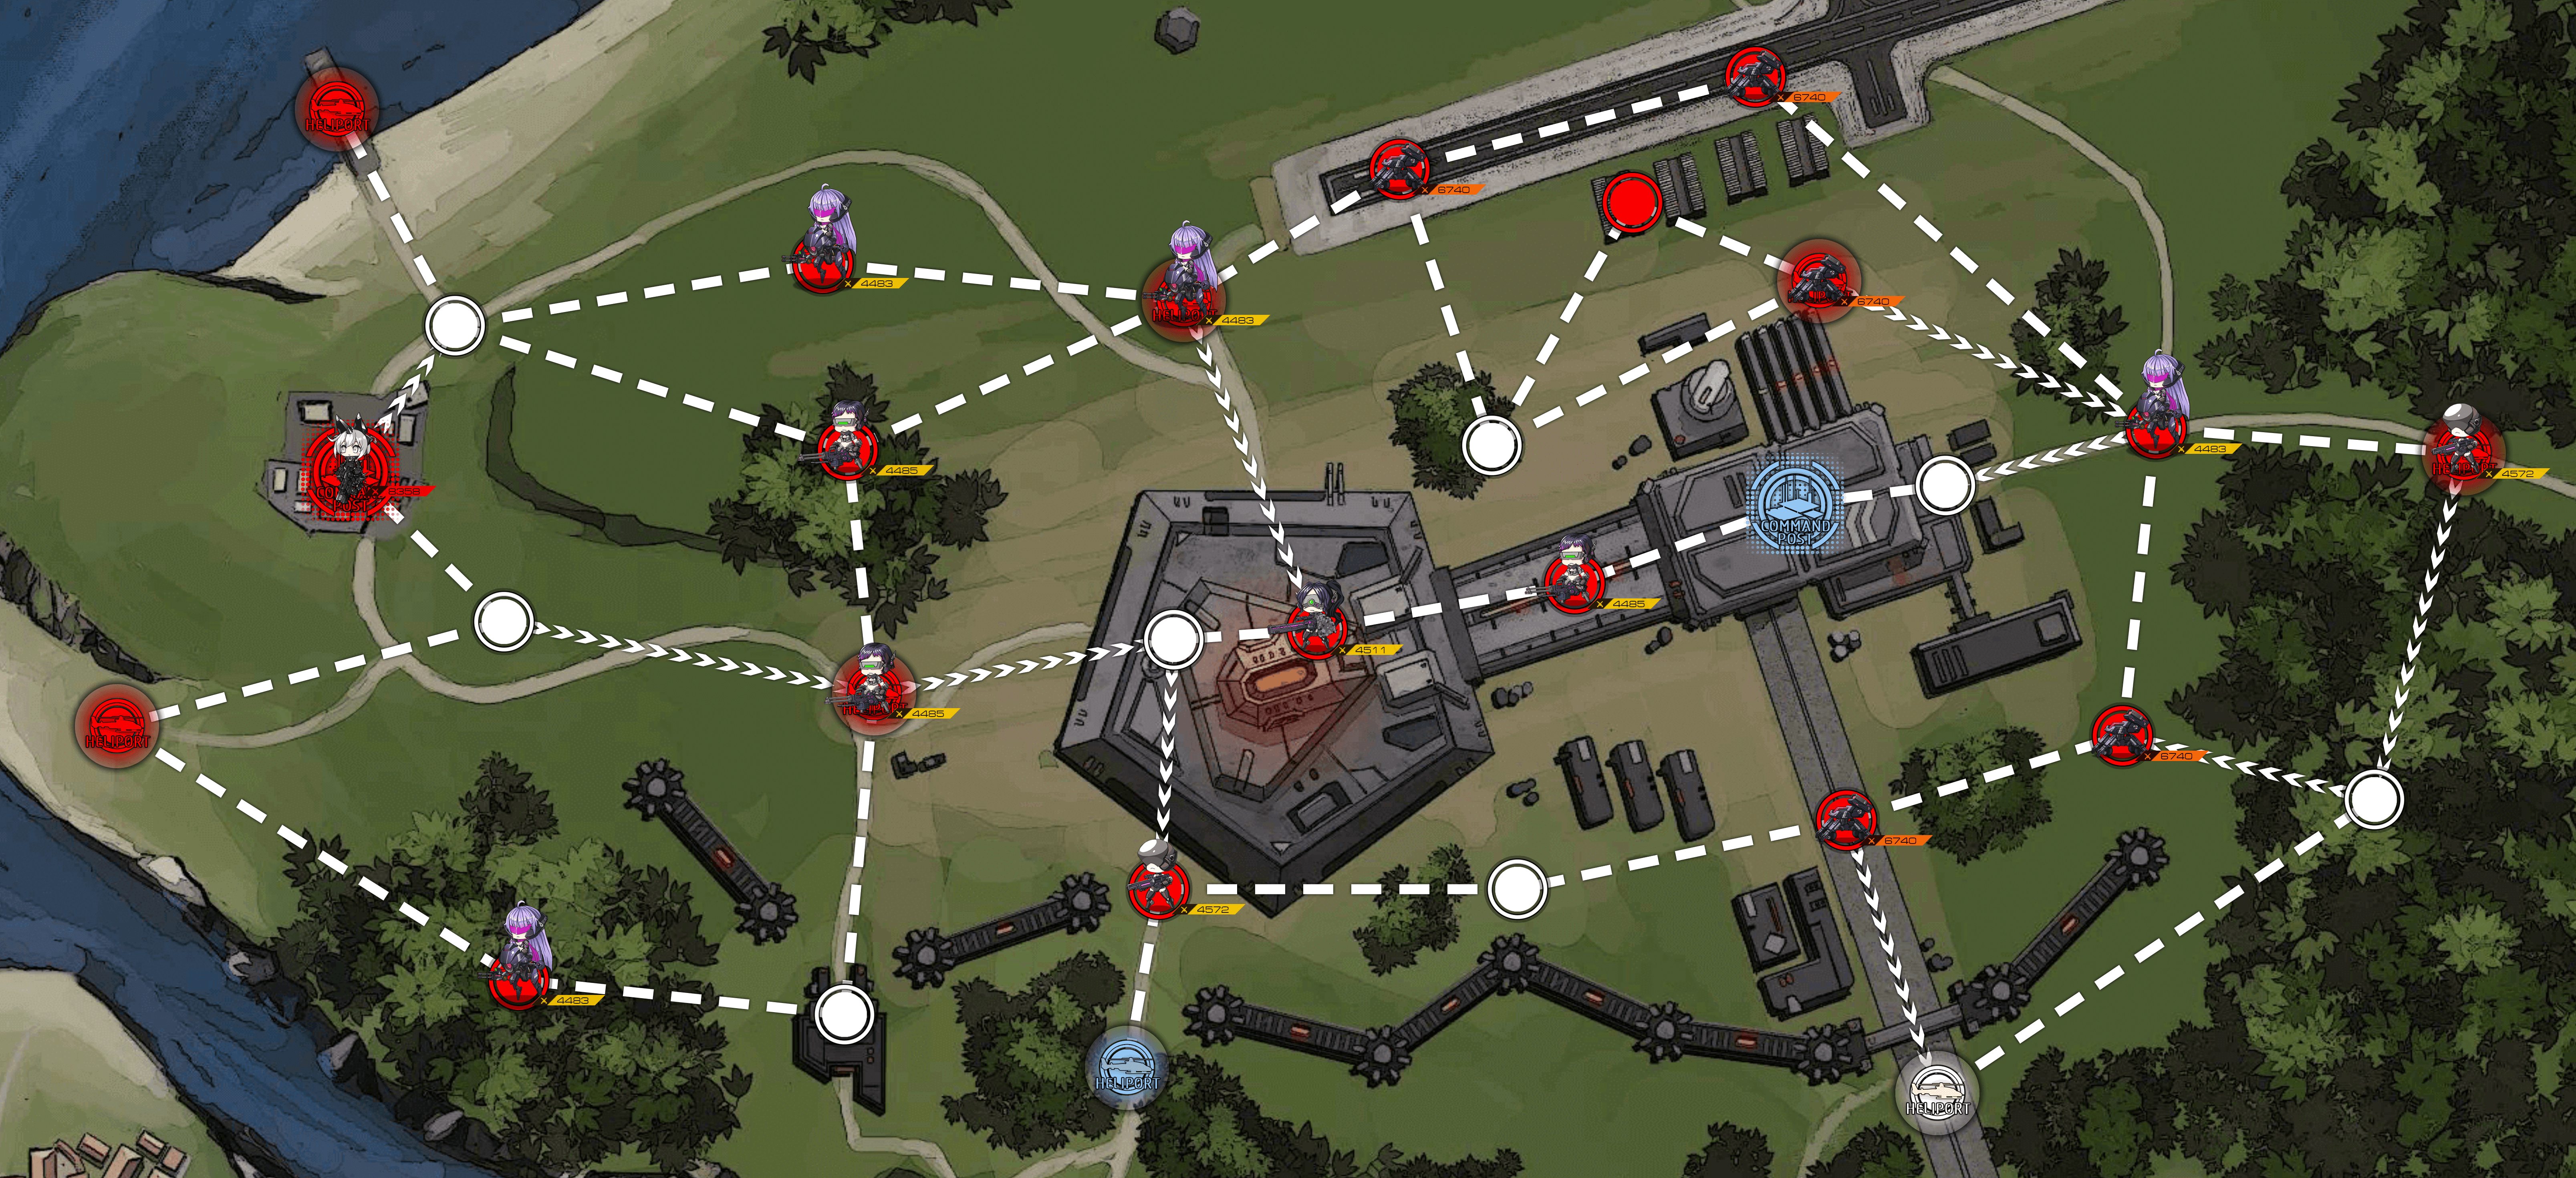
On turn 1, move the Heliport Echelon up to avoid having the Heliport encircled, and the Command Post Echelon two nodes to the left and then one node back in the direction that you came.
On turn 2, the Dragoon on the far right will threaten our Command Post, so we will need our Command Post Echelon to move back in order to garrison it. We can afford to not take the offensive because we created some breathing room by capturing the node to the left, and as such the Command Post is safe from encirclement. Use the remaining movements to capture the southeastern Heliport with your Heliport Echelon.
Since the Dragoon engaged our Command Post Echelon, the node to the right is now vacant, but since the left node has been captured, our Command Post now faces potential encirclement. Engage the enemy squad on the left node with your Command Post Echelon and capture it.
With what movements we have left, we need to capture yet another Heliport to resupply our Heliport Echelon and secure more Action Points. Use your Heliport Echelon to seize the Heliport from the Vespid squad guarding it.
With our Heliport Echelon fully resupplied and our Command Post safe from encirclement, we will make a run to the next available Heliport. While we do this, we will use our Command Post Echelon to capture the node right below it so we can resupply our Heliport Echelon yet again, this time to finally face Elphelt.
With 7 Action Points available and 7 nodes between our Heliport Echelon and Elphelt, we can now make a beeline for the enemy Command Post and face her at last. Remember to move your units into a X formation when you enter battle with her.

And that concludes everything you need to know about this Event. If your Echelon isn’t quite at the point where you can clear Elphelt’s map, don’t worry — Rabbit Hunt runs for a fair while so you’ll have time to train your units up. Remember: just like Cube, there’s no issue with taking your time.


