This is an Old Page
This page is about the original Isomer Ranking. It is not overly helpful for Isomer+ Ranking Rerun.
Introduction
With just three days left to attempt Isomer Ranking in Girls' Frontline, you might not have the time to follow VODs or try to theorycraft how this map works - wouldn't it be nice if there were a step-by-step guide you could follow to get through the whole thing?
This guide gives you exactly that - I have added additional commentary/notes/images to make it easier for first-time rankers to follow. Huge thanks to Ceia for drafting and optimizing it throughout the course of this event. It works for both Normal and EX, but if your teams can handle EX, you should do EX instead since Normal tops out at 600k-800k points. If you want to get a feel for the map first, try Normal once then run EX later - everything is conceptually the same aside from EX enemies being tougher.
08/02 update: Added the Reducing RNG guide
08/01 update: Revised the Turn 9 camping infographic.
Note: If you don't have 3 parachute fairy, you can follow the tips in the following guide below to adapt. It's only a small AP loss early game - no significant impact on final score. For Teambuilding tips, check the teambuilding guide.
Use the following map as a reference for where to go when grid numbers are mentioned - recommend opening it in a new tab/window for easy reference. Images will also be provided in-line where appropriate.
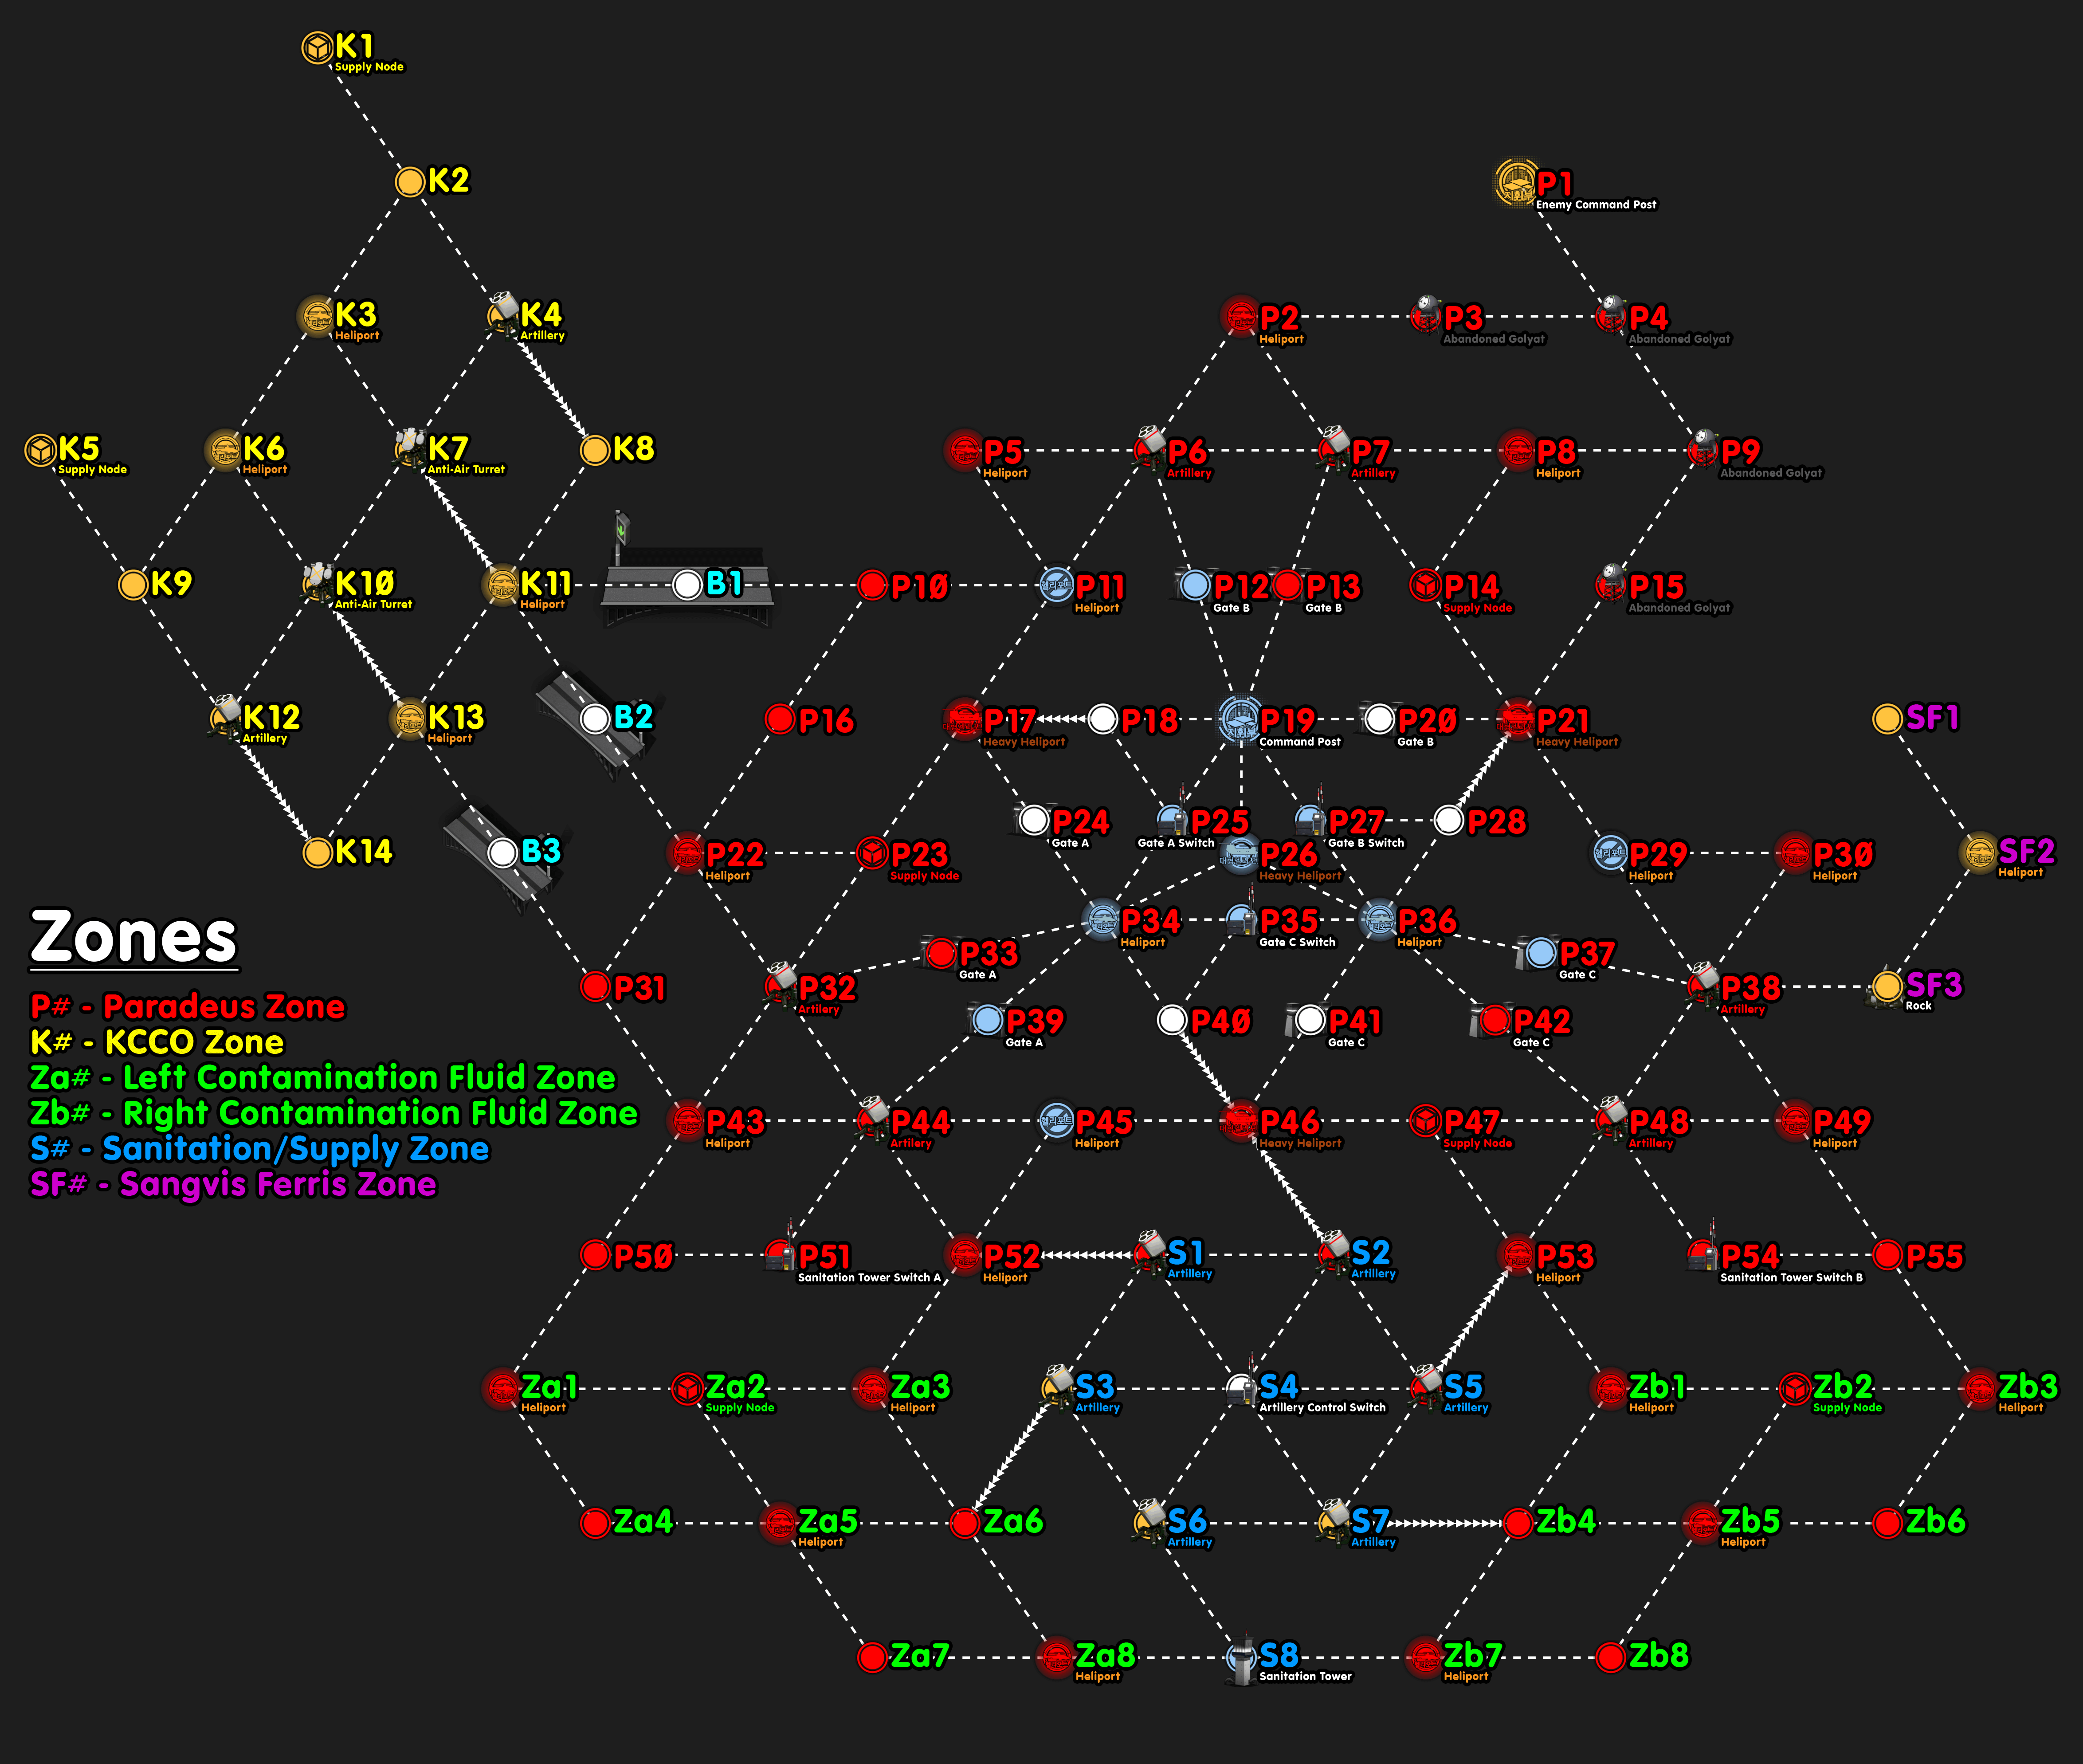
Image Credit: Midgie#4390
Turn 1
Turn 1 is essentially the same for everyone. You'll want to deploy as many teams as you can (up to 8) - use Dummy Echelons instead of combat echelons if you run out of leveled dolls - the AP they give is useful.
First, deploy BGM via P26 Heavy Heliport, Illumination team on P36, KCCO 1 team on P19, and any RFHG team on P34.

Now execute the following steps:
- Move the illumination team from P36 to P46.
- Swap with RO NPC on P45, swap BGM over to P34 and eliminate the missile turret on P44, swap echelon back with RO NPC after.
- This lets RO win the next fight by taking out the missile turret that would normally defend the area.
- Deploy Zombie team 1 (Parachute) via P36, move her to P37.
- Deploy Zombie team 2 (Parachute) via P36, move her to P41.
- If you don't have enough parachutes, deploy a normal RFHG instead. You can deploy the other ELID team from the bottom of the map later.
- Deploy your Bossing team (ARSMG with PEQ preferred) via P36.
- Move P34’s RF team to P24, deploy Double Jupiter (M4/IWS team) via P34.
- Substitute either a normal RFHG or an ARSMG that can handle the Smasher fight
- Move P19’s echelon to P20, then deploy another RF echelon on P19.
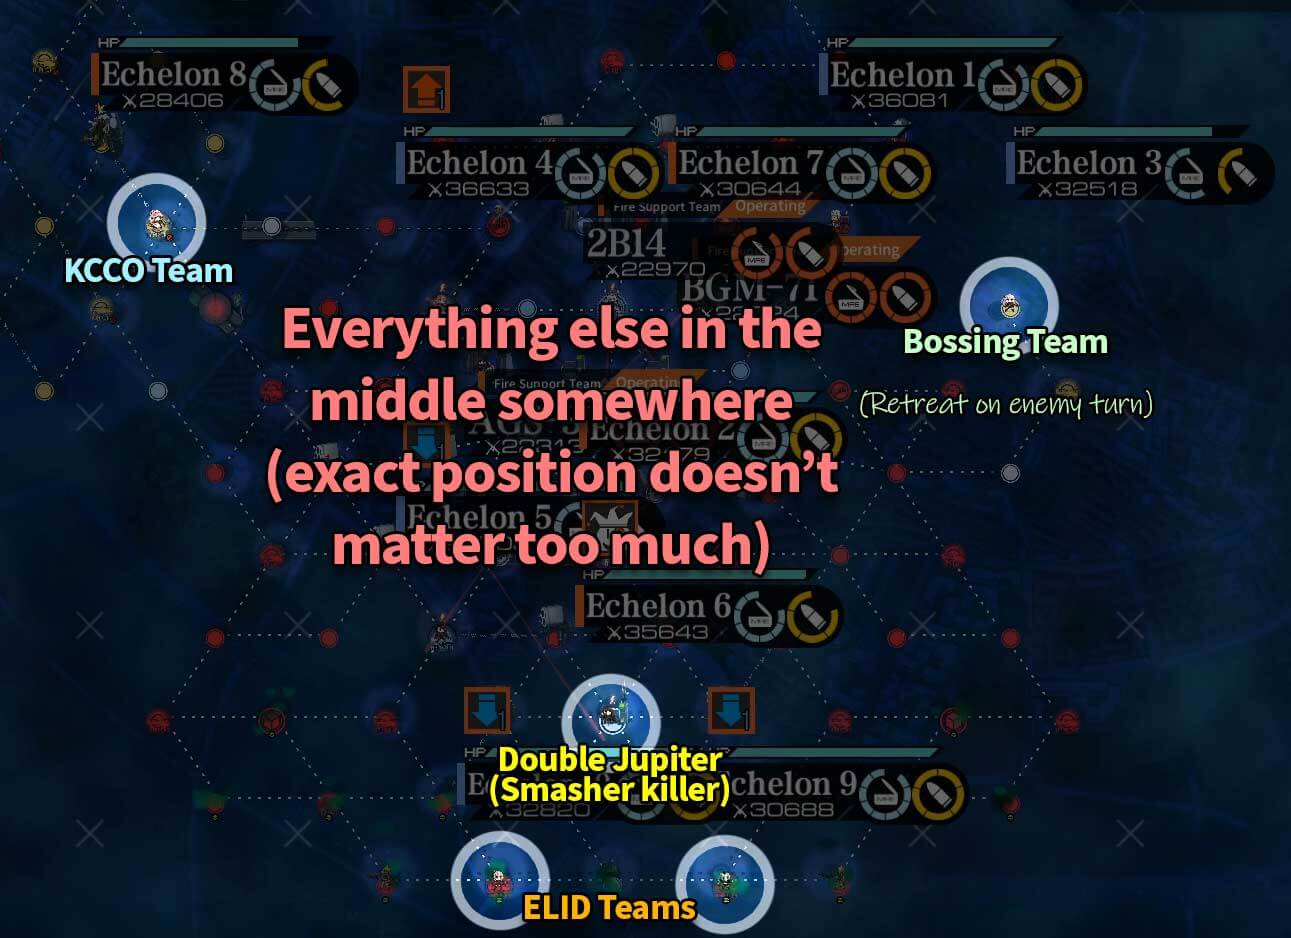
You'll end up with something like this:
By the end of turn 1, you should have 8 echelons deployed as shown above (exact details may vary based on your particular setup), with BGM. (Hint: you can swap echelons via planning mode if needed)
Turn 2
You'll want to achieve as many of the following things as possible in Turn 2, as applicable to your particular setup:
- Use HOCs to destroy enemy Artillery in range
- Set allied echelons/hostages to wait and keep them in a safe area in your swap chain
- Capture the Supply Point with an echelon that can fight the Smasher
- Pick up an Abandoned Goliath then swap/move your KCCO Team to the KCCO Area, blowing up a bridge along the way
- Parachute/move ELID teams down to the contaminated zone and capture the helipads
- Kill Purification Tower for 10k points (if AP permits)
- Destroy the rubble blocking SF area and unclog the helipad
Check the Ranking Guide Intro for reference VODs if you need.
These exact steps require 19 AP minimum (the number of AP you have is RNG) and uses the 3 Para Opening. You can check Midgie's 1/2 para openers above for tips on how to adapt it, but the easiest AP save is doing the SF area on a later turn.
- Set all NPCs to standby, you’ll be using them in your swap chain from now on.
- Eliminate all remaining missile turrets in the Paradeus area using Illumination fairy’s active + BGM-71. (P6, P7, P32, P38, P48)

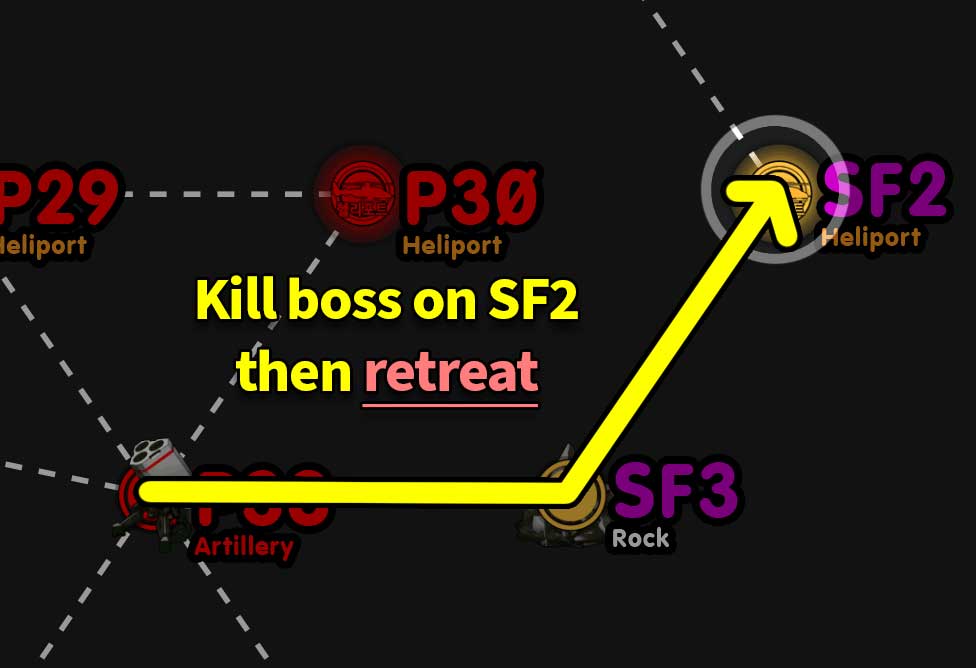
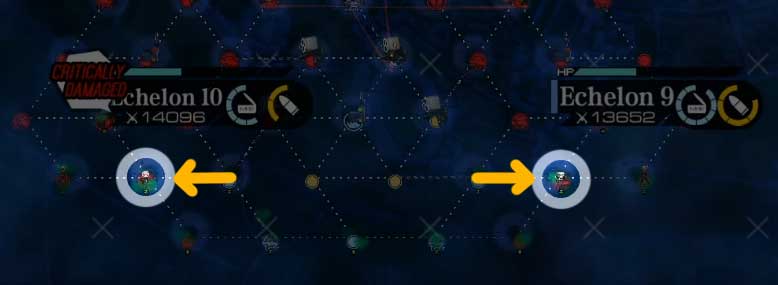
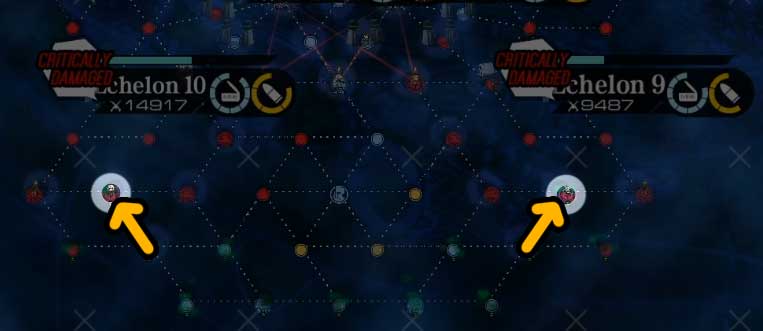
- Destroy rubble with BGM, move boss echelon to SF1 and retreat when attacked on SF turn (VERY IMPORTANT!!!) to set up for double boss spawn (SF2’s spawn will NOT be a boss unit.)
- If you don't have enough parachutes or AP, you can do this part later. This can be delayed to give you spare AP to let you do the opener without 3 parachute or 19 AP.
- Swap echelon at P20 with AN-94 NPC at P21, move echelon at P21 to P15. Deploy 3rd Parachute echelon via P21.
- Have your KCCO deathstack killer pick up a bomb via swapping, swap it back to P17, and move to P23.
- Deploy 2B14 on P17 to support advance to KCCO area
- Have KCCO deathstack killer plant the bomb on Bridge B2, and secure the helipad K11 in the KCCO area.
- Move echelon on P46 to P45, deploy AGS on P46 to support advance to supply line area
- If you have a 4th parachute, you can be parachute it from anywhere to P45 to save 1 AP
- Parachute 3rd Parachute team (Non-Zombie) from P17 to Za3 (saves 1 AP). Ignore this if you don't have 3 parachutes.
- Swap parachute debuffed team back to P15
- That echelon has to be left to cap P15 to set up for capping towards Command Post P1.
- Eliminate S3 Missile Launcher with BGM.
- Move Zombie teams to P19 and P21/P26 before Parachuting.
- Parachute Zombie echelon 1 to Za8 helipad
- Destroy purification tower (S8) with AGS
- Move Double Jupiter to S8.
- Parachute Zombie echelon 2 to Zb7 helipad
- Double Jupiter team moves to S4 to set up for the supply line. Bombard the KCCO Hydra
- Hydra only in the supply area, then disable all missile launchers. (Smasher will walk into the Double Jupiter echelon on enemy’s turn, use Taunt to steamroll)
- Eliminate S6 and S7 missile launchers with AGS.
- Move the zombie team back from Za6 to Za8 if you used it to swap with Double Jupiter (Important!!!)
- Deploy the last echelon on one of the empty helipads.
- Pull back from P17, P21 heavy helipads and P52 helipad to allow enemy to capture them so that more enemies will spawn
- If you don't have enough AP to do it, retreat any team on them that gets attacked
- Swap illumination echelon to one of the heavy helipads/P52 and retreat it after an enemy engages it so you can replace the fairy on it
- Usually KCCO 2 is used for the illumination echelon since you need to redeploy it to the KCCO zone on turn 3.
Your map should ideally look something like this by the end of T2:
General checklist (every turn from now on):
- Make sure that NPC units and HOCs are not exposed to attack at the end of your turn, swap with NPC units to check (as they lack night vision, unlike your own units/HOCs)
- Roam to clear out Paradeus units from helipads so that as many enemies as possible can spawn
- Maintaining your swap chain as much as possible to minimize AP required for resupply/repair
- Avoid surround capturing Paradeus helipads or directly capping them
Turn 3
Turn 3 is the first flexible turn - you'll need to allocate your spare AP yourself based on enemy movement and how much free AP you have.
- Note that KCCO/SF Area are flowcharts/forced moves, and should be done first.
SF Area:
- If you did this on Turn 2, nothing. Otherwise do what you should have done on Turn 2.
KCCO Area:
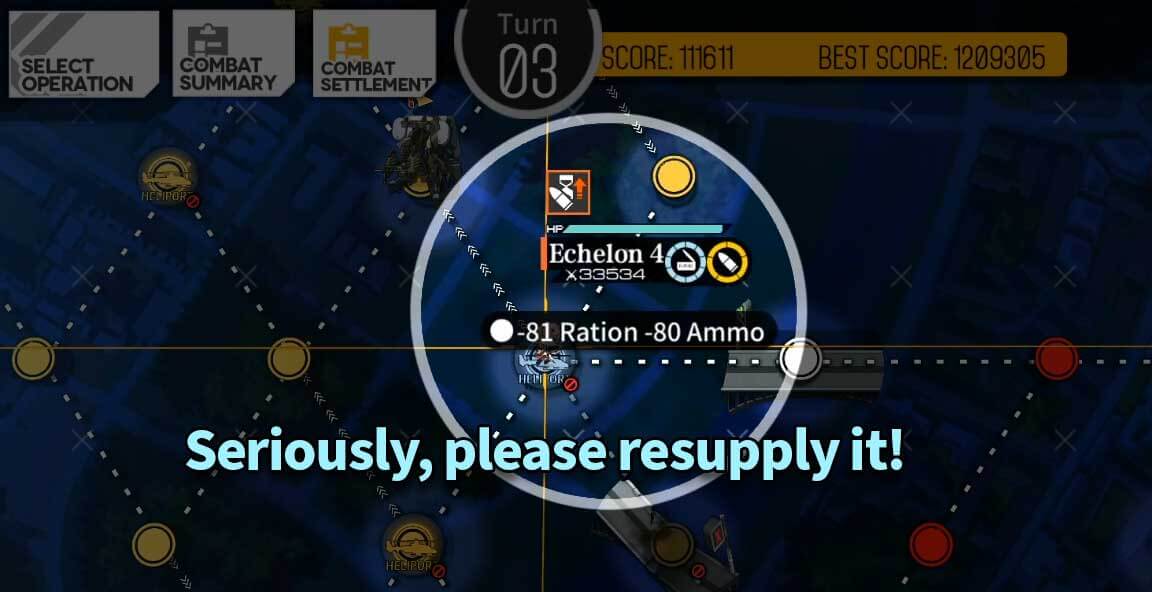
- Resupply KCCO team 1 before advancing (Important!!!)
-
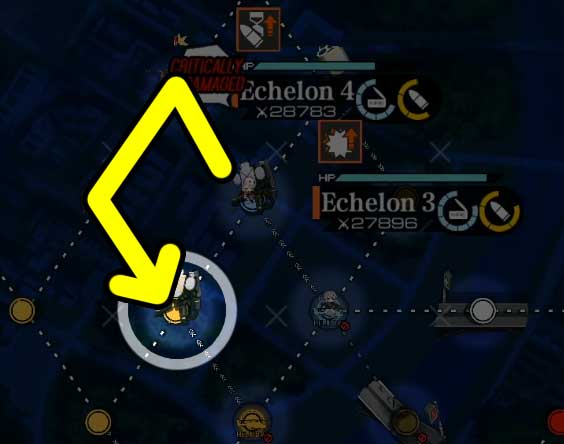
Engage first deathstack (K7) with anti-hydra deathstack echelon, you want to win this fight with enough health to fight the next one as well
-
See the 108k Hydra Node section here for video examples of this particular fight. It's reset-heavy (you want the missile launcher to target your HGs rather than DPS units).
-
Advanced players who have at least 3 spare AP after doing everything else can try and grab some additional kills by declogging K3 and K6 - note that if you do this, you'll need to redeploy KCCO zone echelons 1 turn earlier than the guide shows due to running out of ammo. Only do it if you know what you're doing!
-
- Deploy an echelon on K11 to defend the helipad there.
- This is only possible if you do it immediately after killing the hydras due to a bug. If you exit the map, you won't be able to (since there's another AA tower preventing deployment).
Supply Line Area:
- Reactivate the turrets and bombard the KCCO patrol again
- Destroy all remaining missile launchers in supply area with BGM-71 and/or AGS-30
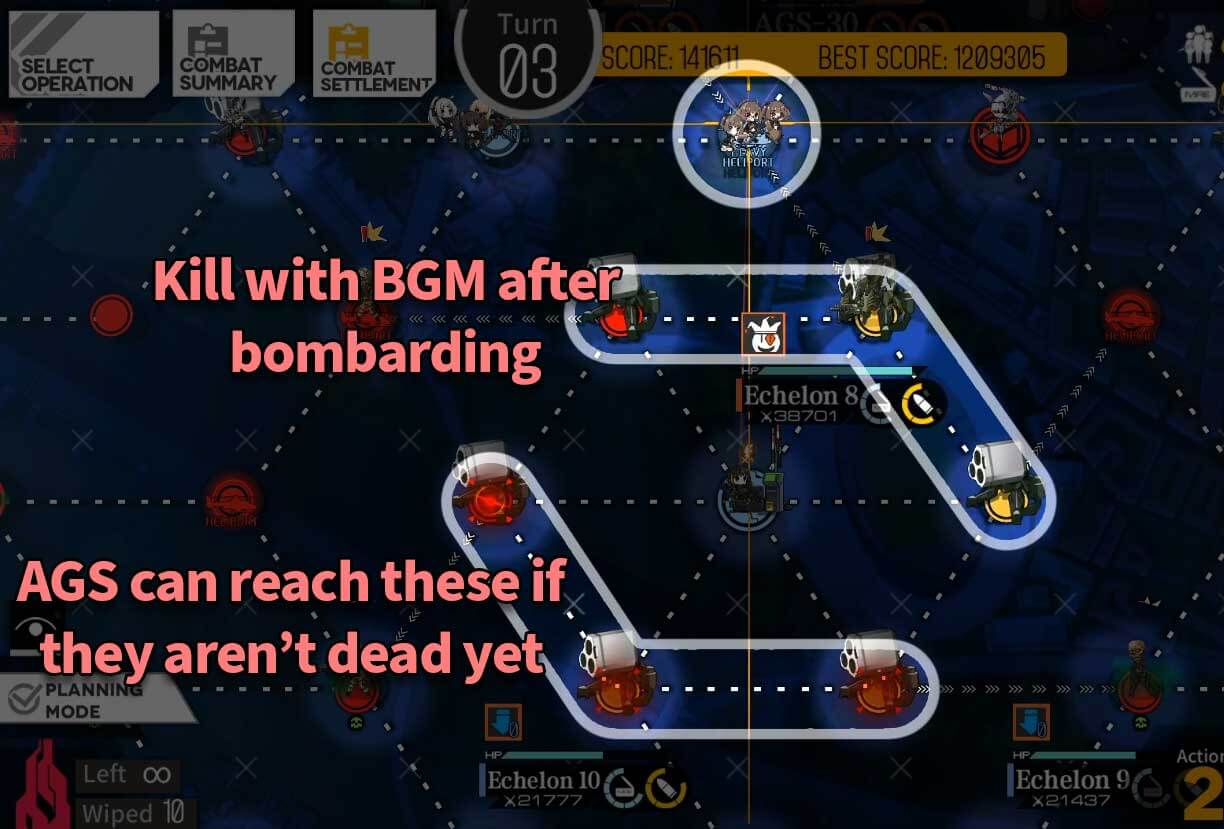
- Move Double Jupiter to S2 to engage KCCO patrol (it should be almost dead and go down easily), which connects the supply line by the next turn.
ELID Area:
- Repair your SGs, (if SG took more than 50% HP damage) & resupply (Important!!!)
- Move to Za6 and Zb4.
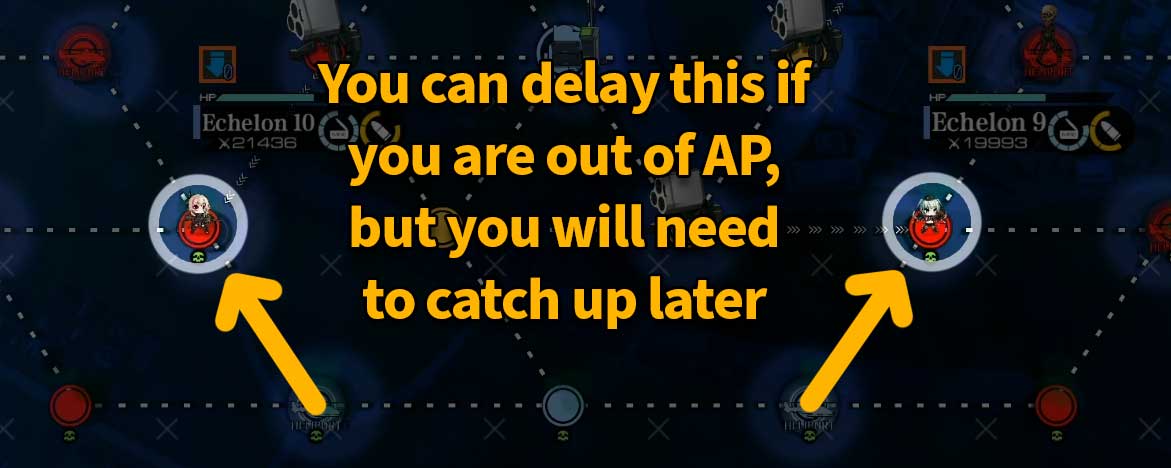
- If you were not able to move both ELID teams down here, either spawn your ELID team now or move it down, ending turn on either Za8 or Zb7 to cap the heliport. (You'll need to perform its actions with a 1-turn delay relative to this walkthrough, so as to let you capture the nodes)
- (Optional) Unclog the helipads if you somehow have extra movement points after clearing out Paradeus.
Paradeus Area:
- Capture Abandoned Goliath tower at P9 and pick it up with your echelon (Parachute preferred), while continuing the advance to the command post
- Do NOT skip this step because your tile will be encircled if you don't move one node per turn.
- Eliminate possible KCCO/Paradeus leak at B3/P31 to prevent it from capping Paradeus/KCCO helipads while unclogging Helipads.
- Unclogging means killing enemies standing directly on top of an enemy-occupied helipad; this will allow the helipad to spawn an enemy (since they can't spawn anything if there's already a unit directly on it), meaning more kills/points.
- Roam around killing enemies for points and to unclog the Helipads for more spawns,
- Make sure to end your route beside a friendly echelon for easy resupply/repairs.
Isomer ranking is actually a lot more nuanced than it may appear at first. While simply following the instructions here will get you 90% there, the last 10% requires some supplementary reading.
If you have time for another guide, make sure to give the below page a thorough look to really squeeze out those extra points.
Turn 4
Turn 4 is pretty similar to Turn 3 in objectives. Most of your upcoming turns will be more of the same, aside from the few moves you make in KCCO/SF/ELID zones.
SF Area:
- If you had to clear this area in Turn 3 instead of Turn 2, then do nothing this turn. If you cleared it on Turn 2, then you can do the following:
- Have a roamer move to P38, clearing Paradeus along the way if possible
- Eliminate Executioner on SF2 helipad and retreat after.
KCCO Area:
- Clear KCCO enemies at K3 and K6, then move to K10.
Supply Area:
- Move Double Jupiter to P46 so you can free it up for fighting in Paradeus zone, since nothing more needs to be done with the supply area.
- Guarding/clearing P45 and/or P47 will seal off P46, securing the supply line.
ELID Area:
- Capture Za5 and Zb5 helipads
- (Optional) Clear clogged Helipads if you have extra movement points.
Paradeus Area:
- Roam around killing enemies for points and to unclog the Helipads for more spawns.
- Surround capture command post P1 by capturing P4

- (Optional) capture supply node P47 so you can defend it
- Points to defend: heavy helipad P46 (critical to maintain supply line), starting area (critical to not get HQ captured)
- Try to end your routes beside a friendly echelon for easy resupply/repairs.
Turn 5
More of the same, like Turn 4.
SF Area:
- Have a roamer move to P38 while clearing Paradeus for easier swaps
- Eliminate Intruder on SF2 helipad and retreat after.
KCCO Area:
- Move KCCO echelon 2 to K7 (Resupply first!!!)
- Retreat and redeploy KCCO echelon 1 to K11.
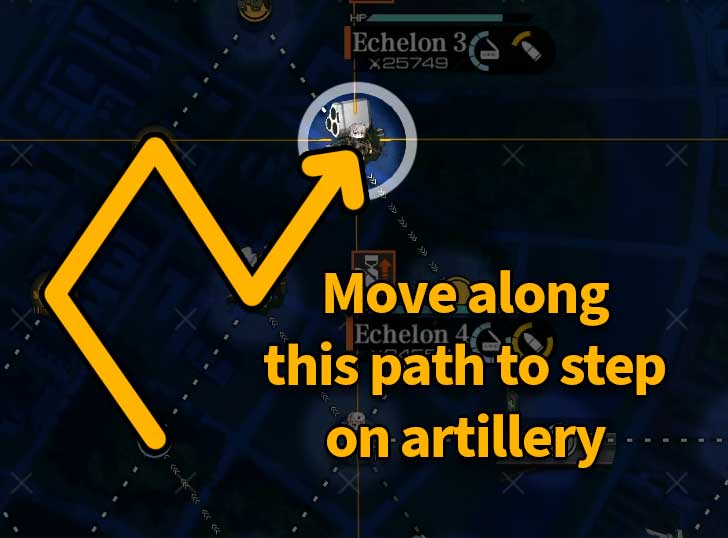
- Step on K12 Missile Launcher with KCCO echelon 2 (K7 > K3 > K6 > K10 > K12)

- (Note) K2 and K9’s enemies do NOT move, taking them out early gives another avenue for the spawns via K3 and K6 to move to.
ELID Area:
- Resupply your echelon and repair your SGs if needed
- Capture Za2 and Zb2 Supply Nodes.
- (Optional) Clear clogged Helipads if you have extra movement points.
Supply Area:
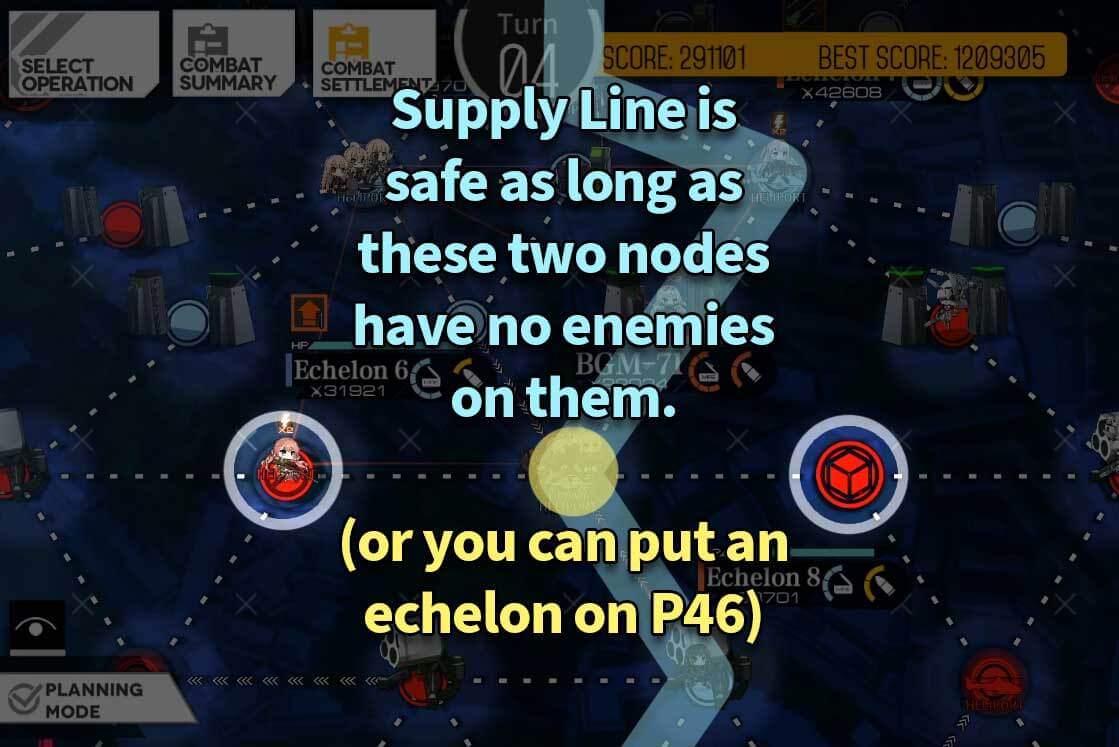
- Make sure the supply line stays in your control via guarding P46 or clearing its two adjacent nodes.
Paradeus Area:
- Roam around killing enemies for points and to unclog the Helipads for more spawns,
- Try to end your routes beside a friendly echelon for easy resupply/repairs.
- Points to defend: heavy helipad P46 (critical to maintain supply line), starting area (critical to not get HQ captured)
Turn 6
More of the same, like Turn 5. Minor change to SF Area to set up for triple M16 if you want to do it.
SF Area:
- Have a roamer move to P38 while clearing Paradeus for easier swaps
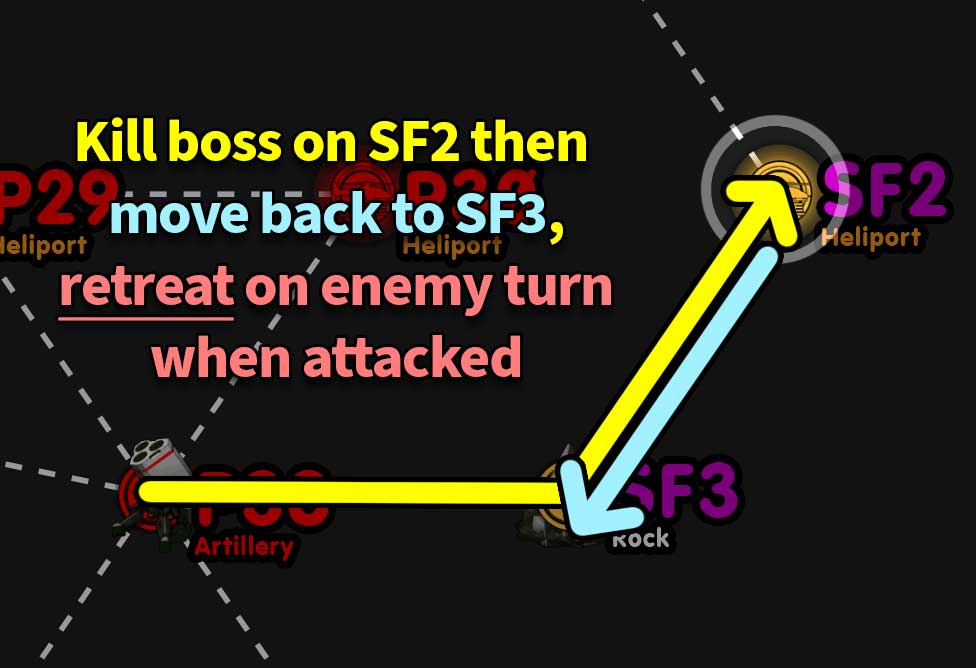
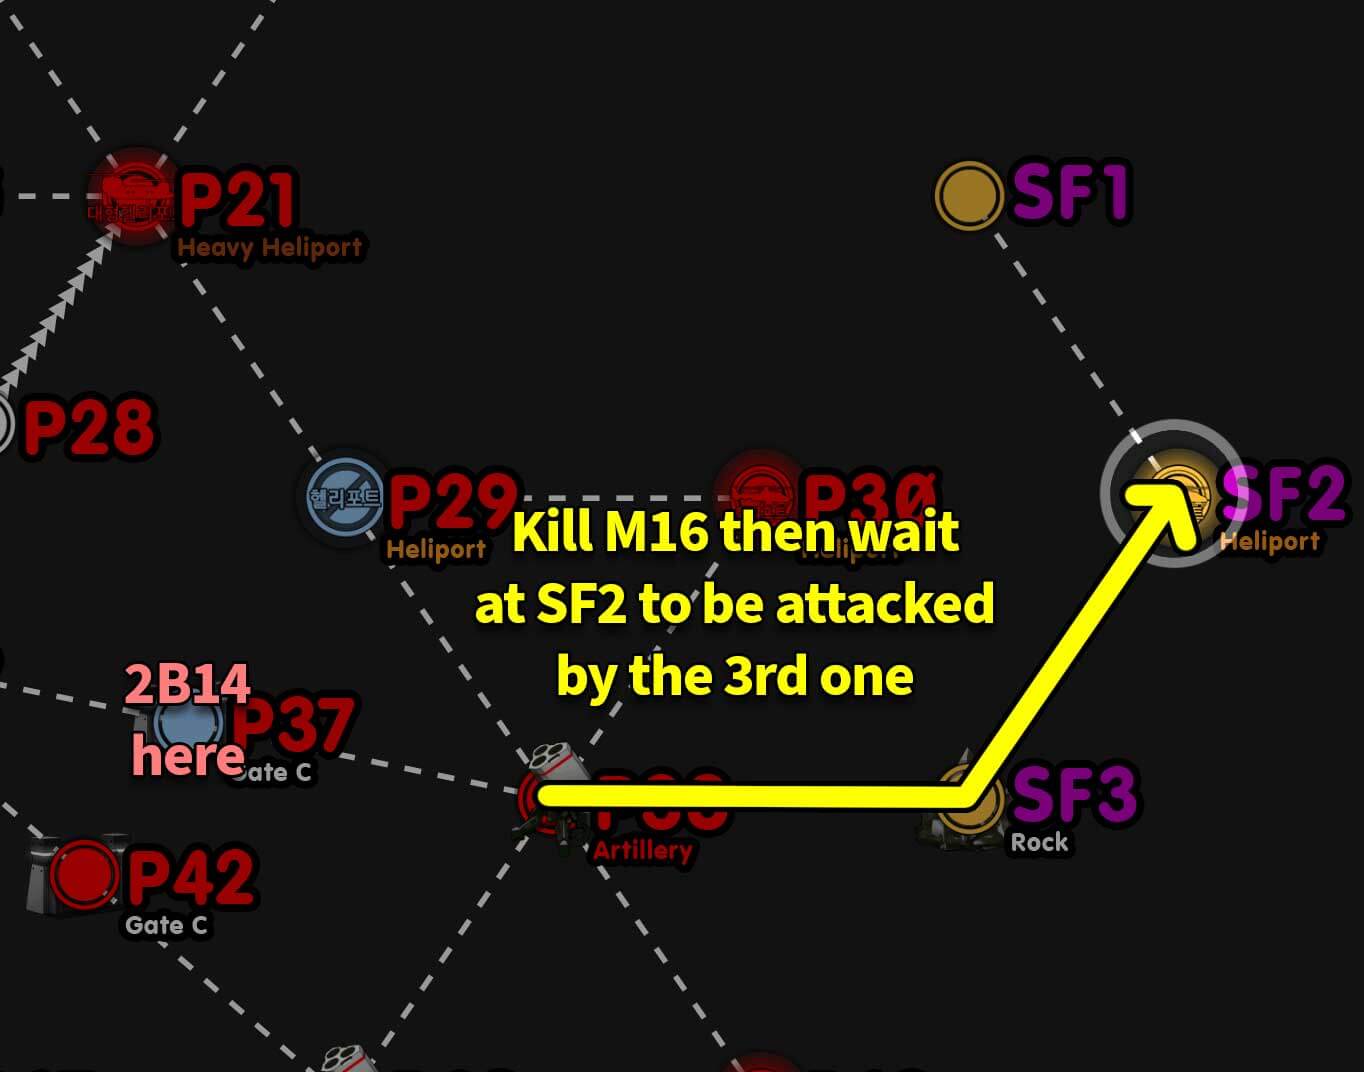
- Eliminate Alchemist on SF2 helipad and move back to SF3 node. Stay there, and retreat the echelon when SF engages you on SF’s turn. This is to set up for triple M16 later.
KCCO Area:
- Step on K4 Missile Launcher with KCCO echelon 2 (K10 > K6 > K3 > K7 > K4)
- The KCCO on K2 and K9 do not move, so you're safe.
ELID Area:
- Either keep Za2 and Zb2 Supply Nodes captured, or capture Za1 and Zb3 Heliports.
- If there are enemies on Za3 and Zb1, eliminate them first, then move to Za1 and Zb3.
- (Optional) Clear clogged Helipads if you have extra movement points.
- If the Zombie teams are out of supply for some reason, you can station 2B14 to assist them. Have the SGs tank while 2B does her work.
Supply Area:
- Make sure the supply line stays in your control via guarding P46 or clearing its two adjacent nodes.
Paradeus Area:
- Roam around killing enemies for points and to unclog the Helipads for more spawns,
- Try to end your routes beside a friendly echelon for easy resupply/repairs.
- Points to defend: heavy helipad P46 (critical to maintain supply line), starting area (critical to not get HQ captured)
Turn 7
The endgame is approaching, so your movement gets slightly more interesting now. Adapt as needed - routing will depend on your current positioning and enemy movement!
SF Area:
- Station an RF echelon on P38 (1 tile west of Dreamer) to lure Dreamer to you. This is to set up for Triple M16 on turn 8.
- Retreat the echelon when Dreamer engages you on SF’s turn.
KCCO Area:
- Surround cap K1 or K5 Supply node by capping K2 or K9.
- Move to capture K13 Helipad.
- Deploy replacement echelon to Command Post P1 (the one at the top right near the Abandoned Goliath) and swap with your Parachute echelon in the area, remembering to resupply.
- Parachute should now be off cooldown, Parachute your isolated echelon carrying the Abandoned Goliath to KCCO area and plant the bomb on B1 or B3
- Before parachuting, make sure to swap back with the 2nd echelon you deployed so you are parachuting from the command post and the other echelon is holding the tile outside it.
- (Optional) If you have enough movement points, retreat the Parachute and redeploy
on P1 HQ. Grab the bomb on P4, and Parachute back to the KCCO area, letting you blow up the
last Bridge for even more points.
ELID Area:
- Capture Za1 and Zb3 Heliports, if you haven't done so already in Turn 6.
- If there are enemies on Za3 and Zb1, eliminate them first, then move to Za1 and Zb3.
- Advanced players may attempt to encircle Zb1 this turn or the next by stepping on P53.
- (Optional) Clear clogged Helipads if you have extra movement points.
- If the Zombie teams are out of supply, station 2B14 to assist them. Have the SGs tank while 2B does her work.
Supply Area:
- Make sure the supply line stays in your control via guarding P46 or clearing its two adjacent nodes.
Paradeus Area:
- Roam around killing enemies for points and to unclog the Helipads for more spawns,
- Try to end your routes beside a friendly echelon for easy resupply/repairs.
- You should have 90+ kills by the end of this turn, so Mercurows will spawn from an enemy captured Heavy Helipad (P17/P21) with random movement.
- You can try to station your Double Jupiter/Boss echelon close to them with Taunt active and 3 HOCs support to eliminate her, or take her out during Turn 8.
- Points to defend: heavy helipad P46 (critical to maintain supply line), starting area (critical to not get HQ captured)
Turn 8
This turn will mostly be spent cleaning up the board and preparing for the Turn 9 setup. Advanced players may attempt to encircle the right-hand-side heliports this turn.
SF Area:
- Eliminate all 3 M16s that were spawned due to the setup done earlier in the run.
- See the SF Bosses section here for video examples of this particular M16 fight. Consult the Teambuilding guides for M16 team examples.
- Remember, step on detector with HG or AR!
- Have all 3 HOCs support the echelon engaging the first M16. (P38)
- Swap the SF Boss echelon, swap back to a friendly helipad and repair before engaging the 2nd M16 if needed. (SF2)
- Have 2B support the 2nd M16 fight (SF2)
- Make sure your echelon can take a 3rd M16 fight after the 2nd fight
- Hold position at SF2 and have M16 walk into you on SF’s turn, and make sure to have 2B supporting that fight.
KCCO Area:
- Surround cap K1/K5 Supply node by capping K2/K9.
- Capture K3/K6 Helipad.
- This should surround and capture the remaining KCCO Helipad in the area; completely capturing the KCCO sector.
- If not done so last turn, retreat the Parachute and redeploy on P1 HQ. Grab the bomb on P4, and Parachute back to the KCCO area, blowing up the last Bridge.
ELID Area:
- Resupply your echelon and repair your SGs if needed.
- Capture Za3 and Zb1 Heliports, which are the final heliports in the area.
- You may capture P53 and have Zb1 surround capped for 1 more enemy spawn if you have the movement points to spare.
- Make sure Zb2 and Zb4 are in your control if you’re trying this. This will surround and capture Za2 and Zb2 previously captured by enemy movement.
- (Optional) Parachute to P53 and surround capture Zb1. Doing this with your zombie
team stationed at Zb2 will surround and capture Zb1.- If the Zombie teams are out of supply, station 2B14 to assist them. Have the SGs tank while 2B does her work.
Supply Area:
- Make sure the supply line stays in your control via guarding P46 or clearing its two adjacent nodes.
Paradeus Area:
- Roam around killing enemies for points and to unclog the Helipads for more spawns,
- Try to end your routes beside a friendly echelon for easy resupply/repairs.
- You should have 110+ kills by the end of this turn, so Nimogen will spawn from an enemy captured Heavy Helipad (P17/P21) with random movement. Station your Double Jupiter/Boss echelon close to them with Taunt active and 3 HOCs support to eliminate her.
- This fight is virtually impossible with an RFHG echelon, so it is recommended to either avoid it or station a competent bosser if you must camp near the heavy heliports.
- Super Paradeus enemies will spawn from this turn, so make sure your HOCs support
as many fights as possible. You don't want to lose because you forgot to give your teams HOC coverage! - Points to defend: heavy helipad P46 (critical to maintain supply line), starting area (critical to not get HQ captured)
Turn 9
The final turn! You want to camp your echelons near enemy spawner helipads in the southeast sector and hope enemy units walk into you, to maximize your point gain. Make sure your HOCs are positioned in range!
SF Area:
- No more bosses spawn this turn, so move/redeploy the echelon elsewhere.
KCCO Area:
- Retreat and redeploy all echelons in this sector, their jobs are done, you need them
elsewhere.
ELID Area:
- This area should be completely captured by turn 8. Para is off cooldown by now so you can use the skill again to cap some helipads for more points (don’t let your ELID teams fight, obviously)
- You can replace your ELID teams with more RFHG combat echelons if you can actually deploy more. This'll let you camp additional spots
Supply Area:
- Make sure the supply line stays in your control via guarding P46 or clearing its two adjacent nodes.
Paradeus Area:
- Rescue and retrieve ALL Hostages (M4, AN-94, RO)
- You may use your HOCs to rescue the Hostages (Press “Activate” while on a
helipad to extract them), but doing it with an echelon is easier.
- You may use your HOCs to rescue the Hostages (Press “Activate” while on a
- Kill as many Paradeus enemies as possible, then station as many echelons as possible beside Paradeus Helipads to catch the last wave,
- Super Paradeus enemies will spawn this turn, make sure your HOCs support as
many fights as possible. You may fiddle around with the gate controls to limit where the last spawn moves to on the last turn.
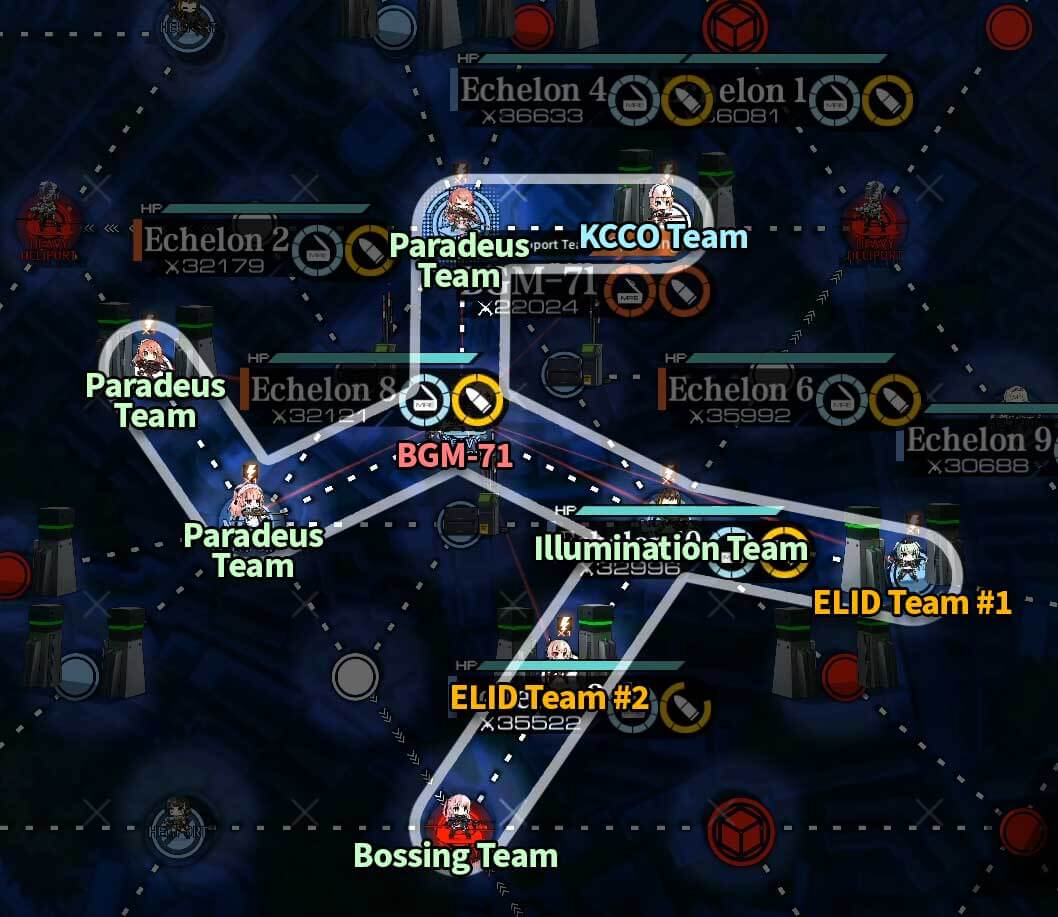
Camping Recommendation
- The below setup shows the most common setup for players with a strong AGS.
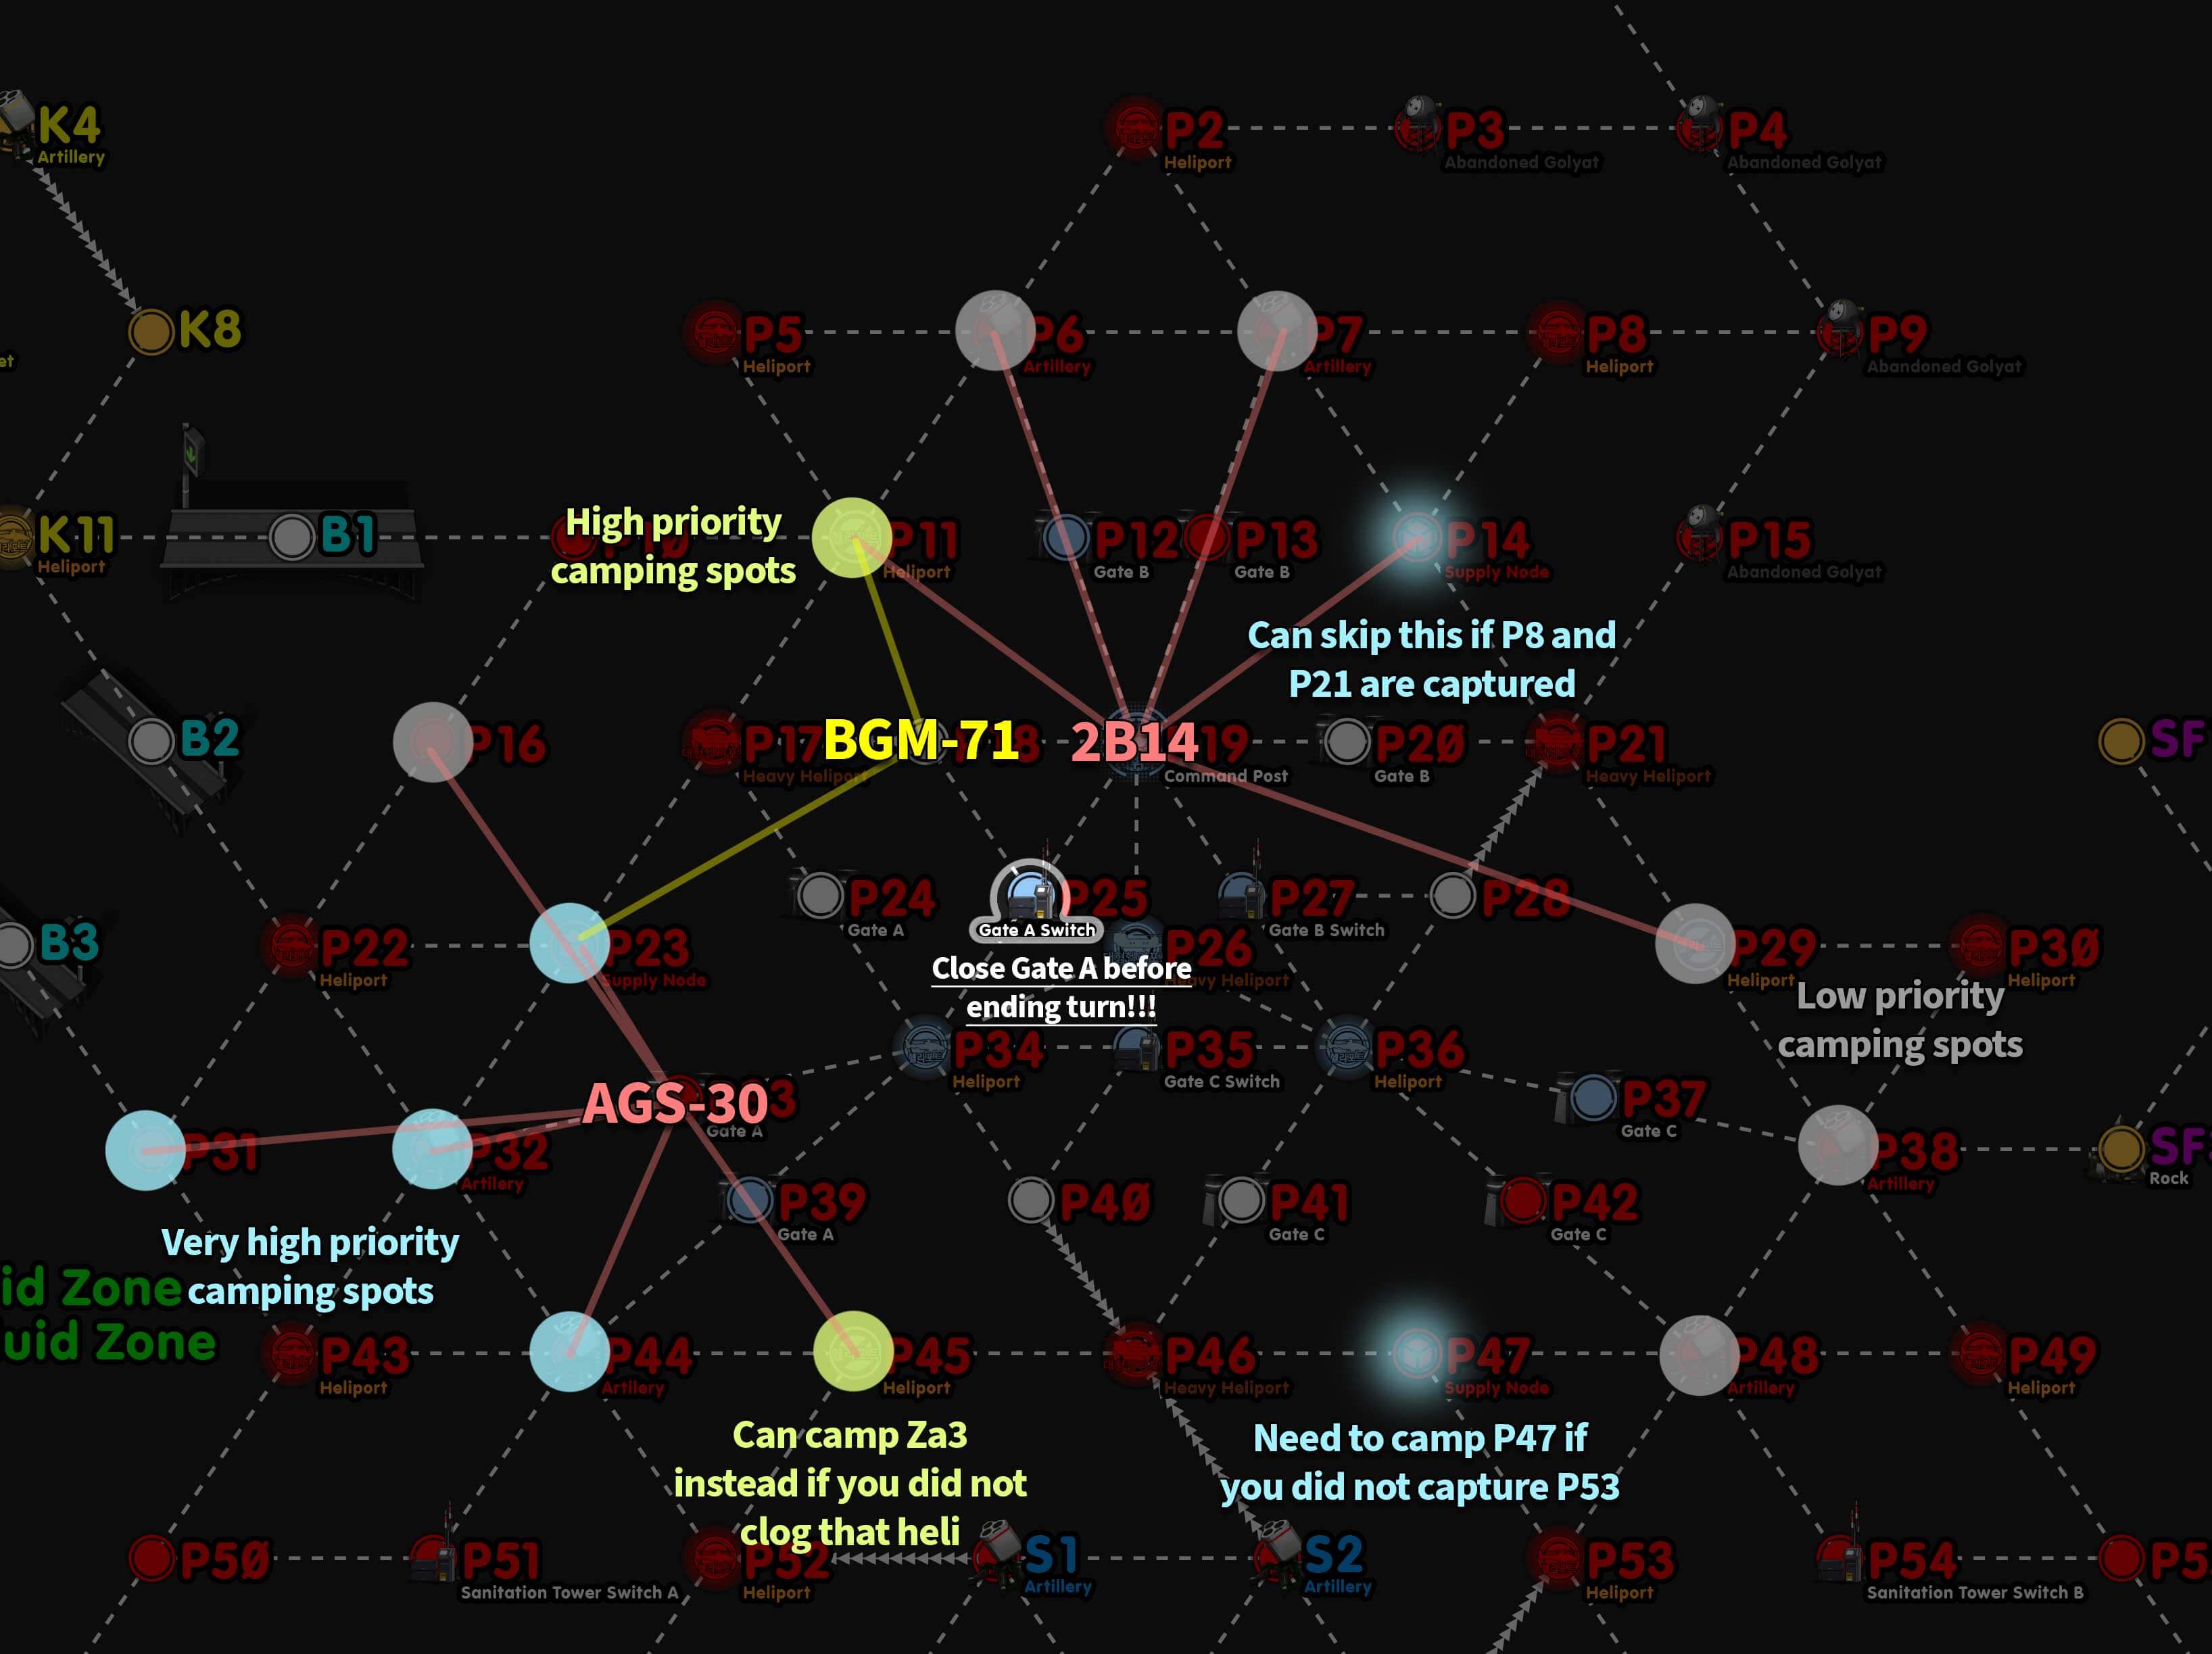
- Prioritize camping P31, P32, P44, and P23 if possible because they have a high chance of getting the high point value double Uhlan spawns.
- Make sure your teams are strong enough to handle triple doppel/double Uhlan with AGS only!
- P6 and P11 can also potentially get a Uhlan/triple Doppel spawn, and P6 is only protected by 2B. If you aren't confident in being able to beat those spawns with 2B only, do not camp P6.
- P14 and P47 must be camped if their adjacent heliports aren't captured, as they are on top of supply nodes that are worth 10k points each.
- P16 does not need to be camped if there is already a low CE mob there - it'll force P22 to move elsewhere.
You should close the Gate A set of defense gates after moving your HOCs and echelons into position; otherwise an enemy spawn could potentially walk into P24 and cause you to lose a kill.
- This can be done by BGM along the way as she moves up to P18.
That's all! Good luck with your Turn 9 spawns!