Introduction
Corpse dragging is a term for having most of the Echelon unsupplied, with usually a single Doll being supplied and thus “dragging corpses around”.
Corpse dragging is a way to reduce the resource cost of grinding EXP and Cores in GFL. By corpse dragging, you can spend the resources in more important places, like crafting/enhancing more Dolls, Equipment or Fairies.
Corpse dragging isn’t for everyone, and some alternatives will be listed below.
Why Corpse Drag?
While slower than full supply, corpse dragging is significantly cheaper. By supplying only a single Doll in a separate Echelon and swapping them before each run, you can have one Doll supplied and everyone else costing nothing but their deployment cost. This significantly reduces the cost, but only works on certain maps with certain setups. Client update v3.02 added Recovery as a stat, and all non-crit Dolls now automatically heal to full at the end of a map. In combination, these two additions reduce the cost of corpse dragging even more, as you should never have to pay for repairs anymore unless you mess up somehow.
By reducing the cost of grinding EXP and Cores, resources can be spent in other places. As raising Fairies, enhancing Equipment and crafting things you are missing all costs quite a bit, this can be a very convenient way of still getting EXP and Cores while not having to spend all your resources on it.
When looking at corpse dragging maps things to note are:
- Average cost. How much does it cost on average to drag this map?
- Core rate. Most corpse dragging maps will have 3☆ or higher Dolls drop, which can then be disassembled for cores. This rate denotes how many cores you get on average through this.
- EXP dropoff. Each map has an internal ‘soft cap’ before you start getting less EXP.
For example, if you go into Chapter 1 with level 90 Dolls, you’ll notice you get only 1 EXP per battle. - Requirements. What are the requirements to ensure that your AFK corpse dragging does not fail?
- Must be AFK. If you have to manually control your Dolls in battle, it is not proper corpse dragging. Due to how much slower corpse dragging is than full supply, it must be possible to set it up and leave it alone until you can start a new run.
It is also worth noting that the best corpse dragging maps usually also fulfill the S-Rank requirements for the map, granting extra cores through this extra drop check.
If you are at an equal level to the EXP dropoff you start gaining a penalty, gaining only 80% of EXP. Every 10 additional levels above the dropoff will reduce the EXP gain by another 20%, all the way down to 1 EXP.
Finally, while starting out, Corpse Dragging will usually stop at level 90 (unless you are intending to Mod a Doll), as level 90 is where you can 5-link Dolls, and going higher than that is not necessary for general content.
How EXP Gains Work
Dolls gain EXP based on several factors:
- MVP: The MVP gains a 1.3x multiplier.
- Leader: The Leader gains a 1.2x multiplier.
- Links: Base EXP is a 1x multiplier, with +0.5x per additional link, up to 3x at 5-link.
Each separate multiplier is multiplicative with the others, and there is rounding before the link multiplier.
For example, if the MVP is also the Leader for 0-2, and is also 5-link, they would gain (490 * 1.3 * 1.2) * 3 ⇒ (764.4 rounded down) * 3 ⇒ 2292 EXP.
Modded Dolls that are also Oathed gain an additional 2x multiplier to EXP, but this is not a reason to Oath Dolls. Spend your Oaths where you want them, on Kar98k and don’t worry about the extra bonuses gained from said Oath as they are rather minor.
Additionally, there is an EXP Up Week event that usually happens before other events or new content, where all EXP gains are increased by 1.5x.
Fairies gain EXP based on how much EXP the Dolls in the Echelon earn, combined with the level of the Weather System in the Fairy Room. At level 10, the Weather System converts 20% of total Doll EXP into Fairy EXP. Remember to max out your Fairy Room after other more important things are taken care of.
Autobattling
Autobattles are unlocked by getting all three medals for the regular Story Chapters, and after clearing Campaign maps just once. The cost of running autobattles is significantly higher than corpse dragging, but it is also faster and far more AFK.
If you actively play the game and have time to corpse drag, corpse dragging is more efficient by a lot, but if you don’t play much and don’t care about the much higher resource cost, this is an alternative.
If you want to dump resources quickly, autobattles combined with autobattle tickets (to allow you to instantly complete them) is a quick way to do this. Or just craft some more Fairies.
For a listing of all maps and their costs, exp gain and ratios, see this sheet by randomqwerty. For autobattle core rates, see BSJ's page on that topic.
Note that Campaign autobattles are terrible for Cores.
The currently most effective map for autobattling is 11-5.
Forward Basecamp Black Market
The Black Market has 3.6k CRs available every month. Provided you run Expeditions with a Dog pet somewhat regularly, you should be able to buy your FCCs and the CRs out each month.
This is a good chunk of resources available each month for little investment.
EXP Combat Sims
You can get 96 CRs for 3 Energy here, but this is highly inefficient as you really need Neural Fragments and Skill Data rather than CRs from Combat Sims.
Recovery
Previously, we had to repair Dolls after each map manually, which costed resources even if the Doll was not at Crit Health (10% HP now). As of v3.02 this is no longer the case, and all Dolls that are not at Crit Health at the end of a map will automatically be healed to full.
This reduces dragging costs quite a bit, and lowers requirements for some maps.
How to Corpse Drag
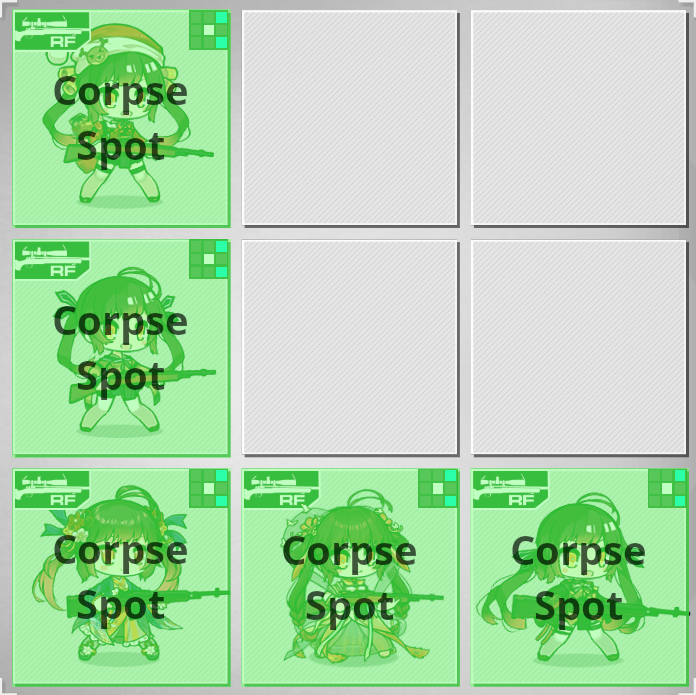
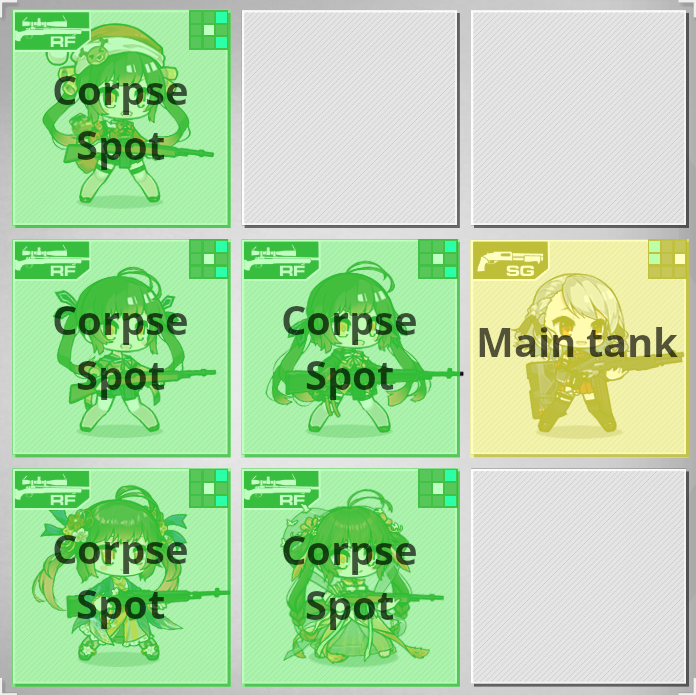
Corpse dragging usually requires 2 Echelons, 2 Dolls that will serve as the DPS and often other requirements.
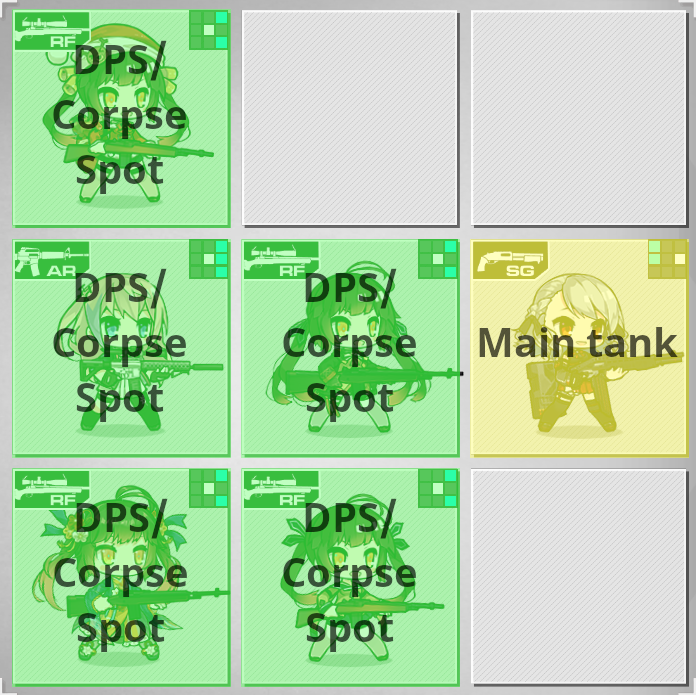
The first Echelon is set up to include the first DPS as well as the 4 corpses (and a Fairy) that will gain EXP, often needing one of these to be a SG tank to soak damage.
The second Echelon will have only the second DPS and nothing else.
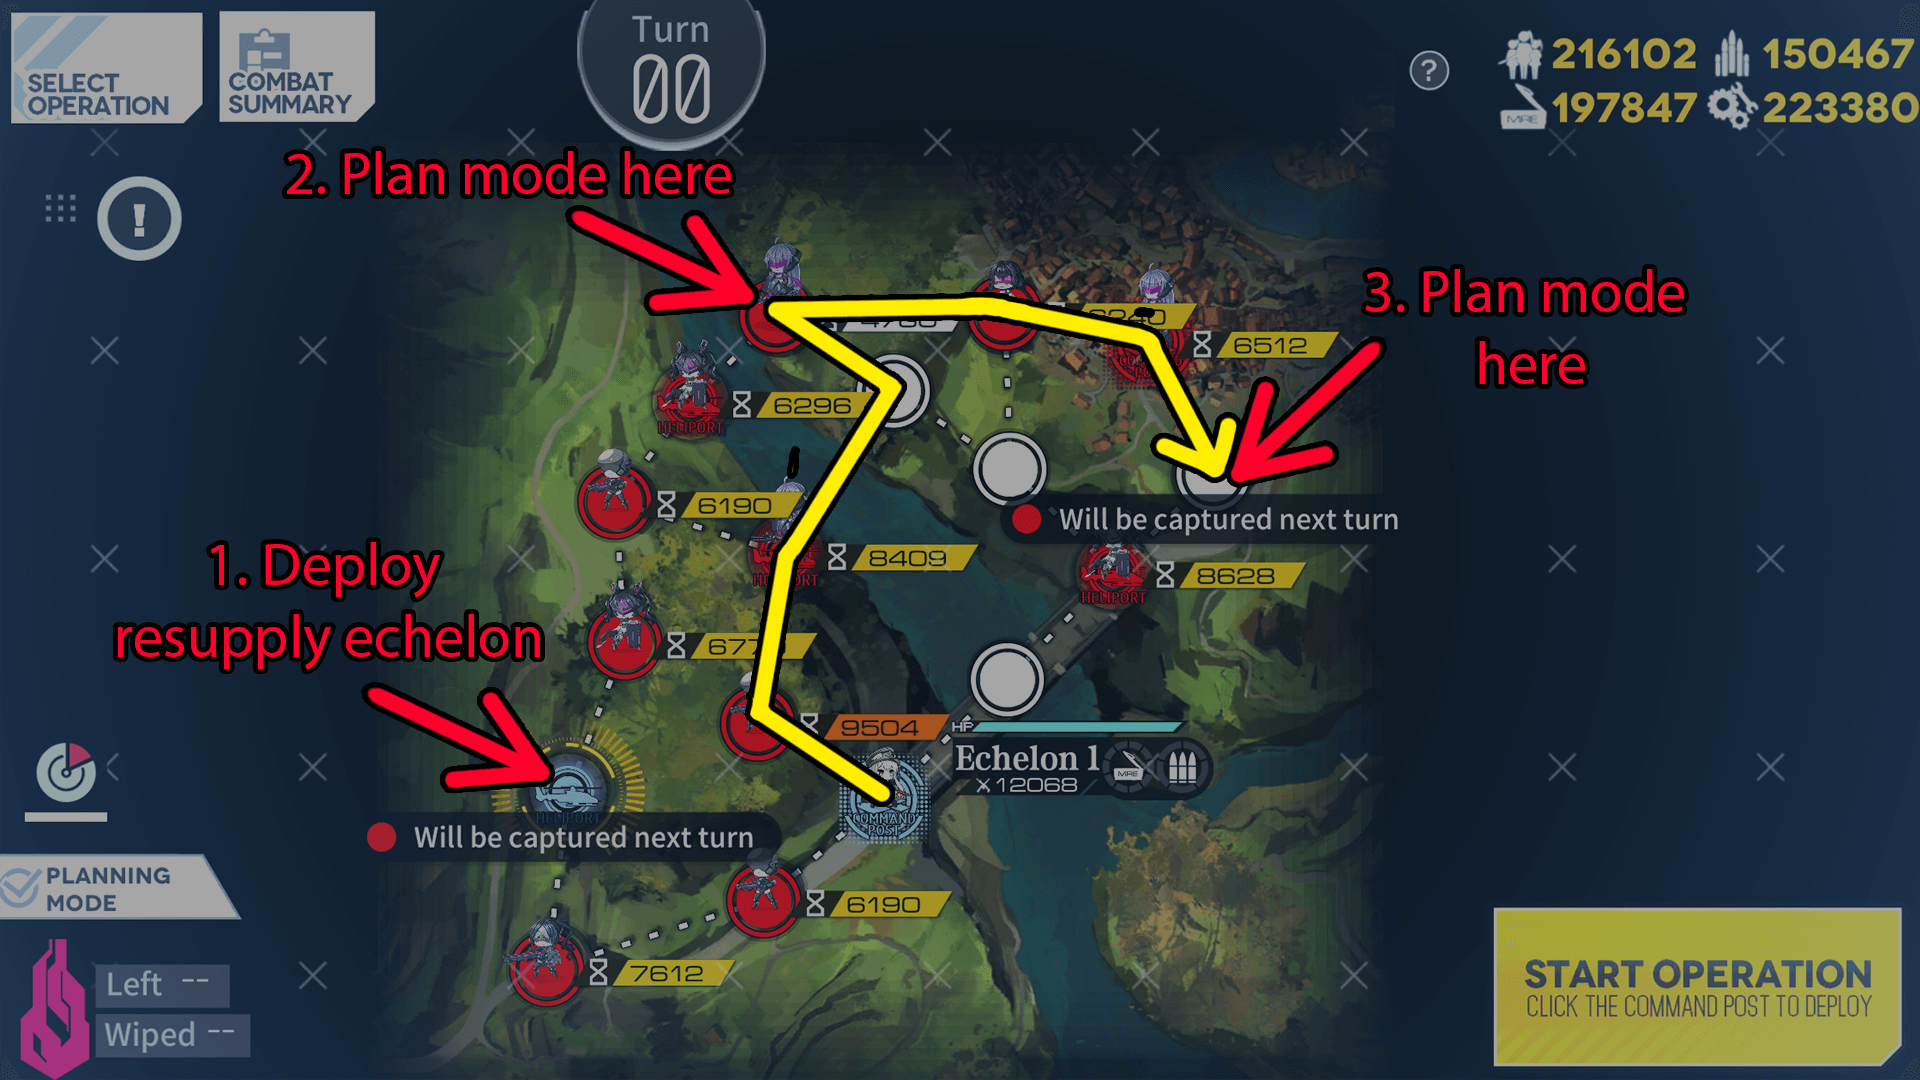
The first time you start, you will need to resupply the DPS in the second Echelon before proceeding.
After this, you swap the two DPS around, then have the first Echelon with 4 unsupplied Dolls and 1 supplied DPS run through the Drag map after resupplying the second Echelon again. Then you simply repeat this step.
Preparing Dolls
EXP gains are based on link count. The base multiplier is 1x, with 0.5x added for each additional link. As such, a 3-link Doll will receive 2x EXP, while a 5-link Doll will receive 3x EXP.
As EXP gains are based on link count, it is recommended to pre-level your corpses to at least level 30 (for 3 links and 2x EXP), or possibly even level 70 (for 4 links and 2.5x EXP) depending on how much time you have and how many CRs you have lying around.
Level 30 only requires 15 CRs and is incredibly cheap, and you should never start dragging a Doll from level 1 due to how cheap this is.
Level 70 requires 235 CRs and is a bit more expensive, but it cuts down the amount of runs needed to get the Doll to level 90 (or higher) by quite a bit. If you have spare CRs and want to speed things up a bit, this is a reasonable alternative.
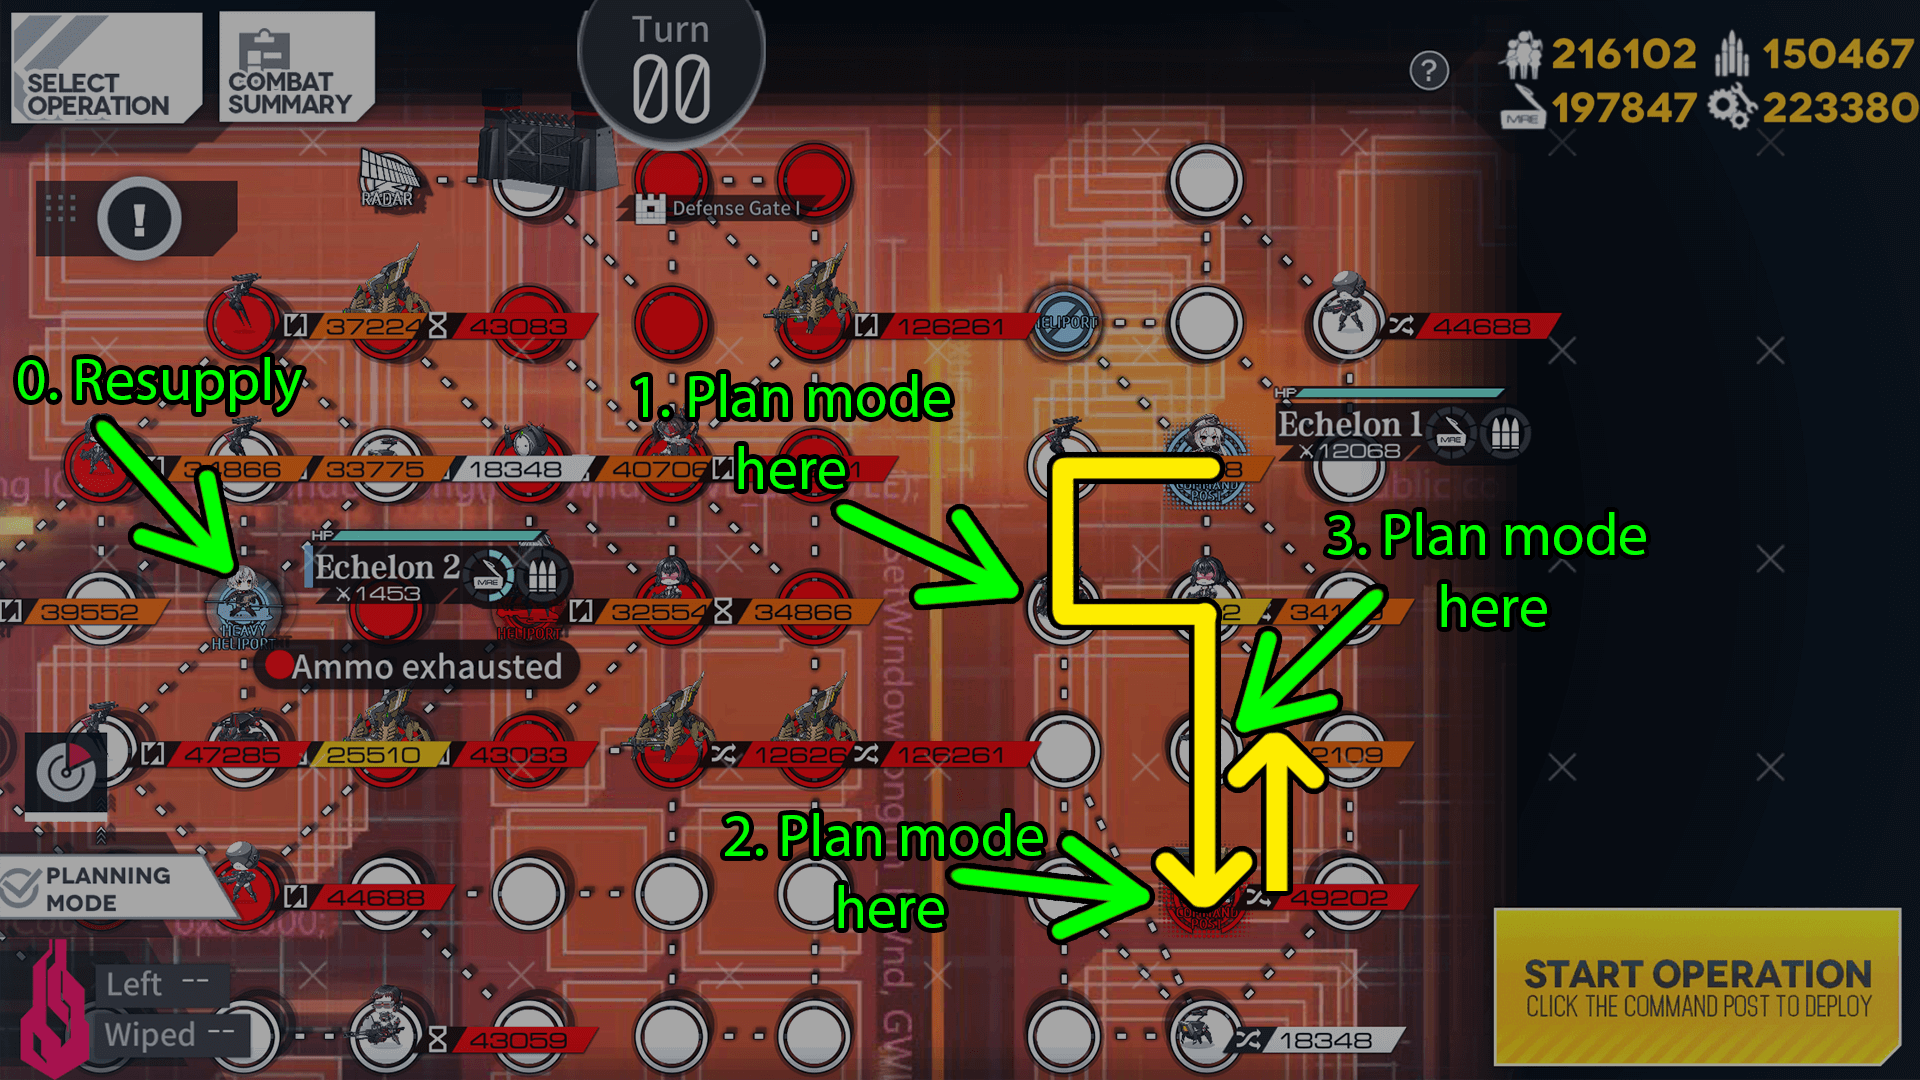
0-2
This is the first useful Dragging map you’ll unlock. Clearing 4-4E will unlock Chapter 0.
The requirements for this map are very low: the free SGs you get from clearing 5-2 or 4-3E are enough to tank (even with no Armor plate equipped), and practically any AR can be the DPS. Your first ARSMG should have 2 Dolls you can use as DPS in ST AR-15 and whoever the second one is (SOPMOD, 416, etc). M4 should be a corpse due to her tiles being very strong, helping with clearing faster.
Older guides will state that M16 with an Armor Plate is required, but this is outdated info. With Recovery being added in v3.02 any SG with sufficient Armor (so level 60+, even with no equipment) is enough and will heal to full at the end of the map.
Base EXP gain: 490 per battle
Core rate: 0.4 per run
EXP dropoff: 112
Cost per run: ~60 MP, 60 Ammo, 42 Rats (if all Dolls are 5-link)
Note that costs are slightly lower due to resources regained from disassembling Dolls that drop.
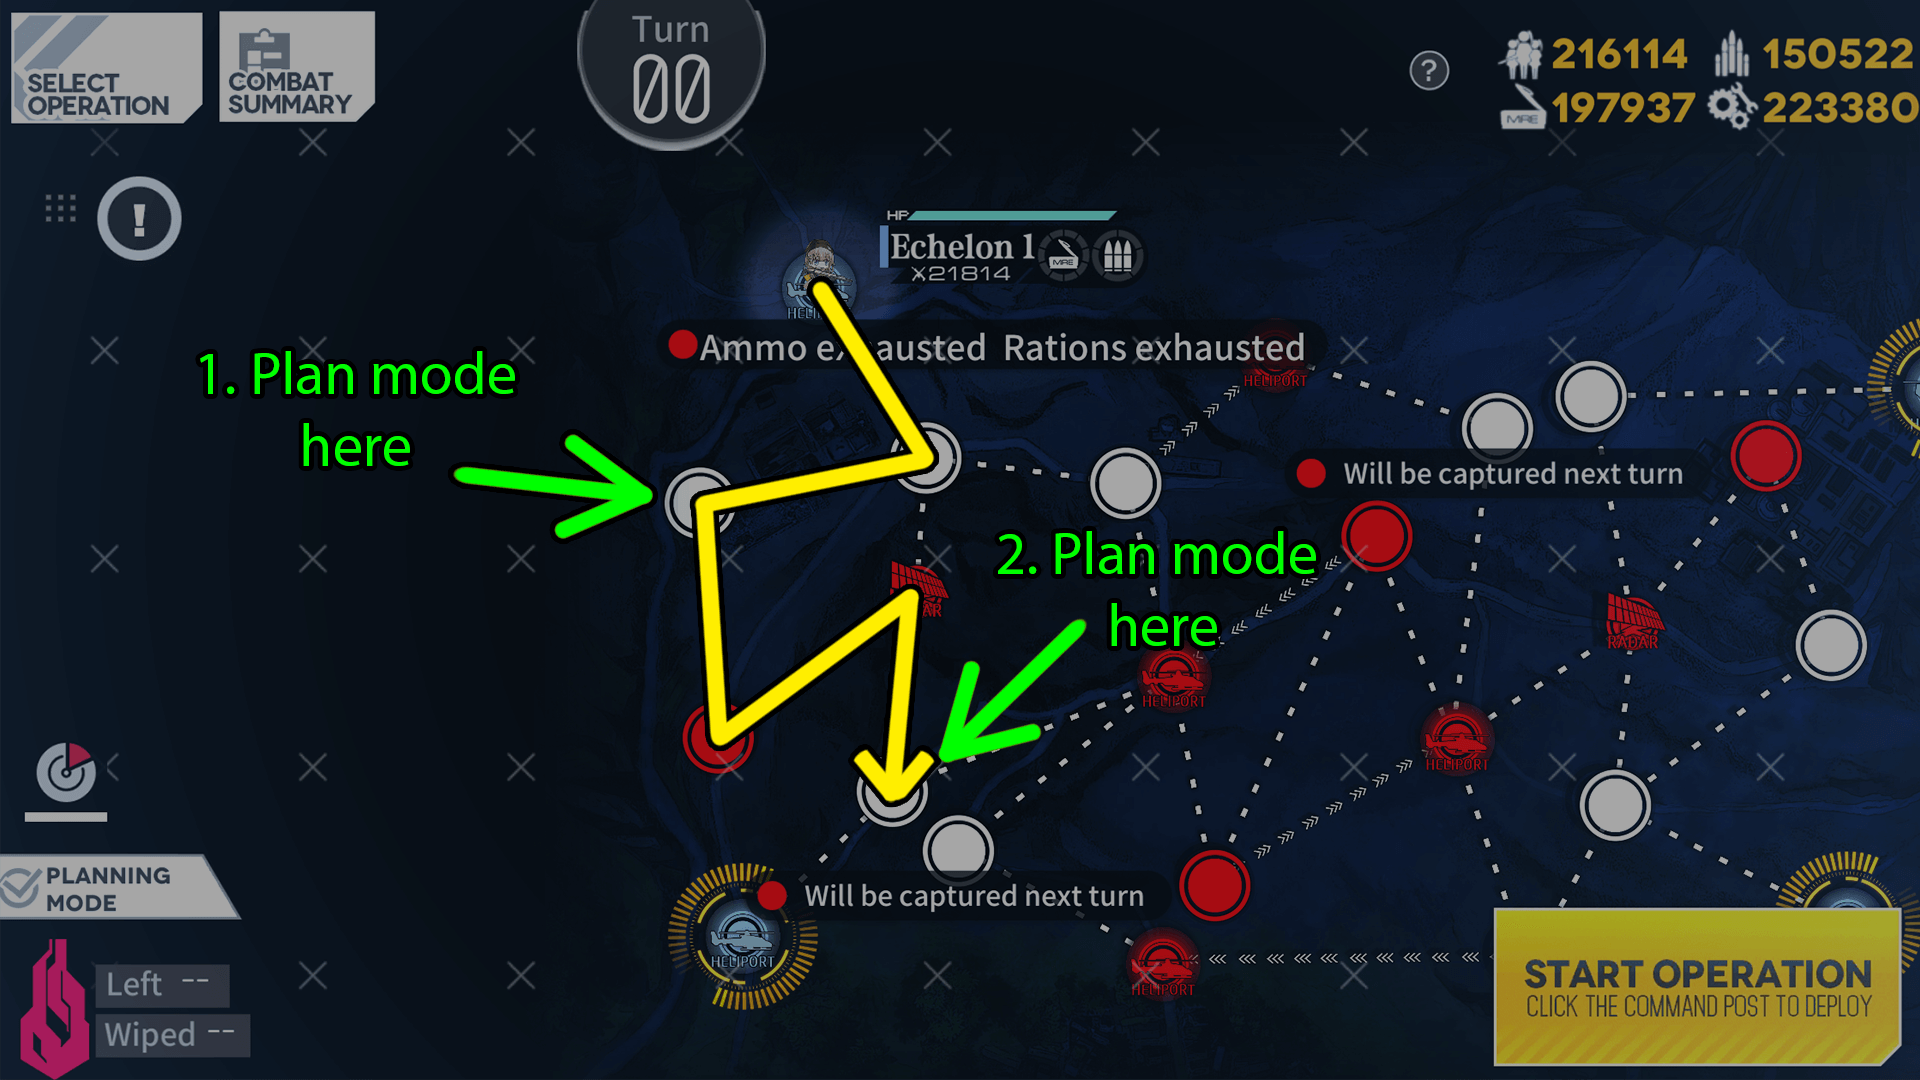
13-4
Easier to unlock than 12-4E (Ch13 maps are mostly puzzles and do not have much difficult combat, whilst Ch12 Emergency starts off with a heavy combat map that requires at least somewhat strong Echelons.)
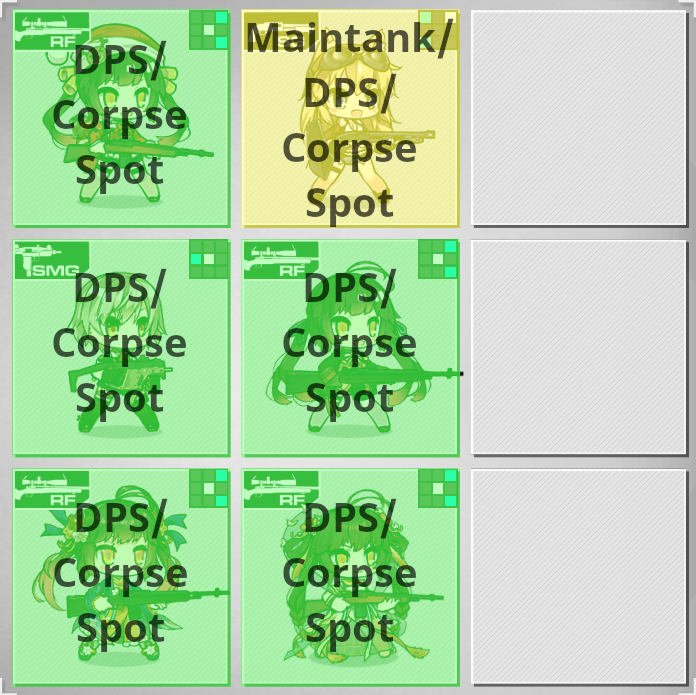
Requirements are medium: you will need 2 Molotov SMGs, the best option is Vector due to being able to be 1-link (thus costing significantly less to field), but Micro Uzi Mod is a very good early option due to needing no tiles and whoever is the second DPS will be who you fulfill the requirements for. 416 also works without any requirements and as such is another decent option.
As 13-4 has 8 Nemeums in the final node, 2 runs of 13-4 will complete almost all combat daily quests and make progress towards the weekly Armored quest.
Base EXP gain: 600 per battle
Core rate: 0.83 per run
EXP dropoff: 130
Cost per run: ~44 MP, 25 Ammo, 10 Rats (if 2 1-link Vectors are used and the rest are 5-link)
Note that costs are slightly lower due to resources regained from disassembling Dolls that drop.
8-1N
Unlocks after clearing 9-4E. This is not used for Cores and there are better options for EXP. Instead, this is a very effective map to farm Armored enemy kills for the Weekly Quest if you somehow don’t get it done by the weekend.
Note that 13-4 and 2 daily Gray Zone nodes should fulfill your Armored kill requirements for the week, but 8-1N exists if you don’t get it done in time.
For this to work, we use a Skill Level 2 Airstrike Fairy, which will kill all the Dinergates/Tarantulas in a single hit. Any higher Skill Level is a waste of data, but SL2 is required.
39 Armored kills per run.
Base EXP gain: 500 per battle
Core rate: 0 per run
EXP dropoff: 130
Cost per run: 50 MP, 15 Fairy Commands (if all Dolls are 5-link)
SC 3-1EX
This is an extreme late game drag option that doesn’t offer Cores and is purely for EXP.
Instead of leveling 1 Echelon with 4 corpses and 1 DPS, this is instead 3 full Echelons with 5 corpses in each, one of which must be a SG in each Echelon. Instead of supplying one Doll in the Echelons, a Friend Echelon with White Nyto (Alina) is used to kill enemies through HOC support.
Similar EXP gain to 13-4 per minute, spread over 3 echelons instead, much longer idle time (8m vs 2m). As the idle time is so much longer, it is easier to be ‘effective’ in SC 3-1EX while doing other things.
Base EXP gain: 530 per battle
Core rate: 0
EXP dropoff: 130
Cost per run: 150 MP (if all Dolls are 5-link)
Note that SC Dragging can go to 99 turns and is as such the cheapest EXP per Resource possible, but you cannot gain Cores. If you still need Cores, you should be doing 13-4 instead.