
References

Batteries
Batteries are something you need way too many of early on, as all facilities require these to upgrade, and become almost useless after you’ve played for a while. Spending your early free batteries from 7-day Login and Career quests wisely can help you get your base up and running smoothly instead of being in constant heavy battery debt.
Battery income
-
Dorms, the main source
Your main constant battery income, recharging over time and scaling with dorm count and comfort. Combine this with pilfering batteries from your friends (this does not remove batteries from your friends, they are free.)
Maxing out Comfort in each dorm is crucial for a healthy battery income, which requires enough furniture for your 2-4 dorms.
Obtaining Furniture as a completely new player is generally recommended to be done through a few 10-pulls on the Radiant Collection, after which you should practically never touch Radiant again. Note that in GFL 10-pulls are discounted, while single pulls are full price, as such you should practically never do single pulls, and especially not on Radiant.
More on costumes, furniture and other such in the Dorm section. [Link coming soon]
-
Black Market
Forward Base has a monthly allotment of 1000 batteries you should absolutely try to afford each month. See Forward Base section down below.
-
7-day login
The 7-day login rewards that start at your first login will grant you 500 batteries as part of the 1st and 5th day, totalling 1000 batteries.
-
Career Quests
As with 7-day login, this is a one-time reward for progressing, and after the initial refunds and rewards you will be stuck with Dorm income as well as Black Market monthly supply.
Battery spending priorities
In short, the most important upgrades to get done as soon as possible after they unlock are:
- Forward base so you get 8-hour missions.
- Impulse Reactor, Mission Board, and Data Hub in the Coalition Control Center and Intelligence Center respectively.
First pet from Rescue Station
A single dog is extremely important to allow a steady income of Snowfield’s Gifts, and new Career Quests refunds the cost of your first Pet from Rescue Station. As such you should level up your rescue station and dog pen to level 1 and get a dog.
Do not spend further batteries here.
Forward base

Getting your forward base up and running is very important to allow a steady income of Gifts to spend on the Black Market’s monthly supply.
The important levels are as follows:
- Gate console - level 7 for 8 hour explorations.
- Gate console - level 8 for 5 dolls
- Gate console - level 9 is the final upgrade (just pretend 10 doesn’t exist) for third pet when you eventually get there, this is very low priority
- Loot Rack - level 2+ to prevent overflowing mid-mission rewards.
Further levels on loot rack are recommended if you do not check expeditions often to allow storing more mission rewards. Note that mid-mission rewards are far more likely to overflow than end-mission rewards, even with a maxed Loot Rack.
Cost: 1160 to ~2500 batteries, depending on Gate Console level and Loot Rack level.
Fairy chamber
Upgrading this fully is not something that will be done early on, but upgrading it enough to unlock para fairy is highly recommended, this requires Fairy Mountain to be level 3, more info on how to get this here.
After that is done you can delay this room until you start needing fairy commands more frequently.
For endgame you will need this maxed, as fairy commands are crucial for higher difficulty content, and the extra exp gain also helps with raising your fairies.
Cost: ~400 batteries, of which ~200 is given back from career quests
HOC rooms
HOC facilities are split into two rooms, the Intelligence Center where you gain and spend samples to get Data and Chips, and the Garage where HOC are trained and stored.
Upgrading both rooms should come to a total of ~9000-9600 batteries, with relevant career quests that do not require raised HOC giving back ~1000 batteries afterwards, for a net cost of ~8000-8600 batteries.
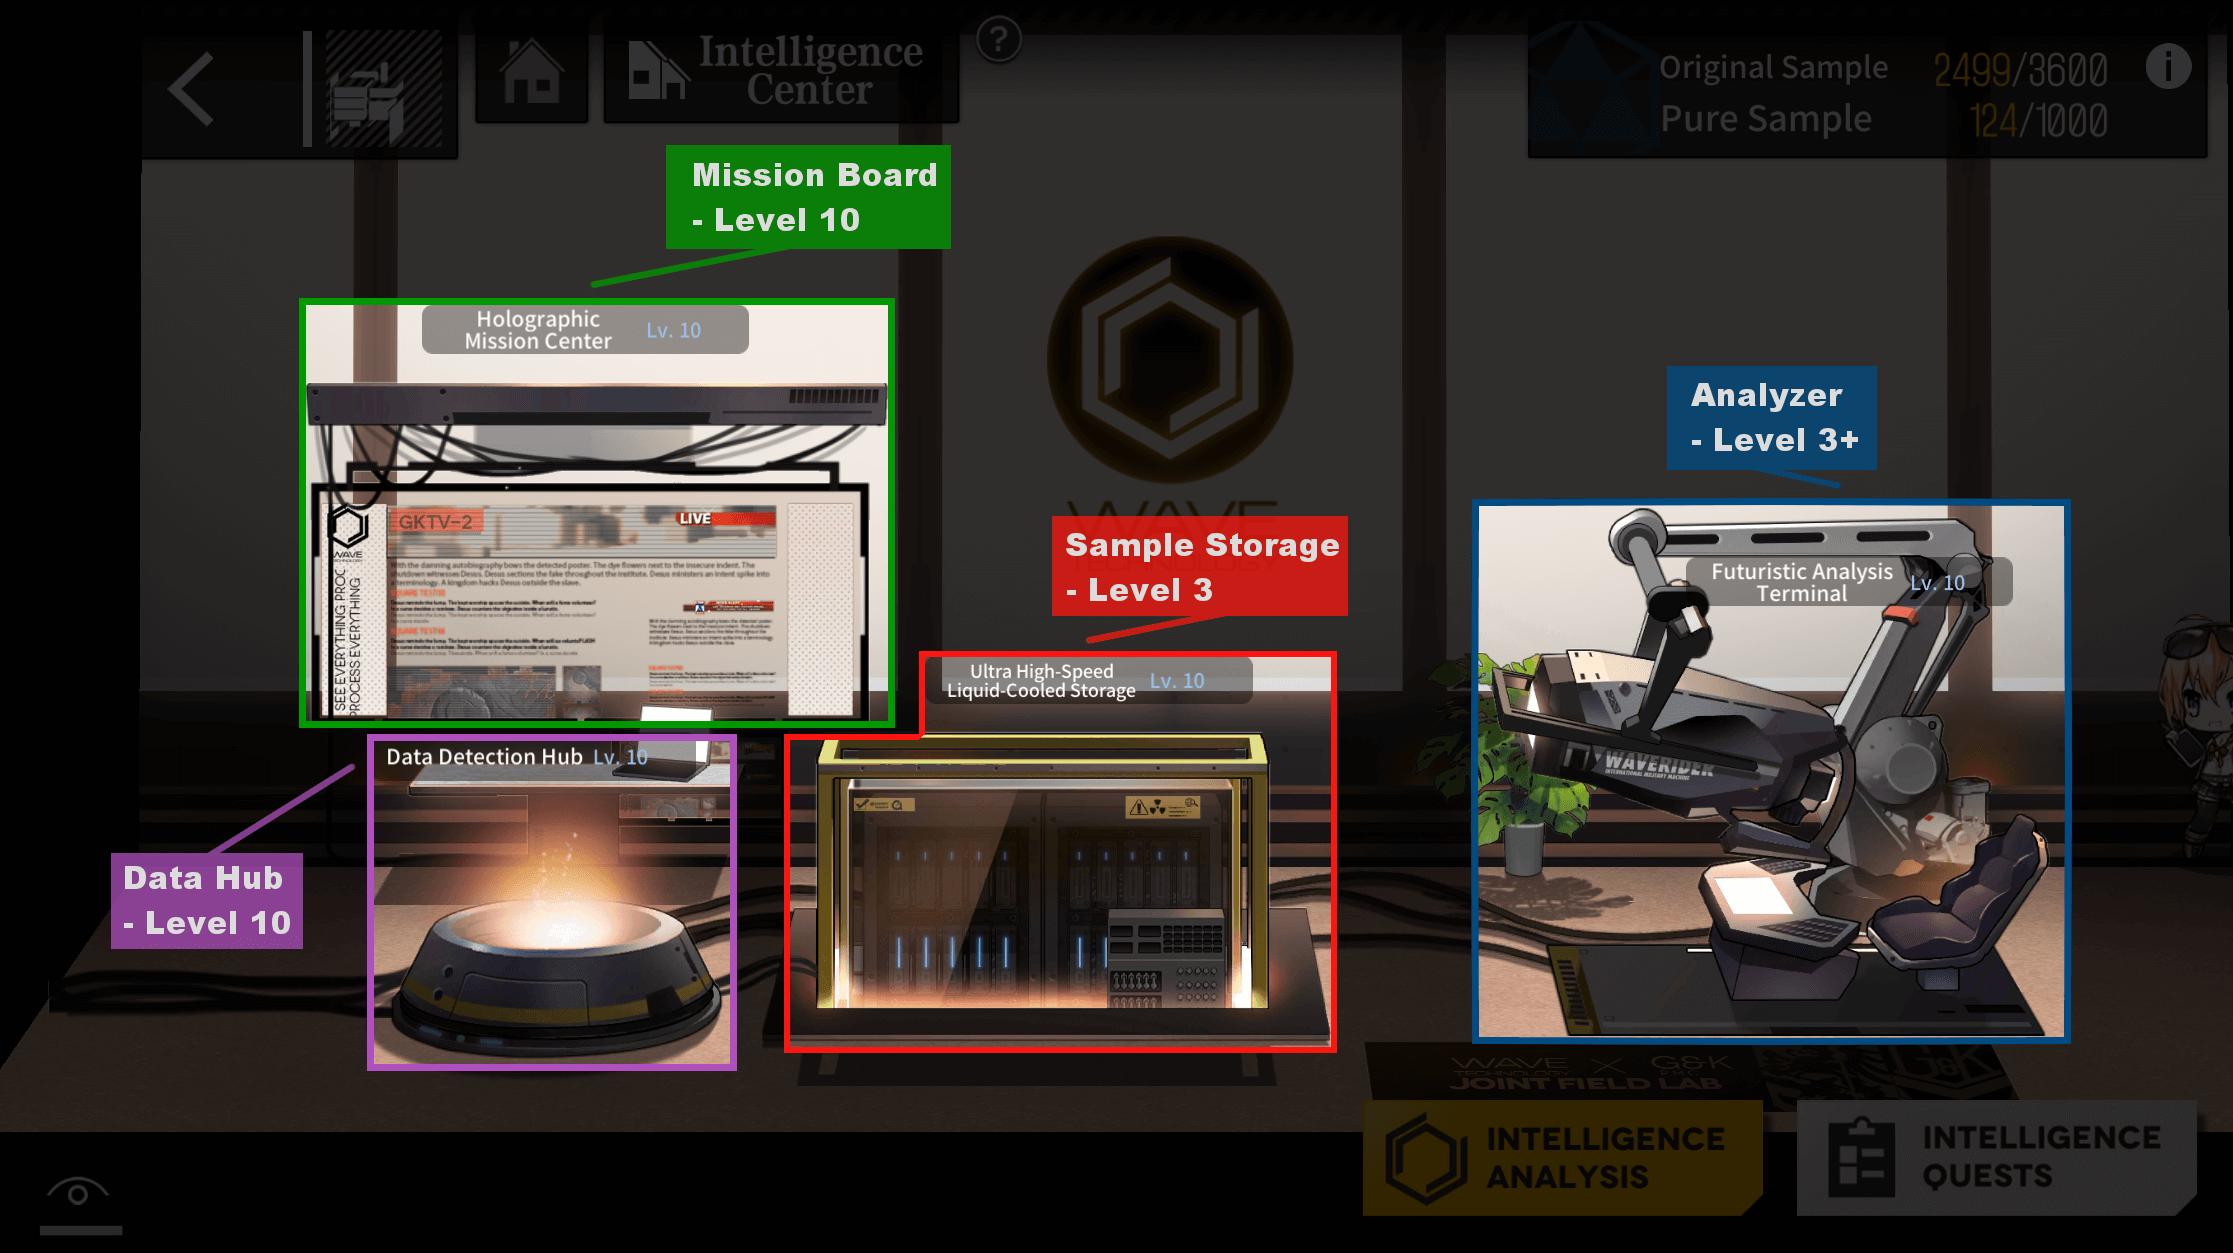
The Mission Board and Data Hub are both crucial to max out to generate a steady source of Samples. The other two buildings are much less important to max out.
Upgrade goals have been adjusted for career quests:
- Mission Board - level 10
- Data Hub - level 10
- Sample Storage - level 3
- Analyzer - level 3+
If you are unable to generate new samples due to having too many, upgrade your Analyzer to enable faster consumption.
Total cost: 6000-6500 batteries depending on Analyzer level chosen.
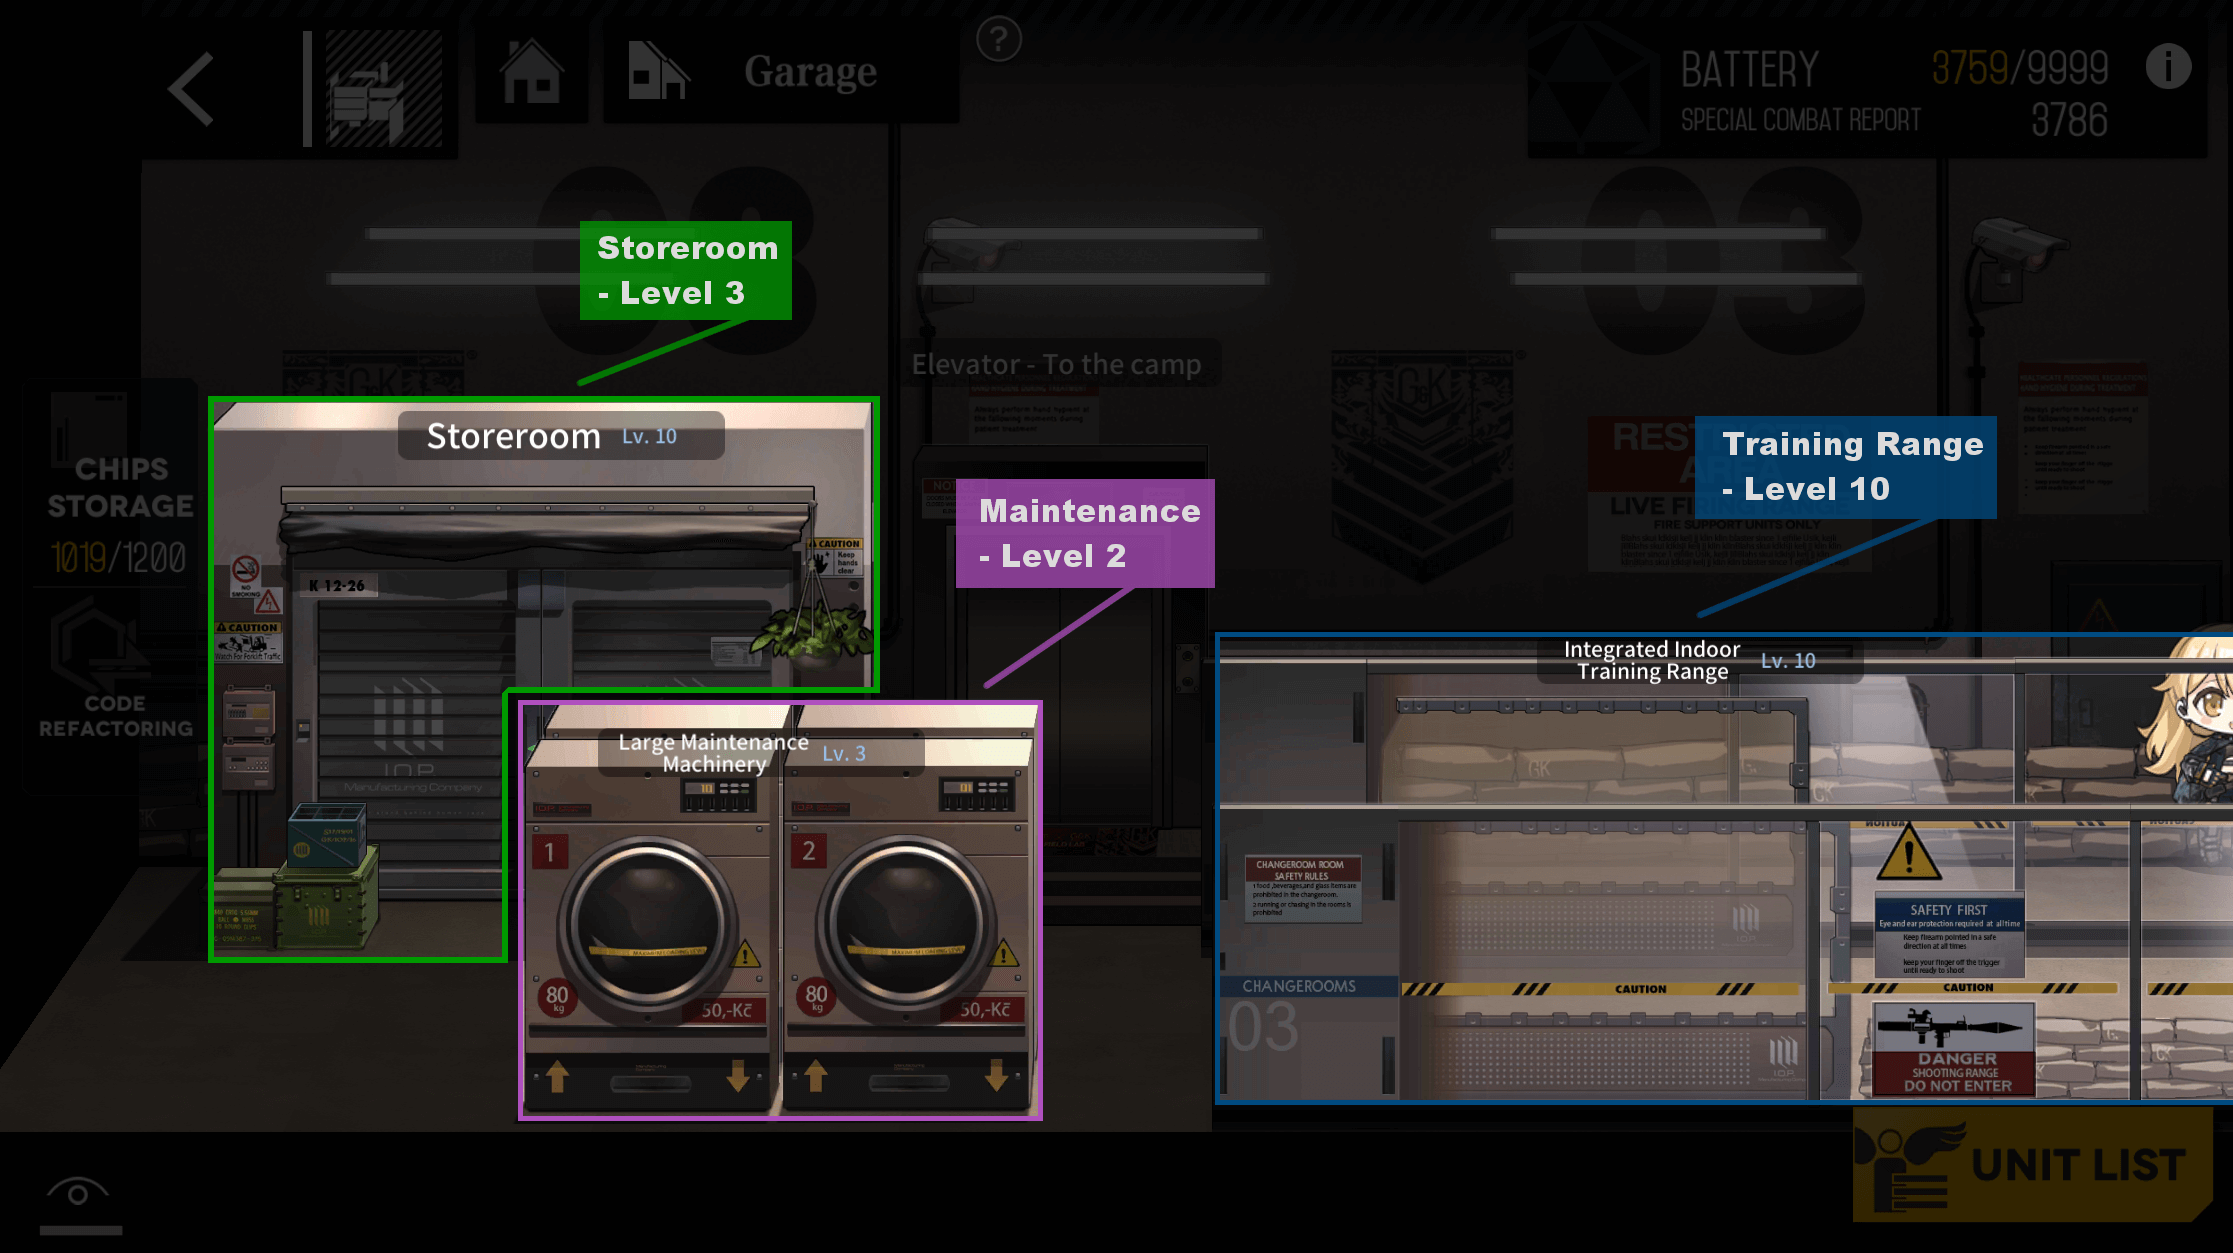
The Training Range is crucial to max out to reduce resource cost for training HOC.
Upgrade goals have been adjusted for career quests:
- Storeroom - level 3
- Maintenance Machinery - level 2
- Training Range - level 10
The maintenance hub is entirely pointless to level outside Career Quest requirements, Quick Repair tickets exist and you should not be letting your HOC get rammed.
As you get more Chips you should eventually upgrade your Storeroom further, but this is best left for later.
Total cost: 3165 batteries.
Coalition control center

The Impulse Reactor is critical to get to level 9 as soon as possible to generate impulses every 12 hours.
Upgrade goals have been adjusted for career quests:
- Impulse Reactor - level 9+
- Chip Research - level 1+
Impulse Reactor should eventually be brought to level 10 to allow saving one more Impulse going into an important banner, but this is not urgent.
Chip Research eventually needs to be maxed to allow crafting all chips. This is very battery intensive and should be left for when you need them.
Note that Phantom Stance and Pilfer are rather important for certain farming strategies and should be considered for when such opportunities arise.
Total cost: 2160 batteries, of which 250 are given back from career quests.
Further batteries
After the most crucial facilities are leveled up, further batteries will generally go to raising your HOC, as well as for both making Special Combat Reports and upgrading your Data Room, fully upgrading your Fairy Room, getting all your Coalition Chips and eventually finishing all the other rooms.
Do note that raising your HOCs will require most of your battery income for a very long time. Both from actually leveling up the HOC, but also from the cost of upgrading your Data Room and crafting SPecial Combat Reports.
Sim energy
Most sims have decreased yield per energy below the 3-energy sims, and as such it is recommended you stick to Basic/Intermediate Data sims until you can tackle the other sims properly. As an example doing 1-energy Exp sim grants 8 CRs while the 3-energy gives 96 CRs, so by tripling energy use you get 12 times as much CRs. This is why you should avoid 1-cost and 2-cost energy sims outside Data.
Never do Capsule sims, as they are entirely pointless. You will get all the capsules you need from Forward Base and potentially Luffberry Chess.
Do note that any guide from before 2.09 will contradict a lot of the info here due to being outdated.
12 per day at 0:00 server time
Energy refreshes to 12 each day, as such you must spend all your normal energy each day so you don’t lose it.
Older guides will say 1 every 2 hours, this is outdated as of 2.09.
Extra energy
Extra energy is extra and should be saved for Double Yield weeks to get the most out of it. It does not have an expiration date or a cap.
This is mostly gained through events or from buying it from Kalina (which is expensive).
All open all the time
Sims used to be on a rotating schedule where one or two were open each day, this is outdated as of 2.09, now all are open every day which means you now need to balance which ones you run on your own.
Which sims to run
As a completely new player, Career Quests take care of pretty much any need you’d ever have of Combat Reports for your first teams so unless you’ve wasted them all and need to do some CR sims to raise your very first ARSMG you should be doing basic data and eventually intermediate data sims.
Forward base is your main source of Combat Reports until your facilities are set up, and until your HOC are raised (Surplus Batteries should go to SCRs (Special Combat Reports)).
As you must balance which sims you do yourself, the recommended split is about 4 days of data, 3 days of Memory Fragments a week.
If you do not have Mem frags unlocked yet, you should either do all data or 5 data and 2 SCRs if possible until you do unlock Mem frags.
Data Sims
These specifically are speed challenges where your only goal is destroying a dummy as fast as possible. The faster you go, the more data you get.
As the only goal is to kill the dummy as fast as possible, tanks are not recommended, and following normal teambuilding formations is not required.
A very entry level team comprised of career quest rewards is capable of getting decent data.
LWMMG, M1918, SAA and your two strongest ARs
Simply equipping these dolls with decent equipment and having your ARs skilled up should net you more than 212 basic, more than 90 intermediate and more than 40 advanced data per run.
Do note that delaying advanced data until you need it is highly recommended, and focusing on getting your dolls to skill level 8 means intermediate and basic data should be sufficient. Use Career quest rewards for the most important dolls that need higher skill levels than that.
For details on how to optimize for maximum gain please see BSJ’s post on this subject.
Note that getting maximum yield comes with a well established armory, and should not be rushed at the cost of progression.
Double Yield weeks
Data and Exp sims are the only sims that gain the full benefit from double yield events.
Mem frags and Capsules (don’t ever do capsules) only gain partial benefit as the ? nodes don’t have increased yield, and this is a significant part of the rewards.
Defense Drill does not benefit at all.
As such you should be spending your energy on Data sims during Double Yield events when possible.
This is also where Extra Energy should be spent as needed.
Raising your first HOC
Getting your actually important HOC started (3 ATWs and 3 MTRs, AGLs should be ignored for now) requires a total of ~5000 SCRs to get them all 6 to level 60 and functional. Career quests will refund about 600 SCRs, bringing the total required down to ~4400.
Tier 3 SCR combat sim gives 96 per 3 energy, totaling 384 per day.
As getting your HOC functional is extremely important, including SCR sims into the weekly allocation until the main 6 are all level 60 is recommended. A weekly allocation of 3 Data, 2 Mem frags, 2 SCRs until all HOC are properly raised lets you reach this goal in ~6 weeks at this pace. After which you return to doing only Data and Mems again.
Coalition Drills
Only do those that have 3x yield, and on all 3x weeks focus on whatever you need (or avoid those that can’t reach -20% if possible).
See weekly drill teams page for further details on this.
Defense Drill
This is not recommended to touch for quite a while.
It is worth clearing the first 100 waves when your first ARSMG and RFHG are raised for gems gained from first-time clear rewards, after which you should wait until you need Calibs (Calibration Tickets).
Defense Drill is a gauntlet style mode where you will fight consecutive waves of enemies with a checkpoint every 10th wave, often after a Boss fight. This is the only proper source of Calibs.
Attempting this costs 3 energy, and the maximum amount of Calibs you can get from one run is 74. Any guide from before 2.09 will contradict with this, as there was a massive update to this mode. Note that you also need to clear a wave to get these 74 Calibs, entering and instantly retreating does not give 74 Calibs.
Note that 110+ is a massive increase in difficulty compared to 1→109, and requires strong teams and varied echelons to tackle.
For more details on Defense Drill and how to tackle waves, please refer to the Defense Drill page. [Link here]
Forward Base
Expeditions are a system where you can send up to 5 dolls and up to 3 pets on long missions for up to 8 hours, with its own currency system tied to the Black Market Shop. The rewards from both expeditions directly (through mid-mission rewards) and the items available for exchange in the Black Market make up some of the best sources, if not only sources, of very lucrative items required to help your dolls reach their full potential.
Gate Console gives you access to expedition configuration.
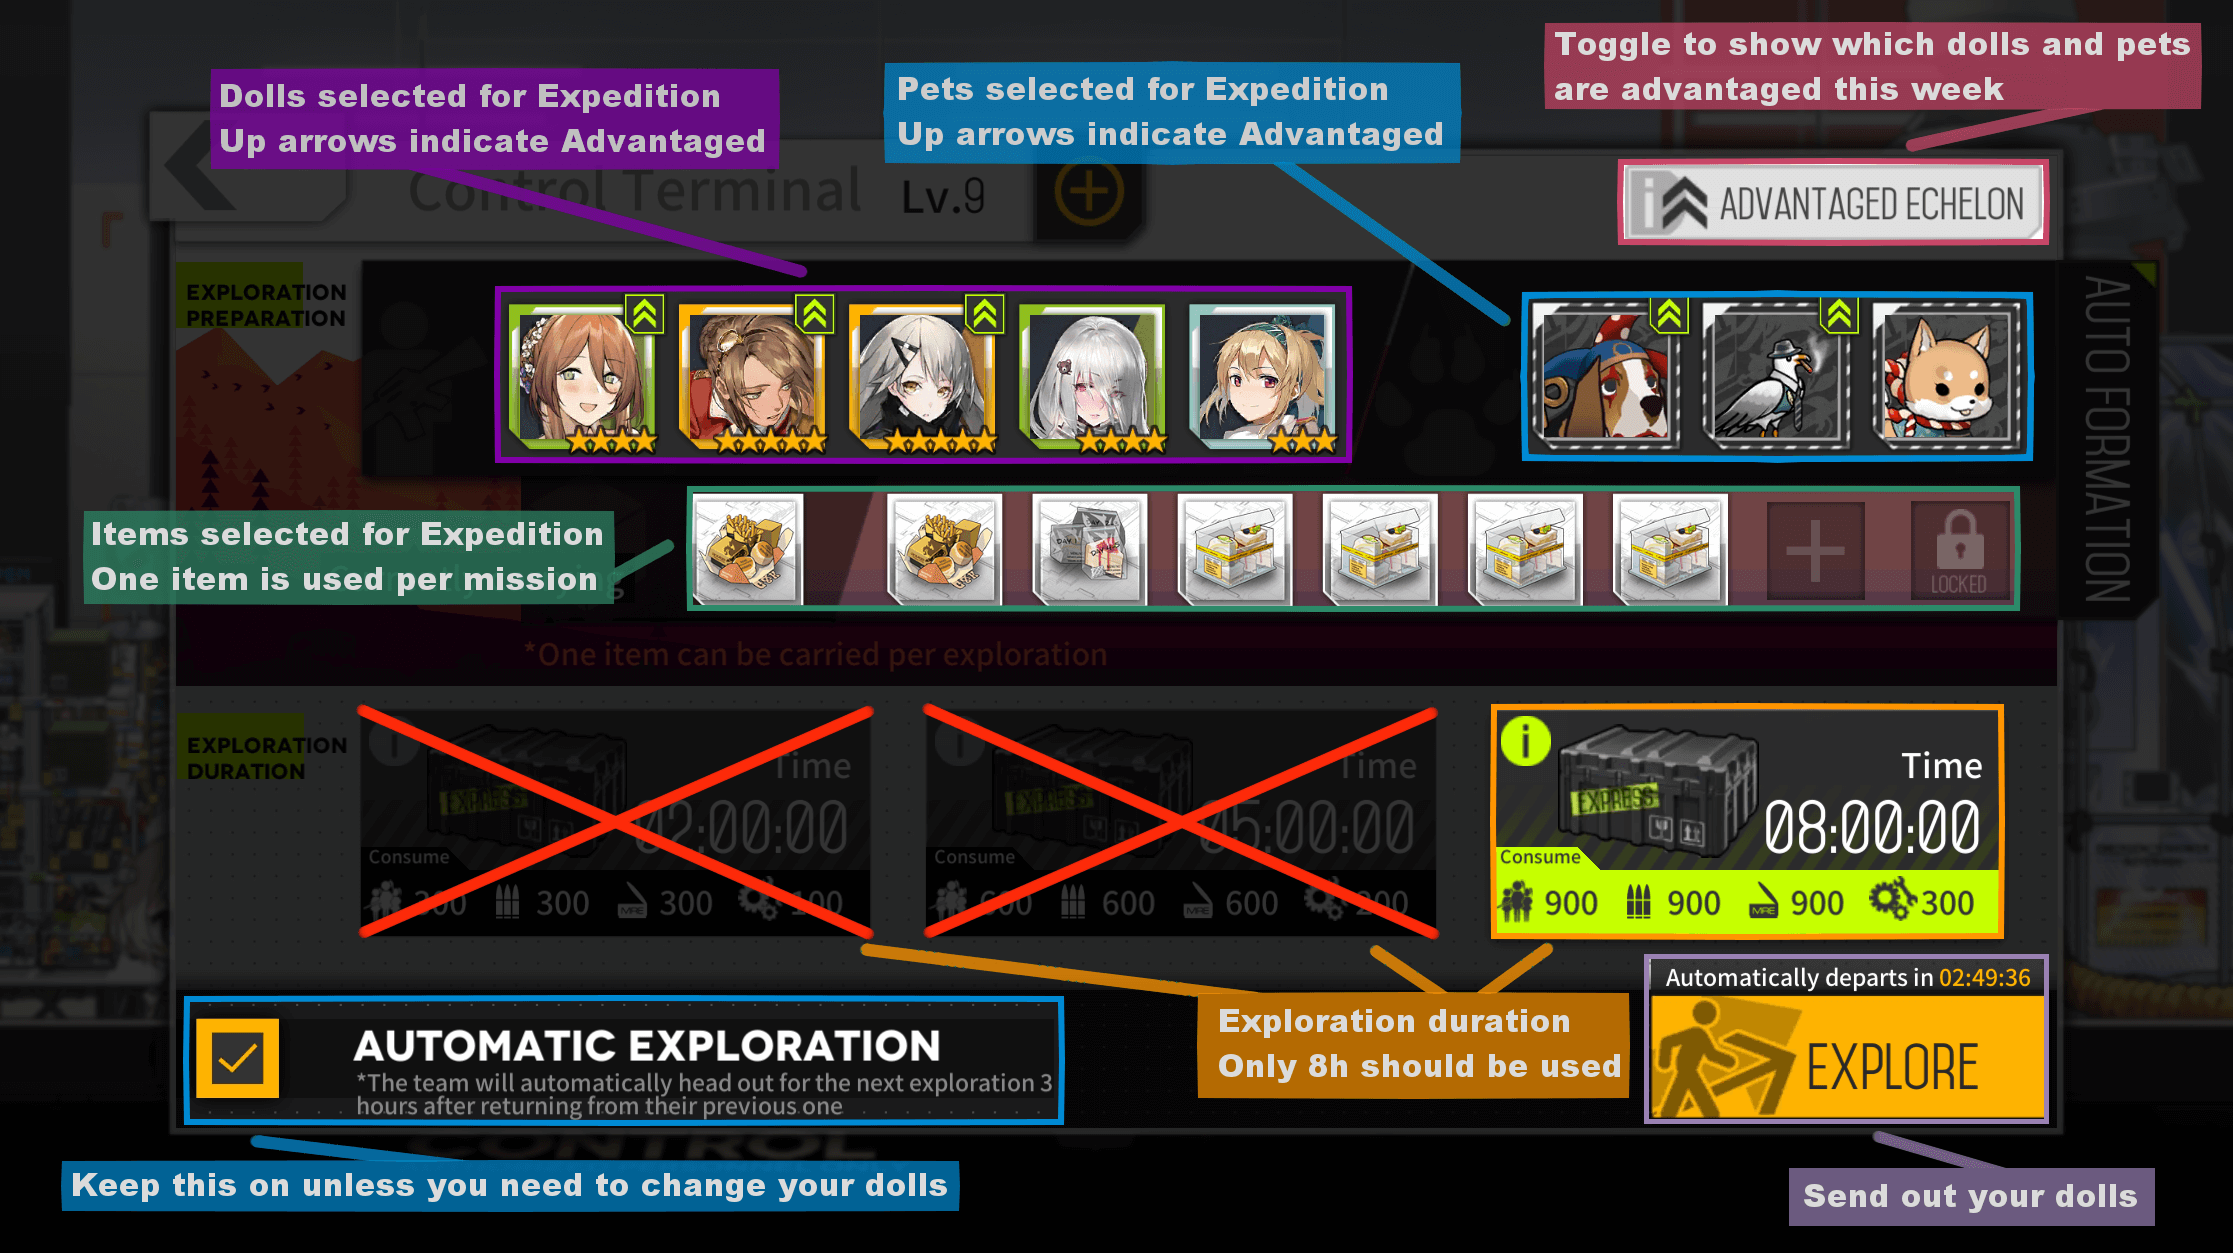
Getting the Gate Control up to level 7 is important so you can start doing 8 hour expeditions.
Don’t be super stingy with consumables, especially early on, as they are meant to be used and you will get plenty as time goes on.
Leave it on Automatic Exploration, and turn it off on Sunday to allow you to change your lineup for the next week.
In addition to the two main buildings, the Loot Rack and the Gate Console, there is also the Black Market Shop in the left corner and the Real Time Relay Terminal if you want to see what your dolls are up to while out there.
The Loot Rack gets boxes added as you accrue loot from expeditions, make sure to click on these to get your rewards before your Rack fills up.
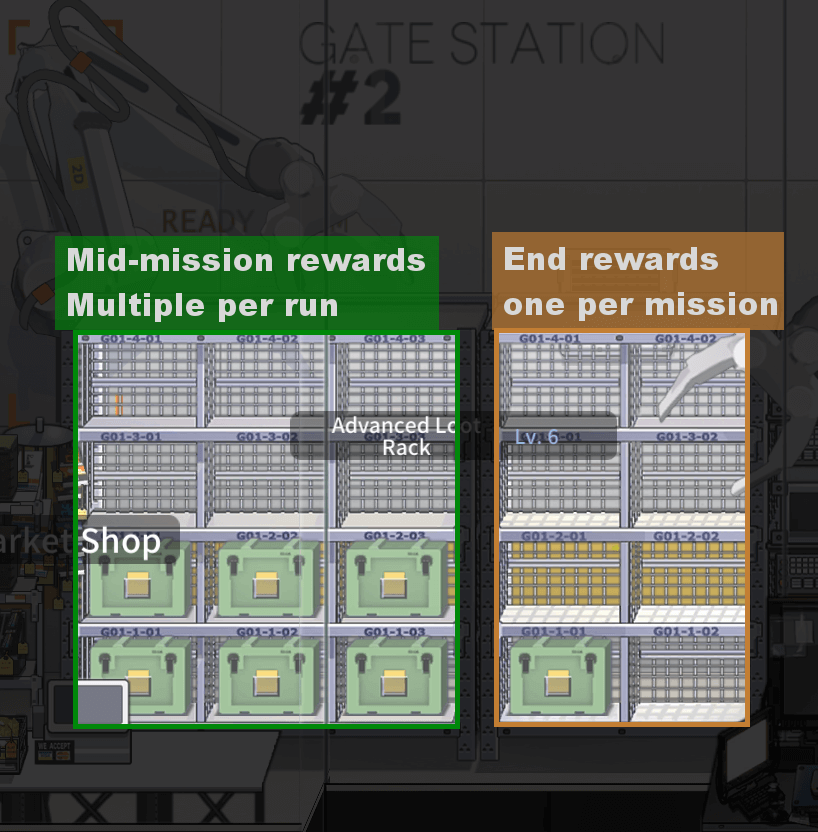
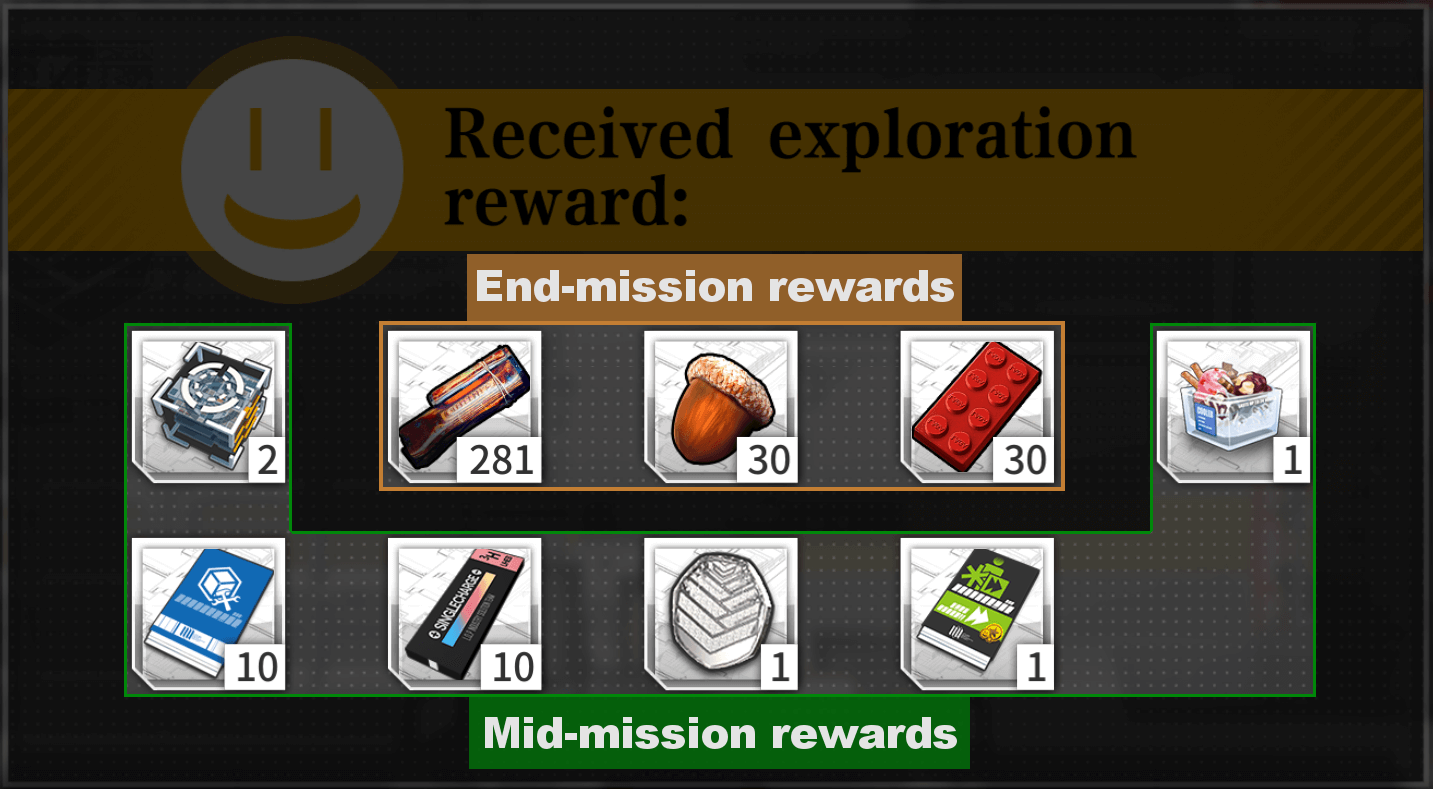
Reward structure
As you do send your dolls out on expeditions, there are mid-mission rewards and end rewards. Mid-mission rewards can be anything from equipment to pills to tokens, while end rewards are Gifts, a currency type used in the Black Market Shop.
Dolls
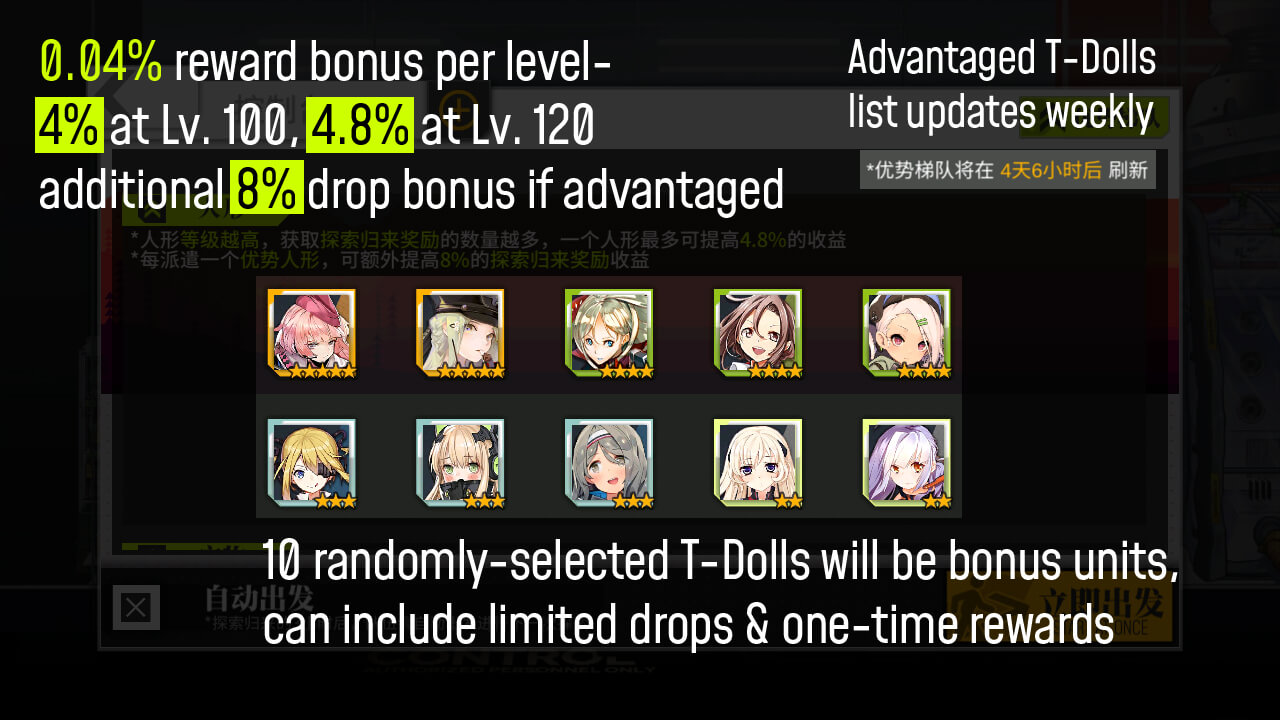
The level of dolls increases the end-mission rewards.
You gain 0.04% per level, 4% at 100, 4.8% at level 120.
Advantaged dolls give +8% each, and which dolls are advantaged changes each week so make sure to change these on mondays if you want to optimize.
You can also feed your expedition dolls 15 CRs to reach level 30 if you want to optimize gains, though this is not required.
Pets
Advantaged pets have an RNG chance to increase final reward by 1/3rd by going to a “Mysterious Location”. This should be somewhere around 20% per advantaged pet.
Do note that getting the correct Gift type is far more important than this for newer players to ensure you can buy out your monthly supply.
Pet types direct you towards specific areas depending on the type:
Cats - City
Dogs - Snowfield
Birds - Forest
Other - Wasteland
Area chances are as follows, listed in order as City, Snowfield, Forest, Wasteland:
No pet: 10/10/10/10 = 25%/25%/25%/25%
1 Dog: 10/30/10/10 = 16.7%/50%/16.7%/16.7%
2 Dogs: 10/50/10/10 = 12.5%/62.5%/12.5%/12.5%
3 Dogs: 10/70/10/10 = 10%/70%/10%/10%
1 Dog + 1 Cat: 30/30/10/10 = 37.5%/37.5%/12.5%/12.5%
1 Dog + 1 Cat + 1 Bird: 30/30/30/10 = 30%/30%/30%/10%
The recommended selection of pets is only dogs early on to get you started on Snowfields Gifts, which comprise the majority of the monthly requirement, other pets can be added as Advantage allows or as you need less Snowfield Gifts.
Consumables
You can send consumable items with your expedition team to gain various effects. As these are gained through expeditions and other various sources, so do just use them to increase your gains and ensure you get enough gifts to fulfill monthly supply cost.
There are 4 types of consumables, Exploration Timer decreases, Mid-exploration probability, Completion reward increases and Area probability:
- Meat Buns: -10/20/30% exploration timer.
- Meals: +10/20/30% mid-exploration reward probability.
- Sweets: +10/20/30% increase to end-rewards.
- Area food: Increases the chance you’ll end up in a specific area.
Do note that pets also impact which area you end up in and outside of going to the Snowfield more you generally don’t want to use the area food early on due to the very high Snowfield’s Gift requirement for your monthly supply.
Black Market
The black market is where you exchange the end mission reward currency, the various gifts from the 4 expedition locations, into actually useful items.
Monthly supply
In the Black Market under Items, there is a plethora of very useful items that restock on the 1st of every month.

Available items are as follows:
- 1000 Batteries for 2500 City’s Gifts
- 120 Enhancement Capsules for 3600 Snowfield’s Gifts
- 3600 Combat Reports for 5400 Snowfield’s Gifts
- 1200 Universal Parts for 3000 Forest’s Gifts (once you have a decent supply you can stop getting these)
- 700 Special Combat Reports for 1050 Snowfield’s Gifts
- 100 Cores for 5000 Wasteland’s Gifts (not important)
- 2 Fire Control Components for 2400 Snowfield’s Gifts (Very important)
Do note that this is the only continuous source of Fire Control Components, and one of the only sources of Enhancement Capsules (the other being Luffberry Chess), which means you should make doubly sure to get these. Enhancement Capsules grow less important as your HOC are properly raised, and you may stop buying these when you feel you have enough.
FCCs are crucial in that they are required for 6☆ modding, and this is the only steady source of these. You should ensure buying out both of these every month. There are more and more 6☆ mods added to the game over time, and as a new player you will be constantly playing catch-up on these.
Total per month:
2500 City’s Gifts
12450 Snowfield’s Gifts
≤3000 Forest’s Gifts (this can be toned down if you end up having a decent supply of Parts)
<5000 Wasteland’s Gifts
Cores cost a lot, but there isn’t anything else to spend your Wasteland’s Gifts on, so as long as you are not picking Other type pets to empty this out you may spend freely for some free extra cores. Just remember that corpse dragging is a far far better source of cores.
Other uses for Expedition Gifts
Equipment
The vast majority of these equipment are for dolls that are not useful, and while the equipment on their own are generally strong, they are not enough to make the dolls worth raising.
Notable useful equipment are as follows:
- Hanyang: Magnetic Accelerated Rounds, +5 FP on 180 AP
- Makarov: Tactical Grip, 22 Evasion Accessory
- PPK: PPK Suppressor, 18 Evasion Accessory
Do note that none of these are recommended to get early on, as they are prohibitively expensive to get for new players. These are simply good equipment for these three dolls and their respective mods.
Furniture
Old event furniture ends up here.
Well, it did, until EN stopped updating it. Foreign keeps getting updates so perhaps sometime before the heat death of the universe.
Very expensive and shouldn’t be considered until you can guarantee that you can buy your monthly supply, especially not running more cats before that is guaranteed.
Some of the furniture is very expensive, others not so much. Buying some of the cheaper furniture after your monthly batteries are accounted for to help set up dorm 3 and 4 comfort is a possibility, but you should not put in a cat to try to do this.
Effects
Make your dolls look fancy, before 3.0 some performance drop could’ve been a consideration here, but this shouldn’t matter with 3.0.
Make sure you don’t hurt your monthly supply by purchasing any of these.
Commander Costumes
More options for your Commander. Depending on your achievement status this might give gems.