Due to the complete removal of all of the old theater waves, and all of the new mechanics in theater combat, this guide has also been completely overhauled.

waiwaiwaiwai, what about the videos and enemy mechanic explanations from the old guide?

Oh, right. Just bring those over without the enemy CEs so people can refresh their memory on the more gimmicky enemies from theater 3-6.
A Whole Lot of New Things to Bully You
Carwashed Paradeus
You didn’t expect Paradeus to keep throwing those old, abandoned machines at you, right? With fixed up weapons and cleaned-up appearances, those Gunners, Gladiators, and Striders are sporting new looks and improved stats. As their skill effects remain the same as usual, this section will simply note what changes the enemies received statwise.
- All three of them have way more HP (about a 50% base increase for Gunners and a 60% increase for Gladiators and Striders)
- Gunners and Striders have higher Accuracy (about a 40% base increase for Gunners and a 30% base increase for Striders)
- Gladiators and Striders have more Armor (about a 50% base increase)
- Striders have higher RoF (50% base increase)
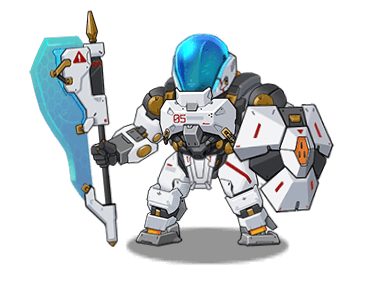
Defender (Nickname: Punisher)
These intimidating-looking enemies are frequently found at the front of Paradeus enemy formations. Their HP is decently high, and in addition to force shields, their axe becomes a shield while moving, granting them a further 50% damage reduction. When attacking, they can hit the unit on the tile behind their target, though their damage stat is very low. Against these enemies, moving your tanks forward to protect your DPS is a good idea.
Hymnal Organ (Nickname: Cherub)
These enemies exist because Paradeus remembers Taunt Fairy and saw the same thing in Assimilated Manticores and Ringleader tanks. These enemies prefer to stay at the back of enemy formations, and attack with high accuracy, armor-ignoring shots that deal more damage the LESS links their target has. In addition, multiple Cherubs attacking the same target will receive a damage buff. Against these enemies, use evasion-focused tanks and focus them down with backline-targeting DPS.

Quill of Patmos (Nickname: Visjnoe)
Another Paradeus backline resident. These enemies don’t attack directly, and instead serve as supporters for their allies. Their first skill (indicated by a blue light during the charging animation) removes all multiplicative stat-increasing buffs from the player’s team, and inflicts a 10% damage debuff. Their second skill (indicated by an amber light during the charging animation) removes all debuffs from its side of the field, and gives an HP shield to its entire team. Against these enemies, try to delay activating your buffs until after the blue light disappears, and avoid anything that relies on debuff infliction.
Sentinel (Nickname: Riotguard)
Paradeus’s answer to the SWAP Guard. They fulfill a similar role, only these ones have higher HP. While these enemies possess an HP shield ability similar to the SWAP Guard, Riotguards’ HP shield builds up over the course of several seconds. Overall, not much of a threat, though whatever they’re providing cover for probably is, so use RFs to aim past them to shoot at the more dangerous enemies.

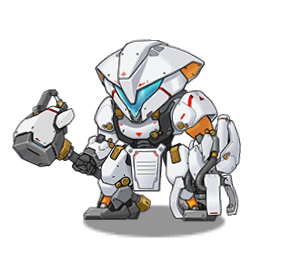
Hannibal
An extremely durable frontline tank. These units have insanely high HP and can extend it even further with strong HP shields, equal to 50% of their max HP. Their attacks also inflict a DoT effect, and can attack with a fast, powerful axe swing that damages through shields and deals more damage when their target has less links (RIP ALCHEMIST LMAO). When their shield breaks, they receive a 50% damage vulnerability debuff and stop attacking for a good 10 seconds, allowing ample time to deal as much damage as possible to kill them off. While working through their HP shields, they can be stopped pretty easily with G&K tanks or Assimilated SWAP Rippers.
Maccabee (Nickname: Metalmax)
A very unimpressive enemy, they only exist to give our SLAP Ammo-equipped MGs something to do. Their Armor stat far exceeds anything fought so far (maxes out at about 457 here), however they struggle with being a threat beyond that. They do have an energy orb attack that deals some SureHit damage to the nearest target, though its damage is affected by armor. SG tanks can just sit there and ignore their existence until the Metalmax all die.
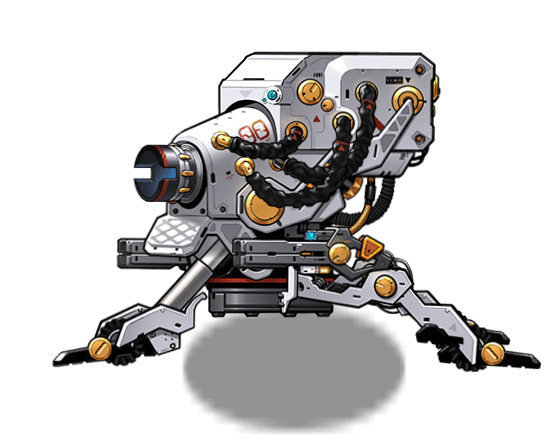
Aceso’s Flask (Nicknames: Obelisk A)
The main body of a pretty large cannon. Even though the rest of it never shows up in this event, this can still attack. It alternates between either a short burst with its point defense guns, or a piercing laser. Although the laser doesn’t deal much damage, it should still be avoided. Kiting them similarly to Rodeleros (keep a full lane clear except for one doll to draw fire) to keep your backline healthy is ideal.
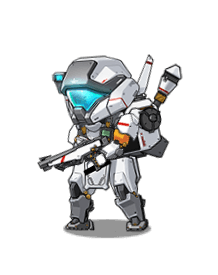
Grenadier
Another backline resident, now with explosives and a desire to make anyone spamming Dinergates really hate themselves. These enemies will alternate between using a special rocket launcher with a large blast radius that deals way higher AoE damage to machine units, but low AoE damage to T-Dolls, and hand grenades that deal low AoE damage to anything caught in their explosion range. When not doing either of those things, they’ll attack using their submachine gun. Kill them quickly with RFs before they get too annoying.
Murat (Nickname: MasterSergeant)
Another supporter unit, but instead of purging your buffs, this one is all about buffing its own allies. These enemies will constantly buff the Evasion, RoF, and Damage of their allies, so watch out if they are paired alongside high-damage enemies such as Gunners. However, killing them will debuff the Damage and Evasion of their allies by 50% for 10 seconds and remove any of the buffs it has applied, and some dolls such as MG338 and AK-15 Mod2+ can target them for high amounts of damage, as while they can’t attack, they do possess a very high Damage stat. Their low armor stat can also be exploited by HS.50, who can kill these enemies in about 2 shots with some Damage buffs.
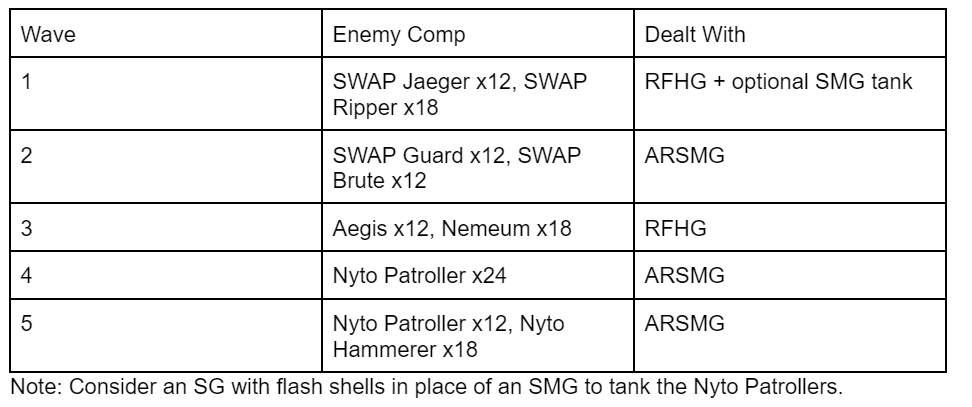
Nyto Hammerer
Surprise! Nytos are normal enemies now! Also, they’re all elites. Fortunately, these ones are more of a nuisance than an actual threat. They don’t do very much damage, but their hammers can stun enemies that they hit, which can be annoying in fights where you will need to move your tanks around often. They also gain a damage reduction buff as their HP decreases, which makes them a bit harder to kill, but not by very much.
Nyto Patroller (Nickname: SMG Nyto)
Alright. You know SWAP Rippers? You know how they have that force shield that gives them 1 second of protection when they lose a link but it only activates once every 6 seconds? Yeah well these don’t have that interval between force shields. Every time one of these loses a link, they give themselves a 1 second force shield and they can activate it as often as they need. In addition, they have a hidden skill that buffs their Accuracy by 50% every time they attack, stacking multiplicatively up to 5 times, allowing for a ridiculous 660% buff, letting them shred through evasion tanks despite their low base Acc. Out-stall them with SGs using flashbang shells and prepare for a long fight. If they are escorting something more dangerous, kill that first using RFs.
Nyto Hawkeye (Nicknames: RF Nyto, Snyto, Actual Demonspawn)
One of the most obnoxious enemies ever added to the game. No hyperbole here, these enemies are so awful to fight that Mica added an automatic win button against them in the form of QBZ-191, but if you weren’t around for Fixed Point or couldn’t beat her stage, good luck. They have a statline roughly comparable with a SWAP Jaeger, only these ones have skills that send them all the way to the top of the “horrible to fight” list. When taking damage, they can kite YOU by jumping back and buffing their range, letting them snipe your tanks from a great distance. Their main skill is a relatively fast-acting nuke shot aimed at the highest HP target in their range that can pierce THROUGH YOUR DOLLS, which can completely shred through your DPS as well as your tanks. If you see these enemies in a comp, kill them ASAP.

Nyto Commander
Yet another purely supportive unit, however unlike Visjnoes and Murats, these don’t have nearly as high of a Damage stat, so the usual options used to focus those will be less effective here. These units opt for a more defensive support plan, buffing the evasion and giving HP shields to their allies as well as debuffing the Damage and RoF of our T-Dolls. They do have offensive buffs, however they can only give them to other Nyto enemies. Overall, not very dangerous.
Garmr (Nickname: Paradog)
Paradeus’s take on the Orthrus from KCCO. Instead of a shield combined with a damage reduction to 1, these units are more of supporters with limited offense, being easily stopped by most Evasion tanks despite their rapid biting attacks. Their support comes in the form of a powerful 70% damage reduction buff to anything behind them. If multiple Garmrs are in the same fight, this buff will stack, forcing these to be killed first so the backline can be dealt with.
Stage Themes
As mentioned in the overhaul guide, stages in Theater come in four distinct themes, each with their own unique gimmicks (except for one).
Normal Stages
Classic theater combat. A series of waves where damage persists. Most similar to Defense Drill in combat design, though at least in Theater you’re allowed to retreat your dolls.
Assassination Stages
These stages will have a boss in every wave, with some random SWAP SF escorts. Usually, one of the objectives within these stages will be to kill the boss under a certain time limit. These time limits may prove challenging to newcomers or those unable to meet the DPS requirements.
Defense Stages
These stages feature huge waves of enemies relative to the rest of the stages. Here, the objective is to survive until the timer runs out for each wave. If every enemy in a wave is killed before the time limit expires, the wave repeats until the timer ends. Damage taken carries over on these stages like normal, so don’t get hit too much.
Electronic Stages
These stages have stronger enemies, though fortunately we get something nice in return. Damage doesn’t actually carry over between waves on these stages, meaning the player’s team gets healed to full HP after every fight. Every stronghold stage is also an Electronic stage, so there’s no need to worry about kiting perfectly to reduce damage taken to zero. (And looking at the enemy compositions on these stages, good luck doing that anyway).
Stronghold Stages and CE Stacking
Previously mentioned in the overhaul guide, Stronghold stages are a different type of Electronic stage where the goal is to stack up a high amount of Boss CE to maximize points out of a boss fight cutscene at the end. There are a total of ten Stronghold stages across Theater, and while some of the bosses repeat, they aren’t always weak to the same types of dolls.
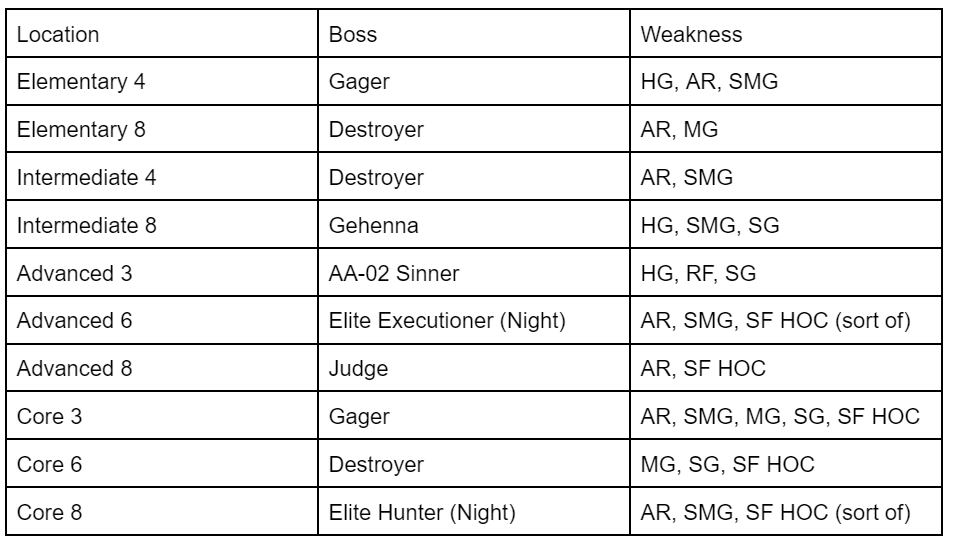
Stages with night bosses will also be entirely night battles, and as many PEQs as possible should be used as possible to maximize CE against these bosses.
Stages with “SF HOC” in the Weakness section are stages where SF units that can be used as HOCs will have higher CE than G&K HOCs. Due to the weak nature of SF HOCs, these stages become more difficult compared to stages where blasting everything to bits using G&K HOCs is an option. Note that in Advanced 6 and Core 8, any SF unit used as an HOC will need the Night Vision chip equipped (the one that removes the night accuracy penalty, not the one that allows for +1 node vision) and be placed in a NON-THEATER echelon to get the correct bonus CE. Since only one Night Vision chip can be in use at any time, only one SF HOC can effectively take the place of a G&K HOC.
Your G&K HOCs don’t have to worry about that, they’re immune to the night penalty anyway. :D
When selecting your fairy, note that only level and rarity affect the amount of CE it provides. All other stats (Aura effects, skill level, FC cost) do not affect this. For example, this means that a Prototype Fairy will provide the same CE bonus as a maxed out Artillery fairy.
With GFAlarm (see installation guide here), you can quickly find an optimized list of CE stacks for each boss stage tailored to your account. Simply turn on the “Save Theater Optimize Team” option under File Save in GFAlarm’s settings menu, and log in to GFL. Once you’ve done that, open your file with GFAlarm in it, and open the “info” folder. You should find a spreadsheet formatted as (player name)_(UID)_theater_optimize_team, which has a list of optimal stacks based on the current state of your armory.
A second alternative is using the Theater Score-Helper website.
Video of how to do this by Zeseling
Stages List
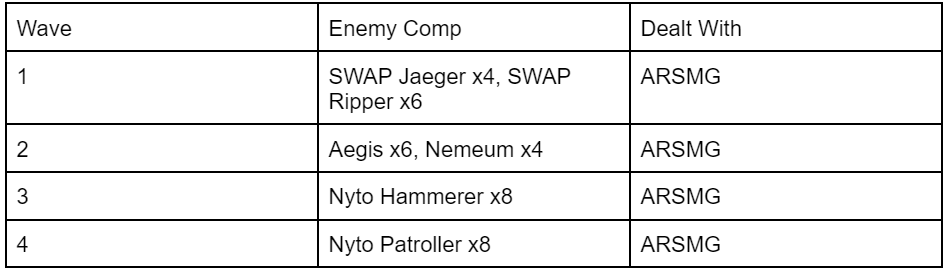
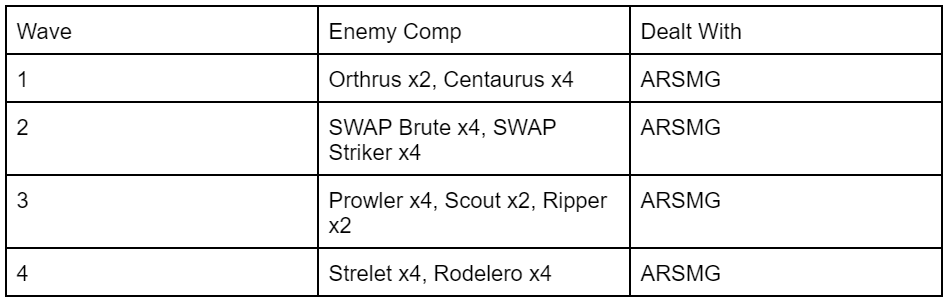
Time for what you’ve been waiting for. Here you’ll find a full list of the enemy compositions for each wave, the stage theme, their objectives, and their added effects.
Elementary Zone
This zone is pretty simple, even for newcomers. The enemies here are different from the stuff most new players are used to fighting, but their levels are so low that it hardly matters anyway. Elementary zone only has one objective (clear the wave), so that part will be skipped for this zone. No HOCs can be used in Elementary stages.
Elementary 1
Theme: Normal
Added effect:
50% RoF buff for all allies

Elementary 2
Theme: Electronic
Added effect:
All allies get an HP shield equal to 20% of that ally’s HP for 10 seconds
Elementary 3
Theme: Normal
Added effect:
Decrease all allies’ ICDs by 50%

Elementary 4
Theme: Electronic
Added effect:
Increase Damage and Evasion for all allies by 3% every 4 seconds, up to 10 stacks.
Elementary 5
Theme: Defense
Added effect:
Deploy a friendly 5 link target dummy every 10 seconds with 1000 HP per link
Elementary 6
Theme: Electronic
Added effect:
All allies get a shield that can absorb damage equal to 10% of HP lost for 6 seconds every 15 seconds
Elementary 7
Theme: Normal
Added effect:
All enemies receive a 500% Evasion buff
Elementary 8
Theme: Electronic
Added effect:
Decrease the echelon leader’s Damage, Accuracy, Evasion, Crit Rate, and Armor by 90%
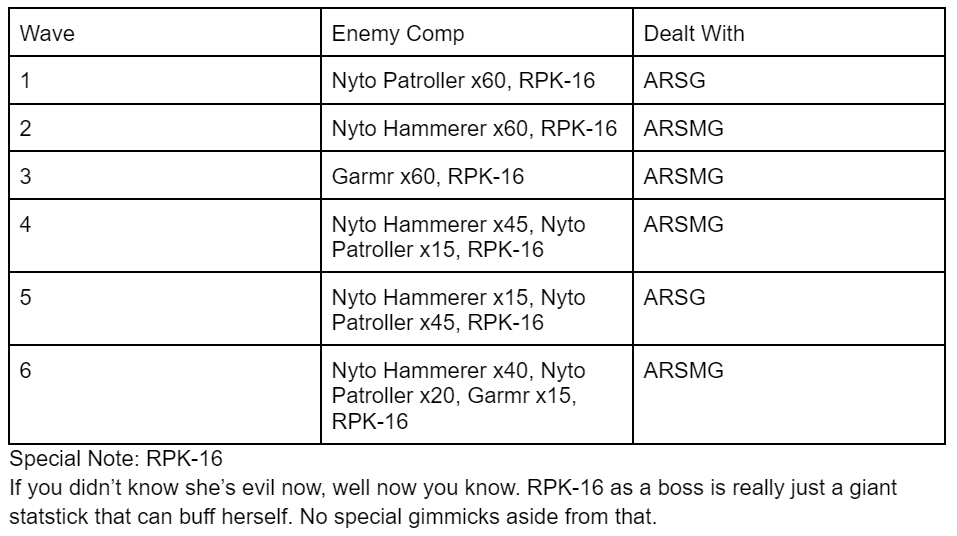
Special Note: Garm
Against Garm, keep your middle column clear, as Garm frequently jumps and fires three grenades into that area. On low HP, Garm will also fire a high damage laser (that can be mitigated by armor) down the middle row as well as a volley of grenades down either the top or bottom rows. Garm is invulnerable while this attack is being used, and will always follow this with grenades on the middle column.
Intermediate Zone
Things start to get tougher towards the end here. Stages will have two objectives and two added effects. 1 HOC can be used in Intermediate stages.
Note: changing to easier difficulties will also remove those HOCs you selected automatically (example: going from Intermediate to Elementary will remove the HOC you selected for Intermediate). Please make sure to fix your HOC slots when changing back to harder stages.
Intermediate 1
Theme: Normal
Objectives:
Clear the wave
Use at least one HG in the combat team
Added effects:
Decrease all allies’ ICDs by 30%
Using a skill decreases its CD by 20%
Intermediate 2
Theme: Electronic
Objectives:
Clear the wave
Win in 60 seconds
Added effects:
Decrease the echelon leader’s Damage, Accuracy, Evasion, Crit Rate, and Armor by 90%
All SMGs get a 100% Evasion and Accuracy buff
Intermediate 3
Theme: Normal
Objectives:
Clear the wave
Do not lose more than 5 links per fight
Added effects:
Increase all allies’ crit rate and crit damage by 30% at night
All allies get an HP shield equal to 20% of that ally’s HP for 10 seconds
Note: All waves are at night, use PEQs on any DPS that can take them
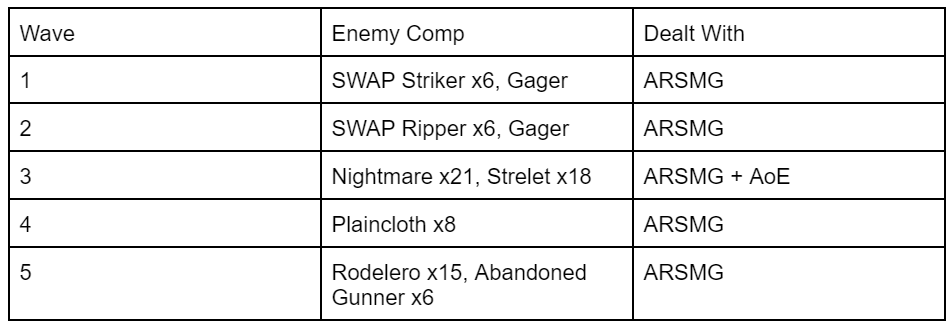
Special Note: Gager
Gager hasn’t changed much since her fights in Arctic Warfare and Singularity, except for one new skill. Now, whenever Gager hits something, she gains charge stacks. When this charge is full, Gager attacks in melee mode with SureHit link-scaling attacks.
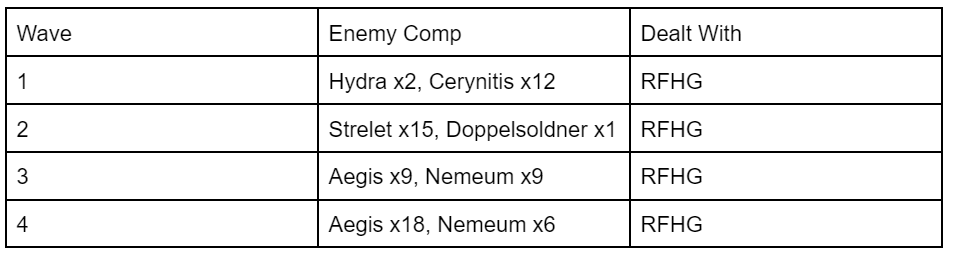
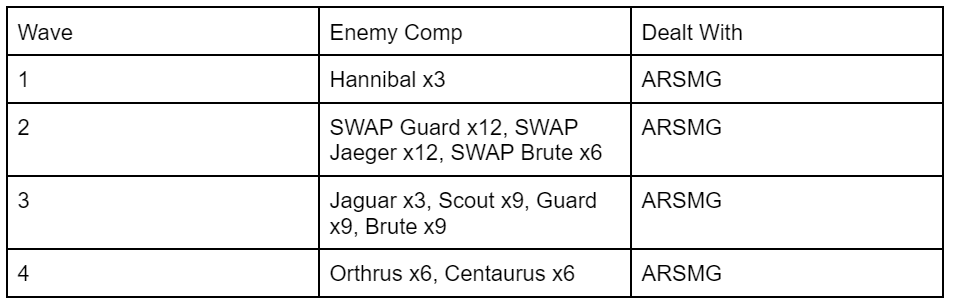
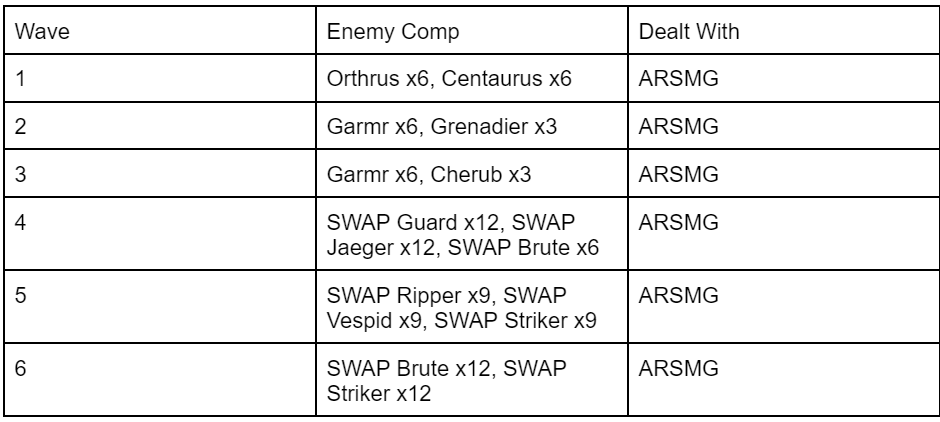
Special Note: Plaincloths only appear in the 4th wave of this stage and nowhere else in this event. They attack with their guns, will advance forward periodically regardless if anything is blocking them, and can buff the Evasion of anything behind them. They shouldn’t be a threat if your ARSMG team is anything above half-decent.
Intermediate 4
Theme: Electronic
Objectives:
Clear the wave
Do not use any RFs in the combat team
Added effects:
Decrease all allies’ ICDs by 30%
All allies get a 20% RoF debuff but also get a 20% Damage and Accuracy buff
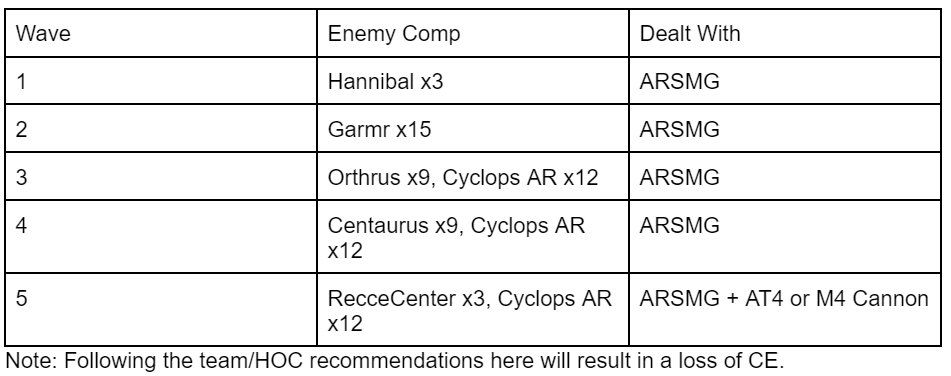
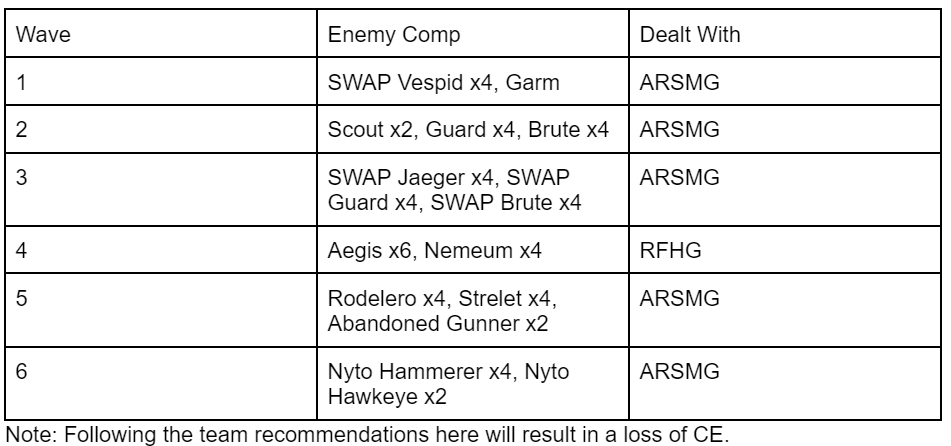
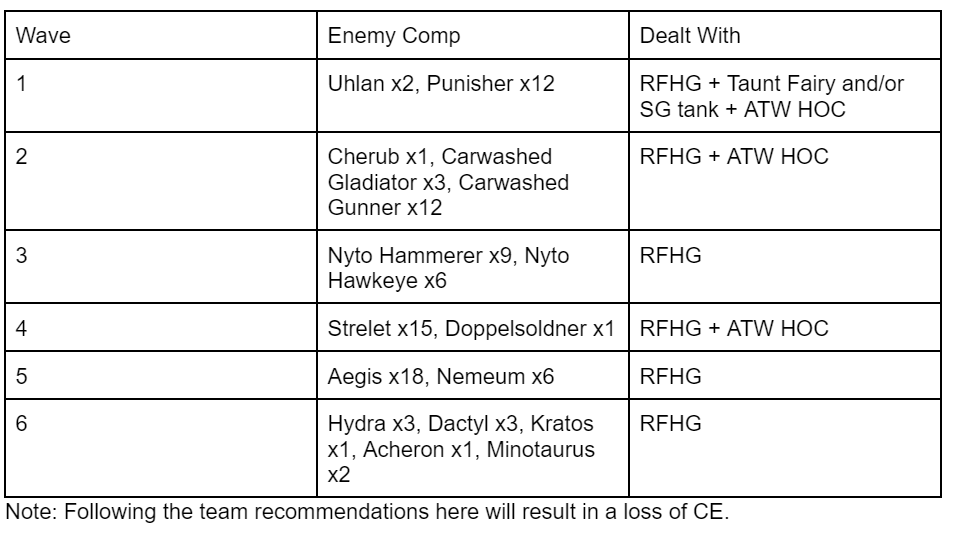
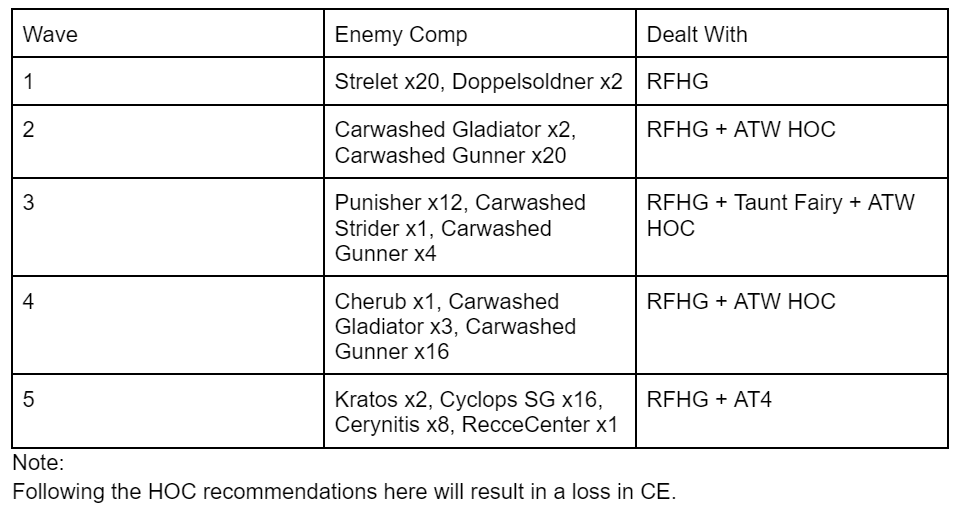
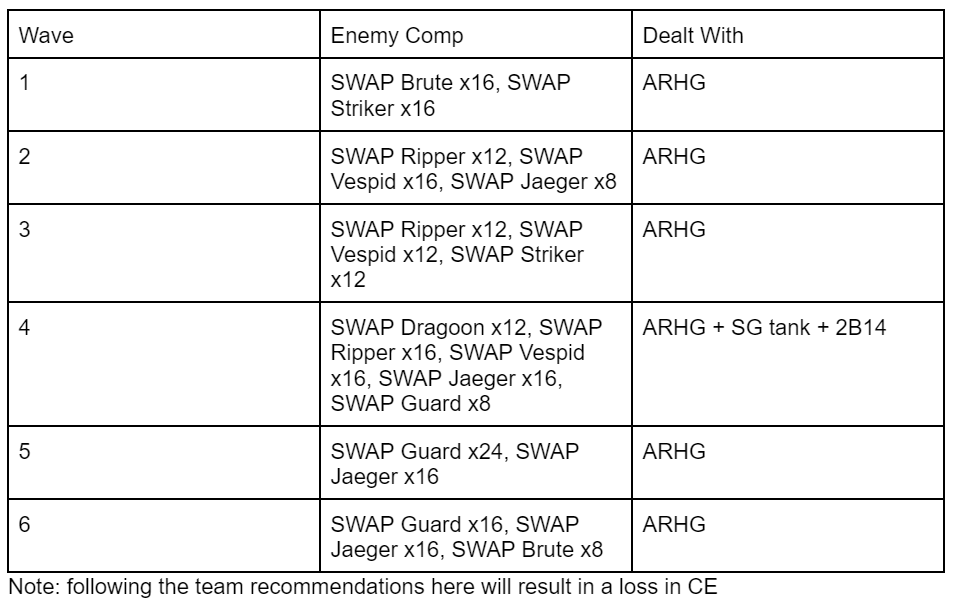
Note: Following the team/HOC recommendations here will result in a loss of CE.
Intermediate 5
Theme: Defense
Objectives:
Clear the wave
Use at least 2 SMGs in the combat team
Added effects:
All allies get an HP shield that can absorb damage equal to 30% of HP lost for 6 seconds every 10 seconds
Increase Damage and Evasion for all allies by 3% every 4 seconds, up to 10 stacks

Intermediate 6
Theme: Electronic
Objectives:
Clear the wave
Use at least 3 ARs in the combat team
Added effects:
Every 15 seconds, reduce a random ally’s Damage, RoF, Accuracy, Evasion, and Armor by 50% for 5 seconds
Stun the ally dealing the most damage for 5 seconds every 10 seconds

Intermediate 7
Theme: Normal
Objectives:
Clear the wave
Have no fewer than 4 units on the field at the end of each wave
Added effects:
All SMGs get a 100% Evasion and Accuracy buff
All ARs get a 20% Damage buff and a 100% Accuracy buff
Intermediate 8
Theme: Electronic
Objectives:
Clear the wave
Use at least three HGs in the combat team
Added effects:
Give a force shield to the highest HP ally for 8 seconds at the start of each wave
Using a skill decreases its CD by 20%
Advanced Zone
Things really kick off here. Juggling the three objectives, added effects, and the fights will prove difficult to a lot of players. 3 HOCs can be used in Advanced stages.
Advanced 1
Theme: Electronic
Objectives:
Clear the wave
Use at least one HG in the combat team
Clear each wave in under 30 seconds.
Added effects:
Deploy a friendly 5 link target dummy every 10 seconds with 1000 HP per link
All enemies get a 500% evasion buff
All allies get a 50% critical damage buff
Advanced 2
Theme: Assassination
Objectives:
Clear the wave
Use at least one RF in the combat team
Defeat Nyto Commander in under 60 seconds
Added effects:
Each use of an active skill reduces skill CD by 20%,
Decrease the echelon leader’s Damage, Accuracy, Evasion, Crit Rate, and Armor by 90%
All allies get a 100% RoF buff
Advanced 3
Theme: Electronic
Objectives:
Clear the wave
Do not have less than 4 dolls on the field at the end of each wave
Use at least three RFs in the combat team
Added effects:
Debuff a random ally’s Damage, RoF, Accuracy, Evade, and Armor by 50% for 5 seconds every 15 seconds
All allies get an HP shield that can absorb damage equal to 10% of enemy HP lost for 6 seconds every 15 seconds
All allies get a 50% critical damage buff
Advanced 4
Theme: Defense
Objectives:
Clear the wave
Use at least two SGs in the combat team
Highest % on the damage contribution board does not exceed 50%
Added effects:
Allies on the front column get a 10% evasion and armor buff every 3 seconds which stacks up to 10 times
An incendiary grenade gets thrown at the highest HP enemy, dealing damage to it and setting any enemy in a 3 unit range on fire, dealing 100 damage every 0.33 seconds for 15 seconds
All SGs get a 20% armor and damage reduction buff
Advanced 5
Theme: Normal
Objectives:
Clear the wave
Use at least two SGs in the combat team
Include MG3, OR MG4, OR MG5 in the combat team
Added effects:
Ally with the highest HP receives a 50% damage reduction buff
Debuff a random ally’s Damage, RoF, Accuracy, Evade, and Armor by 50% for 5 seconds every 15 seconds
All allies get a 50% RoF debuff
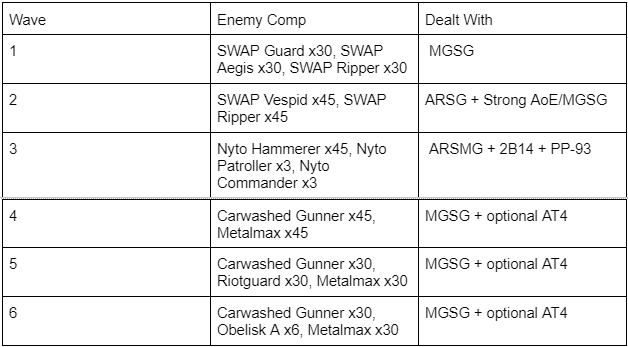
Advanced 6
Theme: Electronic
Objectives:
Clear the wave
Highest % on the damage contribution board does not exceed 50%
No RFs are used in the combat team
Added effects:
Increase all allies’ Crit Rate and Crit Damage by 30% at night (In a ARSMG stage????) Decrease the echelon leader’s Damage, Accuracy, Evasion, Crit Rate, and Armor by 90%
All allies deal 20% more damage to enemies within a range of 3 units
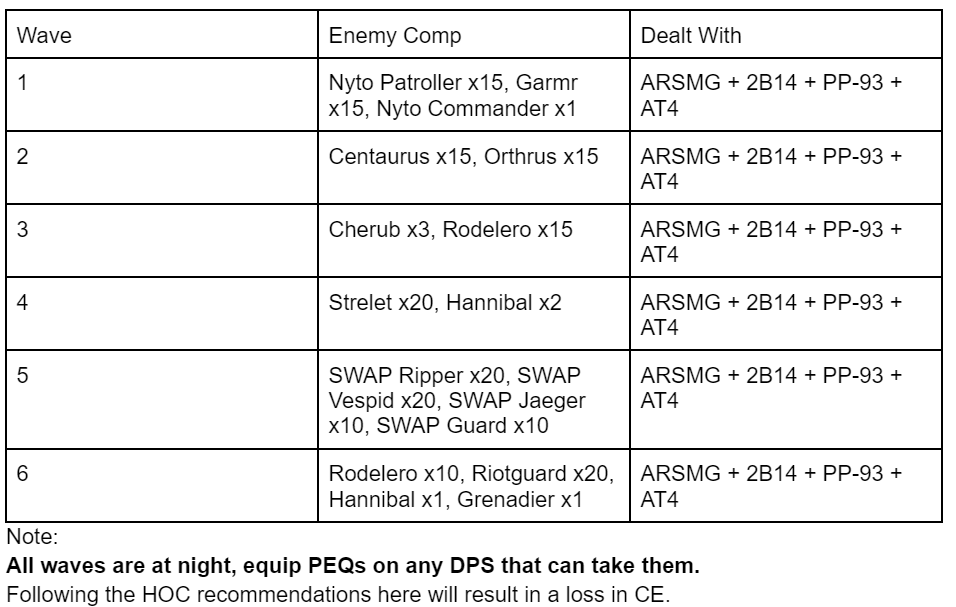
Note: All waves are at night, use PEQs on any DPS that take them
Note: following the HOC recommendations here will result in a loss in CE
Advanced 7
Theme: Normal
Objectives:
Clear the wave
Do not use any SMGs or ARs in the combat team
Highest % on the damage contribution board does not exceed 50%
Added effects:
Using an active skill decreases its CD by 20%
All allies get an HP shield that can absorb damage equal to 30% of HP lost for 6 seconds every 10 seconds
All allies get a 100% RoF buff
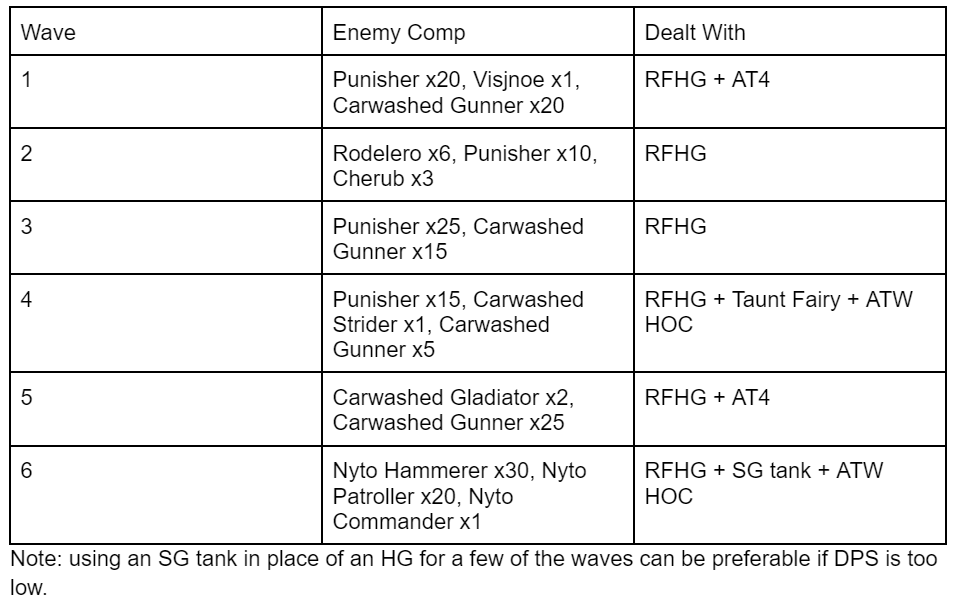
Note: using an SG tank in place of an HG for a few of the waves can be preferable if DPS is too low.
Advanced 8
Theme: Electronic
Objectives:
Clear the wave
Use at least one MG in the combat team
Do not use any HGs in the combat team
Added effects:
The echelon leader receives a 50% buff to Damage, Accuracy, Evasion, Armor, and Crit Rate
Allies on the front column get a 10% evasion and armor buff every 3 seconds which stacks up to 10 times
All allies get an HP shield that can absorb damage equal to 30% of HP lost for 6 seconds every 10 seconds
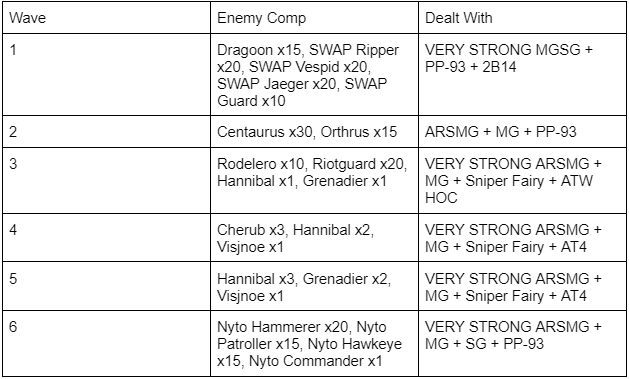
As this is the hardest stage in this event by far (even Core 8 doesn't compare), a video guide has been included.
Core Zone
Core stages start out easy, but quickly become extremely difficult. Stages will have three objectives and added effects, just like Advanced. 3 HOCs can be used in Core Stages.
Core 1
Theme: Electronic
Objectives:
Clear the wave
Use at least one HG in the combat team
Do not use any RFs in the combat team
Added effects:
Decrease all HGs’ skill CDs by 20%
Deploy a friendly 5 link target dummy every 10 seconds with 1000 HP per link
Decrease the echelon leader’s Damage, Accuracy, Evasion, Crit Rate, and Armor by 90%
Core 2
Theme: Normal
Objectives:
Clear the wave
Use at least one RF in the combat team
Use at least two ARs in the combat team
Added effects:
All allies get a 30% buff to Damage, RoF, Accuracy, and Evasion per class present in the combat team
Debuff a random ally’s Damage, RoF, Accuracy, Evade, and Armor by 50% for 5 seconds every 15 seconds
The doll with the lowest % on the damage contribution board takes 999 damage every 15 seconds
Core 3
Theme: Electronic
Objectives:
Clear the wave
Use at least 2 ARs in the combat team
Do not use any SMGs in the combat team
Added effects:
Decrease all allies’ ICDs by 50%
Purge all positive effects from all allies every 8 seconds
All allies get a 100% crit rate debuff
Aww, a baby version of the SWAP Stack! How cute.

Core 4
Theme: Defense
Objectives:
Clear the wave
No more than 5 total friendly dummy links are lost per wave
Do not use any HGs in the combat team
Added effects:
Ally with the highest HP receives a 50% damage reduction buff
Echelon leader receives a 50% buff to Damage, Accuracy, Evasion, Armor, and Crit Rate
All allies get a shield that can absorb damage equal to 30% of HP lost for 6 seconds every 10 seconds
Note:
Could go for ARSMG on wave 2 but it’s not like anything there can really hurt SG tanks.
Core 5
Theme: Assassination
Objectives:
Clear the wave
Defeat Griffin M16A1 within 50 seconds
Use at least 3 ARs in the combat team
Added effects:
Increase Damage and Evasion for all allies by 3% every 4 seconds, up to 10 stacks
Stun the ally dealing the most damage for 5 seconds every 10 seconds
All ARs get a 20% Damage buff and a 100% Accuracy buff
Core 6
Theme: Electronic
Objectives:
Clear the wave
Do not use any HGs in the combat team
Use at least one MG in the combat team
Added effects:
Ally with the highest HP receives a 50% damage reduction buff
Every 15 seconds, reduce a random ally’s Damage, RoF, Accuracy, Evasion, and Armor by 50% for 5 seconds
Using an active skill INCREASES its CD by 100%
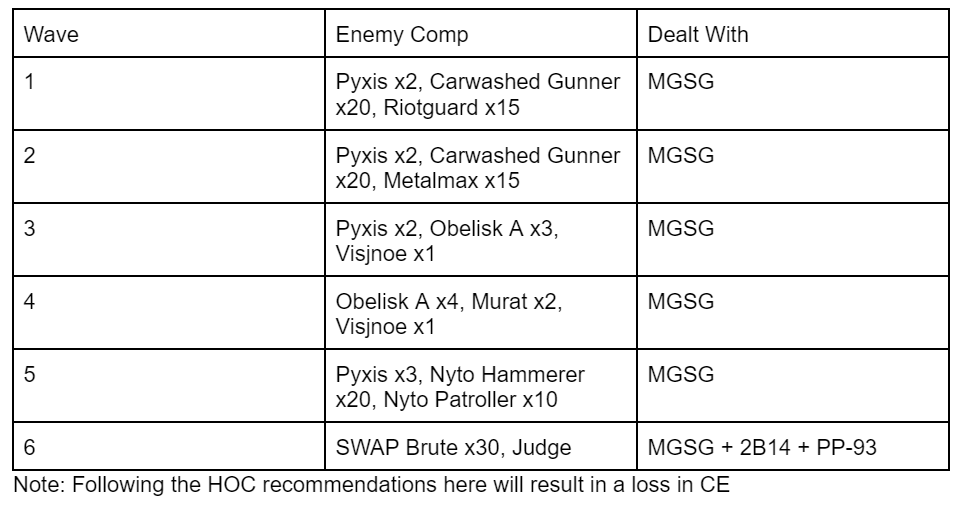
Special Note: Judge
It’s Judge, only this time with so much health that fighting her takes forever, with some actually threatening escorts, and two really painful added effects for this fight. Get rid of the SWAP Brutes immediately, then work on Judge’s massive HP and damage reduction. Also, pray that one of your SGs doesn’t get slapped by the 50% debuff while Judge is in rage mode.
Core 7
Theme: Assassination
Objectives:
Clear the wave
Highest % on the damage contribution board does not exceed 50%
Use ARs in the combat team
Added effects:
Increase Damage and Evasion for all allies by 3% every 4 seconds, up to 10 stacks
Decrease the echelon leader’s Damage, Accuracy, Evasion, Crit Rate, and Armor by 90%
All allies get an HP shield that can absorb damage equal to 30% of HP lost for 6 seconds every 10 seconds
Core 8
Theme: Electronic
Objectives:
Clear the wave
No less than 4 dolls on the field at the end of each wave
Do not use any HGs in the combat team
Added effects:
The echelon leader's damage, accuracy, evasion, armor, and crit rate are increased by 50%.
All allies get a 20% RoF debuff but also get a 20% Damage and Accuracy buff
All allies get an HP shield that can absorb damage equal to 30% of HP lost for 6 seconds every 10 seconds
Note:
All waves are at night, equip PEQs on any DPS that can take them.
Following the HOC recommendations here will result in a loss in CE.