


Part 5: Putting It All Together: Crafting Your Personal Team
With each of the separate sections of a challenge quest covered in detail, it is finally time to put a team together. However, perhaps a reminder of some of the main points from the previous sections is in order. When building a team, make sure to do the following:
- The first step for any challenge quest is to examine the opponent. Which classes and what kind of enemies are contained in the quest, in what order do they appear and do the opponents have any particular trait weaknesses.
- Preferably observe in advance what skills and what Noble Phantasms might be unleashed on the frontline.
- Finally, does the encounter contain any special gimmicks or additional non-standard skills that need to be taken care of?
- In the second step, fit the team into the mold of a support team. The final team should have at least one Servant dedicated to buffing the team with defensive measures.
- The frontline is prioritised and allocated the most team cost while the backline is a contingency plan for when or if the frontline falls.
- The Mystic Code is selected last in order to cover up moments of vulnerability or enhance a main window of burst damage.
- When thinking about survival, set up a rotation of defense skills and Noble Phantasms such that moments of vulnerability, periods in which no defensive measures are active, are limited or non-existent.
- Choose a defensive measure that most counters the main threat to the team and select a support that provides it.
- Choose one Servant to function as the main DPS. If more damage is needed, bringing a Servant that can buff the main DPS is often more effective than a second DPS Servant.
- When thinking about offense, set up windows of burst damage. These are turns in which different buffs are stacked together to do the most damage possible. The team should then alternate between unleashing damage and preparing for the next window.
- Damage output can be further improved by counting command cards and bringing buffs and Servants that broadly benefit from or enhance the same card chains.
Part 5.1: A Basic Step-by-Step Approach
In practice, creating a team is linked entirely to the encounter in question. There are a few general compositions, usually those containing a Berserker or an Avenger, that can be fielded for almost any challenge quest. While these teams will often be successful, creating a team that is adapted to the encounter will always yield better and more consistent results.
After making an assessment of the enemy boss, or see part 1 for advice on how to do so, the first two decisions are inextricably linked. That is:
Step 1:
- Select a Servant to function as the main DPS, preferably with class advantage and skills that can protect themselves or improve their damage.
- Select a Servant to function as the primary support, preferably with access to both Offensive and Defensive skills.
It is up to the roster of the player in question which of these should be borrowed from a friend. Perhaps the player was lucky enough to roll a Jack and will field her as the main DPS. In this case, selecting a friend support that synergizes well with Jack is the best course of action, something like a Waver. However, what if a roster has a glaring lack of Assassins? In that case, a friend can supply the Jack (with maxed skills and perhaps Noble Phantasm upgrades, try to befriend some whales!). It is up to the player in this case to supplement the Jack with the appropriate back-up such as Hans or Mash.
Of course, in most cases it is a trade-off. Can the somewhat decent Servant in your roster do enough damage with a friend support? Or am I better off borrowing the best possible damage Servant and use my own supports who aren’t maxed yet? There is no clear answer for this in many cases and experimenting is the best option. Many challenge quests have very low AP costs where failure only results in lost time and a hurt pride.
Step 2:
With two Servants selected it is time to turn to the third slot. In this case a number of options are available, which as per usual depend on your roster.
- Select a second support that has great synergy with your primary DPS and support (Ideal, but usually only possible if you select a support from a friend)
- Select a hybrid that provides offensive support for your primary DPS, maybe covering a class advantage contained in the challenge quest different from the primary DPS.
- Select a second DPS that perhaps covers a different part of the class triangle or because the player has vastly invested more resources into their DPS than their supports (not uncommon).
Step 3:
With the frontline established, equip them first with the best Craft Essences possible. During raid events that often means using event Craft Essences to boost damage. Afterwards it is time to set-up a contingency plan in case part of the frontline is wiped out.
Step 4:
-
Slot 4 should contain a Servant that replaces the frontline Servant that is most likely to die first. The Servant in slot 4 should either follow the same role or provide a role that may be needed later on in the fight.
Step 5:
-
Slot 5 should similarly be part of the contingency plan, perhaps a tank is what is needed most, or perhaps another DPS is needed just in case.
Step 6:
-
The final slot has two main options depending on the roster of the player. Either provide a Servant that can survive for a very long time such as Heracles, Cu Chulainn or Nero. Or slot in a final contingency that aims to keep the Servants still in play alive for as long as possible.
Final steps:
Use whatever team cost is left to accommodate the backline with Craft Essences. Generally, the team cost won’t be sufficient to slot everyone with ideal Craft Essences. In this case any Servant that makes a last stand and the Servant in slot 4 should have priority. Mash can also assist in reducing team cost by virtue of costing 0 to field. Remember that for some challenge quests a well constructed frontline is sufficient to clear the quest.
After redistributing the final team cost and finishing the plan, choose one of the Mystic Codes that best complement your strategy. If in doubt, the Chaldea Combat Uniform has near-universal applicability. Part 2.4 has an overview of the strengths and weaknesses of each common Mystic Code or refer to the general Mystic Code page.
Part 5.2: Example Challenge Quest Team:
What better way to demonstrate constructing teams than with some examples by using a mock challenge quest. This mock challenge quest will be a simpler version of an actual challenge quest.
The challenge quest contains three waves of opponents. The first two waves consist of mid-sized HP Centaurs whereas the final wave consists of Medb and her minions. Throughout wave 3, Medb will be almost completely protected from damage as long as her minions are alive to protect her. These defensive buffs cannot be removed by normal means. Each minion that dies removes one of her protections while at the same time buffing her offense for the duration of the fight. These offensive buffs can be removed by normal means. There will be 10 minions to take care off, the first 8 of which are Celtic soldiers in the Rider class with about 60,000 HP, while the final 2 are druids in the Caster class with 140,000 HP. Medb and her minions can also buff each other with a variety of effects, with the most dangerous increasing their charge bars.
The event supplies an event Craft Essence that boosts the damage output of one Servant by 200% once Limit Broken. Pretend the Wandering Tales of Shana-Oh is the event Craft Essence in the screenshots.
The plan of approach is somewhat straightforward:
- Use an Assassin as the main DPS due to all the Riders.
- Abuse the first two waves to prepare for the final Wave.
- Keep the main DPS alive throughout the marathon of Celtic minions.
- Bring in a Rider later on in the fight to remove the Casters quickly.
- Use something to absorb Medb’s Noble Phantasm, the Celtic soldiers should fall before they can charge their bars.
- Preferably bring some ways to remove enemy buffs or risk dying to a Medb on steroids.
- Medb’s protections will require stalling for time.
- Caster supports are not ideal due to class disadvantage.
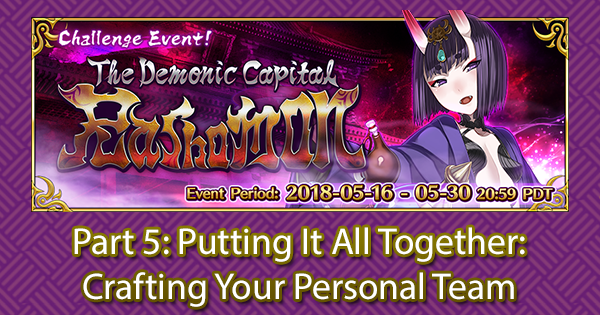
Player 1 lacks a great Assassin of their own for the encounter and therefore chooses the best DPS Servant from one of their (whale) friends. Player 1 constructs the following team:
-
Jack provides the main DPS and through Information Erasure can prevent Medb’s attack buffs from stacking too high. She also has a trait bonus against females, evasion and a targetable heal.
-
The primary support will be Mash who can redirect and tank Medb’s Noble Phantasm. Her defensive buffs will reduce damage and keep Hans alive for as long as possible.
-
Hans’s group buffs will keep the team healthy and increase the damage output of Jack.
-
Once Hans inevitably falls, Georgios will appear to continue protecting Jack.
-
Since Jack’s event Craft Essence is borrowed, player 1 can field one of their own too. Alexander will join or be swapped in at the end of the fight to provide extra offensive buffs while also dealing with the Casters quickly.
-
Heracles provides a last ditch effort in case things go sour.
-
The Chaldea Combat Uniform will be very flexible here and can bring in the right class or a taunt as needed.
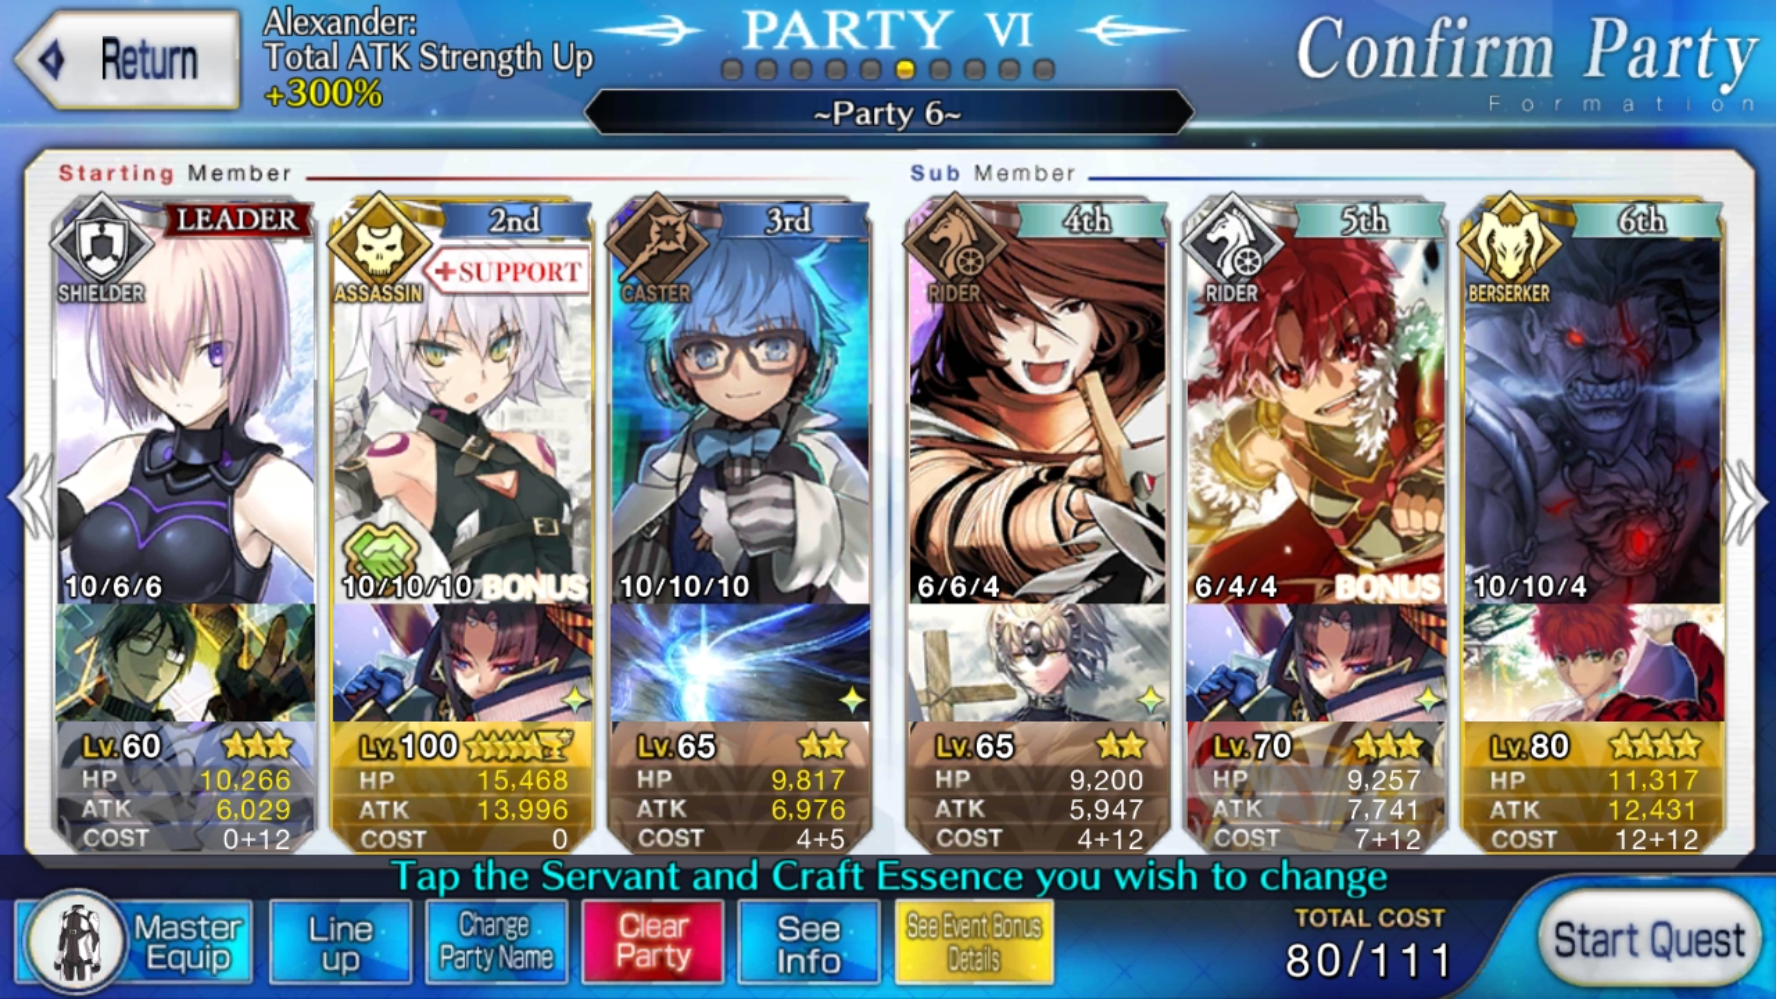
Player 2 however, hasn’t really invested in their supports nor does player 2 want to rely on class disadvantaged Caster supports. Player 2 therefore decided to rely on his own DPS Servant and comes up with the following team:
-
Shiki provides the main DPS and the large amount of arts cards can facilitate spamming Noble Phantasms. Shiki will be equipped with the event Craft Essence.
-
The primary support will be Jeanne, who can negate Medb’s Noble Phantasm with her own Noble Phantasm.
-
Mash will further provide defensive buffs, making this team extremely difficult to kill.
-
Medusa is ready to come in for the Caster minions and can instantly use her Noble Phantasm.
-
Halfway through the fight, Medea can be swapped with Mash to instantly use Rule-Breaker on Medb, wiping out her offense buffs. She will quickly fall, which brings Medusa to the frontline for the Caster minions.
-
Heracles provides a last ditch effort in case things go sour.
-
For this strategy, the Chaldea Combat Uniform is required.
In each of these two team compositions we made sure to:
1. Always have defensive measures in our front team.
2. Try and provide at least some offensive support to the front team - whether through Craft Essences or skills.
3. Make our backline part of a contingency plan that responds to the needs of the encounter.
4. Try to keep the main DPS alive for as long as possible, possibly the entire fight.
Part 5.3: Extremely Short Checklist
For quickly constructing a team, use this short checklist:
1. First pick the main DPS and main defensive support.
2. Preferably add in either another support or a hybrid that has synergy with the main DPS
3. Add Craft Essences to the frontline.
4. The first backline Servant will be based on who is expected to die first and what role is needed.
5. The last two spots will similarly be filled based on how the fight progresses. Filling the final spot with a good solo Servant is generally wise.
6. Finally add Craft Essences to the backline and select the appropriate Mystic code for the composition.
Part 5.4: Closing Words
This has been one of the most comprehensive analysis of team building available to date and while it may have a massive amount of information, hopefully it will have provided a plethora of insight about the game to you - whether that is in constructing teams or fighting challenging bosses. With the insight in this guide you should be more than capable of solving new challenges as they arrive now and in the future.
See the Appendix for some specific advice on the Demonic Capital Rashomon Raid Event that is going on right now! Check it out here.