Introduction
LostWord can be a kind of complicated game, but fret not. This guide is here to teach you the ins and outs of the more complicated or esoteric parts of combat! Thank you to smk#4679 for allowing us to read through his combat documentation to verify this information.
Bullets
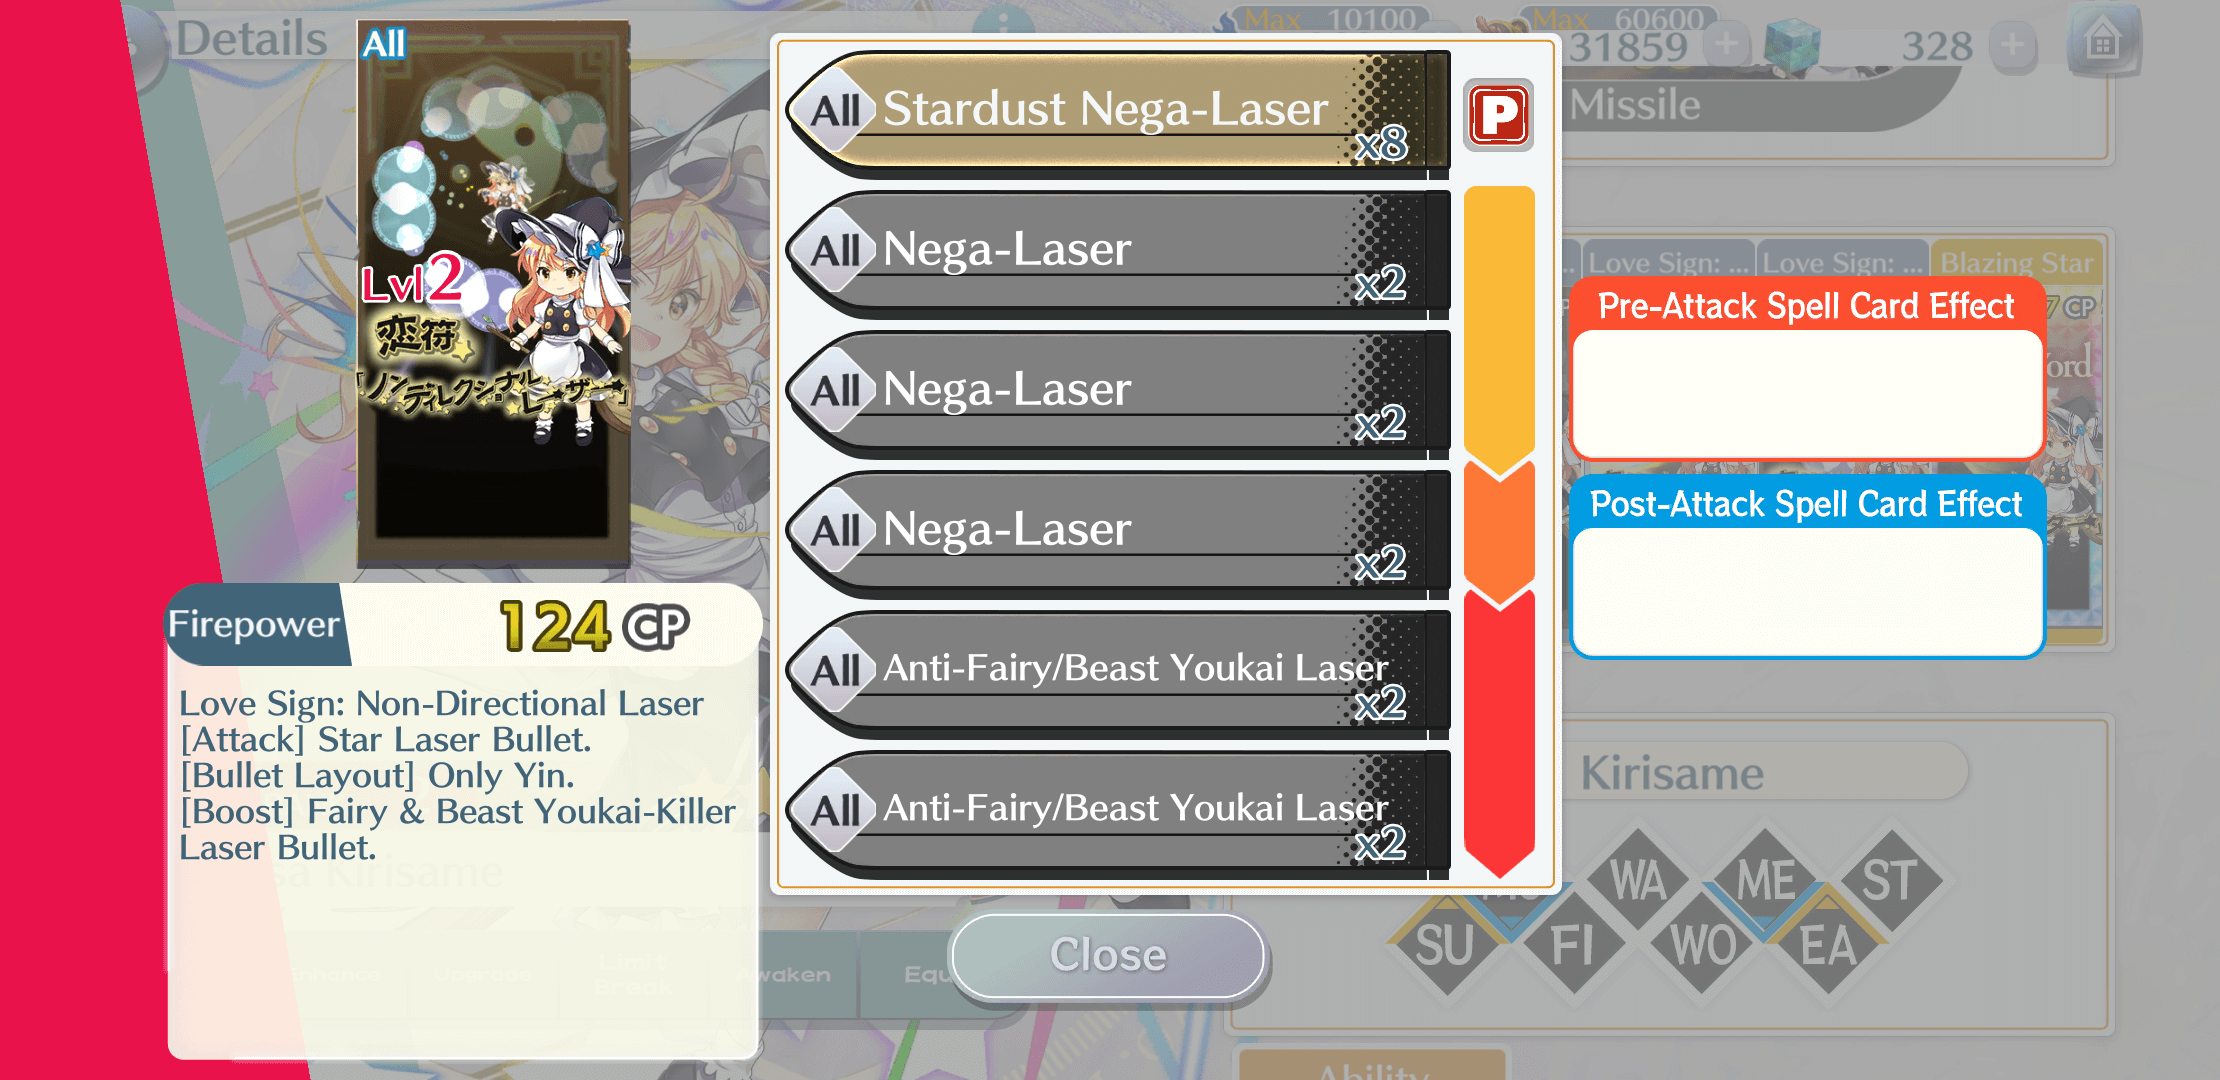
All Basic Shots, Spell Cards, and Last Words in LostWord consist of six bullets, or “lines.” Each of these lines are actually a separate attack, each with their own characteristics (such as accuracy, hit count, damage, element, and bullet type). Without using Spirit Power, only the first line is accessible. The remaining five are added to an attack when Spirit Power is spent, as indicated by the colored arrows next to an attack. From top to bottom, the first (yellow-orange) arrow indicates you get those lines with one boost, the second (orange) arrow indicates you get those lines with two boosts, and the final (red-orange) arrow indicates you get those lines with three boosts. These are all additive - so if you boost three times (thus spending 3 Spirit Power), you will always get all lines of an attack.
The community often refers to how many lines an attack gets with boosts via a numbering system of x-x-x, for first, second, and third boost. For example, a 3-1-1 attack would give you access to the first four lines with 1 boost, and then the fifth and sixth lines would cost 2 and 3 boosts respectively. A 1-1-3 attack, by comparison, would give you the first two lines at 1 boost, the third line at 2 boosts, and the remaining three lines at 3 boosts.
The damage an attack does generally, but does not always, increase with higher levels of boost required. So 1-1-3 attacks are typically much stronger than 3-1-1, at the cost of needing 3 boosts to do their damage.
Bullet Tags

Every bullet can have one of several ‘tags’ attached to it, which you can check by tapping on the bullet ingame, or checking here on gamepress. These come in three categories: type, special property, and killer.
Type is simply a tag that marks what ‘type’ of bullet it is - this does nothing by itself, but Story Cards, certain skills, and passives can either raise or lower the amount of damage specific types can do. The bullet types are: Ofuda, Normal, Energy, Body, Liquid, Light, Laser, Sharp, Heavy, Missile, and Slash.
Special properties affect the bullet in some way, and are covered in more depth in the glossary. These include Hard, Slicing, Sure-Hit, Absorb, Rebound, and more.
Killer, also known as Anti. Any attack line with “Effective against X” simply means that attack will always result in a Critical Hit if the opponent has that designation. So for example, a “Effective against humans” attack line would always crit against, say, Reimu Hakurei.
Damage Calculation
Damage is calculated as follows (with thanks to smk#4679 on discord!):
Hit Damage = (Total Attack × Attacker Level × Shot Power × Shot Buffs× Critical Hit Modifier × Danmaku Level Modifer × Random Multiplier) / (Target Defense × Trait Resistances × Targeting Resistance)
Total Attack is based on the attacking unit’s stats; it is always composed of the unit’s attack and modifiers that apply to the stat, but may include a certain % of defense if Hard is a property, and/or a certain % of speed if Slicing is a property,
Shot Buffs are conditions that buff a shot based on properties such as element and bullet type, usually gained from Story Cards,
Critical Hit Modifier is a multiplier to a hit that applies if it is determined to be a Critical Hit. This may vary depending on the attacker’s Crit Atk and the target’s Crit Def,
Danmaku Level Modifier is a multiplier to a hit which is based off the level of the shot/spellcard. Spell Card level is raised by Awakening a unit, Basic Shot level rises with total Spirit Power
Random Multiplier is a multiplier that applies to every hit and adds a level of randomness to damage, which can be anywhere from 0.336x to 0.4x
Target Defense is based on the target’s stats, composed of the defense stat and modifiers that apply to the stat
Trait Resistances are conditions that decrease the damage of an incoming hit based off its element, bullet type or whether the attacker is of a certain species,
Targeting Resistance is the resistance/vulnerability to Solo/All attacks.
Barriers and Barrier Breaks
For players, every unit has a total of 5 maximum Barriers, but can only use the first 4 for Grazing. Every time a unit Grazes, they will be completely immune to the next enemy attack, regardless of how many hits it consists of. This immunity also carries over to any other effects of the attack. Barriers can only be recovered by attacks, skills, and passives which specifically restore barriers, they do not recover with time.
For enemies, instead they simply have a static number of barriers that they never use. Instead, these barriers exist to apply Barrier Status upon, or to Break. Enemies can also restore barriers via their skills, though this is on an enemy by enemy basis.
Barrier Status (aka barrier anomalies) work the same for both players and enemies. One barrier Status can be applied per existing barrier, and all of them have individual turn durations. They also have various effects, which will be covered in the next section.
Barriers can be broken, either by attacks that specifically Break Barriers with Status, or by Elemental Attacks the target is weak to. A broken Barrier is simply deleted - it can still be recovered as normal. Attacks will first check for Barrier Status Breaks, immediately break all relevant Barriers if even one hit belonging to a line with the Barrier Status Break connects, and then Elemental Breaks happen - only one Elemental Break can happen per attack line, and at least one of the hits in that line need to connect to Break a Barrier.
So, for example, let’s say I have a unit with a Spell Card that has 4 lines: the first 3 are all tagged with Fire, all have 3 hits, and the first is tagged with “Breaks barriers with Barrier Status: Blind” against a foe with 6 Barriers, 2 of which are inflicted with Blind. First, the game sees my first line Breaks Blind Barriers, and those 2 Barriers are broken. Then, two hits of the first line connect, resulting in 1 fire Break. 0 hits of the next line connect, resulting in 0 Breaks. Lastly, one hit of the third line connects, resulting in 1 more fire Break. In total, I broke 4 Barriers, and the enemy is left with 2.
If a unit is brought down to 0 barriers, they are counted as Fully Broken. A Fully Broken unit is stunned for 2 turns, and both of their Yang and Yin DEF are reduced to a fourth of their original values. Once a unit is Fully Broken, all buffs and debuffs are removed. During a Full Break all DEF (de)buffs are nullified - CRIT and EVA (de)buffs still work as normal.
Barrier Status

There are five different statuses that Barriers can be inflicted with: Burn, Blind, Paralyze, Freeze, and Poison. Their effects are as follows (n is treated as the number of that Status applied to the unit):
Burn: The unit will lose 1.4*n% of their Max HP at turn start, which cannot reduce HP below 1. Their Yin ATK and Yin DEF are also multiplied by 0.875^n
Blind: The unit’s accuracy is multiplied by 0.8^n.
Paralyze: The unit has a (unknown) chance to be stunned at turn start. Their dodge is also multiplied by 0.8^n.
Freeze: The unit has a (unknown) chance to be inflicted with Delay. Their AGI is also multiplied by 0.875^n.
Poison: The unit will lose 1.4*n% of their Max HP at turn start, which cannot reduce HP below 1. Their Yang ATK and Yang DEF are also multiplied by 0.875^n.
All effects are multiplicative with buffs/debuffs. All Barrier Status have separate durations. Additionally, the turn duration persists if you switch the inflicted unit to the rear guard. A unit cannot be applied with Barrier Status if they do not have a Barrier to apply Status onto.
Buffs and Debuffs

Levels of buffs and debuffs operate in additive fashion. If you give a unit 3 Levels of Yang ATK Up, and then 2 Levels of Yang ATK Down, the unit will be left with (3 - 2) = 1 Level of Yang ATK Up.
Buff and debuff durations apply in a somewhat odd fashion. Whenever a Level, be it Up or Down, is applied to a unit, the game checks the new (de)buff’s duration compared to the current duration on the unit. If it’s higher, that duration overrides the current duration - if it’s lower or the same, the duration is simply ignored.
All buffs and debuffs are removed from a unit upon the start of a new wave, irregardless of remaining duration.
Attack and Defense buffs both multiply their respective stat by 1.3x per Level above 0, and by (1 / 1 + 0.3n), where n is the number of Levels up, per Level below 0. At 10 Levels of ATK or DEF Up, the stat will be multiplied by 4x. At 10 Levels of ATK or DEF Down, the stat will be multiplied by 0.25x.
As a result of this, buffs have diminishing returns, as the more Levels of ATK Up a unit already has, the less that subsequent Levels will be worth relatively.
As an additional note, ATK Up and DEF Down are extremely powerful when combined as they wind up multiplying one another, due to the fact that the damage formula boils down to Attack being divided by Defense. A mere 2 Levels of ATK Up combined with 2 Levels of DEF Down makes for 2.56x damage (1.6 / (1 / 1.6)), and 10 Levels of ATK Up combined with 10 Levels of DEF Down makes for 16x damage (4.0 / (1 / 4.0))!
Accuracy buffs will be covered in the next section as they are somewhat convoluted.
Accuracy and Evasion

Accuracy and evasion both follow the same general rules as other buffs and debuffs - additional Levels are additive, and highest duration overrides. Where things get odd is that accuracy and evasion are both, effectively, added together on the same side: Accuracy Up is added with Evasion Down, and Evasion Up is added with Accuracy Down. So if you had a unit, for example, attacking with 3 Levels of Accuracy Up against an enemy with 2 Levels of Evasion Down, that unit would effectively have 5 Levels of Accuracy Up.
The way accuracy works is that, if total Levels of Accuracy Up are positive, the attack has its base accuracy multiplied by 1.2 per Level. If they are negative, instead the attack has its base accuracy divided by 1.2 per level. Note that these are increases to the base value - so it takes far fewer Levels of Accuracy Up to make a 75% accurate bullet become 100% as opposed to, say, a 50% accurate bullet.
Every hit of an attack checks its accuracy separately, and its base accuracy is determined by the line it belongs to.
Critical Hits
A Critical Hit is a chance to deal, at base, 2x the damage of an attack. Every attack line rolls its Critical Hit chance separately. Buffs to Critical Hit DMG are a 1.3x additive increase to the modifier - so 1 Level of Crit DMG Up is 2.3x, and 10 Levels is 5x. Crit DMG down works by multiplying the modifier by 1 + (1/1+0.3(n)), where n is the # of levels. In other words, 1 Level of Crit DMG Down is 1.77x, and 10 are 1.25x.
Levels of Crit DMG Up and Crit DMG Down are additive together, like other buffs.
Crit Accuracy and Evasion works exactly like Accuracy and Evasion, only multiplying the base Critical Hit chance instead. However, since most attacks have only a base 5 to 10% chance to Critically Hit, and Crit Accuracy is still subject to the 10 total Levels rule like Accuracy, you won't find much use in Crit Accuracy for most units.
Every hit checks its Critical Hit chance separately, and the base Critical Hit chance depends on what line the hit belongs to.
Killer attacks are treated as if the Critical Hit chance were 100%, and otherwise behave exactly the same as a normal Critical Hit.
Weakness and Resistance
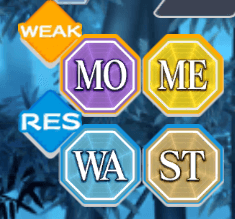
If an enemy takes a hit that’s tagged with an Element they resist, they take 0.5x damage. If a unit takes a hit that’s tagged with a Element they are weak to, they take 2x damage and lose a Barrier (as described in the Barrier section).
There are also specific conditions which apply a resistance to damage of a certain type, which stack additively, up to 100%, at which point an attack will do no damage.
There are also “All and Solo” Attack Resistance buffs that only enemies get. These effectively lower the damage taken by the named type, but additionally boost the damage taken by the other type. For the lowering component, damage is divided by (1 + 0.3n), where n is the number of Levels. For the raising component, the damage is instead multiplied by (1 + 0.3n), where n is the number of Levels.
Agility and Turn Priority
LostWord uses a turn priority order to determine who goes first. First of all, the game splits units into three speed “brackets.” Last Words will always move first, and then Spell Cards, and then Basic Shots. Next, the game checks for Quick and Charge: Units with Quick will always move first within that speed backet, and units with Charge will always move last within that speed bracket. So even if a unit has Quick, if they’re using a Basic Shot they won’t go before a Last Word, and even a unit with Charge will move before a Basic Shot if they’re using a Last Word. Lastly, the game checks Agility, with the highest Agility within the speed bracket moving first.
Delay acts somewhat oddly, in that it simply causes a unit to move as if you were two speed brackets slower. So if a unit was using a Last Word, they will only outspeed other Basic Shots, and if a unit was using a Spell Card or Basic Shot, they’ll be outsped by anyone except other Delayed units.
Focus
A stat available only from buffs and debuffs. Any unit with at least 1 Level of Focus Up will be more likely to be targeted by an enemy attack - likewise, at least 1 Level of Focus Down will make them less likely to be targeted. The exact modifications to the chance to be targeted are currently unknown.
As of 12/17, Focus has been reworked to include an additional feature regarding All-target attacks. Damage is redistributed based on the Focus levels of each character with the basis that a character with Focus UP takes more damage from All-target attacks while the rest of the party takes less damage, while a character with Focus DOWN does the opposite: take less damage while passing more damage onto the rest of the party. The values of distribution are likewise unknown, though note that a lower amount of teammates means the damage will be divided up less due to being spread over 1-2 characters instead of 3.
In addition, unlike other buffs or debuffs, Focus UP/DOWN remain on a character once they are in the Full Break state. This can potentially put a Friend with Focus UP in even more danger if they are fully broken, as the increased damage from Focus UP will still apply.
Switch Links and Friendship Bonus

Every unit has a “switch link” effect, which does whatever’s listed on their character page - this can range from generating Spirit Power, to recovering Barriers, and more.
Additionally, every unit has a hidden “Friendship Bonus” when switching with certain units, which are usually based on canon friendships and relationships. These friendship bonuses have a chance to occur based on the unit switching’s friendship level, and increase the effect of the buff.
Morale
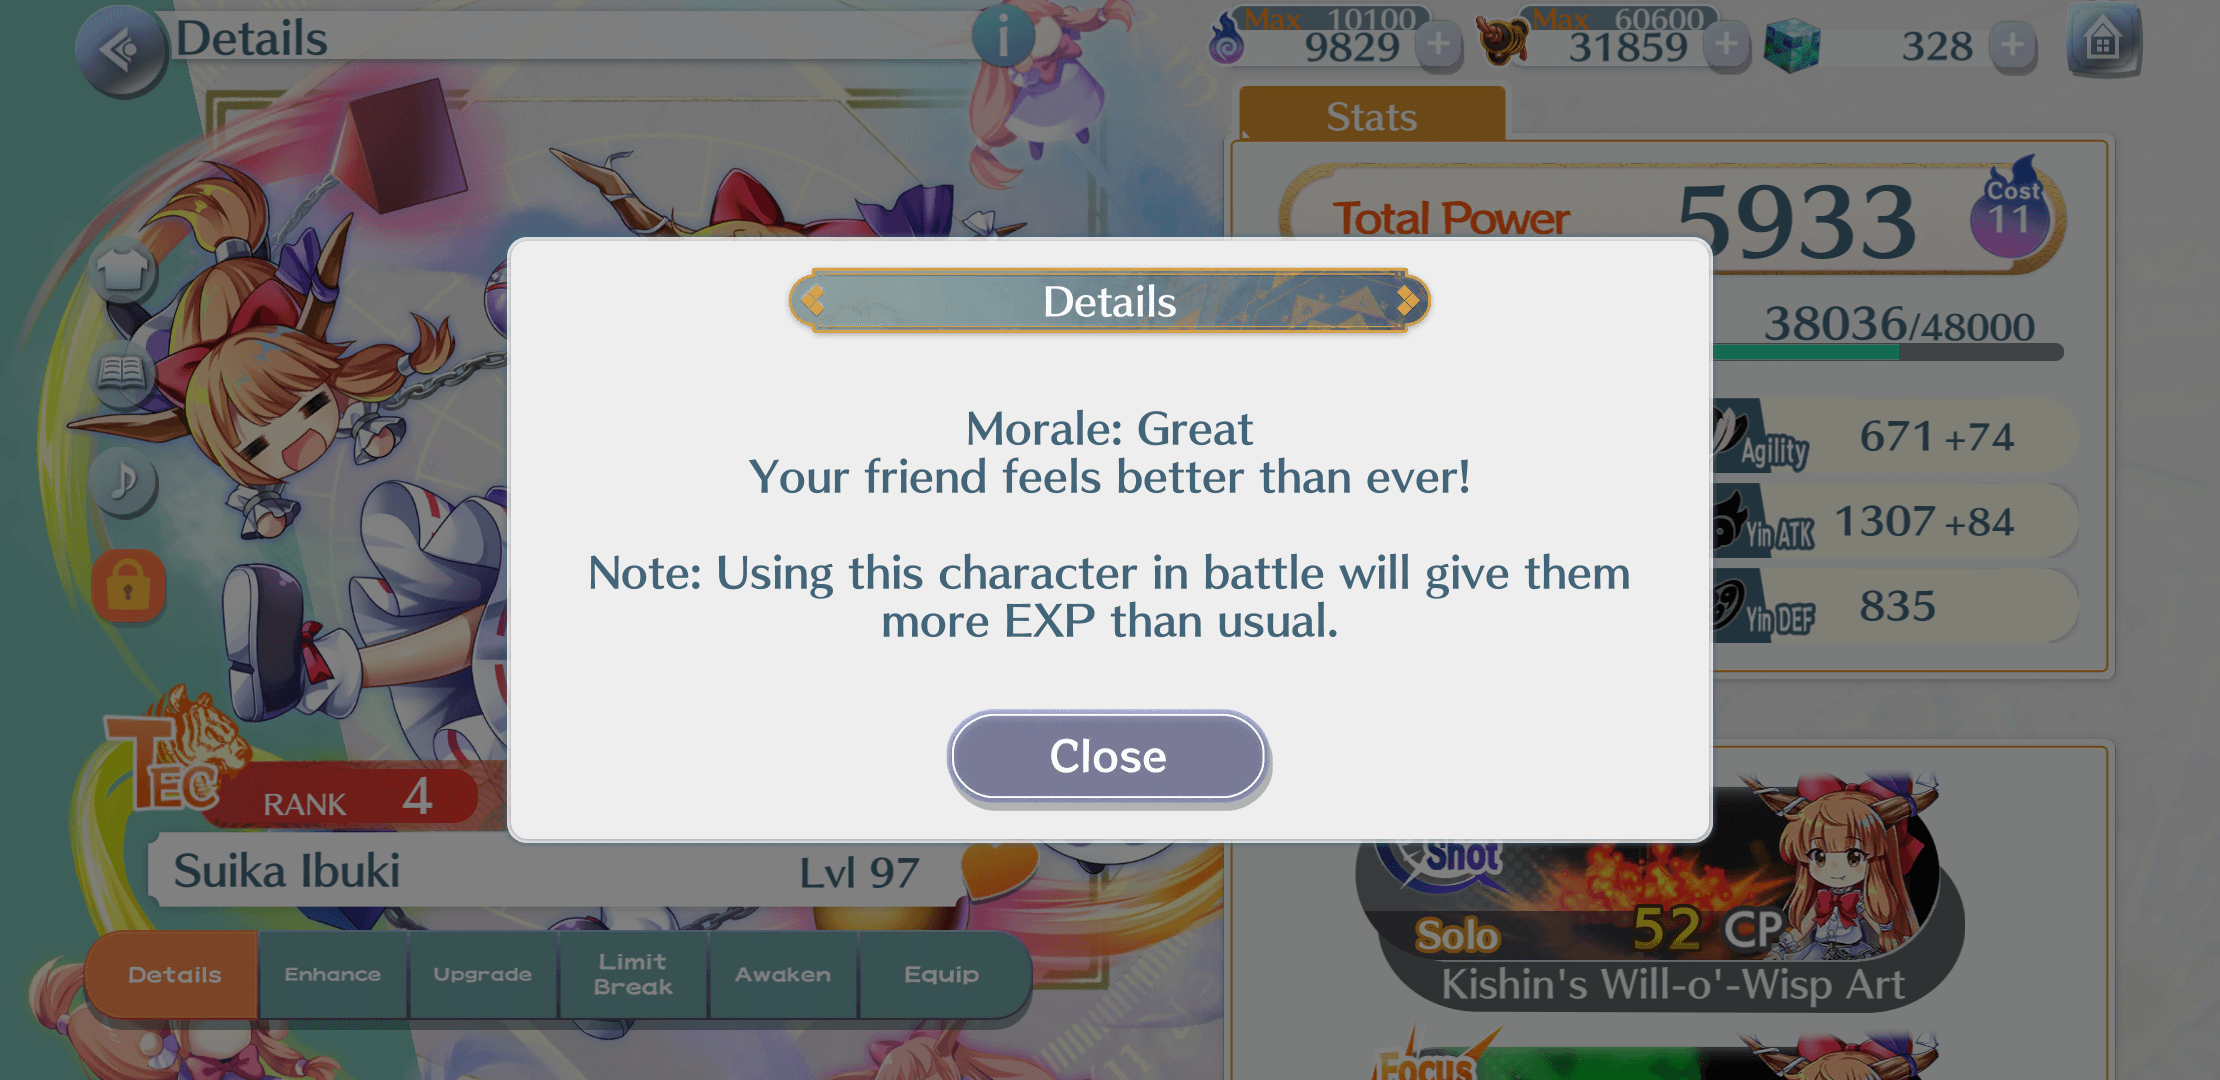
Units have a "morale value," which is measured as follows, based on the icon on their status screen: Overworked (Double Sweat, 0) > Tired (Single Sweat, 1-15) > Energetic (Single Sparkle, 16-60) > Tip-top Shape (Double Sparkle, 61-75).
Morale is capped out at 75 points for units in school, and 60 for those outside of it. Morale is gained at a rate of 1 point per 6 minutes, or 2 points for units in school. It takes a unit in school 3 hours and 48 minutes to hit max morale, and a unit outside of it 6 hours.
Morale is lost at a rate of 1 point per battle, with an additional 5 points lost if a unit is knocked out. Retreating from a fight will nullify any morale loss. Units in Tip-top Shape will gain 1.2x EXP. Units who are Overworked will gain 0.5x EXP. Units will gain friendship at the end of a battle if their morale is Tired or higher, but will lose friendship if they are Overworked.
Make sure never to fight with a unit if they're Overworked, as Friendship provides powerful stat bonuses!
Friendship

Units have an "friendship value," which is measured as follows, based on the color of the heart on their status screen: So-so (Purple) > Acquaintance (Blue) > Friend (Green) > Close Friend (Orange) > Best Friend (Pink). Newly acquired units start out at Acquaintance friendship.
Units will gain friendship at the end of a battle if their morale is Tired or higher, but will lose friendship if they are Overworked.
Units can gain friendship by tapping on the hearts which appear over them in school. Additionally, the unit you set as your favorite (the one who appears on your homescreen) will gain friendship over time.
School and homescreen friendship will only raise a unit to about roughly halfway through Close Friend. Best Friend status can only be achieved by battle friendship. The best bonds are those forged in the fires of battle!
High friendship gives additional stats to a unit: approximately +3% at Friend, +6% at Close Friend, and +9% at Best Friend to all stats. This can really make the difference!
Whilst Friendship doesn't take a particularly long time to max out, it is very quickly lost and can be a pain to build back up again, so take care not to send your units out if they have Overworked morale!
Combat Power
Combat Power is a somewhat misleading stat that, due to using separate calculations from damage calculation, will never fully accurately tell you how much damage a unit will do. It's for the best to just ignore it.
Gauges
Some challenging content may feature enemies with multiple health bars, known as Gauges.
Beginning from Chapter 3 Act 2, players will start encountering enemies that have more than one health bar. These are known as Gauges, and need to be broken in order to bring the fight to the next phase. More than one enemy may come with a Gauge, and enemies can have up to three Gauges total in a single battle, identified by the Red and Yellow dots that appear next to their health bar. Gauges act as a stopgap, preventing you from doing any further damage once you reduce a Gauge to zero. This effectively shields the enemy from any further damage, allowing them additional turns to fight back. Reduce an enemy's Gauge to zero is known as a Gauge Break.
Gauge Breaking an enemy may also result in additional effects being applied. These generally serve as buffs to your opponents, with a wide range of effects ranging from simple stat boosts, to Element Resistance and the application of Anomalies. Gauge Breaking may also result in your team suffering from Seals.
Extra Attack
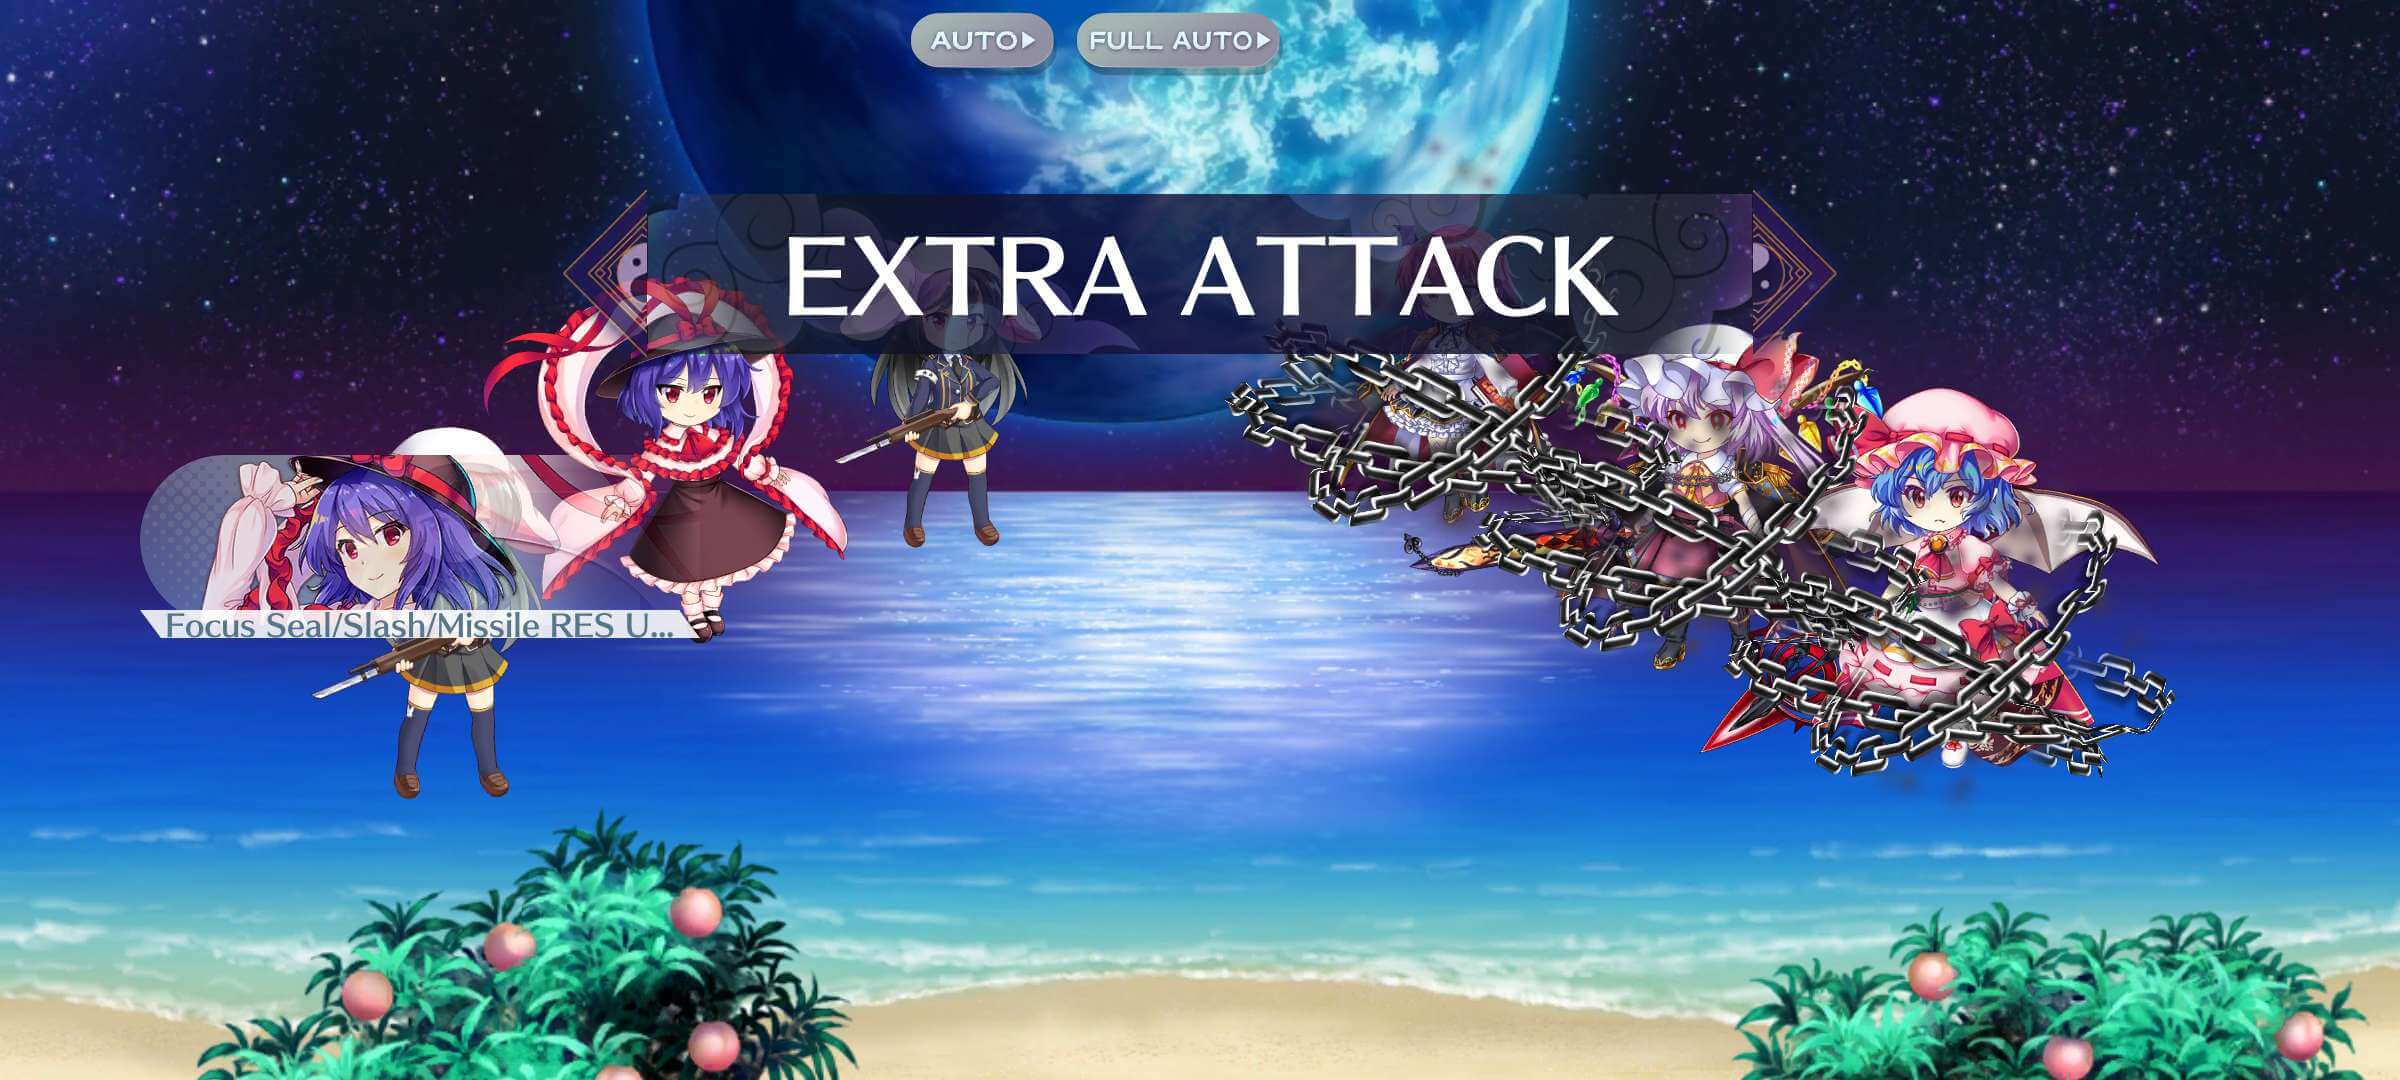
Extra Attacks can seal your team's abilities.
Also known as a Seal, these effects lock away one of your abilities, preventing you from using them. These effects occur either at the start of an enemy wave, or after an enemy has been Gauge Burst.
The list of functions that can be Sealed include:
- Spread Shots
- Focus Shots
- Graze
- Boost
- Skill
- Spell Card
- Switch
Additionally, more than one function can be Sealed at a time. This occurs most frequently when multiple enemies are Gauge Burst, resulting in all their Extra Attacks coming into play next turn. To lift a Seal, players will need to either wait out the prerequisite number of turns, or apply effects that lift Seals. Several powerful Friends carry this effect, either through their Passives or as a Skill. The most prominent of these Friends are listed below:


An example of Focus Shot being Sealed.
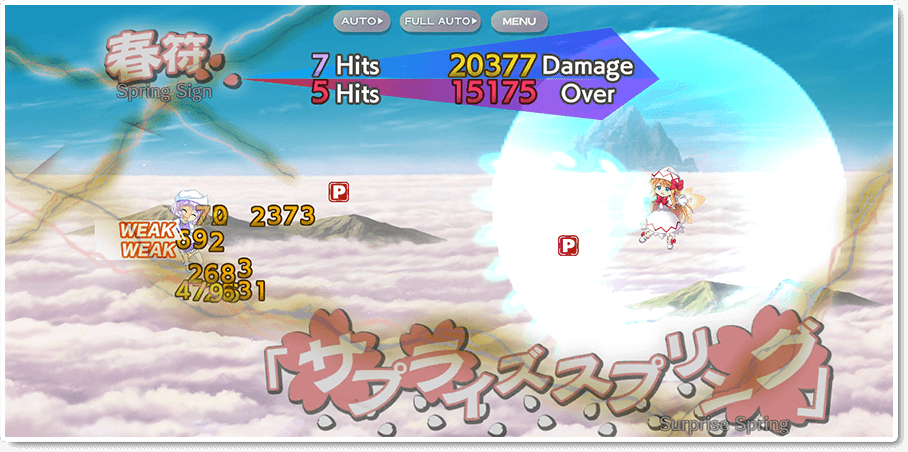
Overdamage
A classic scene of Spring triumphing over Winter. Colourized.
Overdamage was introduced to Touhou Lost Word on November 11, 2022 as part of the 1.5 Anniversary Celebration.
This mechanic rewards players for overzealously punishing their enemies with some nifty bonuses. To activate Overdamage, all targeted enemies must be Gauge Burst. This means that any AoE targeting attacks looking to benefit will have to be on a fully broken enemy team. Any attacks that fulfil this requirement will have their excess Hits and Damage shown underneath the usual Damage counter. If this attack is a Spell Card, that Spell Card is refunded to the Friend. This includes all-powerful Last Words, opening up options players have to strategize around challenge content.
Additionally, Spirit P generated during Overdamage is provided at an accelerated rate. This makes Overdamage a great way to build momentum for your next big hit!
That Spell Card will come in handy for her next Gauge.