
Castlevania: Grimoire of Souls New Player Guide
- Castlevania: Grimoire of Souls isn't the most complicated game; however, it’s full of mildly confusing mechanics
- This guide focuses mainly on how to navigate the various menus and general basics of the game
- Next time, we’ll look at more advanced mechanics and how to optimize your resources and stats

Installing the Game
Installing the game is a little tricky, at the moment, because it’s currently only available in Canada. What this means for a lot of Android users is it’s as simple as downloading the Grimoire of Souls APK off of a website (or something like QooApp) or switching their address in the Play Store to a Canadian one.
For iOS users it’s still pretty easy, but affects your Apple ID as a whole. Like with the Google Play Store, you need to change your address to a Canadian one. So, how is this done?
For Android, changing your country in Google Play is really straightforward. Press the top right options menu, go to your account, and under “Country and Profiles”, you can change it to Canada. Of course, if you’d rather not go through that hassle, searching Grimoire of Souls APK will quickly bring you to a site with it, such as apkpure. Be careful, of course, as these can harm your phone if you’re downloading from a less than reputable site.
For iOS, it’s not much harder. First, you want to sign out of your Apple ID at the bottom of the screen. Next, you launch Settings from the Home Screen, go to General, Language & Region, Region, and finally select Canada.
Home Screen
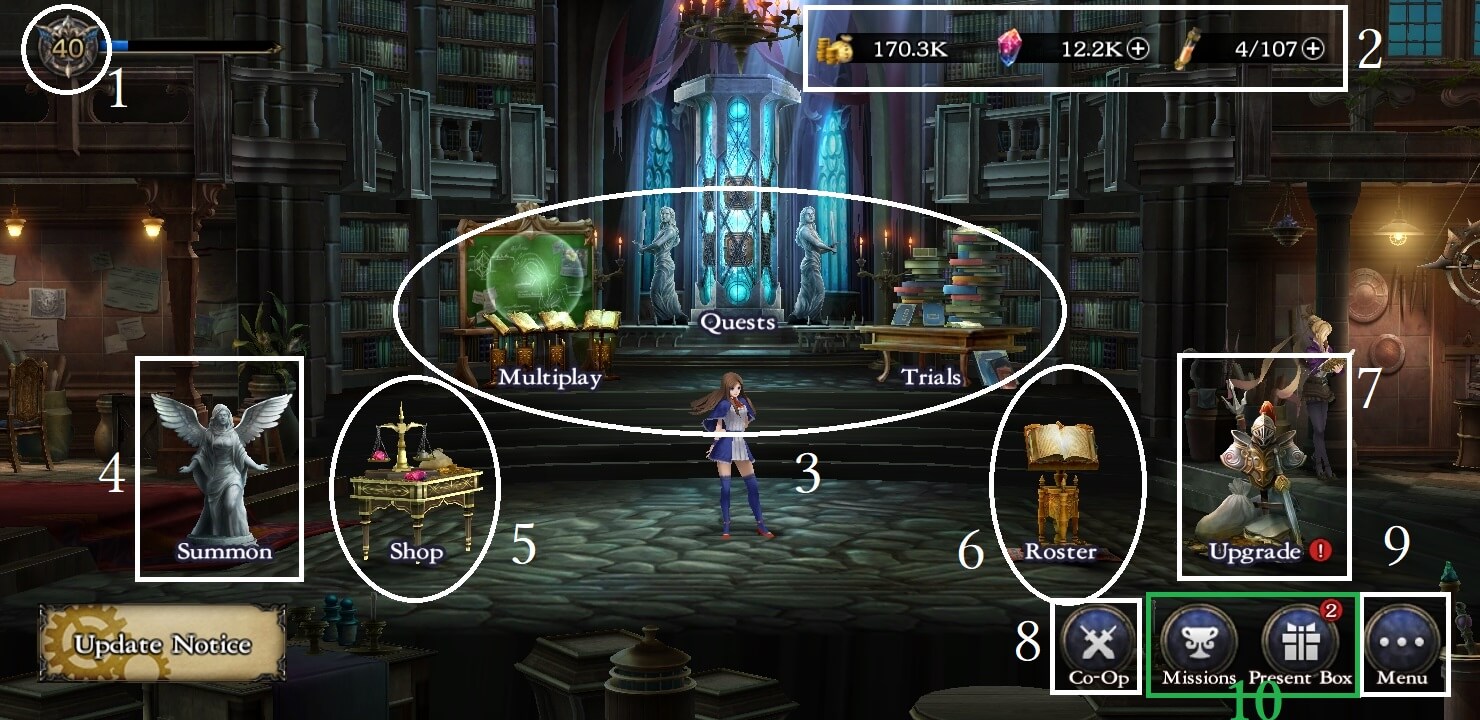
| 1. Your Rank | This determines your maximum Ether and maximum gear level. |
|---|---|
| 2. Your Resources | From left to right: Gold, Gems, Ether. Gold and Gems are used to buy gear, costumes, and other useful items. Ether is used for playing missions, usually 5 or 10 per. |
| 3. Game Modes | From left to right: Bounty Hunt, Story, and Daily Challenges. |
| 4. Summon | You can use Gems or Parchments here to summon Weapons, Sub Weapons, or Armor. |
| 5. Shop | You can use Gold or Parchments to purchase useful gear, costumes, and other useful items. |
| 6. Roster | This is where you go to outfit your Character and view their stats. |
| 7. Upgrade | This is where you go to upgrade Characters and Equipment to make them stronger. |
| 8. Co-Op | This is another game mode. This lets you use join other players using either an invite sent to you or their room number. |
| 9. Rewards | Missions and the Present Box gives you items based on logging in or by fulfilling certain requirements. |
| 10. Menu | The Menu lets you check your profile, friends, items, and achievements, Information (game/server updates), Inquiry (FAQ), Terms (legal and EULA mumbo jumbo), and Help (an in-game new player guide). It also allows you to modify game settings, language, and clear your cache. |
Game Modes
Quests are the game's main story mode.
-
Quests are designed for quickly making you more powerful. For every new Quest finished, you’re awarded a lot more Rank Experience than usual, and everytime you rank up, you get a higher maximum Ether and you’re given Ether equal to your max (this can put your current Ether over your maximum).
-
As you play Quests, you’ll get a lot of materials for upgrading and enhancing equipment, parchments for forging equipment, and brand new characters!
-
Additionally, as you reach certain Ranks, you’ll unlock new game modes and equipment slots. The equipment slots especially are incredibly useful for quickly gaining power.
-
Finally, I mentioned you unlock brand new characters! That’s right, as you progress through the story, you get characters for free. This is very different from most gacha games, and a very refreshing take in my opinion.
As you play through Quests and raise your Rank, you’ll unlock Trials.
- Trials are very useful daily challenges that give you materials for upgrading equipment, character experience, and gold. If you reach S Rank for that tier of Trial, then you’ll be able to skip it from them on.
- Rewards are based on your max Rank, so achieving higher points after S Rank isn’t necessary.
Multiplay is a slightly strange variant of PvP.
-
Each player is spawned in a corner of the castle and gains points based on how many monsters and bosses they kill.
-
This is a very important mode because it gives you Gems and Bounty Coins. Bounty Hunt Coins can be used to buy extremely good items like 5* Weapons, Record Fragments, Stamps, and Costumes. Be sure to check this mode out when you can!
Finally, the bottom right corner of the Roster screen hides a very handy game mode: Practice Mode!
- This one is fantastic for testing your damage with various abilities and equipment, practicing your combos, and getting used to the properties/range of new Weapon Skills.
- In the top right, you can click the cog to change the enemy between Grounded and Flying and quit out of Practice Mode.
The Combat Screen
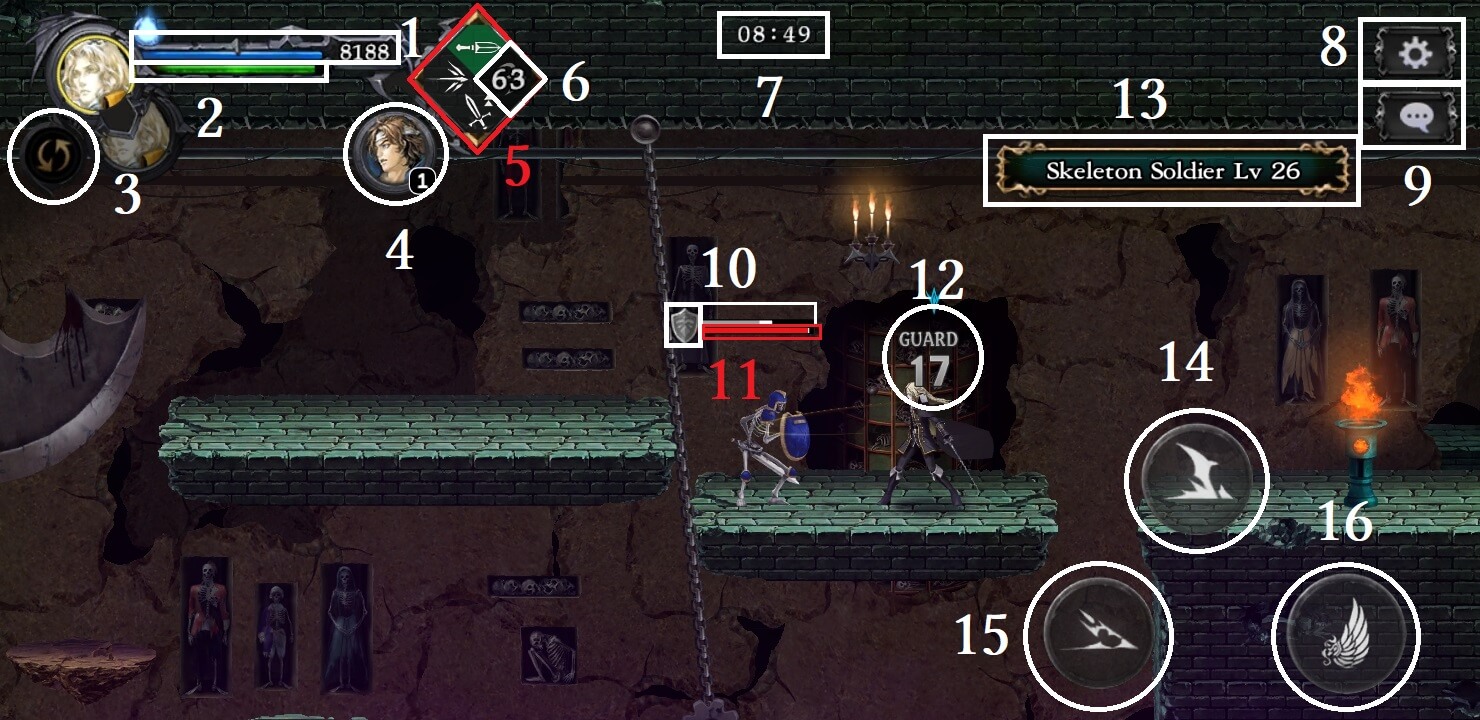
| 1. Health Pool | When this is reduced to 0, you die. The number on the right end of the bar is how much HP you have represented numerically. |
|---|---|
| 2. Mana Pool | Unique Actions and Sub Weapons consume Mana. |
| 3. Swap Character | This button swaps to your Quest Supporter for a limited time. |
| 4. Alter Art | This button casts your Alter Art, a powerful screen wide attack that also makes you stronger. You cannot be hurt during it. |
| 5. Weapon Skills and Sub Weapons | Your three Weapon Skills; the green one is your Sub Weapon. Swipe in that direction on the right side of your screen to use the Skill or up for your Sub Weapon. |
| 6. Cooldown | This Weapon Skill is on cooldown, the number is in seconds. (so 63 seconds until I can use it again) |
| 7. Timer | This is the remaining time in the Quest. When this reaches 0, you lose. |
| 8. Options | Click this to pause your game and see the Quest Options. |
| 9. Chat | Click this to open the Stamps menu for communicating to a partner. |
| 10. Guard Meter | This is the enemy’s remaining Guard Meter. Once depleted, their Guard is broken, putting them in a staggered animation. |
| 11. Enemy HP | Once this is reduced to zero, the enemy is vanquished. |
| 12. Damage | How much damage you’ve dealt. Orange means Critical Hit, Colored means Elemental Damage, White means Normal Damage, and Gray means it was guarded (but the number is still how much HP damage you dealt to them through their guard) |
| 13. Enemy Information | This includes the Enemy’s name and level. |
| 14. Unique Action | This is the Character’s equipped Unique Action. Each one has a different icon. |
| 15. Slide | Clicking this makes you slide. Holding down on the left screen and tapping the right also slides. |
| 16. Jump | Pressing this button makes your character jump. You’ll need this. |
Stats
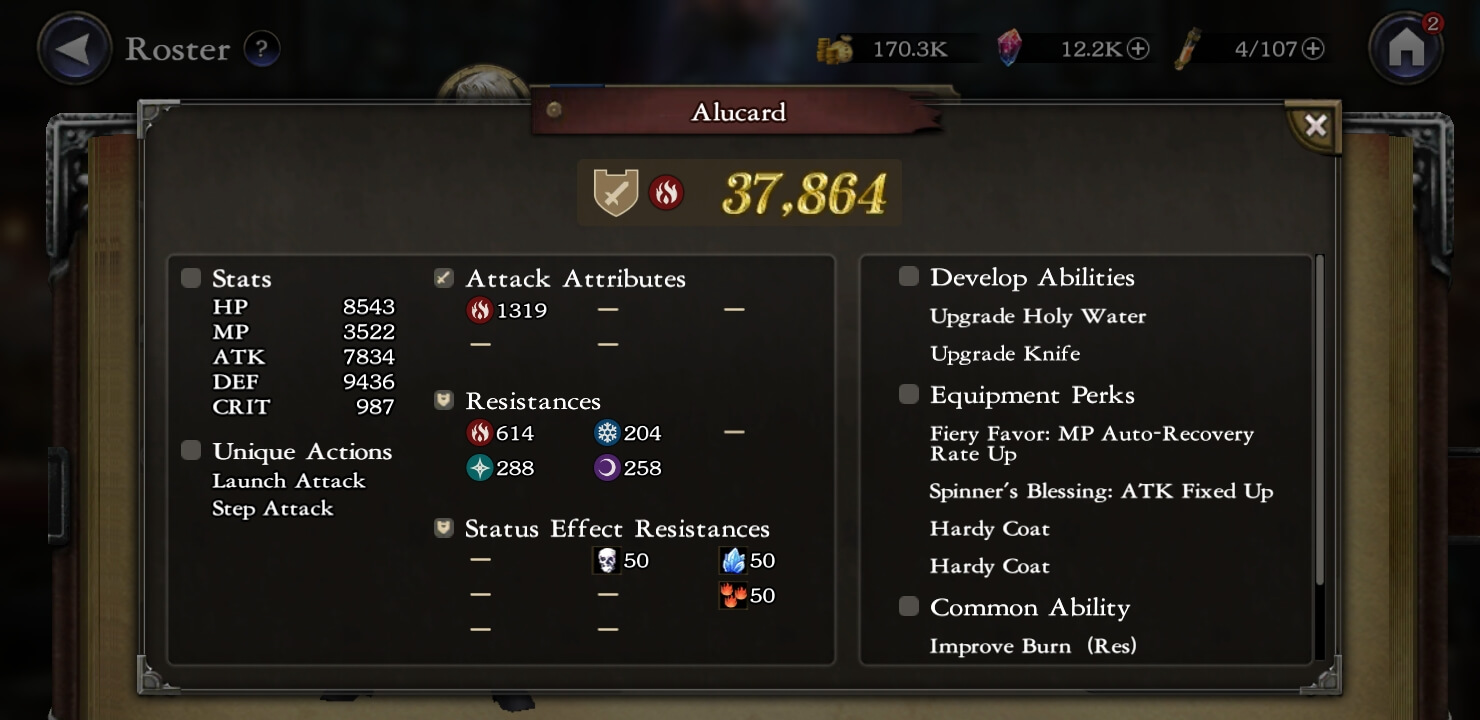
A lot of player confusion comes from how the Stats work. While the information is in the game, it’s not in the most available places.
Attack affects your damage, defense affects how much damage you take, HP is how much damage you can take before dying, and MP is consumed when using Sub Weapons.
Elemental Damage and Resistances are the first confusing part. Elemental Damage and Resistances only take effect when your Element matches the Stage Element. What that means is if the Stage is marked as Fire, you also need Fire as your Main Weapon to add Elemental Damage and a Fire Main Armor to add Elemental Resistances. Finally, Critical affects how often you deal extra damage, but Critical Hits always deal 50% more damage.
Weapons
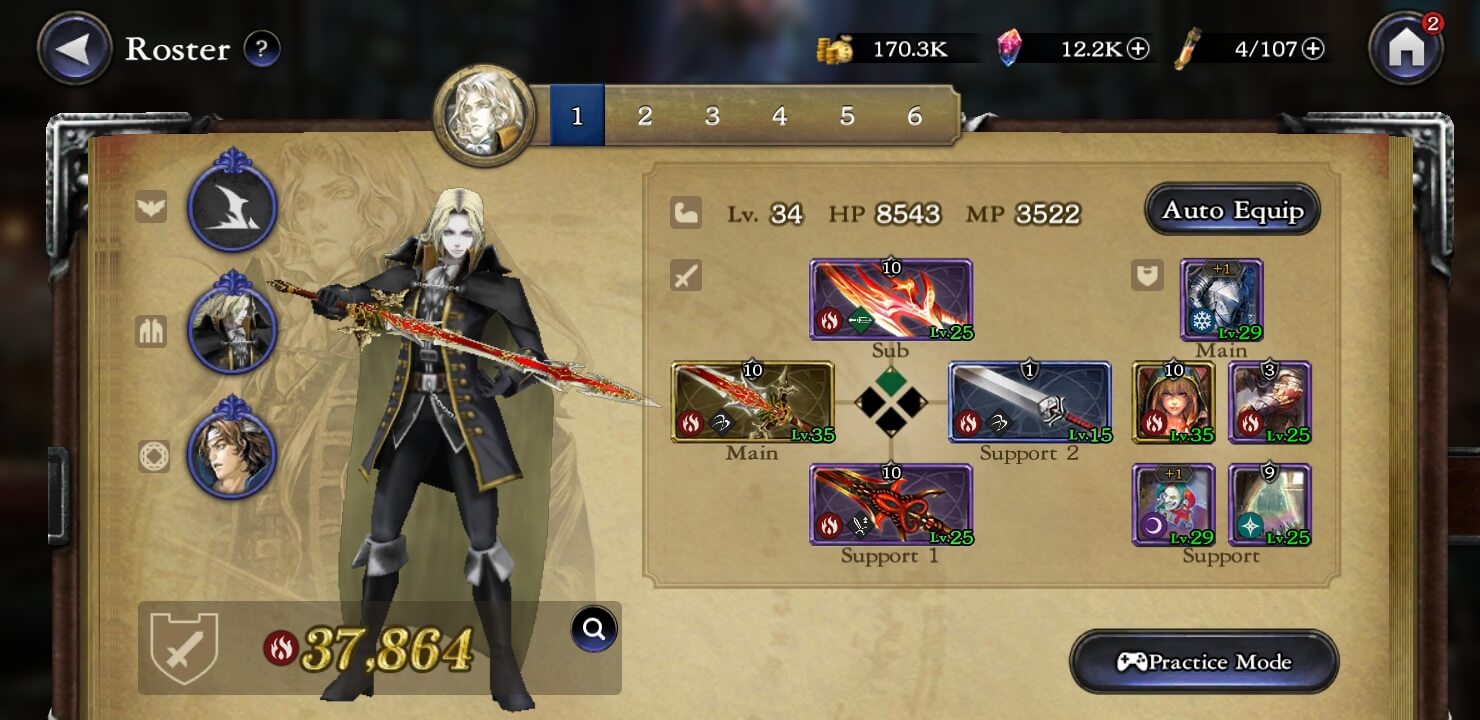
The Equipment system and its finer mechanics aren't immediately understandable. If anything, most of the depth in the game comes from here. Equipment determines most of your passives, skills, and stats. You get three Weapons, five Armors, and one Sub Weapon.
Your Main Weapon is one of your most important equips. It’s the only Weapon which can activate its powerful Equipment Perk. An Equipment Perk is a passive listed within a red box. These passives only activate when you meet the conditions, which you can check by tapping it in the Weapon Information screen.
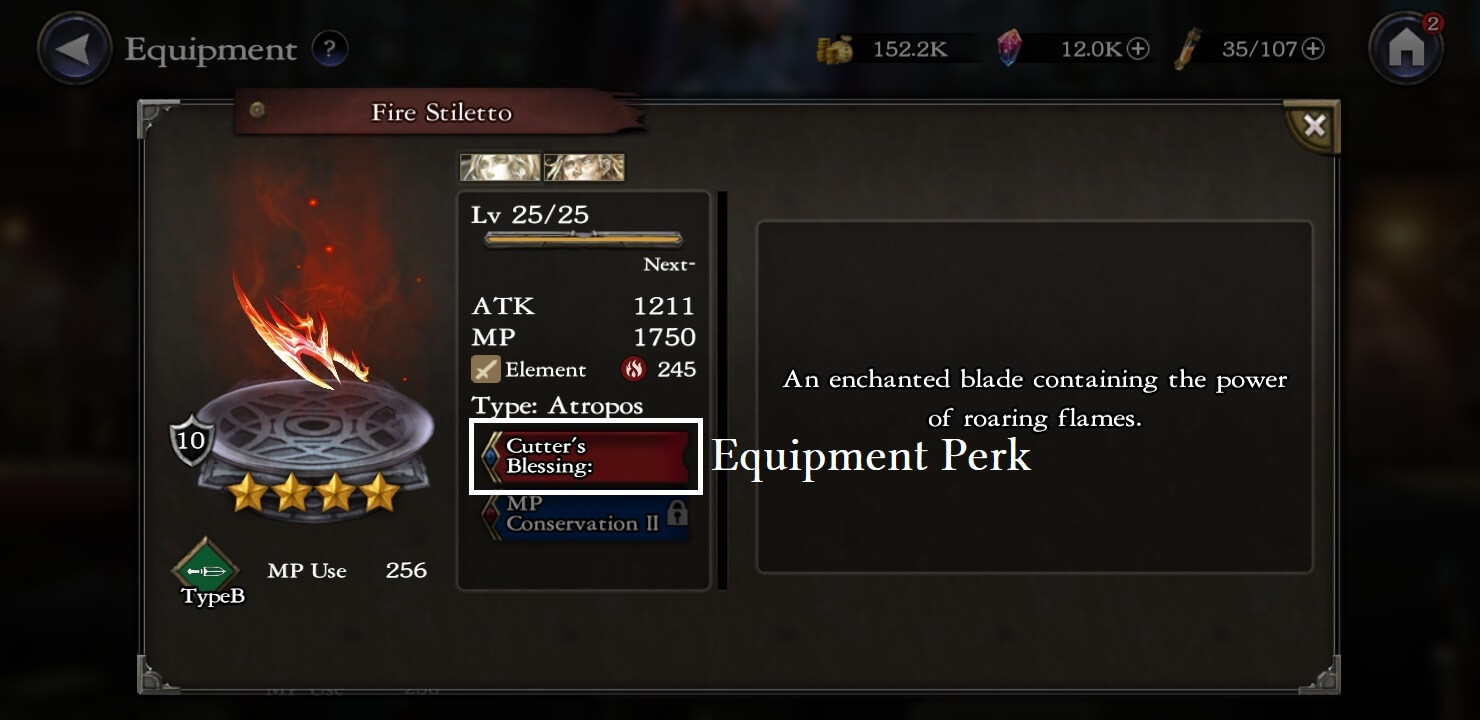
Additionally, all Weapons (Main and Supports) determine three stats for you: Attack, Elemental, and Critical. Attack is upgraded by increasing the level of the Weapons, however the Elemental Damage and Critical are only increased by Enchanting your Weapon. Additionally, Enchanting increases the level of your Weapon Skill, increasing its damage and effects.
Sub Weapons
Sub Weapons are a lot more straightforward. They also affect three stats: Attack, Elemental, and MP, and they have their own Equipment Perk. Just like with Weapons, Attack is increased by leveling and Elemental Damage and your MP Pool are increased with Enchanting. Just to clarify, this increases your maximum MP, NOT the MP Cost of the Sub Weapon. Each Character can equip two categories of Sub Weapons, which is shared between one other Character. Additionally, every Sub Weapon has two forms, called Types.
Sub Weapon Types and What They Do
| Dagger Type A | Throws two Daggers forward; great damage. |
|---|---|
| Dagger Type B | Throws two homing Daggers; good damage. |
| Axe Type A | Throws an arcing Axe; good damage. |
| Axe Type B | Throws an Axe that hangs a certain distance away; fantastic damage when used right. |
| Holy Water Type A | Creates a continuously damaging pool; good damage. |
| Holy Water Type B | Surrounds self in a mist of continuous damage; great damage. Does not move with you. |
| Cross Type A | Throws a boomerang projectile; good damage. |
| Cross Type B | Creates a pillar of continuous damage around you; fantastic damage. |
| Cat Type A | Throws a cat which runs along the floor; dealing good damage or great damage. |
| Cat Type B | Sets down a sleepy cat which attacks any foe that gets too close; good damage. |
| Gun Type A | Fires a gun with wildly different shot types depending on the particular Sub Weapon; high MP cost, bad or good damage. |
| Gun Type B | Fires an arcing cannonball which explodes on impact. Fantastic against mobs and great damage for high MP cost. |
Armors
Finally, we have arguably the most important Equipment type: Armors! So, Armors are the most important Equipment type, in my opinion, because it carries over between ALL characters. Currently, Simon’s Headband and (Maria’s) The Four Guardians are the only Armors that don’t work with other Characters--or I should say their Equipment Perks don’t work with other Characters. That’s right, Armors also have an Equipment Perk, and just like Weapons, only the main Armor’s Perk activates. Armor affects Defense, HP, and Elemental Resistances. Just like with Weapons, Defense is increased with level, and HP and Elemental Resistances are increased with Enchantments. Again, just like with Weapons, your Elemental on your support Armors also affects your total Elemental Resistances, so equipping as much of the same Element as possible is beneficial.
How to Develop Your Account
Gacha Pulls
Most new players are a little confused on what to pull for first with their precious starting gems. After all, there’s three options and it’s easy to make a false assumption and waste them. The first thing you want is Weapons, because you’ll never beat a level if you only deal 1 damage. Fire and Holy are the main elements you want, because you need those for later, tougher bosses.
After you have your 4* Weapon, and hopefully a holy and fire Weapon of any rarity, the next thing you’ll want to pull for is Armor. You should want to get at least one 5* Armor and a full set of 4*s asides, which hopefully won’t take you many Gems because the odds are great! After you have your Weapon and your full set of Armors, you can start thinking about Sub Weapons. Although, you don’t have to. You could always go back to pulling for Weapons depending on your preference or how much you feel your character needs a Sub Weapon.
Typically, the best Sub Weapons are: Dagger Type B, Holy Water Type B, Cross Type B, Cat Type A, and Gun Type B. I should clarify that while these are the best mechanically, sometimes it’s better to equip the other types because of their Equipment Perks.
Limit Breaking
One of the best ways to increase an Equipment’s effectiveness. Limit Breaking requires you to have 100 parchments of the same Equipment you’re using it on. Example: If I want to Limit Break my Scimitar, I need 100 Scimitar Parchments. When you Limit Break a piece of Equipment, you raise its maximum Level, Enchantment Level, and advance to the next Limit Step. If the Limit Step you’re advancing to shows a passive, you’ll get that passive permanently added to it. This means a 3* that’s fully Limit Broken, with all of these bonuses considered, is stronger than a 5* base. So, we know what it does, but what about how? The most common way to collect parchments is through summoning a duplicate Equipment from the Gacha, which gives 100 parchments of the Equipment that would’ve been summoned. The next most common way is from Quests. Quests tend to give a lot of parchments, with higher rarities also being rarer. Not only do they give parchments for Equipment you may already own, they also give unique parchments that you can only get from Quests currently, so definitely take a minute to check the 5* pieces in drop tables, maybe you’ll want it!
Stage Element and Loadouts
This is a lot easier to explain. Your Main Weapon should match the Stage Element. If it does, you gain the effects of that Element’s bonuses. For instance, if you have a fire weapon and 1,000 Fire and 500 Dark and the Stage Element is Fire, you gain the effects of the 1,000 Fire. This is honestly a must for later stages, as the differences become almost insurmountable. Fear not! Not only is it fairly easy to get one of every Element through the gacha system. However, even if you get unlucky, you can still farm fort the appropriate gear from other stages, as detailed in Limit Breaking. You get six loadouts, which is exactly enough for one loadout that’s pure damage and five elemental builds. You want the pure damage loadout for missions that don’t have a Stage Element, such as Trials and Bounty Hunt.
Equipment Perk synergy
One of the most effective ways to bring your build to the next level is by appropriately utilizing your Equipment Perks. If you remember from before, Support Weapons and Support Armors provide the exact same stats as a Main Weapon or Main Armor; the only exception being for determining your Element. What that means is you could have your shiny 5* Weapon set to Support as a more synergistic Weapon is set to Main for its Equipment Perk. While Equipment Perks are extremely beneficial, do not sacrifice a fully functioning and suited build for it. What I mean by that is if you need to unequip a Weapon or Sub Weapon you love using and feel comfortable with using just to get slightly higher stats, don’t do it. Prioritize making a build you love using over the statistically best possible. For instance, all of my Alucard loadouts use Dagger Type B Sub Weapon because I’m most comfortable with that Sub Weapon.
Finally, gacha games are always more fun and easier to learn with a community, so you should drop by the Grimoire of Souls discord at https://discord.gg/sYu3WXP!
Author(s)


Comments


