CB-EX4 Normal And Challenge Mode
This guide will step through a strategy for clearing CB-EX4 that will work for both the normal and Challenge mode.
If you are looking for other Event information or Operation clear guides, see the following:

Map Information and Strategy
| Stage | Sanity | Rec. Lvl & Unlock Cond. | First Time Drops | Additional Drops | Challenge Reward |
|---|---|---|---|---|---|
| CB-EX4 | 15 |
Elite 1 Lv. 70
|

|
|
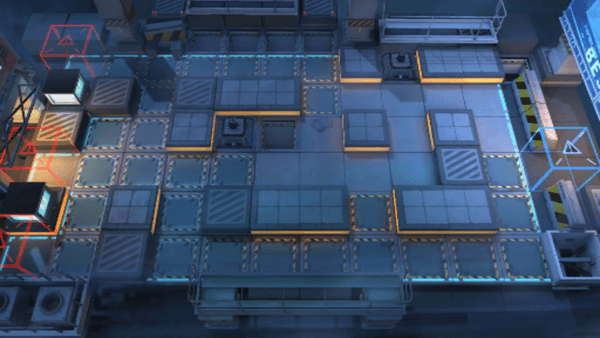
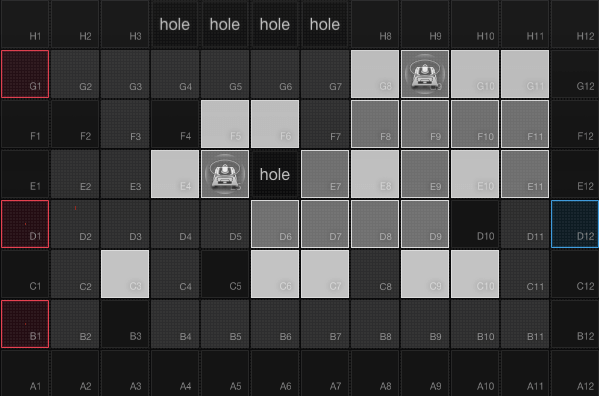
For tile reference:
Challenge Condition: Enemy Marksmen have double HP and increased attack range
This map can be pretty overwhelming for players, as there are many potential threats that can lose the map if they aren't handled properly.
Protecting The Command Terminals
- The command Terminals (at G9 and E5) must survive.
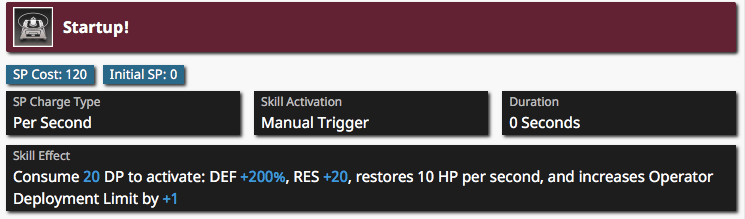
- The E5 terminal is at risk from the Elite Marksmen. They will prioritize attacking it when it is in their range, which means once they reach grid D4. We only need to defend it until it is activated, at which point it gains DEF, RES, and HP regen over time, making it impossible for the Marksmen to kill:
- There are two ways to handle the Marksmen
- Try to kill enough of them before they reach the Command Terminal. The challenge with this method is having enough DPS to do it, and the up-front Operators surviving the marksmen focus-fire. This is the method I'll use in this guide.
- Force the Marksmen to target an Operator by blocking it. This is done by placing a Pull Specialist (Rope or Cliffheart) at D6 facing left. the longer the reach, the better.
- The terminal at G9 is threatened by the Fanatics from the top left G1 entrance. There are 2 ways to handle the Fanatics
- Kill them before they reach it (this is the strat I use in this guide). This can be done by dps or Pushers, though they will need healing support.
- Block them before they reach it, at F8.
The Greytail (aka The Shielded A-Hole)
They Graytail Leader on this map can cause a lot of problems. He spawns from the upper left G1 entrance at around the 28 kill mark, and takes a path to the exit that has no available spots for melee deployment, so he can't be blocked. He has a shield that absorbs a lot of damage, and requires Arts damage to remove. Once the shield is gone, he turns on the boosters and picks up speed.
- The main way to take this guy down is to slow him long enough to remove his shield and kill him, as there are plenty of ranged tiles along his path.
- I also believe it is possible to use True Damage (Amiya S3, Nightmare S2) to bypass his shield, though I did not attempt it so I can't verify 100% it works (let me know in the comments below if you know!)
- A third way to take him down is to deploy a Puller on G11 facing down, and a blocker on E11. This dude is a heavy-ass, so is difficult to move very far, but if you have at least Skill Level 7 you should be able to pull him far enough to get picked up by the blocker.
The Bulldozer
Since there isn't enough else going on, why not add some jerk that requires 3 block spots to stop? This guy by himself isn't necessarily a huge threat, we just need to make sure we have enough block spots to stop him and any of his friends.
My Strategy
- My strategy for the Marksmen was to kill enough of them before they reached the Command Terminal so that it could survive. I found that by putting a Pusher/Puller on C5, they were able to soak the damage without needing healing outside of Perfumers global regen. Then I used Eyja and Meteorite (because of her range) to do the killing.
- For the fanatics I put the Burninator Ifrit to work along with a slower (I used Glaucus, as it also helped with the Greytail as well)
- For the Greytail I used stuns and slows. First, I used Glaucus S2 to stun it within Ifrits range. 2nd I used Texas S2 for another stun. Last I deployed a Slower along the bottom row, and could have followed up with more ranged DPS if I had needed it.
My strategy uses some fairly specific Operators, and I'm not 100% sure how well it would generalize to other Operators, but hopefully the above discussion and some experimentation, along with my clear, will give you some ideas that will help.
Recommended Team Composition
-
1 Skill-DP-Recovery Vanguard, V1
-
1 melee Operator with at least 2 block, M1, a Skill-DP-Recovery Vanguard is nice to increase beginning DP. Ranged Guards can increase DPS on the enemy Marksmen (and possibly the Greytail)
-
1 ST Caster, C1
-
1 Pull/Push Specialist Sp1, FEater preferred
-
1 Medic, M1, Perfumer preferred.
-
1 Slower Supporter, Su1, Glaucus preferred
-
1 Caster, C2, for taking down the Fanatics. Ifrit is ideal. A strong ST Caster might also work.
-
1 long range Sniper, S1, preferably Meteorite or Shirayuki at E2. Shirayuki at E1 with S1 might also be good, and possibly Firewatch.
-
1 Defender, D1, any should work.
-
1 Slower Supporter, Su2, to slow down the Greytail along the bottom row if/when needed
-
1 Ranged DPS, R1, to finish off the Greytail along the bottom row if/when needed
-
2 Flex, whatever you might need here. maybe another Ranged dps to help with the Graytail, or a Defender to help with Bulldozer blocking.
Here is an example of the team I used:
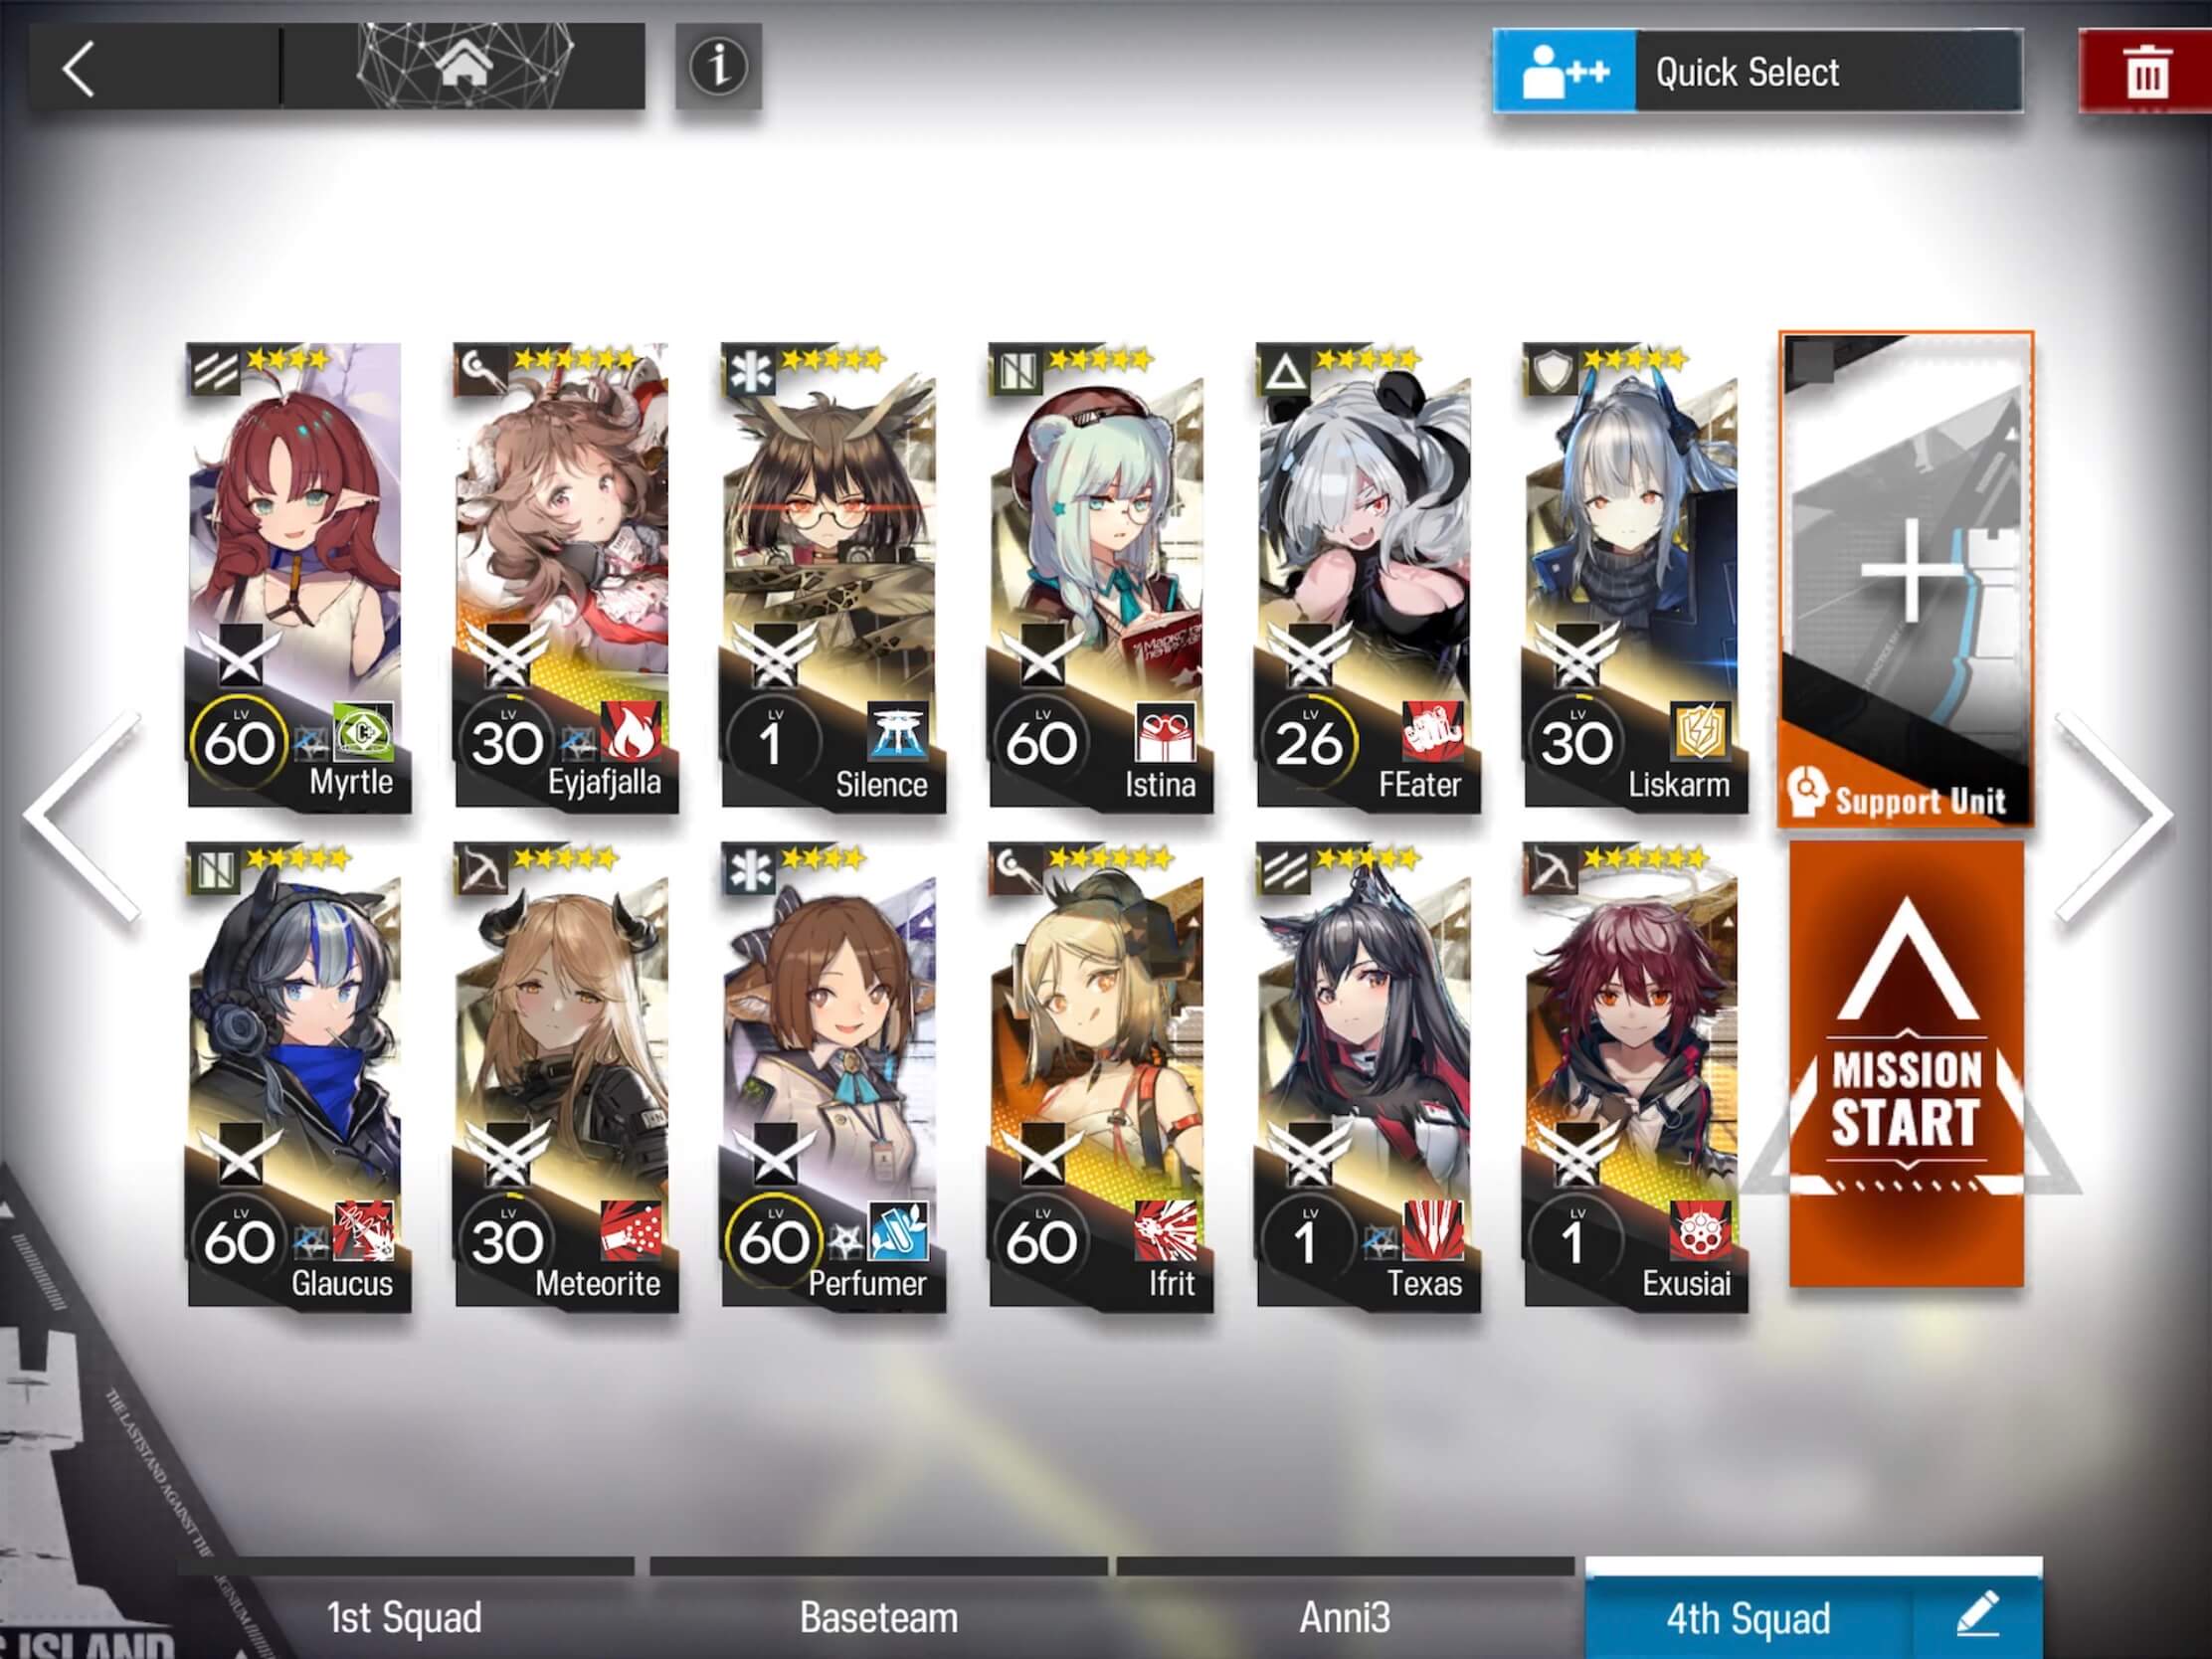
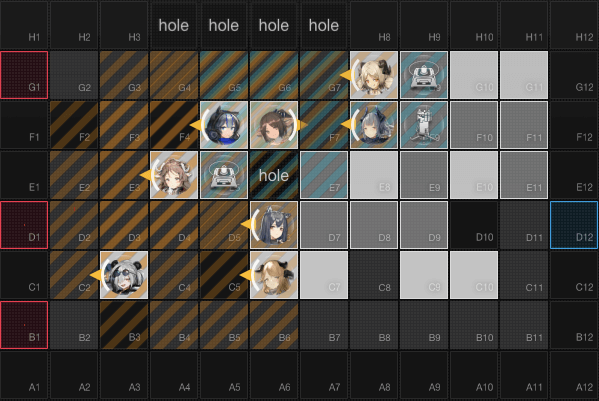
Deployment
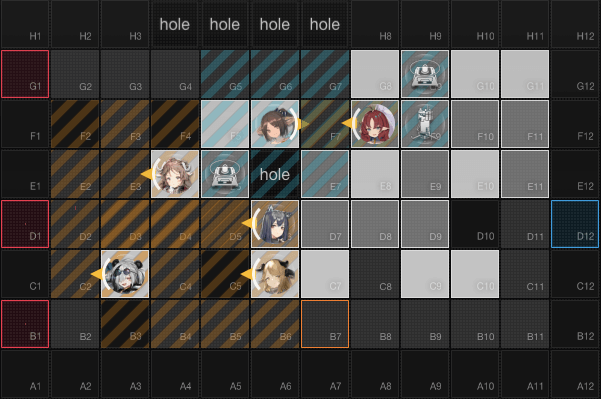
Unit placement can be seen in the image below, and deployment order should be done exactly as presented. Each Operator can be placed as soon as there is sufficient DP.
Deployment Order:
- M1: Texas - Skill-DP-Recvovery Vanguard
- C1: Eyjafjalla - ST Caster
- V1: Myrtle - Utility Vanguard (Doesn't matter where you place her)
- M1: Perfumer - AoE Medic (with global healing) (If you use an ST Medic, place them at E8 facing left instead)
- Sp1: FEater - Pusher Specialist (I faced her left to apply the slow earlier and prevent her from pushing the Marksmen up, causing them to attack Eyja instead)
- S1: Long range Sniper - Meteorite - AoE Sniper
- Portable Supply Station - So that we can get our top-row Operators deployed in time
Deployment should look something like this:
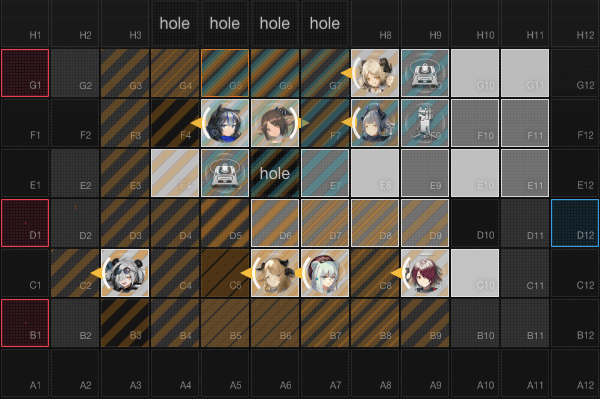
- When the first Fanatic reaches G3, we'll retreat our V1 and Deploy Su1: Glaucus - Slower Supporter
- After we have activated the Commend Center and have enough DP, we'll deploy our C1: Ifrit ( or ST Caster)
- After we have activated the second Command Center and have enough DP, we'll deploy our Defender, D1, Liskarm
Our formation now looks like this:
At about kill 28 is when the Greytail emerges. At this point, be ready to use any stuns, crowd control, or cool downs at appropriate times to maximize damage. If he gets through the main line, retreat V1 and C1 and place
- Su2: Slower Supporter - Istina
- R1: Ranged DPS - Exusia
so that it looks something like this:
And that should be all the tough stuff! If you end up like I did, you'll have to retreat and redeploy some dps to finish off the Bulldozer.
Enjoy the OP!