Introduction

Buckle your seats, because this is one painful ride we're in for.

Methodology

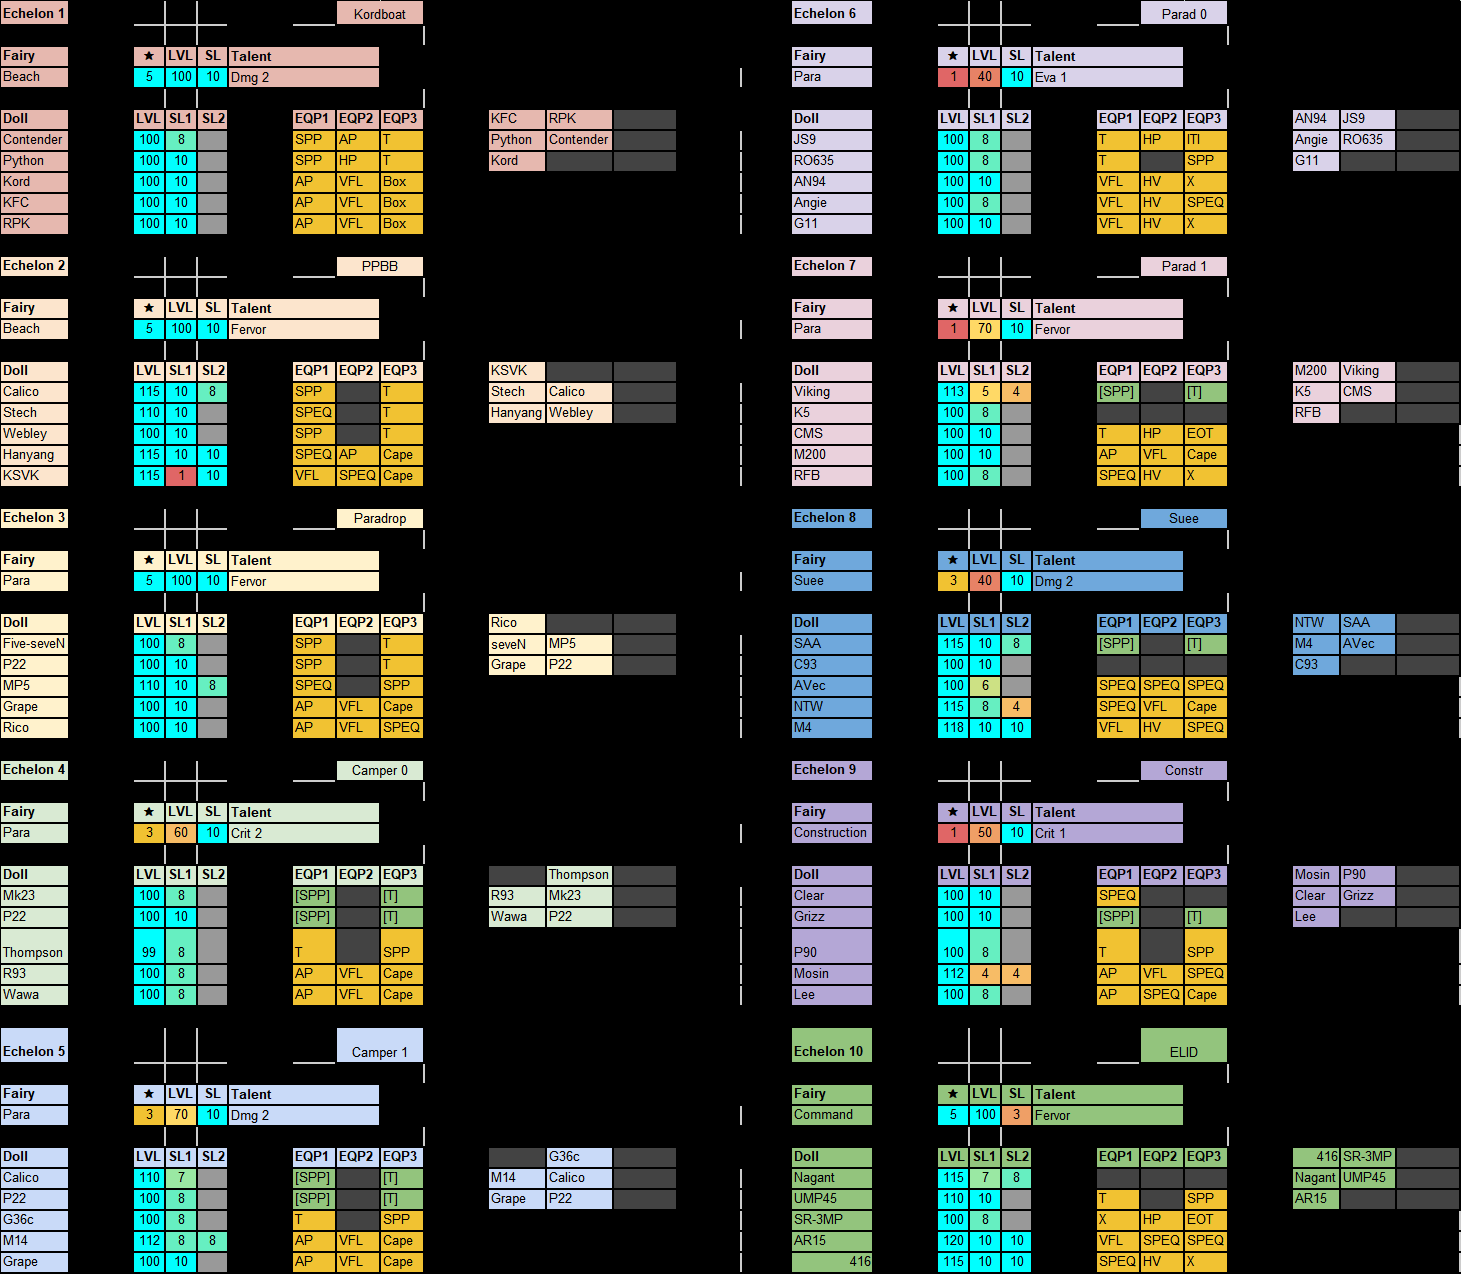
For those who care about methodology, the general formula was as follows.Campers/Fairy backpacks are tested against spawns ID363056/59/60 (a few against other spawns for variety). 3* Command fairy, no talent proc. All skills level 10/max equips etc, because getting beyond that is test case hell. HOCs are only used if the fight is RNG as shit or impossible without them, any fight will be better if given HOC support.
These fights are chosen as they are most likely to cause problems, other spawns appear to be cyclops stacks or a light Cyclops dog, and if you can take the three tested you can take those. Skills are generally kept to auto, some examples with actual sensible skill usage are shown. As we have lots of DPS not a lot of HGs, HGs are standardized for effectiveness, 1 fight with low end HGs shown for effect. I did some unrecorded tests reducing HG effectiveness generally meant a need to bring 1 HOC to the fight, and often better manage skills, but if a battle was clearable, it stayed doable with nerfed HGs.

While there is obviously some kiting involved, I am by no means exceptionally good at GFL micro and can be argued to be quite bad at it. Further, when recording these, I did the fight two or three times to get familiar with it, and then recorded the video, so nothing here is specifically selected for good luck or skillful play, unless called out for smarter skill usage. I assure you, doing better than these examples is not hard.
AR/SMG (ELIDs and KCCO Dogs)
ARSMG has a similar role to that of SC, in that they're there to fight ELID enemies and KCCO doggos/archers and similar comps RFHGs have trouble dealing with. Polarized Light still see a fair bit of them, especially in later turns. Some have fielded hybrid echelons (ARSMG with RF) to deal with all sorts of KCCO comps, deathstacks excluded for obvious reasons. Depending on the hybrid, the team was capable of excellent combat prowess, or be an utter disaster. To keep it simple, we'll be fielding standard ARSMG teams.
Alpha Team


First up, AR/SMG with a side of Saiga.
Saiga is both a blessing and a curse for this Echelon. When fighting ELID’s, she can be thrown forwards and take the abuse while the DPS does the heavy lifting with comparable or better success to an SMG tank. STG (and Vector to a lesser extent) let this echelon down due to high enemy HP, and further weaken this Echelon against the Smasher, where AoE damage has less value. Do not send this Echelon to fight Smashers, it will die. There aren’t any example videos of this Echelon fighting regular ELIDs as there isn’t much to say. Let DPS do damage, send Saiga forwards to get beat up. Take a drink of water while the fight runs, have a snack, etc.

Dog/Cyclops however, is perfectly doable. Moving Vector forwards to 6 immediately is important to keep the Cyclops from using their Grenades to damage AUG. Vector should be sent forwards first as she stands a better chance to avoid taking damage from the Dogs.
Swapping Vector and Saiga after the Dog Shields come up helps keep Vector healthy over multiple fights, but on the final turn death is ‘acceptable’. If Vector’s Molotov is active, try and keep her from retreating until it has gone out, otherwise the effect is lost.
Bravo Team


This team has an easier job, for the most part. Anything the above team can do, this one can do better. Zas’s nade is still poor for Smasher fights, but as shown below doing the battle completely damage less is entirely possible. This is more science than art, moving CMS from 5 to 4 keeps her from taking damage, and wiggle the ARs early to retarget the trash.
X95 shines in Smasher fights as, with a bit of management, her Skill retargets her to the ELID spawns, which she then mows down. Somehow, VAL wins the damage race here, despite being painfully unsuited for Day battles.
Outside of that, this team will perform acceptably against non-Minotaur enemies if provided HOC support.
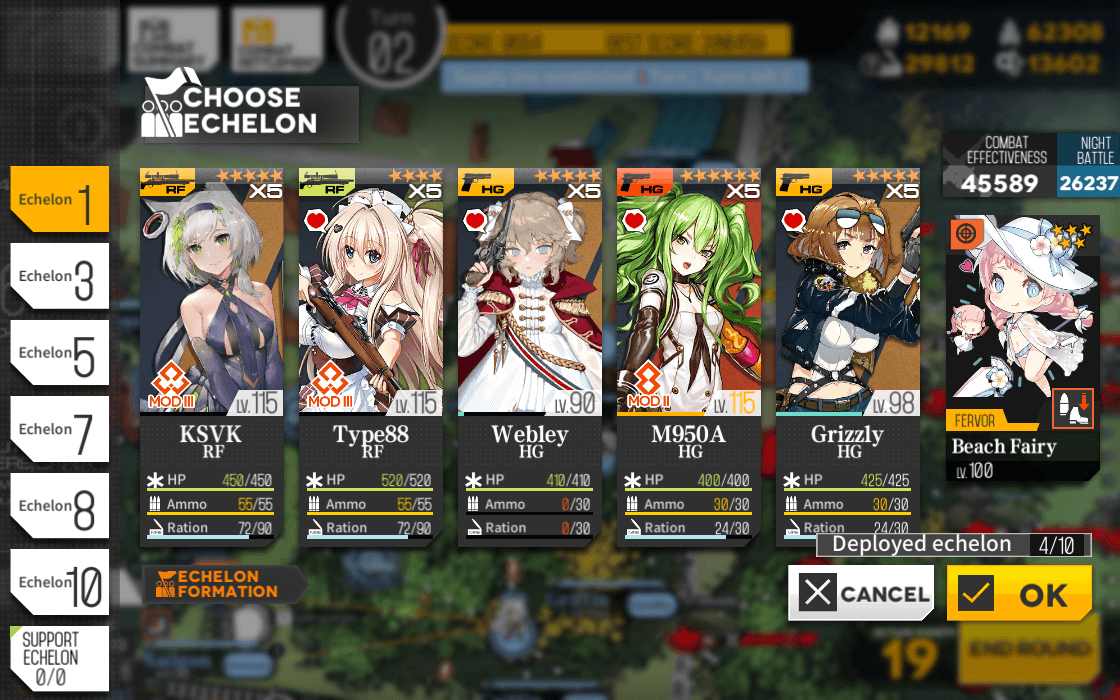
RFHG (Deathstack Support/Fairy Carrier)
The RFs are a little different in approach. Piles of rifles were chosen, but comparatively few Handguns. This opens up team building options, which for someone performing the run in real time, is good, but for making test videos creates a nightmare, because you can mix and match Rifles, Tanks, Fairies, and HOC support in myriad ways, creating an unreasonable number of test cases, even if I wanted to turn this page into a Master’s Thesis on GFL teambuilding.
All fights are done using EX mode spawns. If you set the map too easy mode, this all becomes easier. IF YOU ARE A NEWER PLAYER OR JUST WANT THE REWARDS USING EASY MODE IS PERFECTLY FINE AND ANYONE WHO TELLS YOU OTHERWISE WILL BE BONKED or something.
- 2 RFs per team. (I do have a few showcases of Crally’s teams that use mixed DPS just for comparison).
- I tested all teams against enemies ID 363056/59/60. Minotaur, Archer/Dog, and Dog/Cyclops, in order.
- All teams were tested for the least possible HOC support. Increasing HOC allocation will improve performance.
- 3* Command Fairy, no Talent Proc. Just fairies alone are a conditional nightmare, so I opted for Command, as something everyone had, and with a Skill that didn’t influence the battle. If a Fairy will change a fight considerably, I’ll mention it for that setup. Also as some teams carry dud fairies, such as Suee or Construction in actual practice, so removing Fairy Skills from consideration makes this easier.
- Finally, most rifles got the same set of Handguns. In a real-world setting, the overwhelming majority of players cannot field multiple 5-7/P22/Calico Mod (Actually I can’t, only 1 Calico mod for me) setups, and there are a few showcases of other HGs to show what else works. Fights using the Handguns chosen for this event are shown, but outside of Grizzly and Five-seveN they struggle.
- Deaths are considered acceptable to simulate Turn 9 ‘win at all costs’ conditions, but are avoided when possible.
General team building notes, I went with different rifle comps than Varz suggests in the previous article. In practice, all of these teams want RoF like crazy if we want them to fight Dogs, and I didn’t go into the rabbit hole of AR/RF backlines, so the exact mix of Rifles somewhat comes out in the wash. Mosin is the standout here, she can go with anyone and perform well.
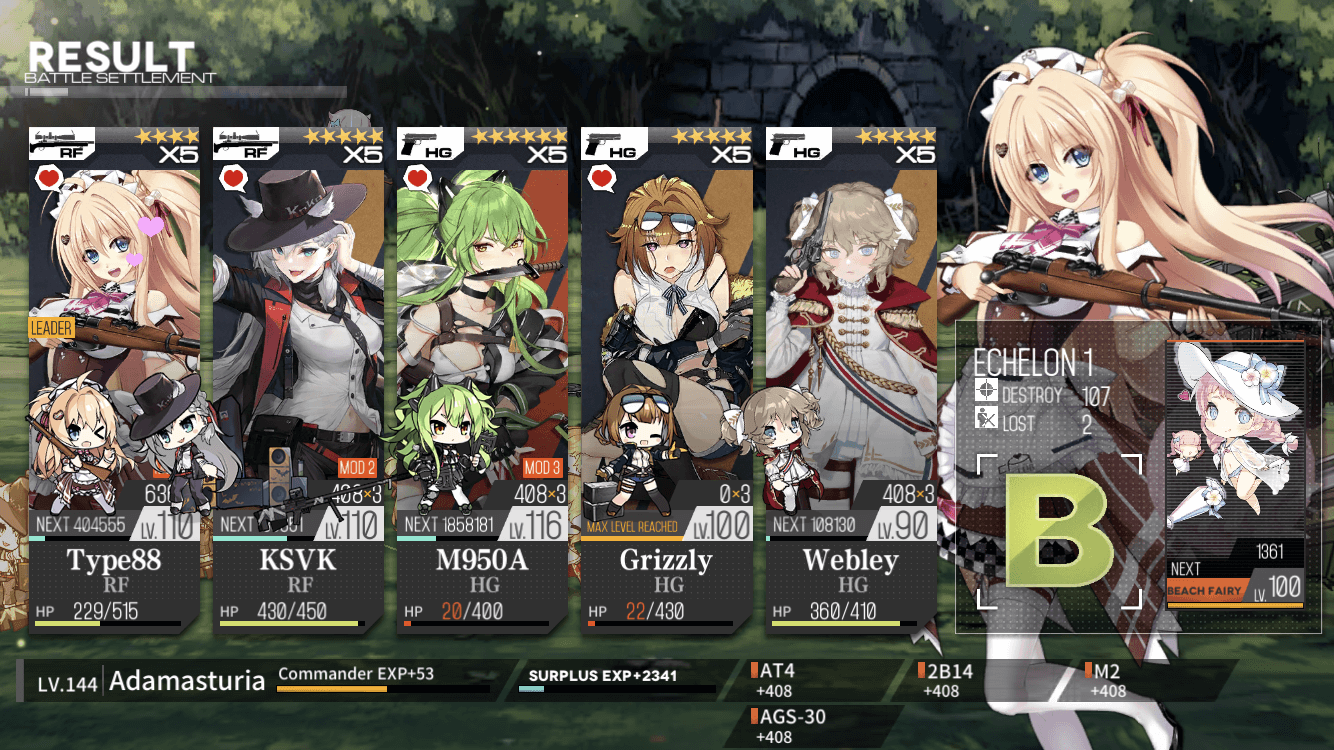
Enough Talk, get to the fighting.
Fairy Deployment System


In terms of performance, this team struggles. Granted, my micro abilities and situational awareness did it no favors (in the Archer Dog Vid, I should have killed the Archers much earlier). With that said, this team’s job is to carry around a useful fairy not to fight if possible, so they can afford to be bad in a fight, as long as they can win one time, casualties be damned.
Good news, they can. Bad news, its hurts. Manual Skill is your friend. Two fights are shown, Mino and Archer/Dog.

M1 Garand
M1 Garand, and her mythical 'ping' occupy an odd place in this roster. As the odd woman out in the rifle lineup, she gets free reign to choose her partner, so she isn't shackled with a second Bamboo for a partner. If I were laying out the teams again, Garand wouldn't be on a Fairy deployment system for this reason, but uh...


Yes, that. So, having already paired everyone off, and not wishing to rewrite this entire article, Garand shall babysit a Fairy. She also breaks all my rules for teambuilding, as I wanted to show off some other handguns, in this case, HS2000, SAA (not modded), and Mk23. As a result of this handgun selection, I opted for a RoF buffing partner, WA2000/SVD, one fight with each.
Thanks to her odd woman out status, Garand can be slotted into a variety of team archetypes and do alright, at least enough to not let down her counterpart. Likewise, her Handgun partners are far more open to debate than others. With a RoF buffing partner, a Damage heavy mix is recommended to best serve her partner.
I'm going to file this under embarrassing kiting performances, as I did this fight far better practicing than this recording. But, as a Fairy Deployment System, they only need to win a few battles with chances to repair in the middle, so I can safely say that this fight is an acceptable real-world result.
SVD against the Dog/Cyclops/Dog stack remains a fairly straight forwards battle if you bring HOC support. However, I want to show something off, so we'll be showing the battle HOCless.
What do I want to show off, you ask? The difference between resetting for better results, and just taking the first clear. For instance, consider the above battle where we clear the fight with our Handguns dead, and some damage to the Rifles besides. While this is does complete the battle, it's painful on the cakes, repair bill and more.
Now consider this example. This took me roughly ten minutes and six or seven attempts, compared to the previous one, which took two tries (yes yes, the irony of resetting for a bad result). Here, we make it out without damage on the rifles, and with all three handguns alive, although quite Damaged.
I actually produced better results in practice while figuring out the pattern to move Dolls, but I don't wish to demonstrate the absolute best possible run, just that sometimes you can produce better results with a little persistence. The primary sticking points to this particular battle are the RNG around Mk23(or whatever HG is in 5), getting chomped by the Dogs early, and the RFs killing the Cyclops fast enough. Good management of HS2000's shield is important. If you are using a P22 for extra shielding this is probably easier to low Damage.
Paradeus


Behold, for I have created terrible formations. First. DO NOT USE FORMATION LIKE THIS OR SO HELP ME GOD I WILL DO MEAN THINGS TO YOUR WAIFU!
Okay? Good.
Right, now let’s actually talk about Paradeus. Because I went full Uzi, KSG isn’t here, and GSH is. That’s not actually a big deal, KSG would just occupy MP443’s slot and 443 moves back to GSH’s, and it doesn’t affect the battle at all. No, I’m not kidding. Actually, probably makes it even lazier.
Basement dwellers are fortunately weak and easy to bully, so this team doesn’t have much to it. While I do perform proper micro on all these battles it’s not terribly important due to the weakened enemies.
Since we have an LWMMG Mod down here, make sure to have a Doll on her tiles to get her shield. If using KSG, this will mitigate almost all damage, but MP443 also use this to tank the Rodel lasers. If using LWMMG shields to tank Rodel lasers, be aware that you will still need to move the Doll to avoid LWMMG getting hit, or retreat LWMMG herself.
RFHG (armored KCCO)
Overview


Standardized HGs, so we can talk about HG options, yay! No so yay, I included a failed attempt at the end.
RF team 2 combined IWS and Barret. If building this team in real time, I actually would suggest this combo stay intact, with the caveat they will want HOC cover. Calico mod can be downgraded to Calico of course, and Astra can be used for a RoF buffer up front.
Five-seveN can be replaced by Stechkin in her RoF buff role, but SAA (Mod) can fit into 4 on this team is needed. P22 isn’t replaceable in her ‘I do all the things’ role but various frontline HGs work here, from 1911 Mod for smoke/extra shots, Px4 for more Damage, and other self buffers. Grizzly can also be fitted into this team if you wish, but Rate of Fire support will be needed.
This team’s performance is solid, and it’s very much let down in the examples by me channeling my inner Uzi. This team desires HOC support against Dogs, even with careful Skill control. Against Archer/Dog, HOC support and careful management is a must.
When timing Skill shots against Dogs, you need to slightly anticipate the shield dropping, which I’ll discuss later on an example where I actually do so.


Alternative HG options for this team are a bit tricky. Rate of Fire remains a premium, in fact it’s almost more important on this team, as NTW has the Firepower to spare, and Kar can likewise hold her own, although some Damage buff is always appreciated, assisting NTW in chaining additional shots when Modded. Astra/Stechkin thus remain good picks, Grizzly or CZ from our lineup of HGs can be picked for this to give NTW additional Damage, with other options include Px4 and P22.


Surprising me, but probably no one with a Mosin Mod, this duo works well together, and are the only Rifle setup that can handle all tested fights without HOC support. Mosin reigns supreme. See below for discussion of alternative handguns.
Even without that trick, Mosin and Spring can handle all fights on this list without too many issues. There are a few extra battles included here, one with actually good use of Skills (correctly timed Bamboos against Dogs) and one where my Skill hotkeys weren’t setup on the Sim and I tried to do it manually with my mouse, with expected results. For reference, that final condition could and would have failed other Rifles fights.
Beyond the extra fights, these battles were smooth sailing.


C93 (Paradrop)


One of the original Paradrop compositions involved C93. Why?
- Good tiles
- Despite her skill description, the passive on team debuff procs with Para
- Her passive couple with her active skill makes her one of the highest buffers in game.
So why didn't the PL Paradrop use her, opting instead for Bunny? Simple: on the less important side, using her means Grape misses MP5 buffs. Normally, MP5's accuracy and crit rate tiles wouldn't make much of a difference, but when every status is debuffed 40%, every buff counts. And on the more important side, kiting between position 5 and position 1 is much harder to time right than kiting between position 4 and 5, which is done to save more time for the team to kill comps on later turns.
Because we are ‘blessed’ with C93 on our lineup she gets stuffed into Parachute as the best place for her.
See the vid for pain and suffering involved.
Deathstacking big painpeko
Finally, we come to the sticking point for this (and many) rankings. Deathstacks.
For those who haven’t seen the term, a Deathstack refers to any enemy intended to be either unkillable or nigh unkillable. In the GFL case, these stacks are generally beatable, they just require specific teams, utilizing either difficult in battle control, or specific units utilizing particular Skills, and high rarity Fairies.
Polarized Light offers tools to weaken them, including the EMP Balls and the Abandoned Goliath Bombs.
This is where we unfortunately must step out from the realm of using our favorite dolls and being able to win. Unless of course, one of your favorite Dolls appears below.
Now. Before we proceed, I want to emphasize something most strongly
NOTHING AFTER THIS POINT IS REQUIRED TO SCORE WELL IN RANKING. YOU COULD STILL GET THE SPECIAL EQUIPMENT AND FAIRIES WITHOUT DEALING WITH THE DEATHSTACKS USING STRATEGIES TALKED ABOUT BELOW.
Alright, with that out of the way, let’s talk about hyper meta strats, and why they are what they are for a moment.
Because these are some of the more technically challenging and control intensive fights on GFL, these enemies tend to rely upon using Dolls with unique or otherwise distinctive Skills or traits, often not found outside of a small subset of units.
Examples of this include:
Beach Fairy: Knock/Slow in one Skill, along with it’s powerful Aura make Beach Fairy one of the most valuable fairies in the game. She further Synergies with KSVK mod, more on that below.
Kord/Hanyang Mod: Kord and Hanyang possess the ability to Pierce, that is to say, attacks will do Damage every enemy between them and their target, massively multiplying their Damage output. While Type 4 does have pierce, it is only on her Skillshot, while Kord can have continuous Pierce, and Hanyang Mod has pierce during her Skill window, which can be kept up thanks to Webley.
Webley: Webley’s ability to shorten cooldowns doesn’t exist anywhere else.
KSVK Mod: While not the only AoE damage Rifle thanks to Hanyang, KSVK mod’s forward targeting along with her AoE offer unique abilities as well, but need for a debuff can limit her.
Calico Mod: See Mod 2 Skill.
Grape: Probably the most meta centralizing Doll in GFL, the ability to delete any enemy that isn’t flagged as Elite is incredibly potent, and--
That’s a lot of words, but what do they mean for PL?

In PL, the Deathstacks occupied the entire upper-right portion of the map. Due to a scoring change, runs aiming for the highest brackets when scoring could not use the old strategies involving Landmine and Rocket Fairies, or the Bombs provided by the map.
Old server teams tended to focus on Kord, exploiting her piercing Skill to allow her to deal damage to move than just herself, and this trend continued on EN, with Hanyang Mod 3 being a focal point of many Deathstack Echelons given she possesses the same ability, without MG targeting shenanigans. These teams came in a few variants, combing Hanyang with various other Dolls from the above list.
Oh. And Beach Fairy. Knockback/slow on Beach Fairy is often important for battles taking on full HP Deathstacks.
On my very cursed run, half clutched by e-sports final match, we noticed ID02 was able to be killed by using Hanyang pierce rather than her wipe attack, which meant she was protected from losing links, to a certain extent. In my experience, it was doable, though because of lag + Hanyang and KSVK on mod 2, it was not damageless, or even crit-less.
ID01, on the other hand, required much better kiting time that was frankly quite hard to pull off on a laggy mobile. Out of the 6 deathstacks I managed to kill, ID01 was impossible to kill on my phone, with my team setup. Possibly, if both dolls were Mod 3, it might have been doable, with some losses.
Thus I hate it with a burning passion.
Below's the result of an ID02 fight with Suee SL10 buff.
e-sports PL saw many unconventional teams facing PL stacks, as consistency was mostly prefered over teams with theoretical minimal damage. PPG was a famous comp that came to life after enemies had a rework with 2.07: enemies such as Hydra no longer had to be stopped to lose their elite tag, instead, their elite tag was removed altogether. That made possible for PPG to fight some deathstack comps that included hydras in them
Meme vs Meta


Allow me.
Across Crally's runs there are a few factors that allows him to have a top 5% upwards score, those being:
- Four-Five star fairies
- Kiting abilities
- PPBB/Kordboat deathstack teams
- Ares team
- Paradrop team
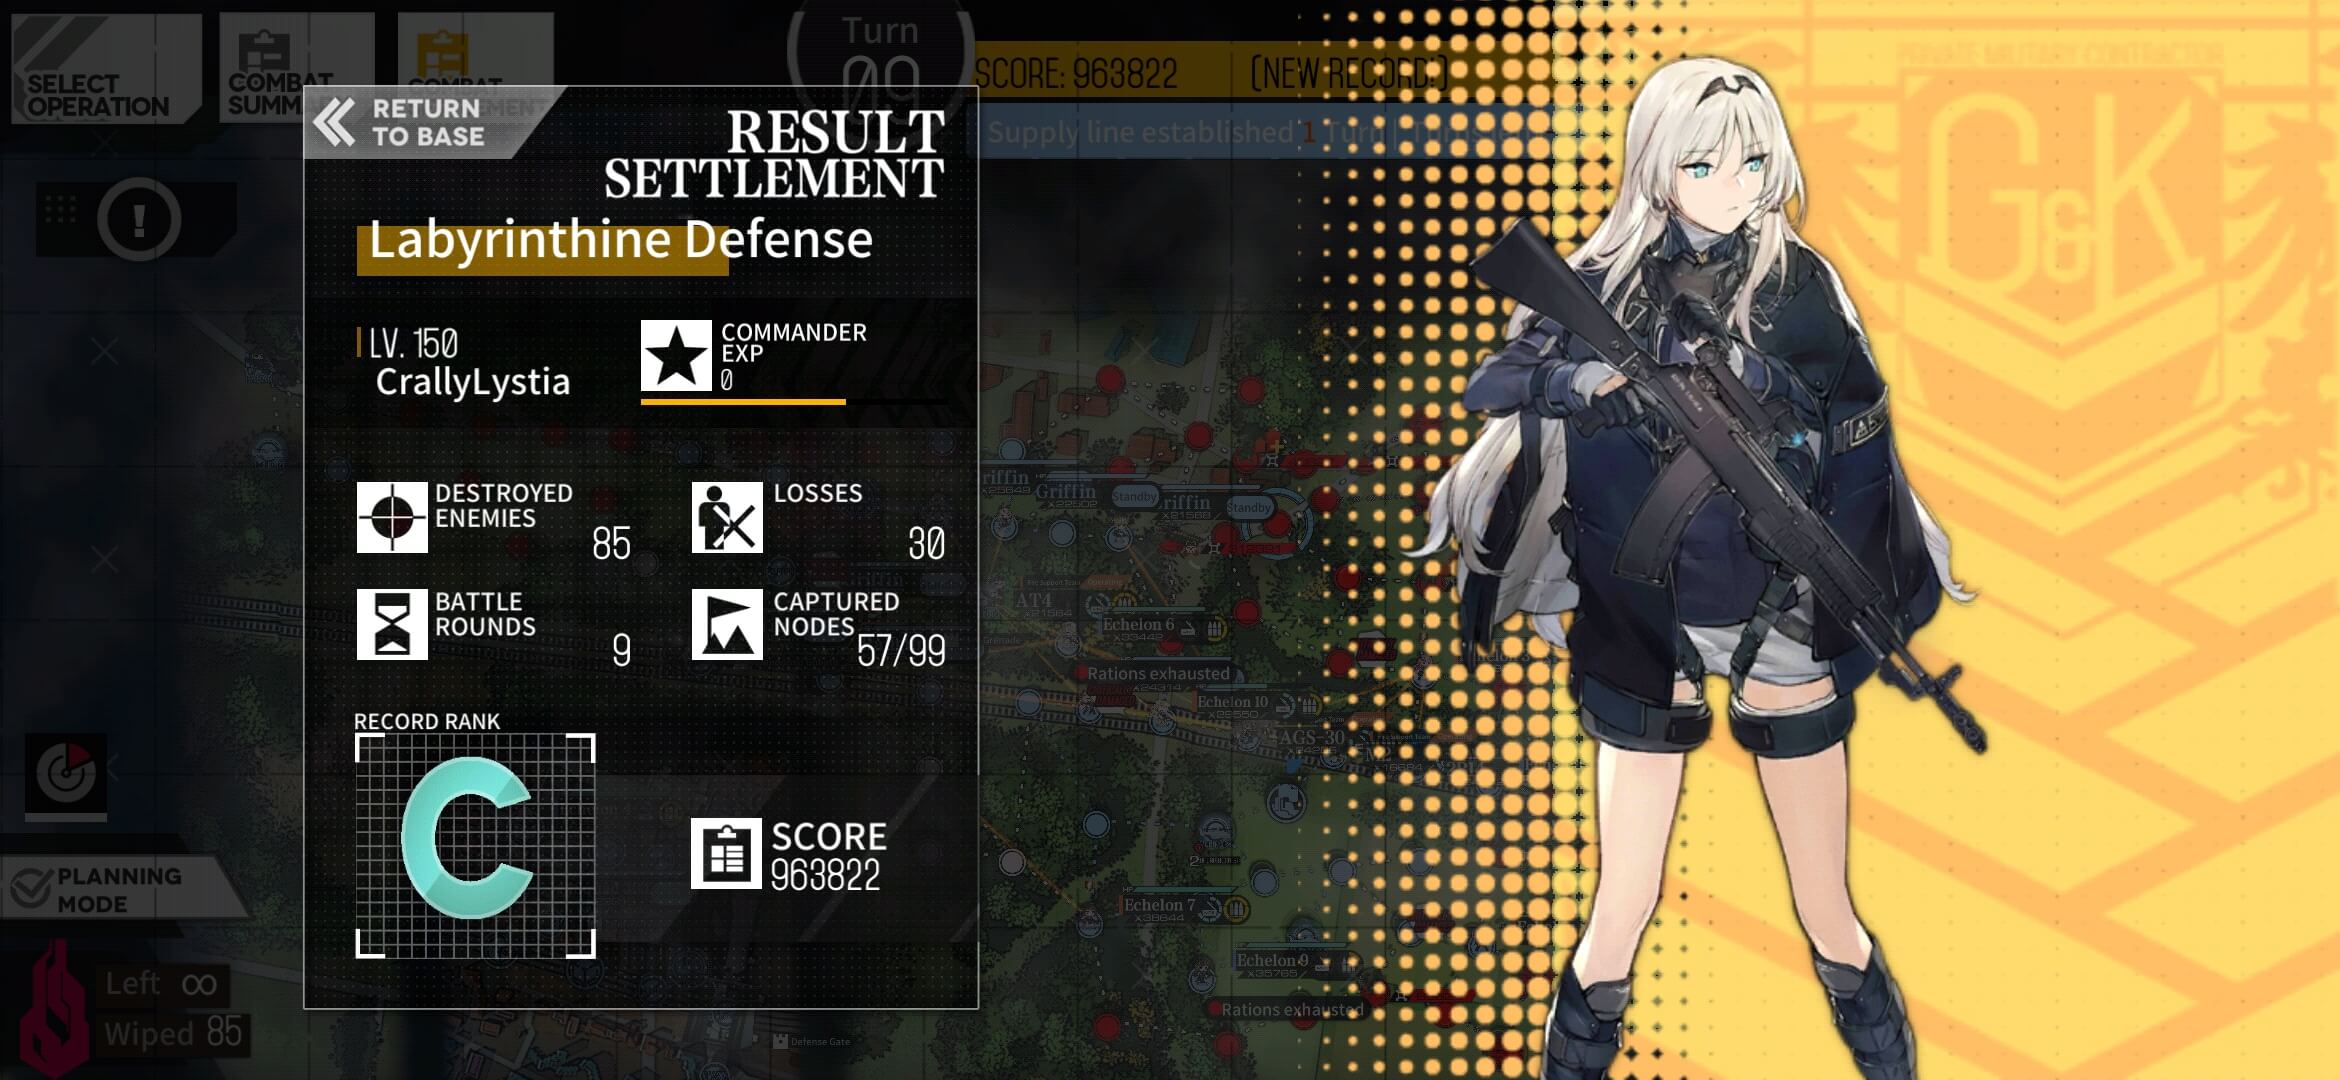
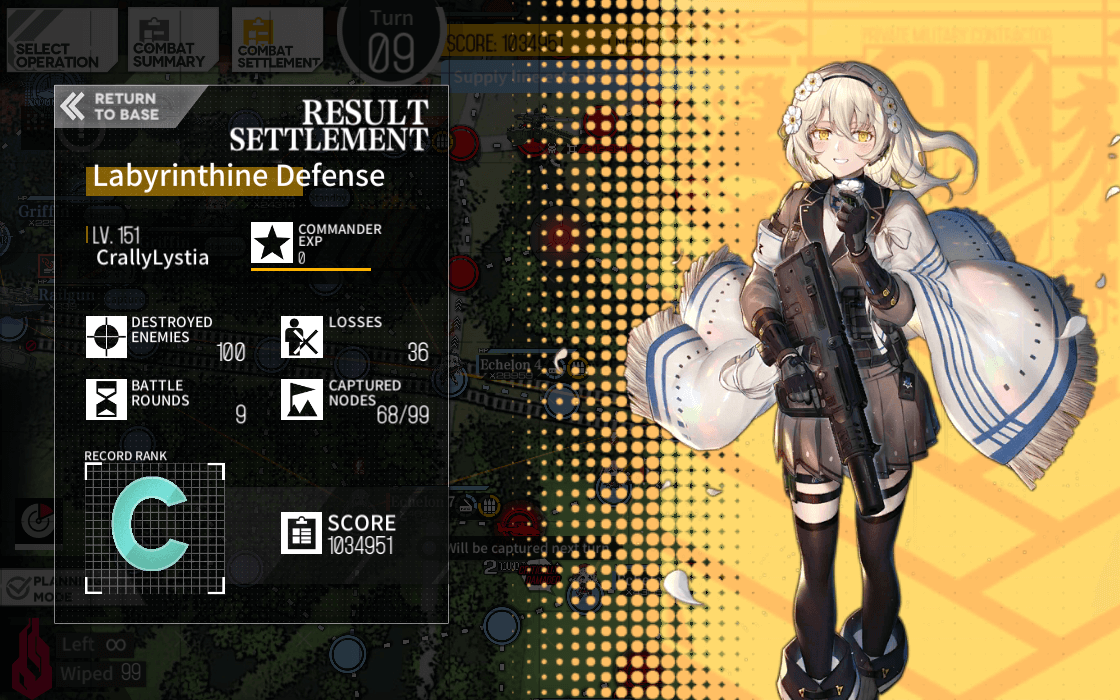
The bulk of PL score comes from killing deathstacks (up to 450K points, repairs notwithstanding), M4 NPC (100K points), UMP45 NPC (10K points), Yeyeye (also known as Yegor, around 22K), Paradrop (estimated around 15K-30K points depending on the turn, so 150K-250K points across 8 turns, depending on spawn RNG), supply line (up to 125K points, depending on RNG), pre-spawned NPCs (if kept alive, each net 15K points, up to a total of 105K points) and 5 capturable supply nodes (50K points). So, at the very least, you're looking at around 900K points completely tied to map mechanics, non-reliant on teambuilding, or deathstack/bossing teams, which are heavily reliant on having optimised teams and strategies.

What does that mean? Basically:
- Optimised Paradrop (ideally 5 star, but 4 star worked to some extent)
- Kordboat/PPBB/PPG/Hanyangxodia (or if you're Cosmic, his IWS strat) with 2 maxed Beaches
- Dedicated Ares team (although in my experience, PPBB was more than sufficient to deal with it)
- Suee (DJ Max collab Fairy) or Construction (5221 recipe fairy) Skill Levelled
- An incredible amount of resets on Paradrop and deathstacks (especially when using Kordboats)
Was enough to guarantee you a top 5%, even possibly a 1 million score. The only team outside of deathstacks and Ares that remotely had some requirements was ELID team, as it had to survive some battles on its own, and a Smasher, to escort M4.
Considering we ended up building 7 teams, some with more leeway on doll pairing than others, we had three spots open for Deathstack 1, Deathstack 2, and Yeyeye team.

In other words, Crally had enough leeway to play his meme and his meta run in a similar fashion; he was not hindered, as we initially thought he would be, by fielding supoptimal teams.
Factor in a bit of RNG, more or less repairs that, at the end of the ranking, add up, map knowledge from his first run, it becomes easy to understand how Crally managed to surpass his initial score with a meme run no less.


You had potential for more

I know I know. I did beat Crally in Isomer and SC, now I have to pay the price of my loss in raising IDW to mod 3.
That said, what can we learn from this ranking for the future?
Besides that Mica really knows how to make painpeko deathstacks.

WATSHI WA ANATA NI MAKEMASEN
I won't lose to you
Just wait and see, you'll be modding C96 after DR is over.

Ahem
SO, what can we learn?
- Deathstacks will be a part of future rankings, and learning how to deal with them is key for high end scores. Will they be as hard as PL stacks? Debatable.
- Knowing the map mechanics matters just as much, if not more, as proper team building. There's a reason I, Petra, and several other top rankers run the maps more than once.
- Highly optimized teams are not necessary to rank, or even to get a score over top 30% bracket.
- Knowing the basics of map mechanics and team buildings (what is an RFHG supposed to fight, an ARSMG, knowing to do a few Heavy Equipment Constructions a day (2/day is entirely sustainable, even more if you log in more often)) matters far more than having 14 Grapes or 14 P22s or 14 Para fairies, if you're not aiming for top 5% score upwards.
For example: in DR, in my experimentation, it is more lax than PL in some ways. Map 1 requires just an SF team with Scarecrow (freebie with SF release) and two Mantis, (preferably XL) and a lot of map knowledge. Map 2 is where the big thinking resides, and Map 3 score is, minimal RNG excluded, deterministic.
TL;DR, Map 1 is Scarecrow walking downtown with her homies, Map 2 is big brain moment and Map 3 is SF buffet for Soppo.
Not a buffet!!!111!
Calling it a buffet is like calling "driving through downtown traffic during rush hour w/ a propensity for road rage" a "cake walk"
While Varz and Adam act like Tom and Jerry, let's wrap up this final part of Waifu Wars. Set backs that put our schedule off track notwithstanding, we hope Waifu Wars gave you Commanders a bit more of insight on how ranking works, and how it is not as scary as it looks. as well at some insight on our personal choices of waifus.
As always, GFC, GFEN and GP discords are open for any of you looking for help on ranking preparations, as well as help on general content and events.
On behalf of Waifu Wars members, until next time!