Introduction
In GamePress's opinion, this is one of the greatest Quality of Life updates in the history of Pokemon GO. The clunky appraisal system (originally launched on August 22, 2016 and unmodified since) has been revamped, and now allows quick appraising of Pokemon. This is a need that many serious trainers have needed and turned to 3rd party apps/screen overlays to provide, such as CalcyIV, PokeGenie, PokeRater, just to name a few. In fact, many trainers explicitly decided to buy Android phones instead of iPhones for the ability to use screen overlay apps such as CalcyIV (iOS doesn’t allow screen overlays, and instead must rely on screenshots or more recently video recording, which PokeGenie recently took advantage of). CalcyIV still provides auxiliary benefits such as level disambiguation (most trainers memorize the mapping of dust requirements to Pokemon level, but there is a range), and most importantly CalcyIV still provides fast nicknaming to the clipboard.
How Does It Work?
In the new system introduced on July 16th, Pokemon's IVs are displayed visually through a bar graph.
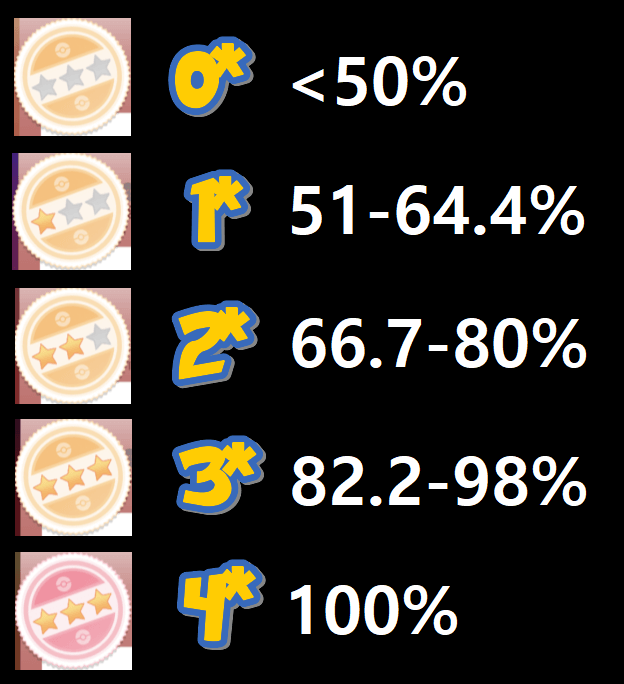
The stars represent the "level" of IVs a Pokemon is at. Zero stars is 0 to 49%, one star is 50 to 64%, two stars is 65 to 80%, and three starts is 82 to 99%. All three stars and a red badge instead of orange means it has 100% maximum IVs.

Four new search filters have been added as well (1*, 2*, 3*, 4*) that will filter your Pokemon based on the IV "star" system above. And you're also able to scroll through your Pokemon from the IV checking screen itself, allowing players to mass appraise with ease.
The bar graphs also show, albeit without numbers, exactly how many IVs your Pokemon have. Here's a handy chart to show exactly where the cutoff marks are.
To give you an idea of why this update is so impactful, let’s briefly highlight the pain points of a trainer prior to this update:
-
Bulk catching for Stardust means that at the end of a grind, the trainer will have a box full of non-meta-relevant Pokemon to appraise. Some trainers decide to bulk-transfer potentially perfect Pokemon to save time. Others manually rate each and every one. During events, some trainers set up keyboard shortcut strings for mons that are extremely common during the event to quickly find high-IV mons. This update completely addresses these pain points. Now a trainer can simply type 4* to see all the perfect newly-caught Pokemon (sorted by recent), favorite them, and mass transfer the rest, or alternatively use !4* to just transfer from the get-go.
What This Means for Community Day
One of the most impacted scenarios for IV rating will be Community Days. Community Day packs an entire (usually) meta-impacting event into a three-hour grindfest, where efficiency and speed are key. Previously, we’ve written extensive guides for how to maximize your playtime during Community Day, such as this article for Slakoth Community Day. Most trainers prepared for CDs by clearing out Pokemon storage so they could catch as many event Pokemon as possible without needing to stop and sluggishly IV-rate. Even in this scenario, tools like CalcyIV just aren’t good enough: the trainer needs to rate and transfer potentially hundreds of recently caught Pokemon as fast as possible. Many trainers turned to search strings for this, that can approximate IV % based on how tight the parameters are and how many different IV combinations collide with the same CP values. This process was however still explicit and frustrating. Now, a trainer only hunting for high-IV CD mon can just type in !3* to show all recently caught Pokemon that don’t meet the three-star criteria, mass select and transfer in seconds! Trainers are still advised to make ample Pokemon storage prior to high-profile events, but this new appraisal system allows trainers to very quickly “clean up” their space and continue event catching. Trainers that enjoy the excitement of knowing they caught a high-IV Pokemon can quickly side-swipe through the full-screen appraisal screens after filtering down to only good Pokemon (e.g., 3*) and see just what they hauled in.
Still More Room for Improvement
While this appraisal overhaul is certainly a huge boon for trainers, there will still be aspects of the game that are painful. This update also removes the “back button” fast-catch technique on Android that trainers love. Without fast-catch, most trainers feel waiting for 9,000th Pidgey to finish rolling around in the ball and be caught is incredibly frustrating and tiresome. This update also doesn’t address the need for complicated nickname schemes - in fact, the author was prepared to write an entire article specifically about leveraging sophisticated nickname schemes in combination with the previous in-game search functionality to drastically increase a player’s efficiency. Until a player can scroll through their Pokemon Collection and know the moves of each Pokemon by just looking at the mini-icon and not selecting the Pokemon to go to the full-screen Pokemon page, nicknaming will still be essential (mostly because Gym and Raid team selection doesn’t allow going to the full-screen page).
Tip: Finding Distance Mons
Efficient trainers that want to get the most candy out of trading their valuable Pokemon know that the best way to do this is to trade for distance, which means the total distance between both Pokemon in the trade needs to be 100km or more in order to trigger the big +3 candy bonus. For many trainers who trade with their local friends, most random Pokemon you select won't meet this criteria. Hunting for a distance Pokemon while already in the trade screne is cumbersome. However, the new appraisal system makes finding those Pokemon you caught (or hatched) far away even easier, assuming you prepare your collection for trades first. The goal is to mark with a searchable nickname all of your trade eligible Pokemon that aren't near your typical play location (e.g., in a different state). First, toss filler Pokemon you don't care about trading and don't want to keep with the "!traded&!3*&!4!" search string technique to make this process faster. Then, search for "!traded" and sort by reverse recent (oldest first). Appraise the first Pokemon, and notice that arrows appear to the left and right to go to the next Pokemon. The text in your team leader dialog immediately tells you where the Pokemon was caught, so you can very quickly fly through your whole collection using the arrows, stopping to rename far away Pokemon (e.g. "tdJP" which might mean "trade Japan" for a Japanese mon or "tdCAN" for a Canadian one) along the way. When you reach the beginning of your current collection or want to stop, just rename the last Pokemon you saw with some nickname you'll remember like "DIST CHECKED". The location of these checked Pokemon will never change, and you never need to check them again. If you do this periodically, now whenever you go to trade with another trainer you can just type in your distance keyword "td" and put the candy machine into overdrive.
Hopefully, Niantic will give some way to easily find distance Pokemon in the trade screen in the future, but this is a nice tip for now.