Battle Sequence
Pokemon Masters is a 3v3 game where players control 3 Trainer-Pokémon pairs, also known as Sync Pairs. In this game, both Pokémon and their trainers can use moves; this makes it feel more like a 6v6 at times despite technically being a 3v3 combat system. Pokémon Masters is a pseudo-turn based game, where the order of attack is based on click priority where the first to lock in an attack gets to attack first.
Assuming that in a 3v3 scenario every ally and enemy trainer is numbered from 1 to 6, and assuming everyone uses Tackle only, the system works as follows: When the Tackle attack command is given in the following order, 3>5>2>1>6>4, where trainer 3 was the first to issue an attack command and trainer 4 was the last to issue an attack command, then the game will execute the moves in this order one-by-one. If a trainer finalizes their move, they are free to queue up another move. In this case, the moment trainer 3 uses Tackle, they can issue another attack command that will happen right after trainer 4. The attack queue will now be 5>2>1>6>4>3, and so on.
All Pokémon moves use up Move Gauge Points, which is the main resource for Pokémon actions. The Gauge refills over time based on the Speed of the player's team, along with other moves that can affect the Move Gauge directly.
Trainer Skills, on the other hand, do not use Move Gauge Points, but instead are limited to a number of uses per battle. For example, Karen & Houndoom’s "Entertain Me!" trainer move can only be used twice per combat.
Keep in mind that Pokémon moves are queued in real time! If the Move Slot Gauge is empty, or if a player is busy picking up a pizza delivery at the door, the game will continue and skip the player's “turns”. This is why Pokémon Masters is ‘pseudo-turn based’; the game will continue if no orders are issued. Note that there is a setting in battles to allow the game to auto-select moves, but it is not entirely reliable. Next, let's look at some stats and mechanics of the game.
Basic Stats
| Stats | Description |
|---|---|
| HP | Hit Points. Pokémon faint when their hit points are reduced to zero. |
| Attack | Power level of physical attacks. |
| Defense | Reduces incoming damage from physical attacks. |
| Special Attack | Power level of special attacks. |
| Special Defense | Reduces incoming damage from special attacks. |
| Speed | Increases the refill rate of the Move Gauge, allowing players to act more frequently. |
| Star level | Indicates base stats, rarity, level limitations and so on. |
Stats in Detail: Bulk, Critical, Speed, Accuracy, and Promotion
In Pokémon Masters, the enemy AI will prioritize your most bulky units first. The formula for bulk is the following: (HP/2.75)+Def+Sp.Def. The higher a Pokémon’s bulk is, the more aggro they will attract. As an example, Rosa’s Serperior is the bulkiest Pokémon currently in the game; a level 100 Serperior will therefore always be your main tank.
How Stat Buffs affect Damage
As a general rule, through empirical testing, we have observed the following changes to damage at each level of stat boost:
- +1: x1.25
- +2: x1.4
- +3: x1.5
- +4: x1.6
- +5: x1.7
- +6: x1.8
- Crit: x1.5
- Sync Boost: x1.5
Note that all moves that hit all opponents also undergo Spread Damage Reduction:
- 1 foe: x1
- 2 foes: x 0.67
- 3 foes: x0.5
(Also note that this reduction does not typically apply to moves that are upgraded to hit multiple targets due to effects such as the passive skill Extended Range, the 6☆ EX upgrade for Striker sync pairs, and so on.)
Critical Strikes can be split up into two components: critical chance and critical damage.
Every single attacking move, whether it’s a physical or special attack, has a chance of triggering a critical strike. When a critical strike occurs, the move will deal additional critical damage on top of its normal damage.
The chance of a critical strike happening is roughly around 4.167%, which is 1 out of 24 attacks. It is also possible to raise your Pokémon’s chance of critting with Dire Hit buffs. Here are the individual stages of Dire Hit buffs and the critical chance at each stage.
| Dire Hit (stages) | Chance | Probability |
|---|---|---|
| +1 | 50% | 1 out of 2 Attacks |
| +2 | 80% | 4 out of 5 Attacks |
| +3 | 100% | Every Single Attack |
P.S. Keep in mind that passive effects exists that can affect critical strikes; for example, Phoebe & Dusclops cannot be hit for critical strikes due to their passive Vigilance.
Sync Moves
- Sync Moves still have a chance of not landing a critical hit at +3 Critical Hit Rate!
- However, using a "Next hit is guaranteed to be a Critical hit" move (aka "Sure Crit") will make a Sync Move 100% Critical hit.
When critical strikes occur, you will deal additional damage called critical damage. The critical damage multiplier is x1.5.
Here are some examples, listed with the assumption that the Pokémon deals 100/200/300 damage and always crits.
| Damage | Damage Multiplication | Critical Damage | Total Damage |
|---|---|---|---|
| 100 | x1.5 | 50 | 150 |
| 200 | x1.5 | 100 | 300 |
| 300 | x1.5 | 150 | 450 |
Element/Type
When you have type advantage, your attacks will deal additional damage; same can be said if you are at a disadvantage, where you will receive additional damage. The game has the following damage outputs, using 100 as an example.
| Attack Type | Damage | Multiplier | Elemental Damage | Total Damage |
|---|---|---|---|---|
| Super Effective | 100 | x2 | 100 | 200 |
| Normal | 100 | x1 | 0 | 100 |
Speed
Above, we explained that speed increased the recovery rate of the Move Gauge. When considering Speed, one must look at all Pokémon in play. The total sum of all three Pokémon on each team’s Speed indicates the replenish rate of the gauge.
We have managed to find a formula that get us close to the real value of Gauge Recovery. Keep in mind all these formulas are made by furious testing. The real difference is very small now that i'm very confident with it. Here is the formula.
12.5 - Speed / 100
Speed = The Speed of the current active Sync Pair.
Example of formula a Sync pair has 325 Speed
12.5-325/100 = 9.25 Sec, which is the time it takes to restore 1 gauge
if you wish to figure out multiple gauge, then simple multiply it. so 3x Gauge in this case would be 3 times 9.25 = 27.75 sec for 3 gauge.
As stated previously this formula is very close to the real value, you should expect to recover 3 x gauges between 27.6-27.8 sec, as we know more i'll do the formal adjustments but currently we can get a very good idea of how much speed benefits us.
p.s. this formula only works for a specific sync pair, as in for co-op, if you use the formula with more then 1250 speed, it will not make sense, not that it is possible to reach that much speed.
Accuracy affects the likelihood of a move successfully affecting an enemy.
The formula for Accuracy is as follows: ((6+AccBoost)/6) x Base Accuracy = Result Accuracy
An example of the formula would be the move Mega Kick. 75 Accuracy.
We then assume the Pokémon has +2 Accuracy.
(6+2)/6*75%
so it's 8 / 6 = 1.33 x 75% = 1 = which is 100%.
This means that a Mega Kick with +2 Accuracy will never miss.
For those who uses Blue & Pidgeot, Hurricane has 93.33% Hit Chance at +2 Accuracy.
Evasion affects the likelihood of a move dodging.
Evasion formula is the following
((6 + AccuracyBoosts) ÷ (6 + EvasionBoosts)) × Base Accuracy = Chance of Attack Landing
Example of a 100% move that enemy uses on you, and you use Misty for +4 Evasion. The formula would then be
( 6 / ( 6 + 4)) * 100 = 60% This means that enemy's 100% move would be a 60% move gives you 40% chance of dodging.
So far in Pokémon Masters units are starred accordingly with 3/4/5 stars. Stars only indicate their base stats, as well as their level limitation. It is possible to increase star level via Promotion Tickets.

The max levels of each star currently in the game are as follows:
| Stars | Max Level |
|---|---|
| 3* | 30/45/60/75/90/110 |
| 4* | 35/50/65/80/95/115 |
| 5* | 40/55/70/85/100/120 |
There are currently 3 different Promotion Tickets, Bronze, Silver and Gold Tickets.
| Promotion Tickets | Effect |
|---|---|
| Bronze Promotion Tickets | Raises the potential of 3* Sync Pairs, after 20 raises they will be promoted to 4* |
| Silver Promotion Tickets | Raises the potential of 4* Sync Pairs, after 20 raises they will be promoted to 5* |
| Golden Promotion Tickets | Raises the potential of 5* Sync Pairs, after 20 raises they will achieve Maximum Potential. |
When increasing potential of a Sync Pair, it’s not only the maximum level that increases but also the pair’s base stats. Currently any 3* to 4* star promotion receives the following stats:
| Stats | Increased by |
|---|---|
| HP | +40 |
| Attack | +20 |
| Defence | +20 |
| Special Attack | +20 |
| Special Defence | +20 |
| Speed | +20 |
Ps. Natural 5 star Sync Pairs will get 100/40/40/40/40/40 stats rather than 40/20/20/20/20/20 from Gold Star Promotion Tickets.
A total of 20 tickets are needed for a promotion. Each ticket gives a small base stat increase, so it is possible to skill up Sync Pairs one ticket at a time.
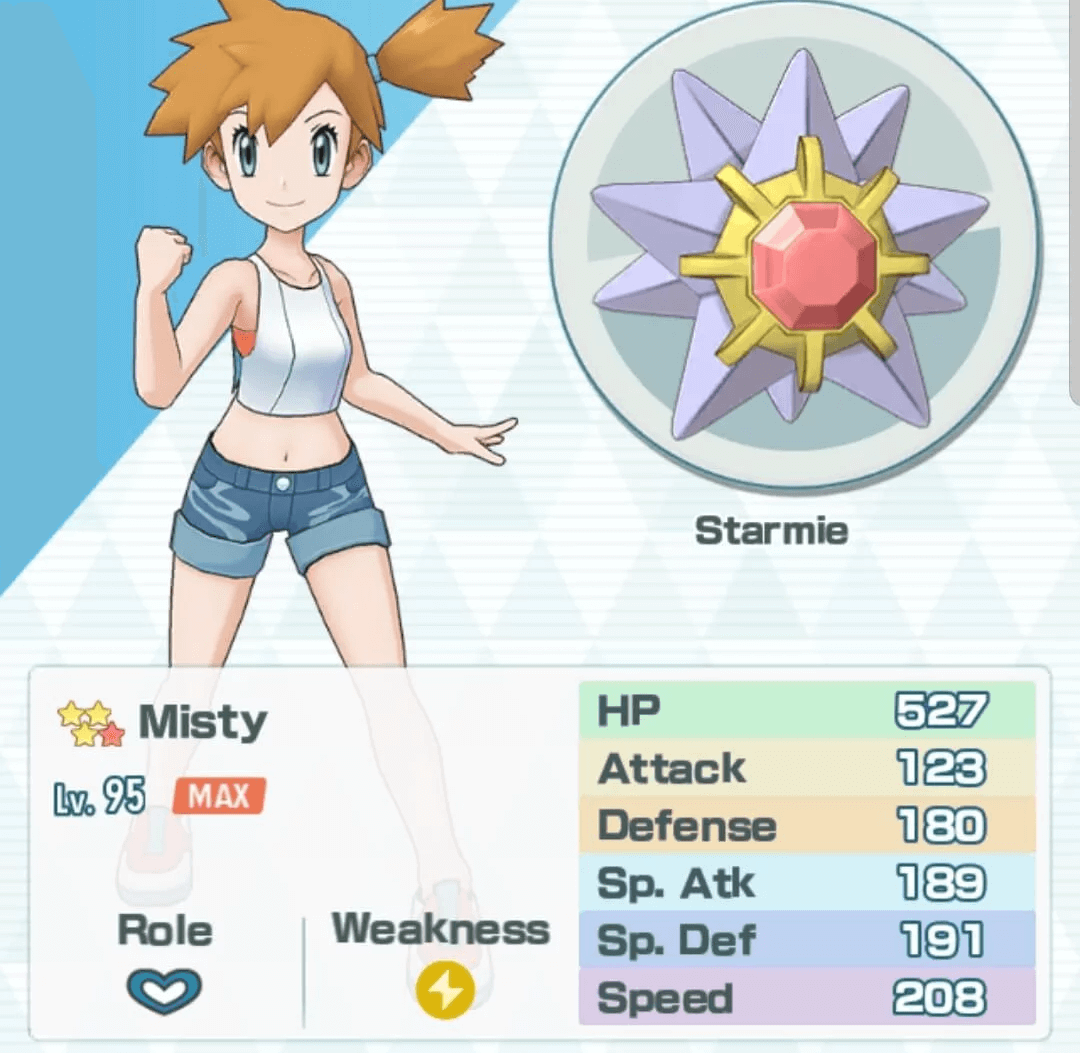
Here is Misty 4* level 95.

It is possible to quickly level up your Pokémon by consuming Level-Up Manuals, which come in 3 different variants.

| Level-Up Manual | XP Obtained |
|---|---|
| Level 1 | 100 |
| Level 2 | 1500 |
| Level 3 | 5000 |
Pokémon Typing
Typing is simplified in Pokémon Masters, but equally important, if not more, when compared to the main series games. Each Pokémon is weak to one type. In the story, players can see the recommended types to bring to each fight, each of which will be super effective against one or more enemies in the stage. In most cases, bringing the recommended types will make battles much easier.
Sync Pair Role

The main damage dealing role of the team. Split into either Physical or Special depending on their main damaging moves. Strike Sync Pairs that can hit from both ends of the spectrum are classified based on their Sync Move's alignment.
On teams with at least one teammate that shares the same Sync Move Type, Strike units offer a flat +15 to both Attack and Special Attack when using moves of the associated Type. For example, if Giovanni and Mewtwo is used on a team with Sabrina and Alakazam (M), its Special Attack gets the +15 boost when using Confusion or Psychic. However, it doesn't gain the Type Skill boost when using Shadow Ball, since it does not share the same Type as Mewtwo's Sync Move.

Support units tend to be the bulkiest Pokémon in the game, which allows them to take enemy aggro and keep your strikers safe. They are also usually the Pokémon that tend to carry beneficial buffs that will help you enhance your entire team.
On teams with at least one teammate that shares the same Sync Move Type, Support units offer a flat +30 HP to all allied Sync Pairs.

Technical Pokémon excel at influencing the game through indirect combat. These would include status effects like Burn, Poison, Sleep, and Trapping, Weather conditions like Rain and Sun, or stat debuffs like Leer. Most of them have Sync Moves that increase in power when the target is affected by their toolkit.
On teams with at least one teammate that shares the same Sync Move Type, Tech units offer a weaker combination of boosts from its Strike and Support counterparts. Instead of +15 to both Attack and Special Attack, Tech units only provide +12. However, it also offers +12 HP to all allied units.
Currently, the most common advice is to use 2 Supports and 1 Striker when building a team.
A Striker Pokémon enjoys dealing lots of damage, which means they are very reliant on the Move Gauge. If you end up with 2 Strikers, you will be in a position where you will quickly run out of resources to give them commands and end up having to wait, which the enemy AI might take advantage of. The moment your bulky Pokémon faints, the damage your team takes will significantly increase since Striker Pokémon are very squishy in comparison. The reason we don’t recommend Tech Pokémon at the given time is that the game isn’t fully released yet. At this time, the hardest content can currently be cleared by level 75-80-85 Pokémon (3/4/5 stars respectively). Perhaps when the full release of the game is finally out and the content becomes more challenging, their status effects will come in handy.
Therefore, we currently recommend 2 Supports and 1 Striker, allowing you to have all the buffs you possibly could need - as well as 2 meat shields for the enemy to chew through before they can touch your damage dealer.
Moves / Sync Moves / Passive Skill Effects
Simply tossing together a team by blindly picking a Pokémon for each role won't always be the best strategy, though. It's equally important to consider what each Sync Pair brings to the table in terms of Moves, Sync Moves, and Passive Skill effects. For example, Rosa and Serperior’s third skill, Time to Energize!, is fantastic for keeping the team’s Pokémon moves going by refilling Move Slots. This enables her team’s Strikers to continue attacking in succession.
Sync Grid
A new feature has been implanted called Sync Grid. Sync Grid is an additional way of powering up your Sync Pairs.
Currently DeNA plans on releasing Sync Grid for 4 Sync Pairs a month. So overtime, they will ensure all Sync Pairs gets their Sync Grids.
So how does it work? In this section we will cover all the important aspects of Sync Grid. You will need to know the following
1- Sync Orbs
2 - Energy Consumption
3- Planning and Execution
Sync Orbs is the currency that one must grind to consume in exchange of unlocking additional powers in the Sync Grid.
Sync Grid is a grid with multiple paths, as you unlock a note, you gain a power up, this can be a stat change, or additional effects to your passives, power moves, or even gaining new game mechanics for your sync pairs.
To obtain a Sync Orb it requires you to use Sync Move, which will then have a chance of obtaining a Sync Orb, in other words, obtaining Sync Orbs is free, and it is hiding behind luck each time you use a Sync Move. Now there are two ways of obtaining them which we will explain here.
Single Player Mode - When playing Single Player, the Sync Pair you use will obtain Sync Orbs, but those Sync Orbs will be limited to the Sync Pair you used. This means that if you used Flint & Infernape and obtained Sync Orbs. Then those Sync Orbs may only be used by Flint & Infernape.
Co-Op Mode - When playing Co-op and using Sync Move in which case you also obtain Sync Orbs, these are general goods as in, they are not tied to the Sync Pair you have used, which means it doesn't matter which Sync Pair you play with. You will receive a currency that can be exchanged for the specific Sync Pair you wish to use it on, and thus exchange it to that specific Sync Pair's Sync Orbs.
It has been proved that playing Single Player is the fastest way to achieve Sync Orbs and is therefore the recommended approach to grind them. If you do not wish to grind them, then just play as you always have done, as you will passively collect the Sync Orbs.
When you first open the Sync Grid you can see many clickable grids where the first one says Energy Cost 0.
As you proceed with Sync Grid one might realize that the cost of Energy is raising up, and is basically works like a limiter.
Energy Consumption is there to limit your choices, so that you may not fully unlock entire Sync Grid, but only certain ones, as you slowly unlock new power ups, you will consume more and more energy, and once you hit your limit, you will not be available of unlocking more. Do not worry, it is possible to reset your talents, where you will get a material refund as well.
So keep in mind that one must be wise about the path and route they wish to take.
With how Sync Orbs and Energy Consumption now has unveiled in the Pokémon Masters universe, it is very wise to plan ahead and execute accurately to ensure that your Sync Pairs lives up to your preferences. GamePress will soon release multiple Sync Grid Builds where we will help you understand your Sync Grids even more, and recommend you various Sync Grid builds.
Feel free to join our discord, discuss, analyze or just seek help. We are around just to help you out.


