


Overview
Plumeria and Sallazze are a bit lackluster as a strike pair, but can act as a jack-of-all-trades that incorporates some of the features of Striker, Tech, and Support pairs at the same time given the proper grid setup. Their strongest tool is a grid-boosted Smog, which every grid listed will lean into to varying degrees. The Jack of All Trades set attempts to strike a balance between Plumeria & Salazzle’s advantages to a certain degree, allowing her to work on most team archetypes. The Alolan Smog set leans extremely hard into the versatility of Smog to make this sync pair a source of harassment that helps both offensively and defensively. And finally, the Technically Supportive Striker maximizes Plumeria and Salazzle’s supportive qualities and potential longevity.
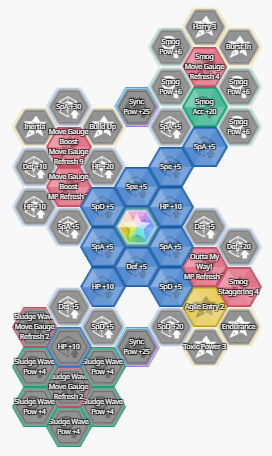
Sync Grid Build 1: Jack Of All Trades

The goal of this set is to maximize Salazzle’s effectiveness as a striker while keeping the trickier effects that give her a niche. Smog Acc+20, Smog Move Gauge Refresh 4, and Smog Staggering 4 make Smog an excellent tool for supporting Salazzle’s team and building the sync gauge quickly, while the two Sludge Wave Move Gauge Refresh 2 nodes let her spread around decent damage in order to help clean up. Toxic Power 3 synergizes with Smog’s high poison chance and helps patch up Plumeria’s damage by making Sludge Wave that much more threatening, while Agile Entry 2 can help keep her alive a little longer despite having thin defenses. Endurance is also also an option over Agile Entry 2, though it doesn't work against Sync Moves, which is where Plumeria is likely to take the most damage in most setups.
While Salazzle is a bit lackluster as a striker when not dealing Super Effective damage, this is usually her strongest set. It can slot in to help harass the opponent, and can work with a strong single-target main striker to help clean up the sides with Sludge Wave.
Sync Grid Build 2: Alolan Smog

While Sludge Wave’s spread damage is nice to have, Smog is arguably the top reason to use Plumeria in the first place, and this grid leans very hard into that fact. As before, Smog Acc+20, Smog Move Gauge Refresh 4, and Smog Staggering 4 are the priorities in order to give smog its spammy and harassing advantages. This set also picks up three Smog Pow+6 nodes to add a nearly 40% base damage boost to a 5/5 Smog, while Toxic Power 3 and Harry 3 take advantage of the dual-status nature of a boosted Smog to raise its damage even higher. Agile Entry 2 is also there to help keep Salazzle going a little longer with some luck. At the end of it all, Smog becomes a fairly high damage 1 bar move with many harassing qualities, and Salazzle’s only real job is to buff up and keep hitting that Smog button.
If you’re using Houndoom, this set makes for a very, very good partner. It can poison and flinch in a single attack, which allows Houndoom’s Dirty Fighting 5 and Foul Fighting 5 sync grid nodes to take effect, which grants tremendous damage boosts when put together. While this version of Plumeria can slot into many teams due to its versatility, it’s with Houndoom that it truly shines.
Sync Grid Build 3: Techy Striker
Taking a bit more of a supportive role, this grid once again follows the same basic route with Smog Acc+20, Smog Move Gauge Refresh 4, and Smog Staggering 4 just because a boosted Smog is so useful. However, this time it also picks up Move Gauge Boost MP Refresh 3 and Move Gauge Boost Move Gauge Refresh 9 to give Salazzle a chance to refresh the uses of Move Gauge Boost, as well as allow it to give 4 bars instead of 3. Outta My Way! MP Refresh 3 is also added as even a single boost is generally enough to make a large difference, adding more long-term utility to Salazzle’s kit, and finally Agile Entry 2 can help to keep Salazzle alive.
This grid is a strong option for the Battle Villa, as it brings a fair amount to the table while letting Salazzle stay relevant through several battles without losing much edge. As before, this set can work very well alongside Houndoom, and can open up some very nice opportunities for very strong plays.
Lucky Skills
Power Flux 3 is generally the top choice for most Plumeria & Salazzle builds. This sync pair can easily fill the bar thanks to their high base speed, fantastic buffs, and gauge boost skill, so this lucky skill will almost always give a full boost. Another skill worth considering is Defense Crush 2. Since Salazzle will tend to spam Smog at basically every possible opportunity and Sludge Wave hits the entire field, this could be very synergetic on Supportive sets like Techy Striker and Alolan Smog, though only when paired with a physical striker, as Salazzle’s attacks are all special and gain no advantage from defense drops.
Sync Workshop Index:
If you're looking for help building your other Sync Pairs or getting a sense of what each does for your gem economizing efforts, the Sync Workshop Index is the place for you! Even if you aren't, really, you can't go wrong with it in an attempt to broaden your understanding of the meta or just find something interesting to binge read either.

About the Author(s)


