

Overview
Since the release of Pokemon Masters, Brock & Onix have been seen as less than useful beyond the game’s early stages. Their sync grid definitely changes this, but it doesn’t really focus on any single strong direction or being the very best at any one role. Instead, it mainly offers ways to make them better than they are at what they already do to varying degrees. This is evident in the Jack of All Trades grid, which basically takes the old Brock & Onix and powers them up. Offensive Tech takes a more offensive approach to their kit, and makes them a more effective secondary attacker while keeping some solid Tech undertones. The Supportive set, which is arguably the most useful set here, makes Brock & Onix a bit less Tech than before and gives them broadly applicable supportive functions. Finally, the Co-Op Permatank is a highly unique set in the format it is designed for that has the potential to completely lock opponents out of the game with decent Mp Refresh rolls.
Sync Grid Build 1: Supportive Tank
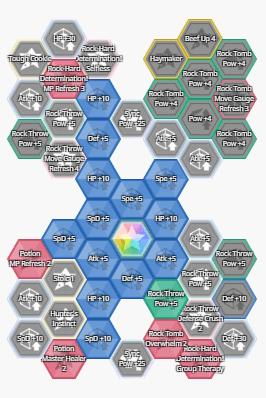
Brock & Onix have some potential as a more supportive sync pair, and this grid seeks to maximize those aspects. Potion MP Refresh 2 and Potion Master Healer 2 come first, as their value is so great. Next is Rock Hard Determination! MP Refresh 3, and Rock Hard Determination! Group Therapy. These two nodes together not only buff Brock & Onix’ attack and defense, they also grant a multiple use Full Heal All that can remove any and all status conditions on the entire team. Finally, Rock Tomb Overwhelm 2 is picked up in order to grant Rock Tomb a chance to drop the target’s attack, which can add another layer of protection for the team. This grid obviously works best when facing off against an opponent that enjoys spreading status around, and has a slight edge when facing physical attackers due to Rock Tomb Overwhelm 2. Spammy attackers like Flannery & Torkoal appreciate the removal of status effects such as Burn, Poison, or Trap that can potentially wear them down quickly, as does basically any team mate that happens to suffer from Freeze or Sleep in particular. It’s also not extremely common to have a single sync pair that can both heal and remove status, which provides the pair with one of its few totally unique niches.
Sync Grid Build 2: Jack Of All Trades

This grid attempts to generally maximize Brock & Onix’ universal utility by basically powering up everything that they already do. The most important nodes here are Potion MP Refresh 2 and Potion Master Healer 2, which let Brock & Onix keep their team alive with Potion. Next, it picks up Rock Throw Move Gauge Refresh 4 and Rock Tomb Move Gauge Refresh 3. Rock Throw is useful for burning through the Sync Counter quickly, while Rock Tomb is Brock & Onix’ strongest move and the only real reason for them to be called a Tech pair due to its ability to drop the target’s speed. Finally, we pick up Rock Hard Determination! MP Refresh 3 in order to give Onix & Brock a chance to max out their Attack and Defense with Rock Hard Determination! and maintain an offensive presence in the Villa after multiple stages. This grid is a good choice in the Villa due to its sheer versatility, or just for filler while running through training stages or events.
Sync Grid Build 3: Offensive Tech
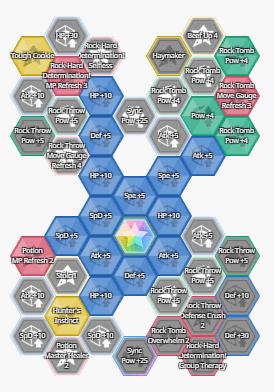
The goal of this grid is to focus on acting as a secondary, snowballing damage dealer. As before, we pick up Potion MP Refresh 2, as Potion’s utility cannot be understated. By picking up Rock Tomb Move Gauge Refresh 3 and three Rock Tomb Power+4 nodes, we enhance the effectiveness and mitigate a good amount of the cost of Brock & Onix’ strongest attack. Hunter’s Instinct is next, as it allows Brock & Onix’ power to snowball as the opponent’s speed drops. Finally, we go for Tough Cookie to raise Brock & Onix’ damage as they buff themselves, and Rock Hard Determination! MP Refresh 3 to give us a good chance at getting to +6 in both attack and defense, rounding off the offensive buffs perfectly. This grid works best against particularly speedy enemy teams, as it can slowly hamstring them to a crawl while assailing them with rocks. It works well with Skyla & Swanna in particular, as they can boost the team’s speed and defense while Brock & Onix slow down the other side. This can create a potentially huge speed disparagement between the two teams given a bit of time. This grid also appreciates Critical Rate support from sync pairs such as Sabrina & Alakazam or Phoebe & Dusknoir, and can also have some nice synergy with a main striker that appreciates the same support, like Cyrus & Palkia.
Sync Grid Build 4: Co-Op Permatank
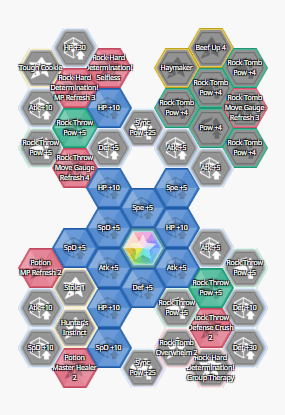
This build is designed solely for use in Co-op, where it can open up opportunities for frailer or slower Strikers like Sceptile and Metagross to dominate by completely shielding them from aggro (aided in no small part by the longevity provided by Potion). The crux of this build is Rock Hard Determination! Selfless, which makes the opposing team focus attacks on Brock & Onix. Rock Hard Determination! MP Refresh 3 is next, as it provides the pair with both more time to tank aggro and more Defense with which to do so. Potion MP Refresh 2 and Potion Master Healer 2 are also priorities here, as they let Brock & Onix support their team and keep themselves alive. Rock Throw Move Gauge Refresh 4, Rock Throw Defense Crush 2, and two Rock Throw Power+4 nodes round out the set, allowing Brock & Onix to fill the sync grid a bit faster while fishing for defense drops. This set is primarily useful against physical attackers due to Rock Hard Determination!’s defense raising qualities, and it absolutely falls flat against teams that use a lot of AoE. This grid also works best alongside a physical striker due to Rock Throw Defense Crush 2, so a pair like Korina & Lucario or Guzma & Golisopod can find some synergy here as well.
Lucky Skills
When paired with a physical attacker, Defense Crush 2 works wonders. This is especially the case with any Sync Grid that already has Rock Throw Defense Crush 2 built in. With the two together, Brock & Onix can throw out a 1-bar move that has two chances to drop defense and has a chance to cost nothing if the MP Refresh node is included. Likewise, Fast Track 2 is another nice choice, and more useful than Defense Crush 2 when paired with a Special attacker. It’s a recommended skill on more generalist supportive builds, though Brock & Onix fill the Defense Crush 2 niche a bit better. Finally, Vigilance is a great choice for the Co-Op Permatankbuild simply by virtue of the longevity it helps to provide.
Sync Workshop Index:
If you're looking for help building your other Sync Pairs or getting a sense of what each does for your gem economizing efforts, the Sync Workshop Index is the place for you! Even if you aren't, really, you can't go wrong with it in an attempt to broaden your understanding of the meta or just find something interesting to binge read either.

About the Author(s)


