

Overview
For their sheer tanking abilities, especially on the physical side of the spectrum, Dawn & Torterra can be exceptionally handy to have around, and their grid options really allow them to shine through when played to their strengths. The Supportive Tank grid is outstanding for most game modes, as it puts a heavy emphasis on Dawn & Torterra’s ability to tank damage, while the Offensive Tank grid sacrifices a bit of supportive function for surprisingly strong damage for a support unit. Either way, Dawn & Torterra make for a strong and reliable sync pair that will likely find their way onto your team frequently.
Sync Grid Build 1: Supportive Tank
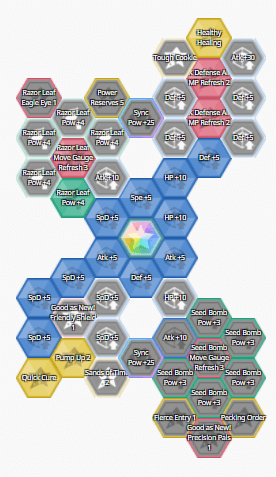
Healthy Healing is first, as it provides Dawn & Torterra with recovery if they enter the battle at full HP. Two X Defense All MP Refresh 2 nodes are next, which protect the whole team while making Dawn & Torterra even harder to take down. Quick Cure can help if Dawn & Torterra are trapped in particular, which can be devastating for a tank as it punishes their ability to attack and work towards the team’s next sync move. Pump Up 2 can provide the team with attack support in a pinch, and works very well with their Six Star EX form as they’ll generally be using at least one sync move per battle regardless. Finally, Razor Leaf Move Gauge Refresh 3 allows Dawn & Torterra to more easily keep attacking once they’re done buffing themselves and their team.
If you need a tank for nearly any game mode, then this grid has you covered. Just keep in mind that Dawn & Torterra do better against physically offensive opponents than special ones. The one area that they fall short in to some degree is the Battle Villa due to the fact that Healthy Healing only takes effect if Dawn & Torterra enter the battle at full health and their healing move only has one use and no MP Refresh, though this can be remedied by the use of the battle villa’s healing items to some extent.
Dawn & Torterra have great synergy with many of the game’s other premier tanks. On this front, Misty & Starmie probably make the best partners, as they provide special defense support, evasion support, and quick recovery. Sygna Suit Blue & Blastoise can provide additional passive recovery and special defense support to make Dawn & Torterra very hard to take down, and they also provide the whole team with KO endurance, which works extremely well with Dawn & Torterra’s fully restoring trainer move, Good as New!. Viola & Masquerain also have very solid synergy with Dawn and Torterra due to their ability to drop enemy special defense, and they can also help drop the opposing team’s defense faster if both have Defense Crush 2 as their lucky skills. On the offensive side, Dawn and Torterra have the advantage of being able to slot into nearly any team very effectively due to their very well rounded tanking performance, though with the lucky skill Defense Crush 2, they work a bit better with physical strikers.
Sync Grid Build 2: Offensive Tank
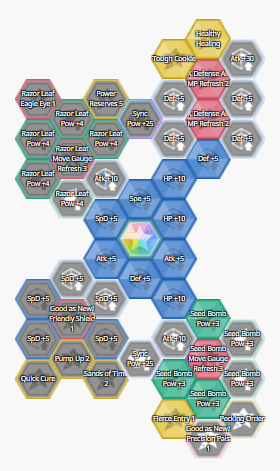
Healthy Healing is first, followed by the two X Defense All MP Refresh 2. They not only boost the team’s survivability, but also support Dawn & Torterra’s damage when combined with Tough Cookie. Seed Bomb Move Gauge Refresh 3 puts an emphasis on Dawn & Torterra’s strongest attacking move, as do the three Seed Bomb Power+ nodes, totalling +9 power. Finally, Fierce Entry 1 can help Dawn & Torterra start dealing max damage a bit faster.
In cases where a shorter battle is expected or a bit more power is needed, Dawn & Torterra can supplement their ability to tank with surprisingly high damage for a support unit. When compared to a +6 Special Attack Sceptile using Leaf Storm, a +6 Attack and Defense Torterra using Seed Bomb deals roughly 1/2 the damage, depending on the target’s defense and special defense values and Sceptile’s grid setup. They deal roughly ⅓ the damage if Sceptile has +3 critical rate and Torterra has no critical support, though their teammates frequently rectify that. This grid works best with speedy partners that can manage the move gauge well such as Lusamine & Pheromosa or Gloria & Zacian. It can also work very well as a secondary tank with powerful supportive options such as Skyla & Swanna, who can provide recovery with Potion and buff team speed. Sygna Suit Blue & Blastoise or Sabrina & Alakazam are also great as they provide critical support to the whole team alongside their other various supporting effects.
Lucky Skills
Normally, tanks like Dawn & Torterra want Vigilance as their lucky skill, especially considering their ability to boost Defense. However, Dawn & Torterra are unique as they already have Vigilance as a standard skill, so lucky skill options become far less absolute than they tend to be with many other sync pairs.
Defense Crush 2 is a top choice for any build that uses Razor Leaf as its main attacking move, as it grants a chance to drop the defense of multiple opponents at the same time. Though it is worth noting that this skill is only genuinely useful when paired with a physical damage dealer. Bug Guard is also a stand-out, as it almost entirely covers Torterra’s Bug Type weakness and allows Dawn & Torterra to slot into teams without fear of a random Bug Type attack dropping their effectiveness. Fast Track 2 can be useful for patching up Torterra’s low speed, which helps the entire team. Finally, Sand Shelter is also worth a note, as Dawn & Torterra don’t appreciate chip damage, and they do have a Sands of Time 2 node on their grid but no innate sandstorm immunity.
Beyond these, lucky skills can be a great way to customize the kind of tank that you want Dawn & Torterra to be because no one lucky skill is “mandatory” for them. Any type guard skill could be useful if you want them to tank a particular stage or game mode, as could any status resistance skill. While the above skills will tend to have the most general utility, the sky really is the limit with this sync pair!
Sync Workshop Index:
If you're looking for help building your other Sync Pairs or getting a sense of what each does for your gem economizing efforts, the Sync Workshop Index is the place for you! Even if you aren't, really, you can't go wrong with it in an attempt to broaden your understanding of the meta or just find something interesting to binge read either.

About the Author(s)


