

Overview
Once considered a top Support sync pair, and one of the best overall sync pairs in the game, Phoebe & Dusknoir are ready to make their triumphant return with their sync grid! ...or rather they would if it had been good. All joking aside; their grid may not be the flashiest in the game, but it’s very focused on providing Phoebe & Dusknoir what they need and alleviates some of the liability that their base kit brings to the table. As a wall that provides outstanding offensive support, they definitely can deliver in the form of the Physical Wall set, while a less orthodox approach with the Backup Wall can provide outstanding defensive coverage and protect the team at the same time.
Sync Grid Build 1: Physical Wall
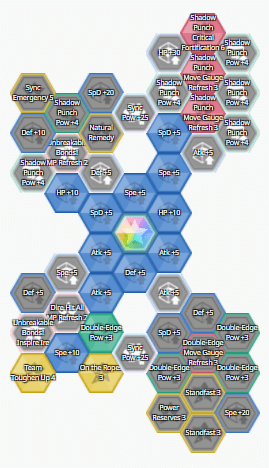
While the “tank” status of Dusknoir & Phoebe has waned a bit in the face of other, bulkier units, it’s still a viable choice with great offensive support. Two Shadow Punch Move Gauge Refresh 3 nodes and Shadow Punch Critical Fortification 6 make Shadow Punch an outstanding utility move, with solid odds of refunding one or both move gauge bars that it takes to activate and great odds of raising Dusknoir’s defense on use. Team Toughen Up 4 is outstanding here, as Phoebe & Dusknoir will end up taking a lot of hits, and spreading a lot of boosts as a result. Finally, On the Ropes 3 can give Phoebe & Dusknoir a sizable increase in physical bulk when their HP is low.
This grid is definitely best when used against opponents that prioritize Physical attacks, as several of its effects are useless when facing Special Attackers. For this reason, it’s great in the Champion Stadium - Master Mode against Bruno in particular. Bruno can beat Dusknoir repeatedly, yet Dusknoir will stand firm despite it all. They can also be useful in the Battle Villa, though their reliance on skill uses to excel will begin to become more obvious there. Legendary Arenas that focus on physical moves are also great, as Phoebe & Dusknoir provide fairly expansive role compression due to how many different advantages they grant at the same time. Full Force Battles are largely the same story, though the fact that these battles tend to fluidly switch from physical to special moves with each passing lair makes our dear Hoenn Elite Four member a bit less effective on this front.
Sync Grid Build 2: Backup Tank
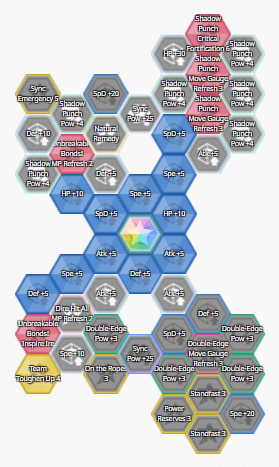
Two Shadow Punch Move Gauge Refresh 3 nodes and Shadow Punch Critical Fortification 6 are first again due to their sheer supportive utility. Team Toughen Up 4 gives solid odds of scoring a defense boost for the entire team when Phoebe & Dusknoir are attacked, and Unbreakable Bonds! Inspire Ire ensures that they will take those hits, with Unbreakable Bonds! MP Refresh 2 giving more chances to redirect damage.
Despite their solid bulk, the point of this grid is not to use Phoebe & Dusknoir as a primary tank. Rather, it’s designed to use them as a secondary tank with the ability to redirect damage at will and give the team’s main tank room to breathe and time to recover. While many other sync pairs have the ability to function in this manner, Dusknoir & Phoebe are the bulkiest options and the most likely to actually survive multiple redirects, and they provide the best offensive support for the team in this role, meaning they’re not simply dead weight picked only for a novel strategy. This build can be especially valuable in cases where the main tank is under heavy siege, like in the Champion Stadium: Master Mode, where Phoebe & Dusknoir’s offensive/defensive role compression can make physical strikers in particular extremely powerful. This same role compression and overall effectiveness also makes them great in Full Force Battles, where they can keep the flow of battle going for a prolonged period of time. They’re also very nice in the Battle Villa thanks to their passive ability to boost team defense, though their ability to redirect damage is locked behind a skill, meaning they’re best just using the previous grid when facing a physically offensive stage in this scenario.
Tanks that can take a bit of time to recover like Jasmine & Steelix with Recuperation 2 work well with this grid, as it buys them vital time that they need to get back into the battle when damaged. Holiday Erika & Comfey with their numerous incremental recovery options have great synergy with this grid, as Comfey can provide recovery and regenerate its own HP, while Dusknoir can boost defense, increase the team’s Critical Rate to boost Draining Kiss’s damage, and take pressure off of Comfey by redirecting damage. Phoebe & Dusknoir are also great when paired with powerful yet not self-sufficient physical strikers such as Gloria & Zacian or N & Zekrom, as their ability to raise Attack, max Critical Rate, and provide Sync Gauge support lets them fill the holes teammates’ kits.
So why would you consider this approach instead of simply running a healer like Skyla & Swanna? After all, redirecting attacks takes a skill use, just like activating a Potion. The answer is Role Compression. What other sync pair can simultaneously help out the team’s main tank, max Critical Rate, boost the move gauge, and boost team Attack all at the same time?
Lucky Skills
Because Phoebe & Dusknoir already have Vigilance built in, they’re ahead of most other Support units when looking at lucky skills. Defense Crush 2 is a top pick, as Phoebe & Dusknoir are already designed to synergize with physical attackers and have two MP refresh nodes on Shadow Punch. Dark Guard is an option if you want to use Phoebe & Dusknoir as more of a universal tank, as it allows them to have virtually no weaknesses and wall with near impunity. Finally, Fast Track 2 is a good option that lets Phoebe & Dusknoir patch up their low speed stat without outside support.
Sync Workshop Index:
If you're looking for help building your other Sync Pairs or getting a sense of what each does for your gem economizing efforts, the Sync Workshop Index is the place for you! Even if you aren't, really, you can't go wrong with it in an attempt to broaden your understanding of the meta or just find something interesting to binge read either.

About the Author(s)


