

Overview
Say hello to one of the best free-to-play tanks in the entire game! Sycamore & Xerneas are very similar to the often lauded Sygna Suit Blue & Blastoise in many ways, and while they do have quite a bit of overlap in terms of what they do, being compared to one of the best sync pairs in the game is never a bad thing! With their unprecedented ability to outright max the team’s Special Attack, Special Defense, and Speed after a single Sync Move use at 5/5, Sycamore & Xerneas make for extremely attractive partners for many of the sync pairs currently in the game, and that’s without even going into the way that their sync grid, the first to ever be released for a Legendary event free-to-play sync pair, improves their performance. In essence, the use of their sync grid comes down to which attacking move you want to focus on. The Horn Leech Regeneration set allows Sycamore & Xerneas to act as a premier tank thanks to the regeneration that Horn leech provides. The Moon Blast Secondary Offense set focuses on valuable Fairy Type damage and Special Attack drops to whittle away at the opponent while supporting the team. And finally, the Dazzling Gleam Support set focuses a bit more on team and move gauge support, allowing the team to focus on using constant heavy hits with ease.
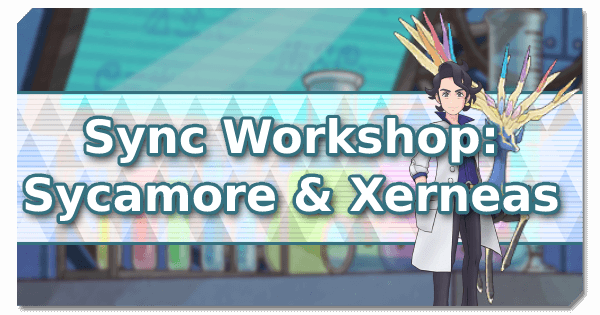
Sync Grid Build 1: Horn Leech Regeneration
Going for Horn Leech and its recovery capabilities is a bit of a no-brainer when building a tank like Xerneas. As a result, Horn Leech Move Gauge Refresh 3, the two Horn Leech Master Healer 1 nodes, and Horn Leech Power+ nodes totalling +9 base power are also no-brainers, as they make the move extremely useful to abuse. Recuperation 1 provides healing when Xerneas uses its sync move, and Revenge Boost 4 gives great odds of recovering move gauge when Xerneas is attacked, which helps to offset the high cost of Horn Leech. Of course, team speed issues largely evaporate once Sycamore & Xerneas use their sync move and maxes the entire team’s speed stats at once.
This sync grid has utility in basically any game mode thanks to Xerneas’ high bulk. It’s the premier tank build thanks to Horn Leech’s recovery options. Its biggest issues come from the blind-spots in Sycamore & Xerneas’ base kit. In particular, the fact that their Sync Move, Gentlemanly Geomancy, doesn’t boost the team’s Attack, Critical Rate or Defense stats, though the former can be boosted by the sync pair’s passive skills… some of the time. With that in mind, this grid can protect and boost the entire team through the Champion’s Stadium, Legendary Arena, and most Full Force Battles with ease if played to its strengths. It’s also particularly outstanding in the Battle Villa, as almost none of its big strengths rely on skill uses.
This grid really wants support in two areas: Attack and Critical Rate. Defense too, but not quite as much. This is because more damage on Horn Leech is directly connected to more per-turn recovery. This makes Phoebe & Dusknoir a great choice for a partner, as they can max Attack and Critical Rate while also potentially redirecting damage with specific sync grid setups. This can give Xerneas time to recover and reach their Sync Move safely. Sygna Suit Blue & Blastoise is another outstanding choice, as they offer Defense and Critical Rate boosts, though the latter will take some MP refresh luck to max. Xerneas and Blastoise can also double-up Team Shout 4 together and raise Attack passively, but that takes a mix of luck and time. On top of all of this, the two are a bit redundant in what they give to their team. While that’s not exactly bad per-say, as both are outstanding in what they do, it does entail a bit of lost potential that can be a waste in the Champion’s Stadium in particular. Sygna Suit Leaf & Venusaur are also great partners due to their ability to use Potion and lower enemy defense, which is the other way to raise Horn Leech’s damage. As far as more offensive sync pairs go, the grid itself doesn’t provide much of the team support that would help distinguish between potential partners. That’s more left to their base kit.
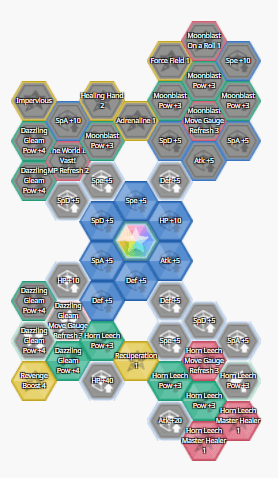
Sync Grid Build 2: Moon Blast Secondary Offense
Moon Blast is Xerneas’ most powerful Fairy Type move; a type that is currently lacking in viable damage dealers, and Xerneas itself has most of the tools needed to buff it to very solid dps for a support unit. Moonblast On a Roll 1, Moonblast Move Gauge Refresh 3, and Moonblast Power+3 are first, as they provide solid support to Moon Blast. The World is Vase! MP Refresh 2 is next in order to provide additional chances to support the team with move gauge acceleration, status healing, and passive recovery. Healing Hand 2 provides solid odds of removing the entire team’s status problems every single turn, which can be invaluable for being able to continue tanking hits without needing to worry about being worn down by poison or burn. Finally, Recuperation 1 allows Xerneas to heal up with a sync move, keeping it on the field for a greater length of time.
If you need a bit of extra Fairy Type damage or are dealing with opponents that have high Special damage, then this is the build for you. This grid takes full advantage of the power that Professor Sycamore and Xerneas’ sync move grants the entire team. Maxed team Speed means the high cost of Moonblast isn’t much of an issue. Maxed team Special Attack means that Moon Blast hits for maximum (discounting criticals) damage, and Maxed team Special Defense, when combined with the high odds of reducing enemy Special Attack that Moon Blast brings to the table, means that Sycamore & Xerneas’ entire team becomes hilariously bulky when facing special attackers. This is a great grid to work with for any fairy-weak or special attack heavy stage of the Champion’s Stadium, as it provides great support and fair damage in one unit with little opportunity cost. Just remember to leave off the “”No stat reduction” modifier for Master Mode! It’s also great for Full Force Battles, where Xerneas can protect and buff the entire team and set them up to steamroll the opponent’s team in no time flat.
If used for added offense, then this grid really wants some Critical Rate support. If used purely as a tank, then Defense is the key in order to ensure that a random Physical move doesn’t spoil your day. Our old friend Sygna Suit Blue & Blastoise can provide both, and is another remarkable tank sync pair that works very well with
Sycamore & Xerneas (as well as many, many other sync pairs) due to their ability to fill in holes. But, again, they do have several redundant effects, so it might be best to not use this pairing in the Champion’s Stadium. New Years Lillie & Ribombee provide some interesting support here as well, as they can max Critical Rate and also boost Evasion, which is yet another way that Xerneas can tank powerful hits. Skyla & Swanna provide Defense boosts and instant healing with Potion, but their other extremely valuable boost (to Speed) is largely wasted after a single sync move cycle, meaning they might be, again, best not paired with Sycamore & Xerneas when it comes to the Champion’s Stadium. Dawn & Torterra also works extremely well for a dual-tank comp, as they fill in the holes left by Gentlemanly Geomancy defensively speaking and can drop the opponent’s attack stat any time they take a hit. Christmas Erika & Comfey also love working with this grid, as it patches up their special defense and greatly increases the damage of Draining Kiss. In return, they provide whole-team healing, additional Status cure odds, and defense boosts. Interestingly, a rather unorthodox offensive partner that likes working with this grid is Gloria & Zacian. While they can’t take advantage of the Special Attack boosts that Sycamore & Xerneas provide, they can max their own Attack, and love the boosts to Speed and Special Defense. In particular, their high base speed and numerous MP refresh options make team speed largely a non-issue after they enjoy the buffs that Sycamore & Xerneas bring. Additionally,they also don’t mind giving up the first sync move of the battle that much, as the real power of their sync move comes into play after the opponent has used their own. They can also pull off a very solid Fairy Type set, making this a potentially brutal combo in fairy-weak stages. However, this team comp borderline requires Critical Rate support in the 3rd slot to hit maximum potential. Beyond this, basically any Special Attacker that has some alternate way of buffing their own Critical Rate and a lack of Special Attack buffs loves being paired with this grid.
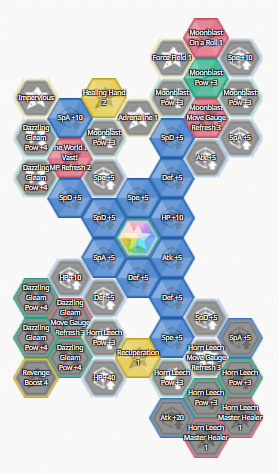
Sync Grid Build 3: Dazzling Gleam Support
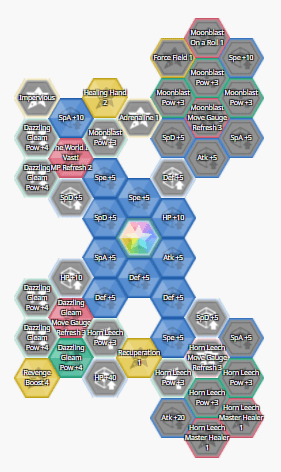
Dazzling Gleam lacks the passive recovery of Horn Leech and the attack drops/solid Fairy Type damage of Moon Blast, which often causes it to be overlooked. However, Dazzling Gleam does have the advantages of AoE damage and lower cost, making it just as viable as its competition. Dazzling Gleam Move Gauge Refresh 3 and Dazzling Gleam Power+4 are the only offensive nodes invested in for this grid, with The World Is Vast! MP Refresh 2 and Recuperation 2 coming in next for their general utility. Revenge Boost 4 has a very good chance of granting 1 move gauge bar when Xerneas takes an attack, making this even better for teams that use a lot of bars to operate, and finally Helping Hand 2 gives Xerneas good odds of removing status from the team every time it attacks. This can also be switched out for Impervious very easily if your Xerneas is more likely to face a stat-dropping opponent than a status-inducing opponent.
As stated, this is the grid to use if you want to prioritize the move gauge. Between Dazzling Gleam’s lower gauge cost and MP refresh, Revenge Boost 4’s random gauge generation, and capping out of the whole team’s speed stat after a single sync move, keeping up the gauge will not be an issue with this grid. The main use of this grid is when it’s paired with 4-gauge attackers like Lysandre & Yveltal or Lance & Dragonite, as it makes that liability far, far easier to work around. While it’s hard to point out a specific game mode where this grid’s advantages make it better than the others listed here, it’s also equally as valid to say that in virtually any mode, if given the proper team composition, it can definitely stand on its own merits. As the “one size fits all” grid, it is not very demanding of the team, though Defense boosts are greatly appreciated. Its low-cost, high-return playstyle is perfect for the Battle Villa in particular, and can be great in literally any other game mode depending on the requirements of the team.
As stated, 4-bar attackers appreciate this grid, but so do sync pairs that are generally not seen as main attackers and are held back by the high cost of their moves. On this front, Sygna Suit Blue & Blastoise can start relying on the heightened damage of Hydro Cannon, and Sygna Suit Leaf & Venusaur can enjoy the power of Frenzy Plant, even paired with a main attacker that has a reasonably high move gauge cost. New Years Lillie & Ribombee are also great with this grid, as they can protect from status, raise team Evasion and Critical Rate, and afford to use Leech Life despite its high move gauge cost.
Lucky Skills
Vigilance is the obvious choice for a lucky skill. The ability to instantly max the team’s Special Defense is basically useless if a single poorly timed Critical attack ignores it and takes a huge gash out of Xerneas’ health. However, if you’re willing to gamble a bit, then Stoic 2 is an okay choice as well, as it can patch up Xerneas’ weaker defense stat over time. Just keep in mind that a Critical attack will, as previously stated, cut through this and make it basically worthless. Finally, Defense Crush 2 is a good choice for the Dazzling Gleam-centric grid, as it has a chance to drop the defense of all opponents with each use. However, Sycamore & Xerneas are generally best paired with Special Attackers due to their ability to max the team’s Special Attack, so this will end up going to waste unless accounted for in team building.
Sync Workshop Index:
If you're looking for help building your other Sync Pairs or getting a sense of what each does for your gem economizing efforts, the Sync Workshop Index is the place for you! Even if you aren't, really, you can't go wrong with it in an attempt to broaden your understanding of the meta or just find something interesting to binge read either.

About the Author(s)


