Preface
This guide is written under the assumption that you already know the basics of the game, as there will be some min-maxing, common terminologies, nicknames as well as in-game mechanics that I won’t be explaining. If you happen to come across this doc as a newbie, consider checking out this Beginner’s Guide. For comments, concerns, questions, suggestions, etc., join the official discord, GFC discord, or the official Gamepress discord.
Basic formation
For the sake of clarity, this guide uses the computer Numpad to refer to the positions in the formation grid:
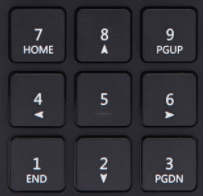
For example, “Position 1” is bottom left, “Position 7” is top left, etc.
ARSMG taxonomy
What is an ARSMG Team?
An ARSMG Team is a team composed of AR T-Dolls as the main DPS unit and SMG T-Dolls as the tanks, and occasionally HG T-Dolls as support. The tile buff synergy between ARs and SMGs is what makes this team work well. With ARs’ average stats across the board and SMGs’ typically higher health pools and evasion, ARSMGs are well-rounded teams that are well suited for most enemies and a majority of boss fights. It is recommended to start off with an ARSMG as your first team and to have one to two teams leveled for future content.
To understand how to build an ARSMG, we must first understand the existing roles a T-Doll can have. Each class has Dolls with different roles inside it, and understanding these roles is a crucial step to building a well synergized, strong team. In this guide, we’ll focus on the roles ARs and SMGs have and how they’re used. HGs will also be briefly mentioned.
What is an AR T-Doll?
AR (Assault Rifle) T-Dolls are one of the main DPS units in the game, and the first DPS Commanders have contact with at the start of their career. They present balanced Accuracy, Damage, and Rate of Fire.
ARs usually have tiles that buff exclusively SMGs, and so are often paired with SMGs. As such, an ARSMG echelon is capable of dealing with a wide variety of enemies early on and can help Commanders progress a fair amount. Their usual positions are on 1, 4, and 7, with Position 4 reserved for a specific type of AR called Support AR.
What is an SMG T-Doll?
SMG (Submachine Gun) T-Dolls, on the other hand, are a class of Doll whose primary role is to tank enemies by having a high HP pool and high Evasion when compared to DPS Dolls (as well as some other methods that will be explained later.) SMGs are also one of the first types of Dolls Commanders meet during the start of their career, and can adequately tank most enemies. SMGs usually have tiles that buff exclusively ARs, completing the ARSMG team’s synergy. They commonly go on positions 5 and 8, and rarely position 2.
How to teambuild?
Remember the numpad? We’ll use it to detail how a typical ARSMG is built and positioned.
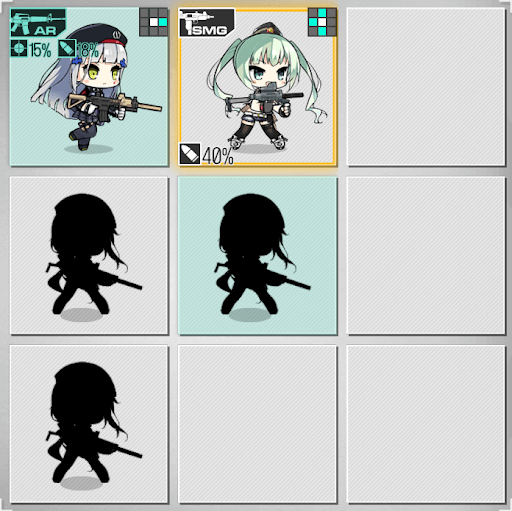
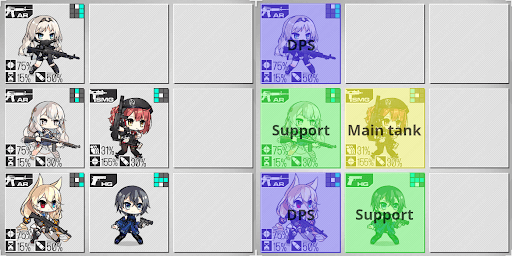
A typical ARSMG will be in Positions 1, 4, 5, 7, and 8. This is what’s known as “F Formation” due to its resemblance with the letter F.
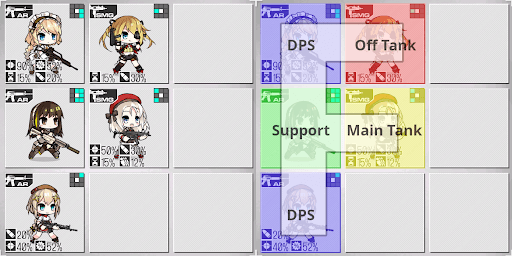
What an F formation looks like
The entire echelon is pushed to the left side because that gives the Dolls the most time for their skills to come off cooldown and more time to shoot the enemy coming from the right side.
Position 8 is often preferred over position 2 because of how enemy positioning works. Many enemies have a circular target range. Due to the game’s layout, enemies along the top row (7, 8, 9) spawn higher up and stop further forwards. Therefore they can end up targeting the DPS unit at 7 if someone is not on position 8, whereas the same is not typically observed on the bottom row (1, 2, 3). Because T-Dolls can be moved in battle, this is not a hard requirement but is definitely preferred. This top-heavy bias is illustrated in the image below:
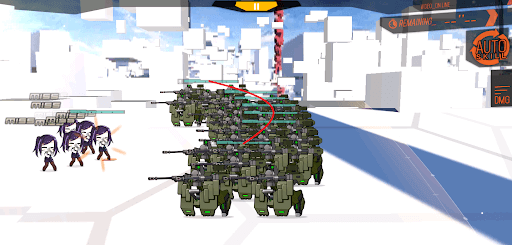
Disclaimer: Demonstration was performed with enemy damage off. Jill is not a tank. Note how the top-most Cerynitis is further forwards than the bottom-most Cerynitis
Positions 1 and 7 are reserved for typical DPS ARs. These are your generic damage dealers or grenadiers.
Position 4 is reserved either for an HG or a Support AR. For more details, check the Support AR section and the 3AR vs 2AR+HG section.
Position 5 goes to an SMG called the main tank. Their primary role is to draw enemy fire and buy time, as they are standing at the frontmost part of the formation. When selecting a main tank, Commanders should consider defensive base stats (HP and Evasion), Skill, and Tiles. As such, SMGs with a bad tanking ability (poor HP pool, low Evasion) should generally be avoided, as it will not contribute to the team’s survivability.
SMGs’ skill and tiles should be weighed out. Commanders can either opt for SMGs with very strong tiles (e.g. UMP45 tiles) to greatly increase the ARs’ DPS or a strong defensive Skill (e.g. RO635’s Skill) that will vastly increase the SMG’s tanking ability to buy time for the Echelon to deal with the enemies.
Position 8 is reserved for an SMG either capable of adding significant DPS to the Echelon or supporting/also being the maintank SMG. Since they are not in the very center of the frontline, the T-Dolls on position 8 are shot less than the maintank; therefore, a purely defensive skill is not as urgent. This leads to the idea of the offtank (or offensive tank). By using skills, the offtank SMG can deal additional damage to the enemy and lighten the burden on the maintank SMG. As they say, the best defense is a good offense. Offtanks can still be used to tank a couple of shots; however, as they are preventing the enemies from reaching part of the backline, and still have SMG survivability stats.
As early enemy compositions don’t warrant 2 Maintanks (fights don’t last long enough), new Commanders are advised to use an Offtank SMG for position 8.
Since many offtank SMGs are unable to reach all DPS ARs from position 8 or 2 with their tile buffs, one thing to look out for is to have the AR that receives those limited tiles be the one that makes the most out of it (e.g. grenadiers getting firepower tiles)
Example offtank on position 8 gives firepower on tiles, so a grenadier behind them on position 7 is a nice option
AR T-Doll roles
Note that Neural Upgrade can change the behavior of some T-Dolls, either by granting them another category (like AR-15 gets added to multi-hit category due to her Skill 2) or by giving them a unique role (M4A1’s Cannon on Skill 2). With that said, most ARs fall under the categories below:
- Grenadier AR: ARs that have a grenade Skill, be it AP (Anti-Personnel) or HE (High-Explosive); e.g. 416, M4 SOPMOD II, StG44, and G3


- Support AR: ARs that are capable of buffing other ARs either through Skill or Tiles; e.g. M4A1 and Ribeyrolles

- RoF AR: ARs whose skill primarily consists of buffing their own RoF; e.g. ST AR-15, Type 97, AUG, and OTs-12


- Damage AR: ARs whose skill primarily consists of buffing their own Damage; e.g. G41 (Homete), TAR-21, OTs-14 (Groza), and FNC


- Night Specialist AR: ARs whose skill provides a vastly stronger boost at night, but is average or suboptimal at day; e.g. AS Val, OTs-14 (Groza), and 9A-91


- Multi-hit AR: ARs whose skill grants them the ability to shoot more than one bullet at a time; e.g. AN-94, G11, and ST AR-15 Mod


- Burst ARs: Self-buffer ARs whose skill uptime is very short; e.g. TAR-21, G11.
- Sustained ARs: Self-buffer ARs whose skill uptime is very long; e.g. ST AR-15 and Type 95

For more details on what each type of AR T-Doll does, refer to the following sections.
AR roles in detail
Grenadier AR
Grenadier AR, also referred to as Nade AR or Grenade AR, is any type of AR that shoots a Grenade as its primary Skill. The grenades have an explosion radius, and whatever the explosion hits is dealt damage equal to the skill’s stated multiplier multiplied by the number of links the enemy has. They are often used to take out dense packs of enemies. Grenades also all ignore enemy armor and evasion. Inside the Nade role, there are different types of Nade ARs, which will be discussed below:
Anti-Personnel (AP) Grenades
AP grenadiers are the most used type of grenadier in the AR class. They shoot a grenade at the highest HP target. By default, they have an 8-second initial cooldown, around a 2-second delay between skill activation and grenade impact, a small explosion radius of 1.5 units, and the highest raw damage multipliers of any grenadier.
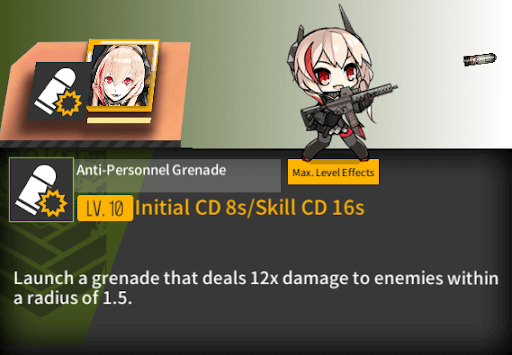
Example of the Anti-Personnel Grenade skill (M4 Sopmod II)
Pros:
- High damage
Cons:
- Long initial cooldown (8 seconds)
- Small radius
- No Self-buff, thus they lag behind self-buffers on auto-attack DPS
High-Explosive (HE) grenades
HE grenadiers are the least used type of grenadier in the AR class. They also target the highest HP enemy and have an 8-second cooldown, 2-second delay, but a 4 unit explosion radius. However, they have a much lower damage multiplier that also weakens with distance from the point of impact. Because of the low multiplier, HE naders are often unable to perform well and are not worth the investment.

Example of the High-Explosive Grenade skill (FAMAS)
Pros:
- Large radius
Cons:
- Low damage
- Long initial cooldown (8 seconds)
- No Self-buff, thus they lag behind self-buffers on auto-attack DPS
- Not strong enough to significantly affect enemy attacks or backline enemies
Unique Grenades
There are a couple of ARs whose Grenade Skills are neither an AP Grenade nor an HE Grenade. These unique Grenadiers each have their own type of skill, with their own ICD, multiplier, aim time, and even how many grenades they shoot.
Some examples of Unique Grenadiers are FAL, K11, and Zas M21. FAL used to have a niche in 0-2, K11 has a niche in 12-4E and Zas M21 has a niche in 8-1n. For more details, please check the Dolls’ page.
Pros:
- Useful in their niches
Cons:
- Inferior to AP Grenadiers outside of their niches
Mod Grenades
Grenadiers that undergo a Neural Upgrade acquire a second Skill that is usually an add-on to their grenade Skill. Examples of AR Mods with grenade skills are 416 Mod, M4 SOPMOD II Mod, and StG44 Mod. Each of these Dolls acquires, after Neural Upgrade, a unique Skill 2 that interacts with their grenade Skill, which is best described on the respective Doll’s page. For more details on the pros and cons of each Mod Grenadier, check the Neural Upgrade page for available Mods in EN, or the respective Doll’s page for more details on their Skill kit.
Grenade Overlap
Grenades deal more damage against enemies that have more links. 2-links means twice the damage. 5-links means quintuple the damage. This means that grenadiers do very well against highly bunched-up and highly-linked enemies, but also means they don’t do well against ungrouped or low-linked enemies. This includes bosses, but also enemies that have been hit by other grenades. Thus it is usually not recommended to have more than one AR grenadier per team, as the second grenade will likely not be nearly as effective.
Support ARs
Support ARs are, by definition, any AR capable of buffing other ARs through Tile buffs, Skill buffs, or a combination of both, and thus sit on Position 4 where they are able to buff the AR in Position 1 and the AR in Position 7.
Support ARs can provide support either by their tiles (M4), by their Skill (Ribeyrolles) or by a combination of both (Ribeyrolles too). A support AR that provides support exclusively from her tiles (such as M4 and AUG) requires exceptionally strong tiles and decent self-DPS to replace the support a traditional HG (such as Grizzly or SAA) provides.
While there are other ARs who can buff ARs, mainly through their tiles, (StG44 Mod and AUG for example) those usually present weak tiles (either buffs to stats that barely improve an AR’s DPS capacity, such as 10% Damage or irrelevant to what ARs do, such as Evasion buffs) and so Commanders are recommended to consider them traditional AR units rather than dedicated Support ARs.
Example:
M4A1
The most notable example in the game is M4A1, who is acquired upon completing Chapter 2-6 and remains a key T-Doll throughout a Commander’s career in Girls’ Frontline. While she does not possess a Skill that buffs ARs, her tiles are notably strong, as they provide buffs to two important stats for ARs’ DPS: 18% Damage and 30% Crit Rate. These tiles are comparable with the best tiles HGs can offer: Python offers 30% Damage and 20% Crit Rate. Her own DPS is also very high due to her skill.
AUG
While AUG does have tiles that can buff any type of T-Doll, including ARs, she is not a good example of a Support AR, due to how weak her buff is. 20% Accuracy buffs provide marginal gains to ARs, while a 12% Damage buff is vastly inferior to what M4A1 or Ribeyrolles can provide, or what an HG can provide in a 2AR+HG setup. On top of this, her skill makes her unable to fully benefit from the bonus that a #2 Processing Chip provides.
Rate of Fire (RoF) ARs
Rate of Fire ARs are Dolls whose Skill primarily increases their Rate of Fire. In Girls’ Frontline, RoF is not as straightforward as other stats are, higher RoFs have lesser gains due to being tied to the game’s Frame per Second animations. For a more in-depth explanation, check this article on how RoF affects gameplay.
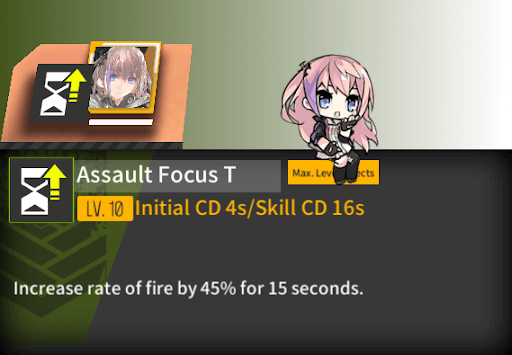
Example of RoF Skill (ST AR-15)
With that said, RoF also happens to be one of the few stats in the game with a realistic cap. Any extra RoF past 116 RoF will not change how fast the T-Doll shoots. As they have an average base RoF that they increase with their own skill, RoF ARs often need to be carefully considered so as to not excessively overcap their RoF. Overcapping RoF is throwing away potential DPS after all.
To illustrate RoF overcap situations, consider the following:
Type 97 has a base RoF of 72 at level 100 and increases her own RoF by 50% with her skill. Normally she reaches 108 RoF on her own, which is not over 116.

Type 97 behind Vector, pushing her slightly above the maximum cap of 116.
Now if we add Vector in front of T97, who has a tile directly behind her with a 25% RoF buff, Type 97 reaches 135 RoF, which is overcapped. This is not the end of the world, but a lot of other SMGs also have RoF tiles, and we have not even gone over another major source of RoF.

Type 97 with a #2 Processor chip automatically pushes her high above the maximum cap of 116, which is generally a bad idea.
Another situation would be to give Type 97 a #2 Processor Chip. With her extra 25 base RoF, she reaches 145 RoF on her own. Both these situations waste what could have been utilized tile buffs, and should generally be avoided if convenient.
These examples can be applied to most RoF ARs, which means RoF ARs often have a lot of restrictions to work around. The #2 Processor chip makes it exponentially easier for RoF ARs to overcap severely. Many SMGs have RoF tile buffs, which, as shown by Vector, can also easily overcap AR RoF. So RoF ARs mostly prefer FP tiles from SMGs instead. Because of these restrictions, FP ARs are usually easier to work around and therefore preferred, with some exceptions.
That’s not to say RoF ARs should not be raised. Some have skills, equipment, or other ways to avoid overcapping themselves on #2 Chips. Orthus enemies heavily favor fielding RoF ARs due to their specialized shields and said enemies are common among KCCO post-Isomer.
Pros:
- Great against Orthrus
- Less prone to overkilling compared to Damage buffers
- Good against low HP enemies
Cons:
- RoF has a cap, unlike Damage
- Way too easy to cap with #2 Chips
- Struggle against Armored units
- RoF buff is not straightforward, so DPS increase can vary
Damage / Firepower (FP) ARs
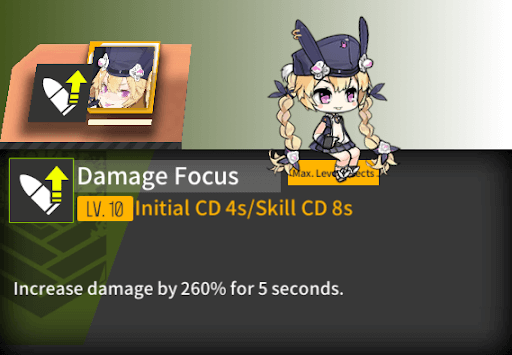
Damage ARs, also commonly called FP ARs, are Dolls whose Skills primarily consist of increasing their Damage stat. Unlike RoF ARs, they are not prone to overcap, and thus are easier to work with. As ARs are less prone to overkilling, they aren’t as strict on RoF buffs as their RFs counterparts are. As there’s no realistic cap on damage, they don’t have a particular preference for SMGs with RoF tiles, and can also be paired with Damage tile SMGs.
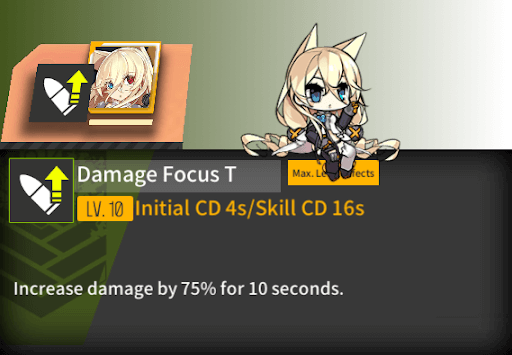
Example of FP skill (Gr G41)
A distinct role Damage ARs have outside of just shooting things is that, with sufficient support, they’re capable of brute-forcing enemies’ Armor. As the Armor stat is a flat decrease in damage taken, these enemies can be faced either by stacking more Firepower than the enemy has armor or by using Dolls capable of equipping AP ammo, namely RFs and MGs.
Pros:
- Can deal with Armor better than RoF ARs
- Straight forward buff, unlike RoF
Cons:
- Struggle against low HP enemies - can end up overkilling
Night ARs
Night Specialist ARs, or Night ARs, are mostly Damage ARs that usually have a couple of distinct features:
- Burst ARs, in that they have a short Skill uptime
- Longer initial cooldowns
- Tremendous Damage buffs when at night, weakened versions at day
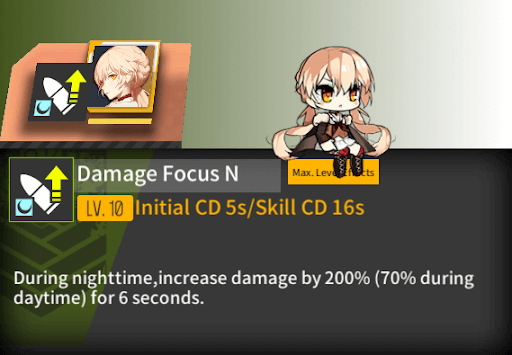
Example of Night Specialized skill (OTs-14)
Night ARs are a niche role, as they only function their best at night, while they have average to mediocre performance during the day when compared to less niche ARs. They also happen to be less worthwhile to invest in for Commanders over time, as Armored enemies become increasingly hard to brute-force due to increasing Armor stats in later stages. Post-Shattered Connexion high-level maps are also rarely nighttime.

Highly professional visualization of enemy armor values increasing dramatically with level, to the point where brute-forcing with night specialist ARs becomes impractical.
Night ARs also don’t excel over their generalist counterparts against unarmored enemies on Night Missions, especially as Commanders have early access to ST AR-15 and M4 SOPMOD II, both of which don’t need to replace a VFL scope for a PEQ once they unlock another equipment slot at level 50, as they have two accessory slots. Additionally, generalist ARs that are not night-specialized often will perform perfectly well at night as well so long as they have PEQs equipped, making the need to raise dedicated night ARs questionable.
Besides the specialization, Night ARs share most of the strengths, weaknesses, and needs that FP ARs have, just to a more extreme degree.
Pros:
- Excel against low-medium Armor at night
- Strong Burst
Cons:
- Low uptime
- Niche unit, not ideal for beginners
- Gets outdated with increasing enemy stats, which include Armor
Multi-hit ARs
Multi-hit AR is a role consisting of a few Dolls whose primary Skill enables them to shoot more than one bullet at their target each time they attack. Each bullet is usually fired by each link of the T-Doll and counts as a separate attack on the enemy.
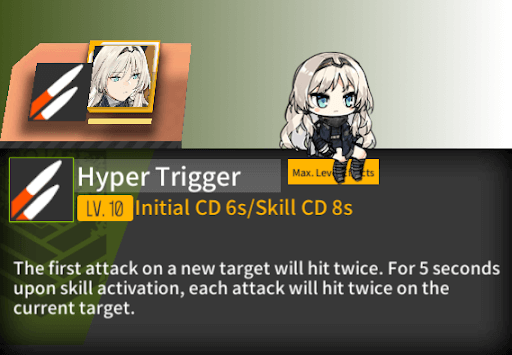
Example of multi-hit skill (AN-94)
Their Skills have a couple of advantages over a traditional RoF buffer or Damage buffer, namely mitigating link protection, not worrying as much about being capped by RoF, and being better to use against enemies that require RoF ARs over Damage ARs. However, their multiple shots can come with downsides like armor penalties being much harsher on them.
Pros:
- Pseudo RoF buff, without the downside of cap
- Great against Orthrus, a KCCO enemy common post-Isomer
Cons:
- Multiple hits mean armor penalties are multiplicatively stronger, applying for each bullet
Burst vs. Sustained ARs
Uptime is a concept where a self-buffer T-Doll is at its strongest when its skill is active, which can create different results if varied. It is usually noted as X/Y where X is the skill’s duration and Y is the skill’s normal cooldown. For example, G41’s Damage Focus T skill lasts 10 seconds upon activation and has an 16-second cooldown, so it’s noted as 10/16.
Some self-buffer ARs have unique quirks to their skill uptimes to improve them in certain kinds of fights. They can either be classified as “Burst” ARs or “Sustained” ARs:
- Burst AR: ARs with low skill uptime but stronger buff effects are generally considered “Burst ARs”. These types of ARs will typically see use in situations where they can properly end fights within their skill uptime (known as a “burst window''). Burst ARs also usually have ICDs in the 6s range, making them more popular for 2AR1HG backlines to take better advantage of powerful buffs.
- Sustained AR: Sustained DPS ARs have longer skill uptime, but weaker skill effects are considered “Sustained ARs”. These ARs are more popular in longer fights against tankier enemies, such as most boss battles.
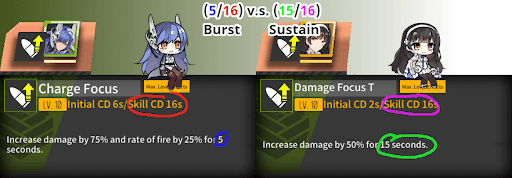
Example of burst and sustained skills and how to determine their uptime
A practical rule of thumb (which is not a strict rule) is that if an AR has an uptime equal to or lower than 50%, she is a Burst AR, and Sustained ARs have little to no skill downtime like 15/16 or passive skills. Most self buffing ARs are outside of these classifications and have around a 5/8 or 10/16 uptime.
Burst ARs can be paired with skill-buffing support ARs like Ribeyrolles since their skill uptimes and powerful buffs coincide neatly with the many Burst ARs’ skills. Hopefully, the fight ends before they run out of skill uptime.
As HG’s also have an Initial Cooldown of 6s, Burst ARs are also preferred to pair with them on Day and Night setups to match their Burst with the HGs’ Skills. Note, however, that Sustained ARs also work with HGs, as those usually have a longer uptime than Burst ARs.
Burst ARs can also be particularly useful against Orthrus and other types of enemies who have short windows for being damaged. As Burst ARs dish out a strong DPS burst in a short time period, Commanders can opt to turn on their Skills once the window to deal damage on said enemies is open, thus requiring significantly less time to dispatch them compared to Sustained ARs.
Specialist ARs
Lastly, there are ARs that don't fit any of the aforementioned roles and should be looked at on a case-by-case basis. Commanders should consider what the T-Doll’s Skill does, what roles she performs, and the enemies they’re facing. A couple of examples to illustrate this:
- RFB: Has a pretty unique Skill where she switches to farthest enemy targeting, just like RFs. Because of this, she is known as an “RF disguised as an AR.”
- EM-2: Forsaking any kind of self-buff, EM-2 instead fires 3 perfectly accurate skill shots at randomly chosen targets.
- K2: Has basically a 0-second initial cooldown. K2 can output very high burst damage early on against unarmored targets (deals about 156% of her normal DPS at the start of the battle.) However, she struggles immensely against armored targets and in long battles. Once she overheats her debuff is debilitating.
- M16A1: This AR doesn’t try to be an AR at all. Instead, she ends up trying to fill the role of a mixed armor/evasion tank by giving up her accessory slot for another body slot and the ability to equip armor. This leads to often poor results as her Evasion and HP aren’t nearly as good as most SMGs, and her armor is far lower compared to most SGs. But she shines more than either in corpse dragging one map (0-2) and can tank some enemies with both low accuracy and damage such as Strelets.
Lastly, Pros and Cons depend on each individual AR stats and Skill kit, therefore Commanders are recommended to check a Specialist’s Analysis page.
SMG T-Doll roles
Most SMGs fall under the following categories:
- Maintanks: Dolls whose Skill primarily enhances their tanking capacity, either by self buffing or by debuffing enemies; e.g. UMP45, RO635, MP5, and MP7


- Offtanks: Dolls whose Skill focuses on dealing Damage against enemies; e.g. Skorpion, Vector, PP-19, and SR-3MP


Note: Neural Upgrade can change the behavior of some T-Dolls, either by granting them another category (like M38 Mod’s Skill 2 granting her Stun Grenade a Burn effect) or giving them a unique role (UMP9’s Skill 2 being able to buff Damage for allies in the same column).
For more details on what each type of SMG T-Doll does, refer to the following sections.
SMG Roles in details
Maintank SMG
A Maintank SMG is an SMG responsible for tanking the enemies’ incoming Damage to protect the DPS Dolls behind her. On top of having High Evasion and HP pools to tank, they also make use of their skills to boost their team’s survivability in one way or another. Within the Maintank role, there are sub-roles for maintank SMGs:
- Primary Maintank: It’s the SMG that generally starts on Position 5, and is largely responsible for eating the majority of the enemy damage. Usually have a strong survivability skill.
- Secondary Maintank: If enemies start to become too difficult for the offtank to easily kill, or when the situation calls for more survivability, an SMG that can support the primary maintank can instead be used. They support by either boosting the primary’s survivability stats even more or swapping out with the primary maintank when its skill runs out, to maximize survival skill uptime.
Some common main tank skills include:
- Smoke Grenade: A 1-second ICD Skill that decreases enemy Rate of Fire and Movement Speed in an area. Aimed at the highest HP enemy. It’s primarily meant to make the enemy walk time longer, so the Echelon can gun them down before they have the opportunity to fight back. Useful as many enemies have a long walk time.
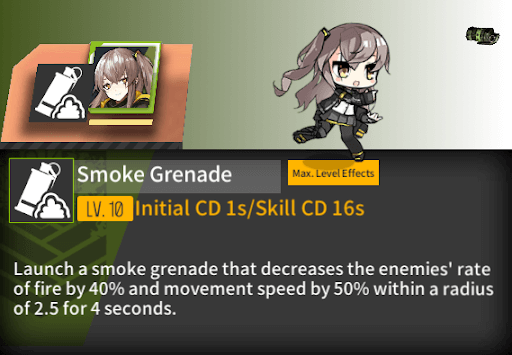
Example of a Smoke Grenade skill (UMP45)
- Stun Grenade: A 5-second ICD Skill, it makes enemies unable to move or attack in a certain area around the highest HP enemy. However, because of its duration despite a longer ICD, and the fact that many enemies are immune to it, including enemy Bosses, make them less popular than Smoke Grenade SMGs

Example of a Stun Grenade skill (UMP9)
- Debuff: Any type of Skill that hinders the enemy’s ability to inflict damage on your Dolls. RO635, for example, debuffs enemy Damage with her Skill. Certain types fall out of favor as enemies with Sure-hit attacks start being common post Chapter 10 and are not affected by certain debuffs.
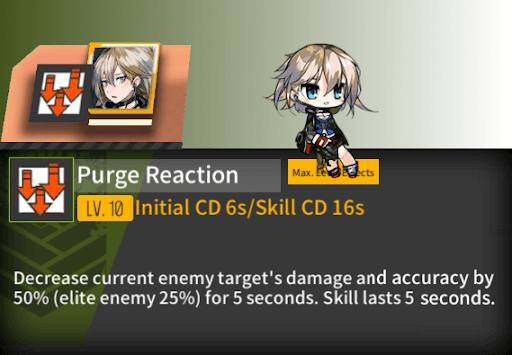
Example of Debuff skill (AK-74U)
- Self-buff: Any type of Skill that increases the Dolls stats, usually Evasion. SMGs who rely on purely buffing Evasion are less relied upon as post Chapter 10 content introduces enemies with High Accuracy, sure hit attacks and more. Very useful for surviving many bosses in long-term fights, because normal boss attacks can become extremely painful if not evaded.
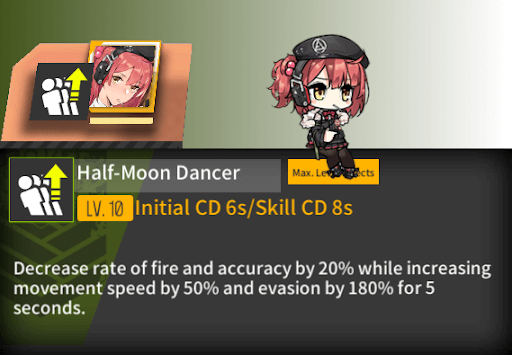
Example of Self-buff skill (MP7)
- Forceshield: A unique type of Maintank SMG whose Skill grants them invulnerability for a short amount of time. Those SMGs usually have an ICD of 8 seconds and a very short-lived skill duration of up to 4 seconds, which makes them unsuitable for tanking early incoming Damage that traditional Maintank SMGs deal with. They would take too long to use their skill, and once up it wouldn’t last long enough. However, when unevadeable, high accuracy, or extreme amounts of damage are present in a fight, that’s when forceshield SMGs shine. Their shield can soak any amount of damage, not even Golyats (Beans) can damage them when they’re shielded. It’s one of the few ways to tank sure-hits reliably.
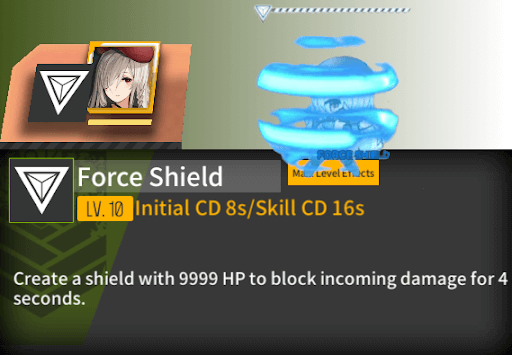
Example of Force Shield skill (G36c)

Difference between an HP shield and a Force shield
- HP Shield: Not to be mistaken with Forceshield, this type of Skill that grants a temporary HP shield that can tank a small amount of incoming damage and where its usage relies heavily on each individual T-Doll’s kit. Lusa has a kit with HP shield that works in certain niche situations, while Type 100’s kit is just a poor kit overall. In the end, Pros and Cons depend on each individual SMGs stats and Skill kit, therefore Commanders are recommended to check an HP Shield SMG’s Analysis page. Variations of this Skill can also be found in other classes, like HGs (HS2000 and P22 being prime examples of HGs with HP Shield Skills).
Unorthodox Maintanks
There are dolls whose Skill kit does not typically fit any of the four kits mentioned above.
- Sten MkII: she seems to have no survival skills due to her hand grenade skill; however, her base survival stats are on par with 4-star Maintanks. Because of this, she is considered a common budget maintank for early ARSMGs.
- P90: creates Holograms to redirect enemy attacks.
- Agent Vector: a Division collab Doll, creates barriers in front of her.
- JS 9: she is a Secondary Maintank that technically can perform as a Maintank and Offtank, but is primarily used for her Maintank abilities and good tiles.
Maintank Uptimes
Maintank SMGs also have the concept of uptimes. Some get their skill’s survivability in short bursts, have it permanently up, or only gain it when taking damage. Ones with lower uptimes are good for surviving high-pressure situations in short windows of damage and are ideal for the double maintank strategy, quick-medium duration fights, or fights where the enemy stops attacking sometimes for some reason (bosses). Ones with higher uptimes can stand at the front the whole time.
Offtank SMG
An Offtank SMG is any type of SMG that increases the Echelon’s survivability by thinning out enemies to ease the pressure off the Maintank. They can either do this by improving their own auto-attacks (Direct Fire Offtanks) or by throwing grenades to deal damage (Nade Offtanks):
- Nade Offtank: Any SMG that uses an explosive to inflict damage on enemy units. Those have a short Skill ICD, making them a strong ally for Commanders in early Chapters.
- The 2 main types of nade offtanks are Molotovs (Incendiary Grenadiers) and Hand Grenadiers.
The 2 main types of nade offtanks are Molotovs (Incendiary Grenadiers) and Hand Grenadiers.
- Incendiary Grenadiers have a smaller explosion radius, but a higher damage multiplier and deal additional burning damage over time in the area of effect. They’re usually the preferred nade offtank due to their higher potential damage output.

Example of Molotov skill (Vector)
- Hand Grenadiers have a larger explosion radius, but a lower damage multiplier. Still an acceptable choice for offtank due to higher coverage.
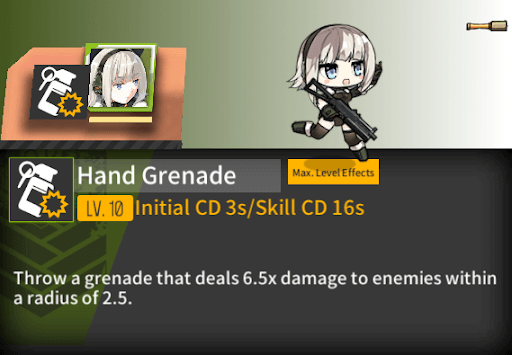
Example of Hand Grenade skill (PP-19)
- Direct Fire Offtank: Any SMG that relies on increasing their stats, usually Damage, to inflict damage on enemy units. SMG offtanks usually tank at least some of the incoming enemy Damage, and also have poor raw DPS stats (Low Accuracy and Damage) when compared to their AR counterparts. The shots the Direct Fire offtank takes could lead to them losing links. While this is not a concern for grenadiers since their skill does the same damage regardless of how injured they are, Direct Fire offtanks rely on their links to do damage. Therefore, Direct Fire Offtanks are niche units that are very rarely used due to the difficulty of making the most out of them.
Example of Direct-Fire skill (SR-3MP, "Shrimp", or Cleista-chan for the intimate)
Commanders are highly recommended to raise at least one Nade Offtank, usually Skorpion or Vector, during the start of their Career, as enemy HP on early Chapters is low enough for Nade SMGs to have a significant DPS output. Nades are also able to ignore Armor, so Commanders can face Armored units in early Night Chapters before they have a proper RFHG to deal with them.
Frontline HGs
ARSMG teams, in some situations, may also have an HG slotted on the frontline. Situations that may allow that include when only one maintank is enough to guarantee the Echelon’s survivability, when Night Vision is required but without sacrificing the DPS that a third AR offers, or when the HG boosts both the team’s DPS or the maintank’s survivability. P22 is the prime example of this, being an HG that offers backline tile buffs, damage increasing buffs to the DPS ARs and survivability buffs to the maintank.
Note: Px4 Storm is widely regarded as an option for a Frontline HG. However, she’s exceptionally bad at that role in Night missions due to the fact that the DPS contribution she offers on her Skill relies on the ARs’ Crit Rate. As in Night missions almost all ARs cannot equip Crit scopes, and their base Crit Rate is low, Px4’s contribution to the DPS ends up relying mostly on her tile buffs, which cover the entire backline. Opting for another HG that does not cover the entire backline, but offers a significant DPS contribution with her Skill as well (like Mk23) is a better option.
What adding a frontline HG could look like (feat. P22)
3AR versus 2AR+HG
2AR+1HG performs similar to 3ARs if fielding a Support AR on Position 4. That is only if the HG fielded is a 5-linked, high skill level, support buffer HG, such as SAA, which Commanders acquire through Career Rewards, or Grizzly, a foolproof option due to good tiles and good skills. They would have to be an HG that improves DPS with both their tiles and skill. So HGs like NZ75 and P7 are not good choices.
With a support HG, a 2AR team performs the same if not better than a generic 3AR team in most scenarios, while a support AR beats them both out:
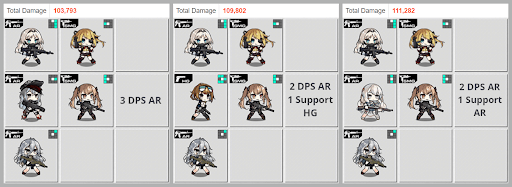
The example shown was built without careful team building to illustrate that the results are much more dependent on who’s in Position 4 than the rest of the team.
An argument can be made that during short-term battles, 3 generic DPS ARs can perform better than 2 AR + 1 HG, but there are many uncertain variables involved. For example:
- If one AR is significantly better than the others
- If it’s a boss fights,
- If it’s night battles,
In any of these scenarios a position 4 HG takes the upper hand. But if you really know what you’re doing you can opt to use the 3 ARs instead.
That said 2AR+HG teams also have a few benefits over 3 AR teams for new Commanders:
- For early maps, they perform similarly in Day maps and Night maps when Commander lacks 5-star VFL scopes to consistently Crit, and the HG also provides visibility on Night Map
- Costs less Ammo and Rations to resupply. This is crucial in the beginning as new Commanders don’t have access to good logistics
- With only 2 ARs, the equipment demand for VFL scopes, HV ammo, and #2 chips is easier to meet
- Once raised, the support HG is flexible and can easily be swapped to other teams such as MGSGs and RFHGs
Lastly, Commanders acquire M4A1 on Chapter 2-6 and SAA at Level 65 and 3 links from Career Rewards from clearing 4-3E, which means they need not craft more good ARs to build a proper team and can focus their limited resources on Dolls that will last them a good while.
As always, remember teams in Girls’ Frontline are built to tackle enemies units they’ll face, rather than being a one size fits all glove. Thus, there are scenarios where 3ARs can perform well (~8 seconds battles) or even better than 2AR (against Orthrus, a type of enemy that appears post Chapter 12 content). Nevertheless, new Commanders can safely bet on 2AR+HG until they have sufficient progress and a wide variety of Dolls in their roster to experiment with.
For a more in-depth analysis of 3AR vs. 2AR1HG, see:
A Guide on 2AR vs 3AR by the one and only BigStupidJellyfish
Equipments
For ARs:
All ARs should have HV ammo equipped.
For commanders with 5* #2 Processor Chips:
Teams with high-rarity fairies that have a critical damage aura (e.g. Command, Taunt, Beach, Parachute), equip a VFL & #2 Chip on all non-RoF ARs.
Teams without that (e.g. low-rarity fairies, no fairies, Artillery, Airstrike, Twin, Rescue), equip an EOT & #2 Chip on all non-RoF ARs.
For commanders that don’t have 5* Chips, or are using RoF ARs:
In these situations the stat gain from chips no longer outweighs the crit penalty, so the ARs should use a VFL and an X-Exoskeleton(optional).
ARs with a body slot SPEQ(Special Equipment) available should prioritize them over chips, thus equipping a VFL & SPEQ.
In Night Battles all ARs should equip a PEQ & #2 Chip instead.
Exceptions: ST AR-15 and M4 Sopmod II have two accessory slots and should instead equip a PEQ and VFL. AS Val Mod 2+ can bypass the night penalty and should use daytime equipment.
For more details about this complex topic, see here: How to #2chips by the one and only BigStupidJellyfish
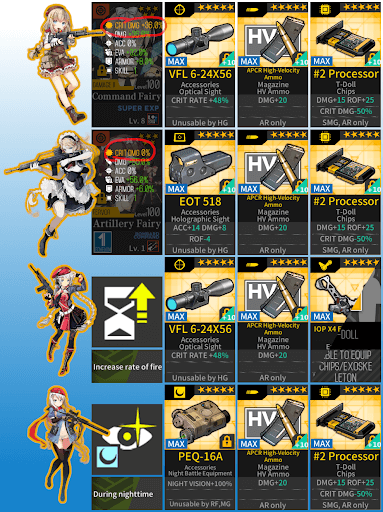
A general guideline for AR equipment in certain situations
For SMGs and HGs:
Maintank SMGs and Support HGs should have a T-Exoskeleton and suppressor, with the added option of flare ammunition to increase the team’s accuracy.
Offtank SMGs should have a #2 Processor Chip and HP ammo.
For nader Offtank SMGs, their scope is an EOT.
For Direct-fire offtank SMGs, they would want an EOT normally, ITI if the enemy has good evasion, and PEQ if it’s night.
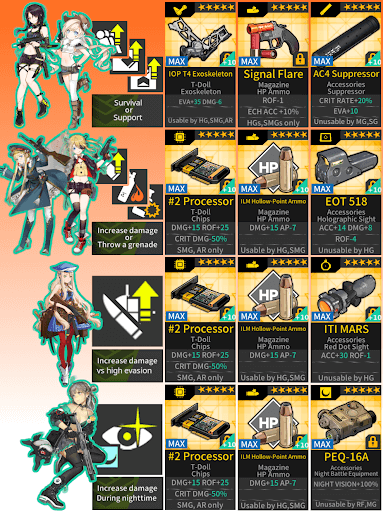
A general guideline for SMG/HG equipment in certain situations
Applying Concepts: Starter’s ARSMG in 2.08
Now to apply all of these concepts, let's go over one of the earliest ARSMG teams generally recommended to newer players.
Taking our roles we have:
- 2 DPS ARs: ST AR-15 & M4 SOPMOD II
- 1 Support AR: M4A1
- 1 Offtank: Skorpion
- 1 Maintank: Sten MkII
The support AR M4A1 is on position 4, middle left, so that her tile buffs can reach the DPS ARs on positions 7 and 1. This results in more damage output than just 3 DPS ARs.
The main tank Sten MkII is in position 5, in the center. From this spot, enemies will naturally target her instead of her allies behind her, and she will provide the ARs with her tile buffs as well.
Above her on position 8 is Skorpion. As an off-tank, Skorpion prevents enemies from reaching the top AR and initiates fights with her molotov to prevent large groups of enemies from wearing down Sten MkII too much.
Now we make sure that the whole team is furthest to the left as possible, as to give the team members as much time as possible to shoot the enemy before they get in range, and this naturally brings the team together into an F formation, as discussed in the beginning.

Standard recommended starting ARSMG with Dolls given for free in missions up to 3-6
M4 SOPMOD II is left on Position 7 as she benefits more from Skorpion’s tiles than ST AR-15. This is due to the previously covered topic of rate of fire overcapping, as AR-15 is an RoF Self buffer.