Preface
This guide is written under the assumption that you already know the basics of the game, as there will be some min-maxing, common terminologies, nicknames as well as in-game mechanics that I won’t be explaining. If you happen to come across this doc as a newbie, consider checking out this Beginner’s Guide. For comments, concerns, questions, suggestions, etc., join the official discord, GFC discord, or the official Gamepress discord.
Basic formation
For the sake of clarity, this guide uses the computer Numpad to refer to the positions in the formation grid:

For example, “Position 1” is bottom left, “Position 7” is top left, etc.
What is an RFHG Team?
An RFHG Team is a team composed of RF T−Dolls as the main DPS unit and HG T−Dolls as the support. The team works well due to the tilebuff synergy of RFs for HGs. RFHGs are usually an intentionally very fragile team, due to the lack of a dedicated tank. This is because RFHGs revolve around the idea of the “glass cannon”, they have high damage output but low survivability. As far as we know, dead enemies cannot shoot.
Because of this extreme focus on DPS, RFHGs almost always require high link−count and skill levels to perform properly. This is further exacerbated by HG tile buffs scaling with link−count. At lower links and skill levels, the DPS loss is so severe that HGs provide insufficient support to justify using. So RFHGs should always be pre−leveled before usage.
Armored enemies show up starting in early night chapters and everywhere after chapter 10+. Since armor provides a flat penalty to damage taken, ARSMGs often have trouble dealing with these fights. RFs can equip Armor Penetrating and Sniper ammunition to ignore the damage penalty.
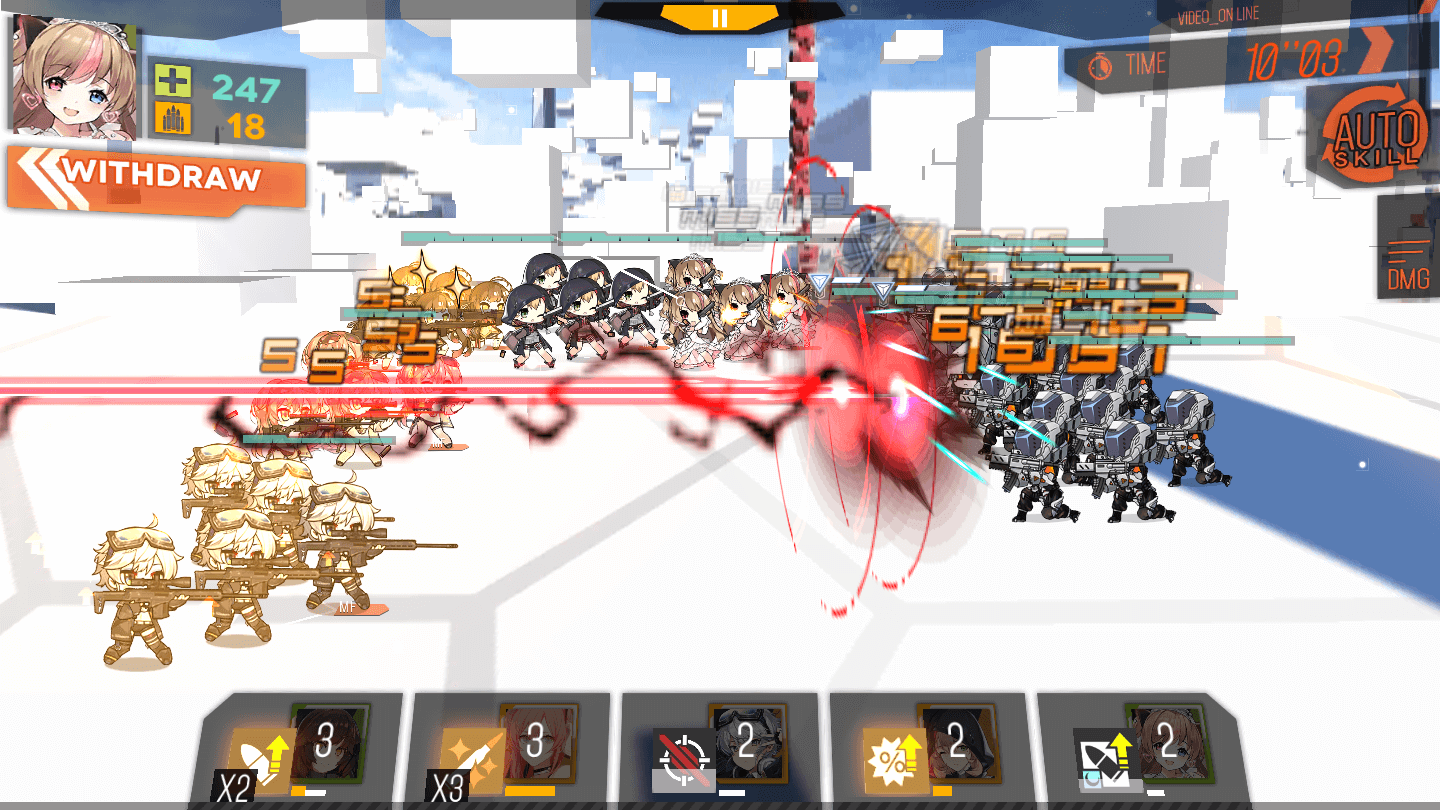
RFs also have the ability to prioritize key threats in enemy formations with their backline targeting. HGs have middling healthpools but powerful team buffs. Certain compositions and enemies are far too difficult to directly tank with typical SMGs/SGs, due to high accuracy, unavoidable attacks, incredibly high damage, etc. Below is an example of a typical enemy composition with meatshields and dangerous but squishy enemies hiding behind them:
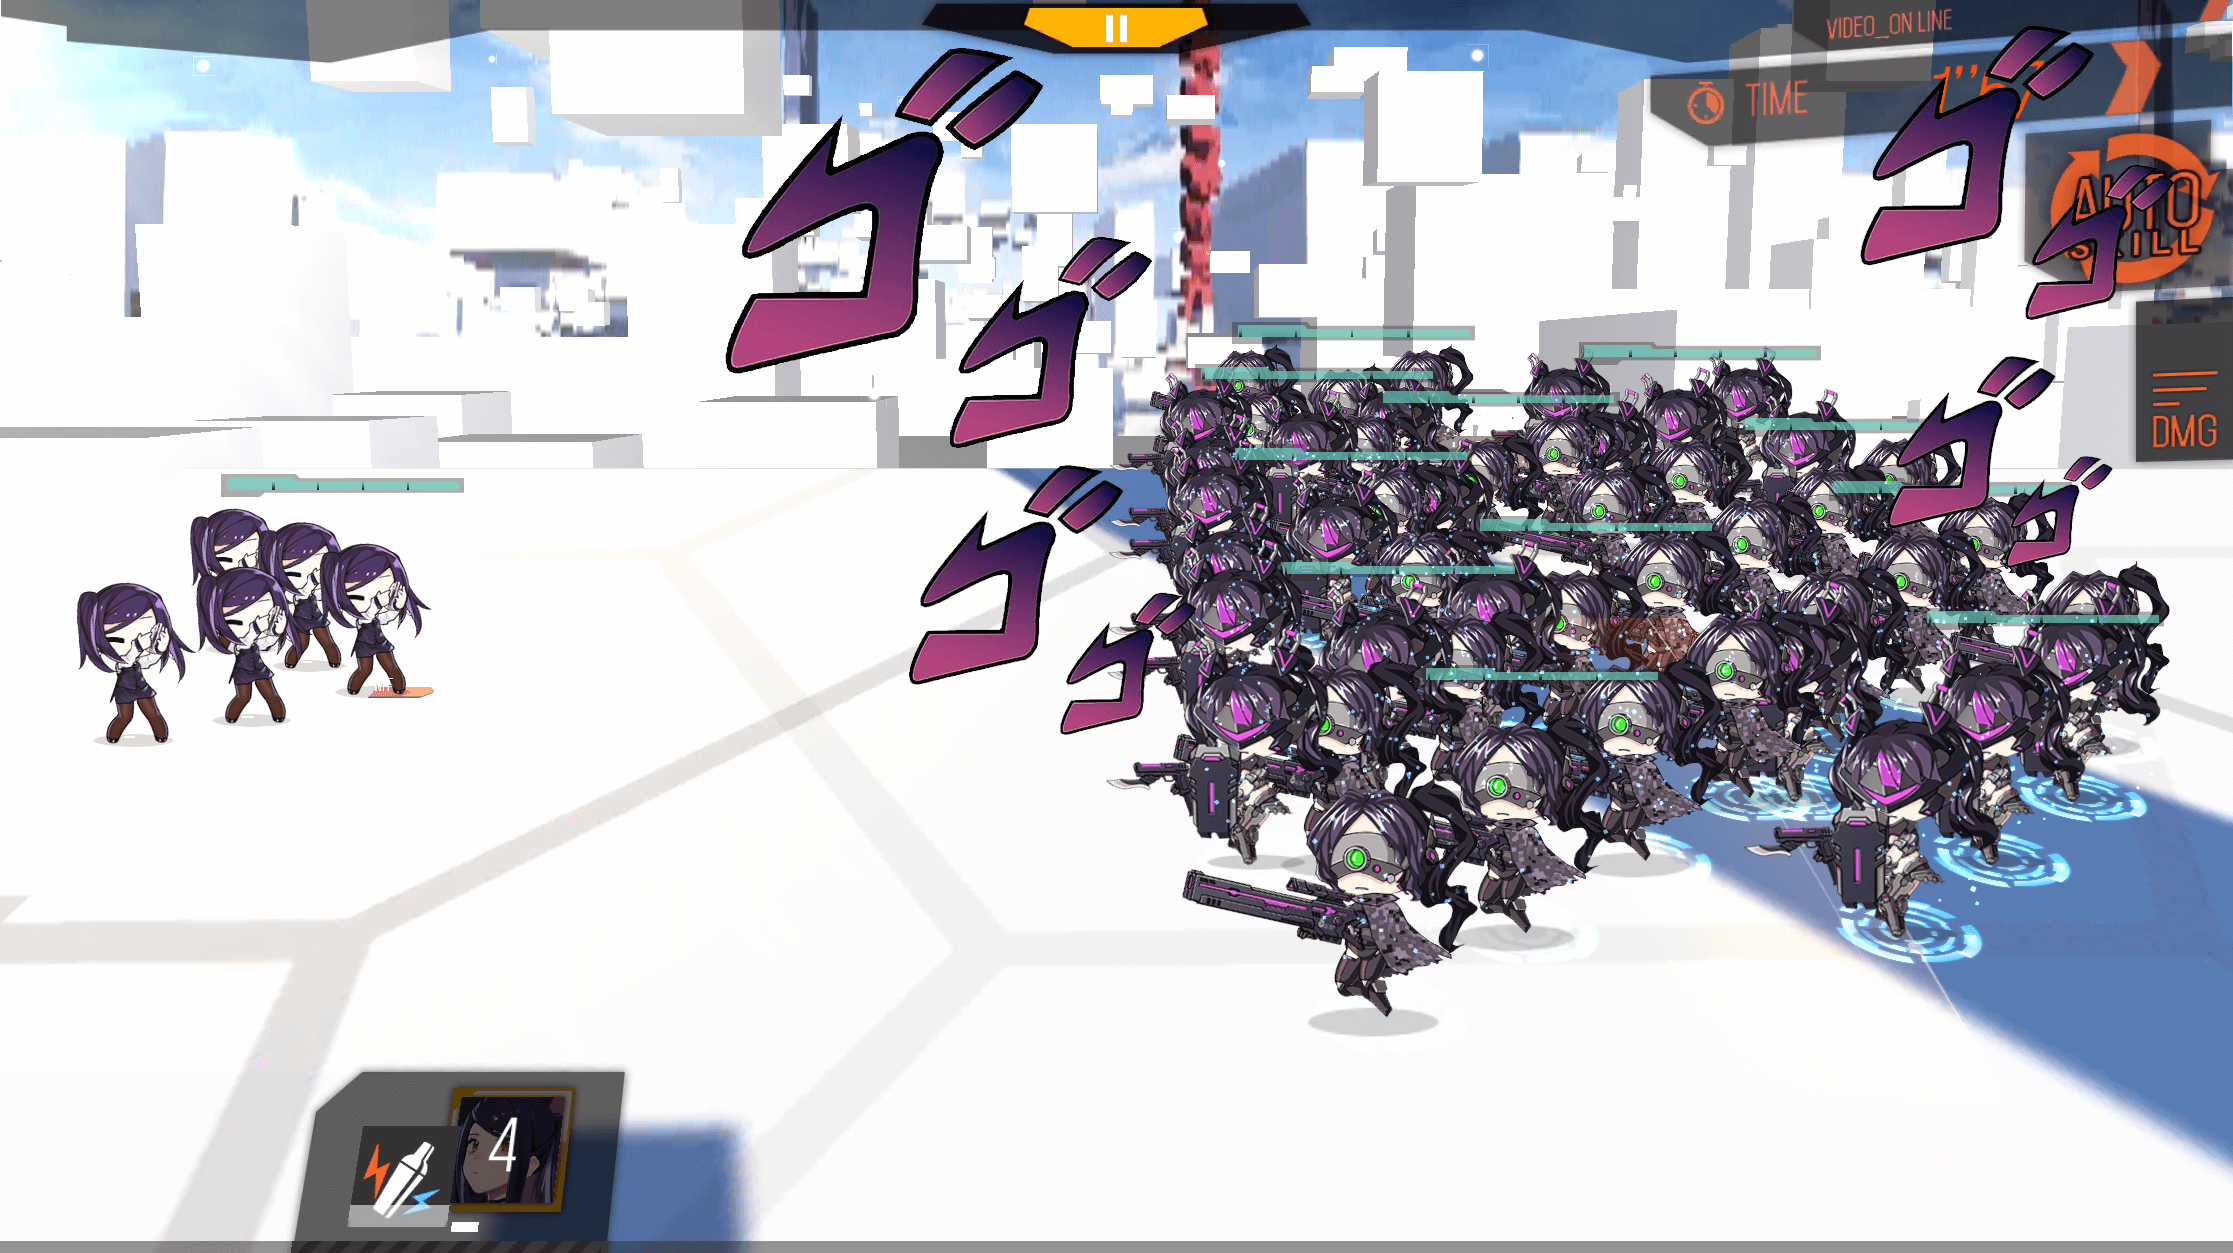
In Front: Guards (Meatshields, low Damage and high HP) and in Back: Jaegers (DPS, low HP, high Damage, and high Accuracy).
ARSMGs would be forced to kill all the tanks before getting to hit the backline. Instead, RFHGs opt for killing these enemies before they get to attack. To deal with these types of enemies, It is recommended for new Commanders to raise an RFHG as their second team.
To understand how to build an RFHG, and its existing variants, we must first understand the existing roles a T−Doll can have. Each class has Dolls with different roles inside it, and understanding those roles is a crucial step to building a well synergized, strong team. In this guide, we’ll focus on the roles RFs and HGs have and how they’re used. This guide also assumes you have read the ARSMG Teambuilding guide first and will be borrowing some of its terminologies.
What is an RF T−Doll?
RF (Rifle) T−Dolls are one of the main types of DPS Dolls in Girls’ Frontline. They’re capable of equipping AP ammo and have high Damage, Accuracy, and 40% Crit Rate at the cost of having lower RoF and being unable to equip PEQs to counteract night−battle’s accuracy penalty. They also usually attack the backmost enemy in range instead of the frontmost like ARs. They specialize in eliminating dangerous enemy backlines and armored targets. They struggle with swarms and frontline threats.
Since RFs have a low movement speed and suffer an even larger movement speed penalty when equipped with capes, RFHGs are not recommended in scenarios that require team−wide kiting, such as some post−chapter 10 Bosses.
RFs usually have tiles that buff exclusively HGs, and exclusively reduce their cooldowns. This makes them pair well with HGs, as more frequent buffs are more effective. An RF’s usual positions are 1 and 7. Awkward tile layouts or certain situations could call for a position 4 RF instead.
What is an HG T−Doll?
HG (Handgun) T−Dolls are primarily the support units in the game and the cheapest to resupply. They usually have a tiny amount of HP, high evasion, low damage, and strong tile−buffs/skills that buff allies/debuff enemies. Their high movement speed makes them ideal for individually kiting enemies while avoiding taking damage. They are the only units whose tile buffs increase with links.
Initial RFHGs usually run 3 HGs on positions 4, 5, and 8 to maximize their tile placement on RFs. Due to their wide variety of tile shapes and skills, some RFHGs may have different HG placements.
While there are a wide variety of HGs to choose from, the type of HG that RFHGs prefer is the type that boosts relevant DPS stats such as damage, rate of fire, critical chance, and critical damage with both their tiles and skill. This is due to the glass cannon focus RFHGs have. A majority of other tanks and HGs that buff survival simply get crushed by what RFHGs fight against, and would be better replaced with more damage output. Exceptions such as DPS HGs will be discussed in individual sections.
How to teambuild?
Much like ARSMG Echelons, RFHGs are also usually deployed in an F formation for similar reasons (see ARSMG teambuilding for a detailed explanation):
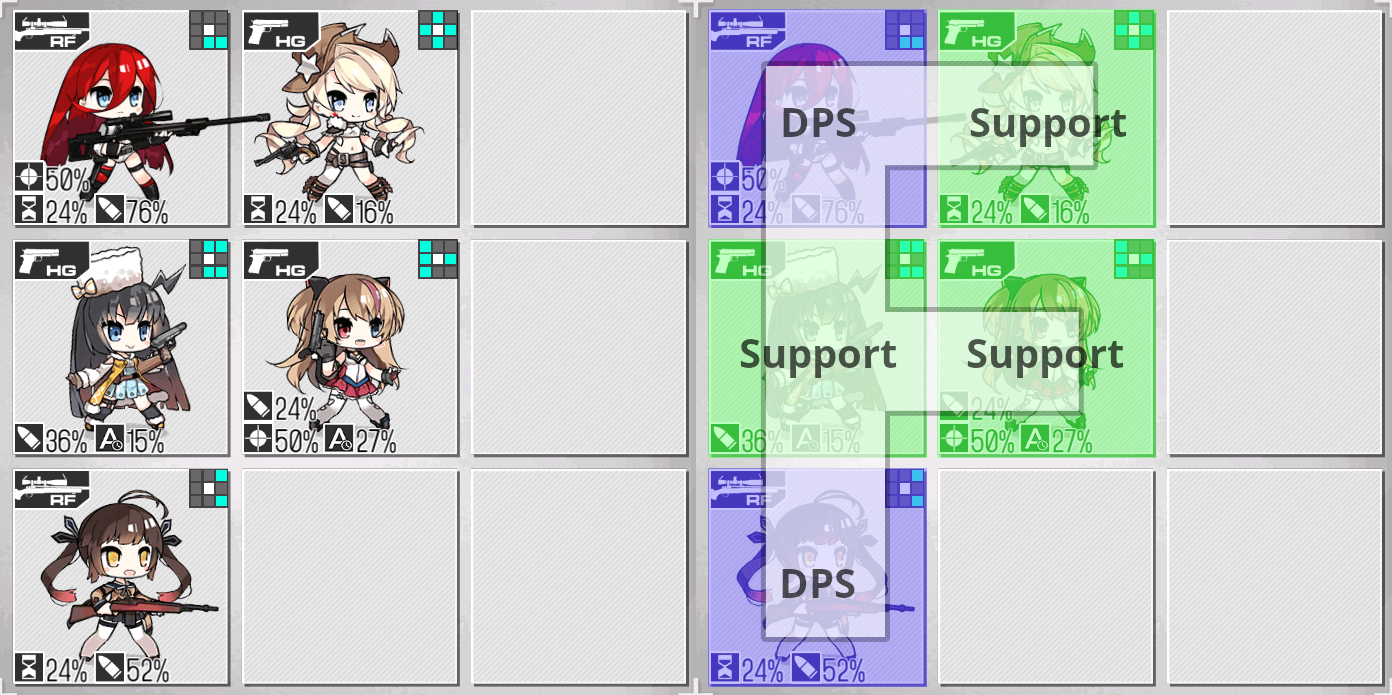
What an F formation looks like
On an RFHG, positions 4, 5, and 8 are typically occupied by HGs. Notice how the HGs’ tilebuffs cover the RFs as much as possible without breaking up the F formation.
As HGs are not tanks, HP and Evasion shouldn’t affect what HG goes on Position 5 in an RFHG. The major consideration that dictates whether an HG is fielded on Position 4 or Position 5 is their tile shape, i.e. M950A can only be fielded on Position 5 while Five−seven can only be fielded on Position 4.

Handguns are not meant to tank for you
As RFs are usually placed in Positions 1 and 7, tile layouts can get awkward. Most HGs available to new Commanders cannot reach both RFs outside of positions 4 or 5. Those that can (i.e. Px4 and P22) are usually difficult for newer Commanders to acquire.
This means that, when building an early RFHG team, newer Commanders may have to put a HG that only gets their tilebuffs on one RF. Ideally, they should be in front of the stronger RF. See a Dolls analysis page to gauge which RF should be prioritized in a formation.
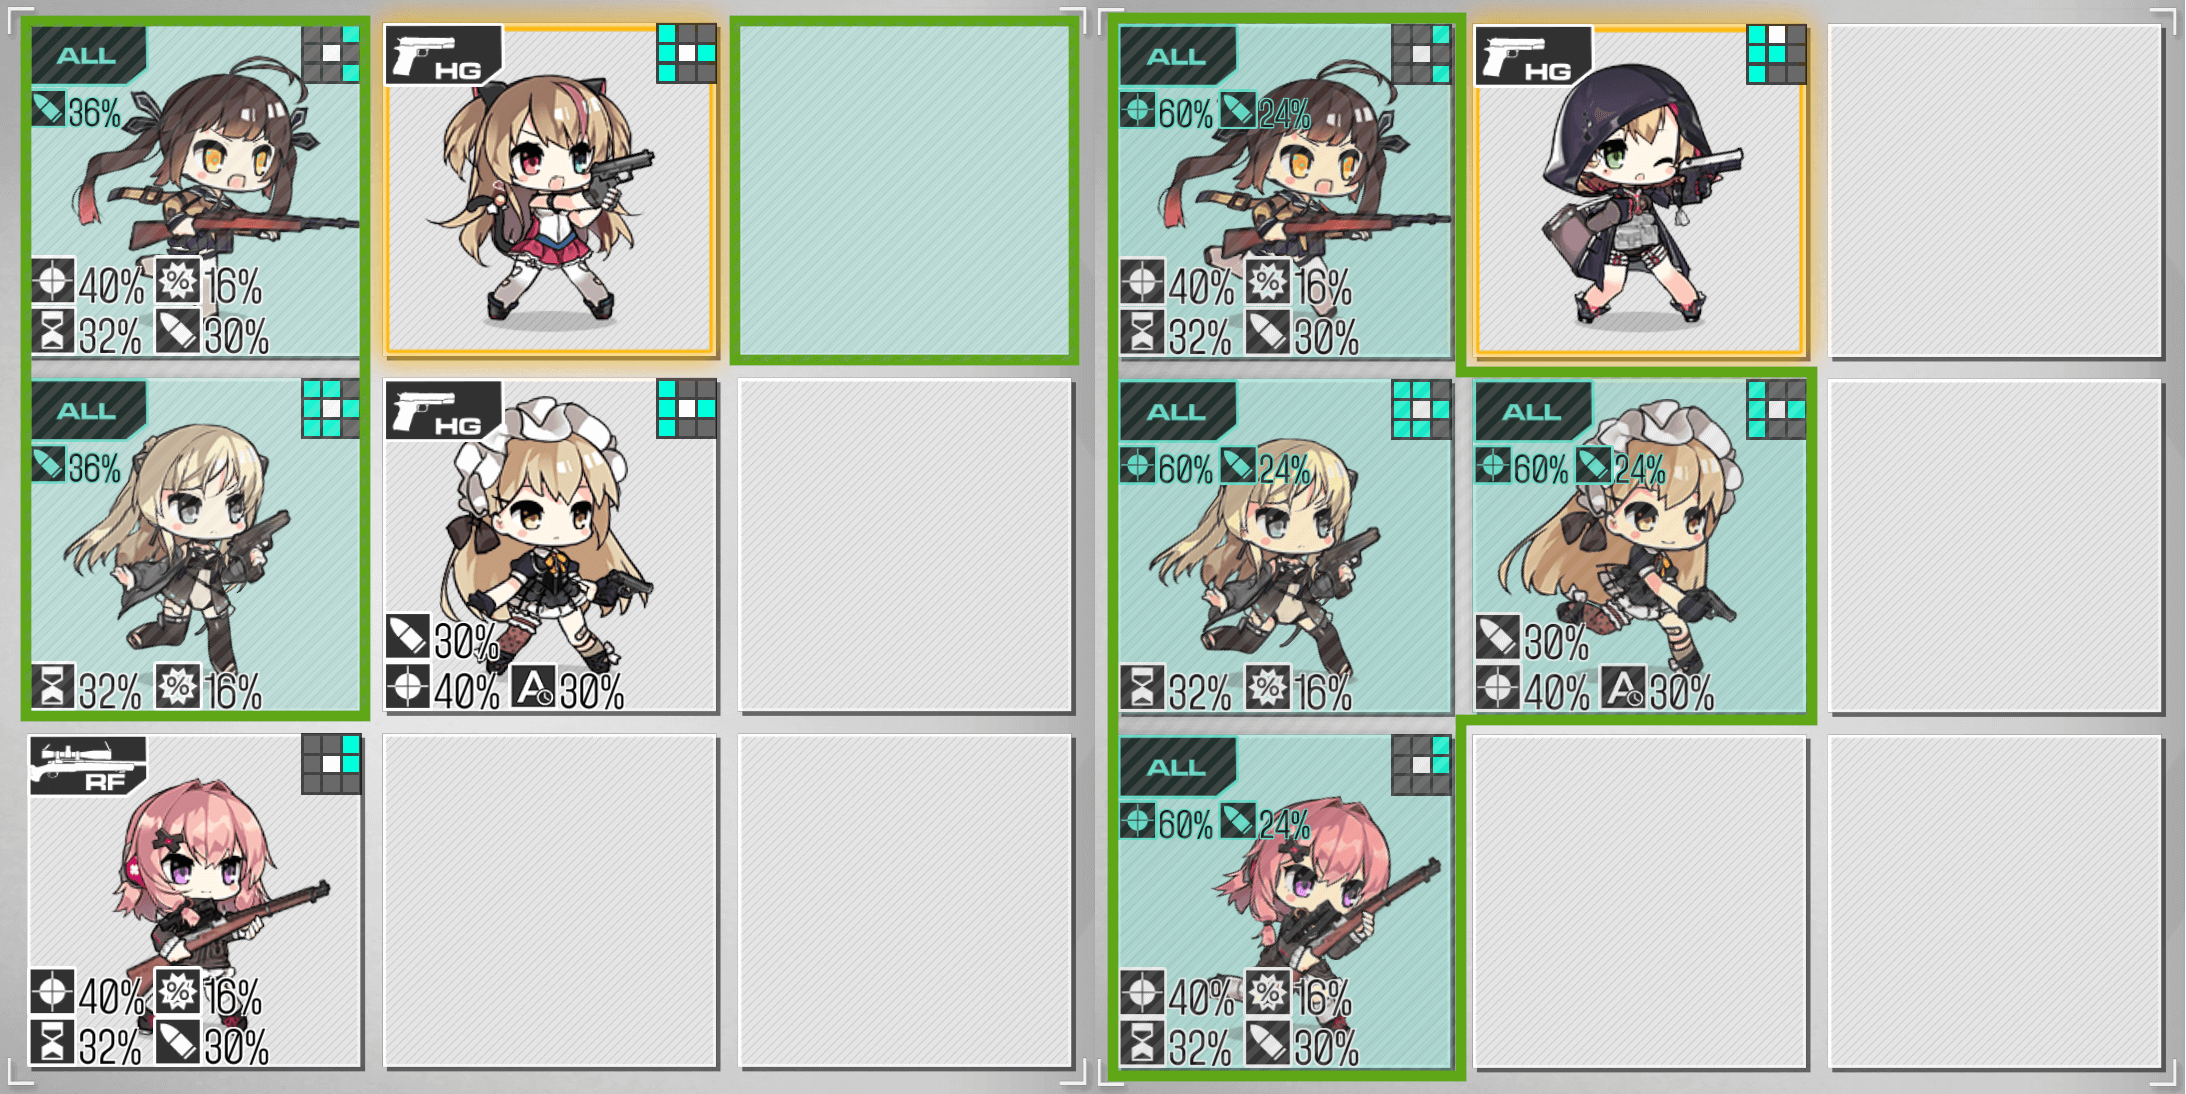
Typical pos 8 HG tilebuff coverage v.s. Px4’s tilebuff coverage (ft. Gr Mk23 & Px4 Storm)
As Commanders progress in Girls’ Frontline, they will inevitably come in contact with strong HGs that break out from the mold of a standard F formation, with P22 being the prime example. Her tiles allow her to buff the entire back row from Position 2, thus enabling the “b” formation. Other HGs also mix up the formation while also being able to potentially reach both RFs, some examples being HS2000, HP−35, Desert Eagle, and Webley. If using these kinds of HGs, it is recommended to reorganize the team to maximize tile coverage. In P22’s case, she replaces Position 8’s HG by being placed on Position 2 like this:
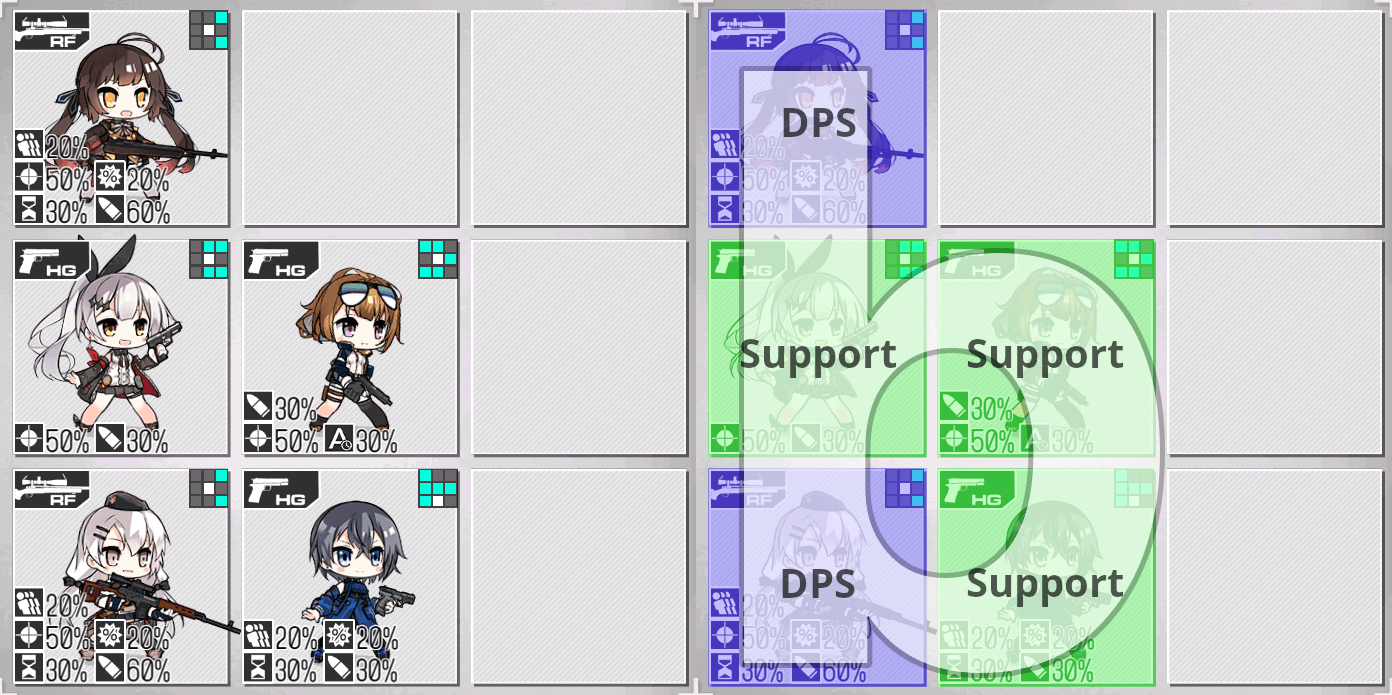
What a b formation looks like (ft. P22)
As another example, here’s HP−35 moving the position 1 RF to position 4:
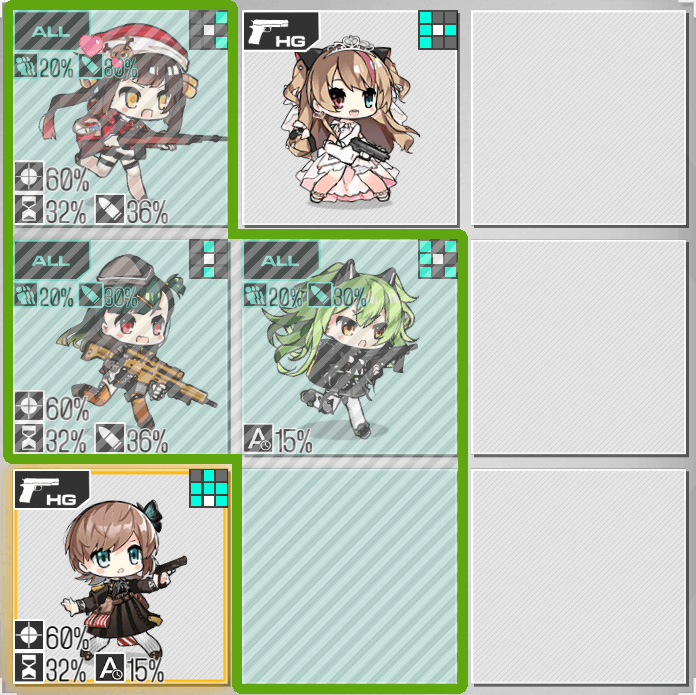
Awkward positioning demonstrating HP-35’s tilebuff coverage (ft. HP−35)
RF T−Doll roles
Here are some important categories for RFs:
- Bamboo RF: RFs that have a single, unavoidable, charged shot as their Skill. Examples are Springfield and Mosin−Nagant.
- RoF RF: RFs that self−buff their RoF stat as their Skill. Examples are WA2000 and SVD.
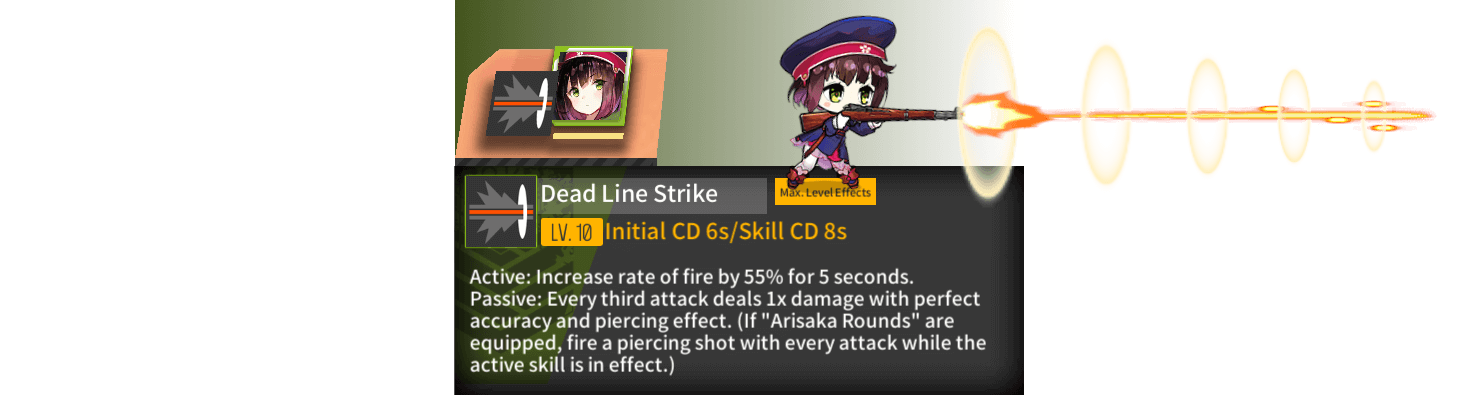
- FP RF: RFs that self−buff their Damage stat as their Skill. Examples are M14, R93, and Lee−Enfield.
- Sure hit RF: RFs that have sure−hit attacks, entirely bypassing the Evasion check. Examples are M200 and SSG 3000.
- Pierce RF: RFs capable of piercing through multiple enemies with their shots. Examples are Type 88 Mod and 4 Shiki.
RoF and FP self−buffers are considered generalist RFs.
Note: Neural Upgrades and Special Equipment can change the behavior of some T−Dolls, either by granting them another category (like Type 88 Mod gets added to pierce category due to her Skill 2) or giving them a unique role (NTW Mod’s Skill 1 bypassing shields).
For more details on what each type of RF T−Doll does, refer to the following sections.
Bamboo RFs are RFs that shoot a single, unavoidable, charged shot as their Skill. This charged shot usually has a multiplier that increases its damage dealt. Depending on the Skill, the RF may shoot its current target (e.g. OTs−44), the closest target (e.g. KSVK, NTW−20), the farthest target (e.g. Mosin−Nagant, Springfield), or a specific target (e.g. M21). Most of the Bamboo RFs have a charge−up window, where they can delay their skill activation to stack charges, which in turn increase the charged shot’s multiplier.
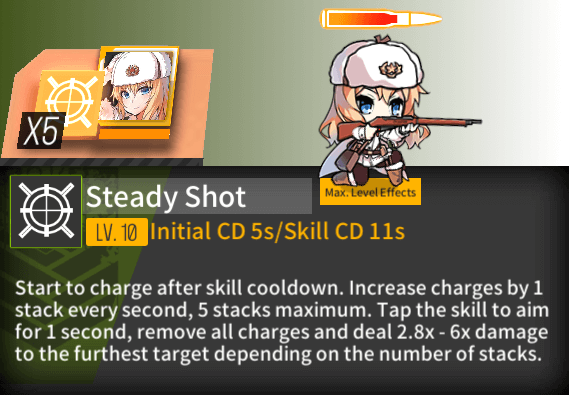
Example of a bamboo skill (ft. Mosin−Nagant)
Self−buffers are often preferred over bamboo in normal combat for a number of reasons. Initially, the damage multiplier on the charged shot is really low. If allowed to charge up to full stacks, they often reach their skill’s maximum potential around the 10−15 second mark. This can be fixed by some with an LRF equipment, but it sacrifices an enormous source of RF auto-attack DPS from crit damage with their capes. Additionally, their skill only damaging one enemy means it’s rather inefficient against multiple enemies. They kill one enemy really hard then have nothing for the rest of the enemies, and enemies come in packs larger than one.
Bosses were once prime targets for bamboos to one−shot kill while skipping all of the boss’s phases. However, bosses got harder. They have obscenely large HP pools, the ability to force units to avoid certain tiles, and thanks to a rework, bamboos no longer charge their skill while moving. This makes setting up a bamboo boss kill usually more difficult and a bigger hassle than the effort saved.
Another role bamboos have is picking off high−priority enemies, specific units in the enemy’s formation that are incredibly dangerous if left alive for too long. So instead of necessarily contributing with higher DPS, the bamboo eliminates the biggest threat with their unique targeting so that the other RFs can clean up the rest.
The definition of a bamboo is vague, with quite a few edge cases. Some units that many would consider a bamboo are ineligible for equipping an LRF. While a large majority of bamboo RFs and their respective skills are pretty bad for the given reasons, there are stand out exceptions.
Bamboos with a low initial cooldown and ludicrously high damage output on skill without charging stacks like Carcano M91/38 “Grape” can specialize hard into the role of priority enemy killer.
Some bamboos, whether through neural upgrade or other circumstances, also have a significant self−buff or extra shots that they can use (read: not SV−98 Mod), making them also able to function as a normal self−buff RF when not shooting their nuke. Due to this, they reduce the main flaws that come with being a bamboo RF and become usable. How they do this and what they are good for are explained on the T−Doll’s own page.
Pros:
- Can eliminate high−priority enemies quickly
- Ignore evasion and armor on skill
- Can deal large amounts of damage in small windows of opportunity
Cons:
- Extreme risk of overkilling
- Largely ineffective when facing large groups of enemy mobs
- Long cooldown timers
Generalist RFs are RF T−Dolls that have some kind of self−buff skill that modifies their stats to deal more DPS. Their ability to combat enemies tends to be very consistent, and can tackle almost all things required of an RFHG. Highly recommended. The most common generalists are rate of fire and firepower RFs.
Rate of Fire RFs are Dolls who self buff their RoF as their primary Skill. Examples are SVD and WA2000. They are generalists. In Girls’ Frontline, RoF is not as straightforward as other stats due to being tied to the game’s Frame per Second animations.

Example of a RoF skill (ft. WA2000)
With that said, RoF also happens to be one of the few stats in the game with a realistic cap, the other being Critical Rate. For RFs that cap is 116 normally (consult their page to make sure), going any higher does not make them shoot any faster. Unlike their RoF AR counterparts, RoF RFs are in less danger of overcapping due to the naturally low RoF stat of an RF. Nevertheless, Commanders should still mind as to not overcap the RoF of these RFs.
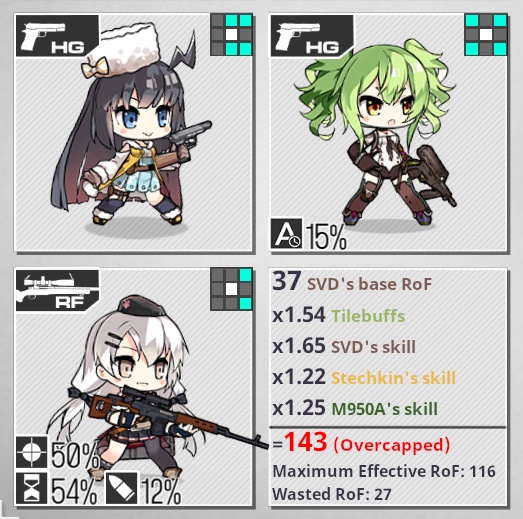
SVD w/ 2 RoF buffers, pushing her RoF above the maximum cap of 116 and wasting a lot. This is extremely stupid. Don’t do this.
Pros:
- Diminished risk of Corpse Whipping when compared to FP RFs
- Better suited for facing enemy comps with numerous mobs
- Diminished risk of overkilling
Cons:
- RoF has an easily reached cap, unlike Damage
- RoF is not a straightforward stat, so the DPS increase can vary
Damage RFs, also commonly called FP RFs, are Dolls whose Skills primarily consist of increasing their Damage stat. They are almost always generalists. Unlike RoF RFs, they are not prone to overcap, and thus are easier to work with. Examples are Lee−Enfield, M14, and R93.
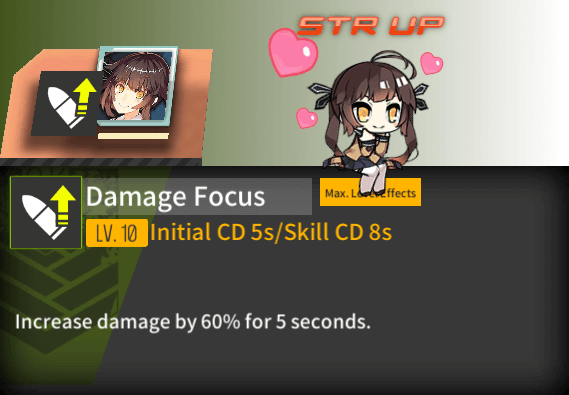
Example of FP skill (ft. M14)
Unlike their RoF counterparts, they are significantly more prone to overkilling, due to the RF nature of hitting slow and hard. Because they usually do not buff their own RoF, they’re also more prone to Corpse Whipping than RoF RFs.
Since they increase their own Firepower stat, FP RFs have an easier time when fighting enemies with insanely high armor values. There are enemies that can have armor values much higher than the RF’s AP value. In those cases, higher Firepower does better than a higher Rate of Fire due to how the armor penalty is calculated.
Pros:
- Straightforward buff, unlike RoF
- Have an easier time brute−forcing enemies with more armor than the RF’s AP value
Cons:
- Struggle against low HP enemies — can end up overkilling
- Can end up with similar RoF and corpse whip
Sure−hit RFs are Dolls whose skill allows them to completely bypass enemy Evasion checks.
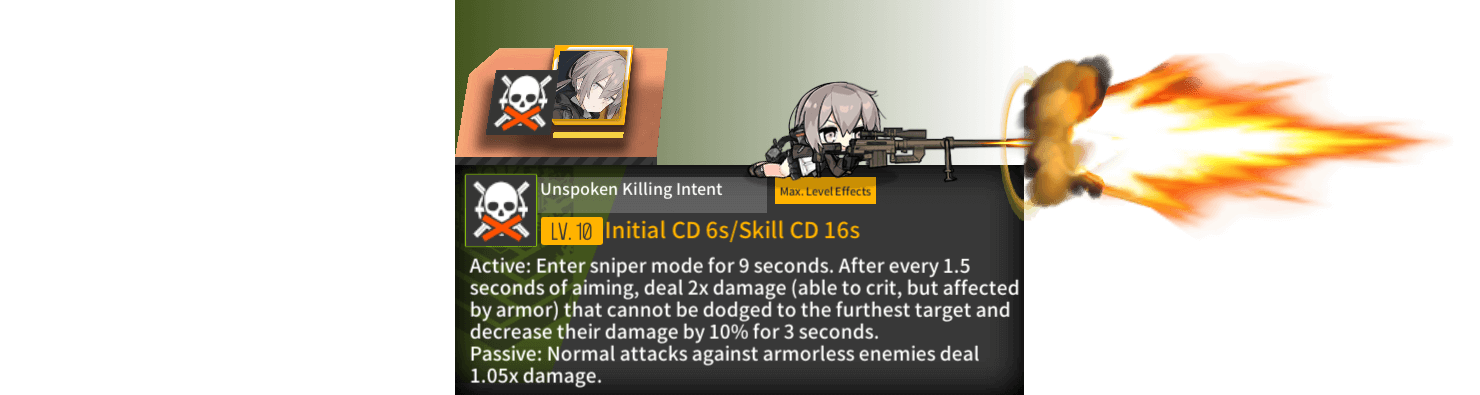
Example of Sure−hit skill (ft. M200)
Members of this class manifest sure−hits in different ways. M200 has a fixed RoF while her sure−hit Skill is activated, firing 6 shots while her Skill is activated, 7 with cooldown reduction. 4 Shiki has a sure−hit passive in that every third shot she fires is a sure−hit shot with a piercing effect. SVCh’s skill adds extra damage with every shot that ignores evasion, armor, and HP shields.
As the way sure−hit is manifested is on a case−by−case basis, refer to the Doll’s respective page for more details.
As RFs are not capable of equipping PEQs, they cannot avoid the night penalty like ARs can. Facing off against armored enemies at Night can be particularly challenging if said enemies have the slightest bit of evasion, as the RFs’ Accuracy is reduced to single digits. Enemies such as Uhlans and Patrollers can threaten commanders who do not know how to counter them.
Pierce RFs are Dolls capable of piercing through multiple enemies with their bullets, with the best example being Type 88 “Hanyang” Mod, whose Skill 2 allows her to fire piercing shots as long as her Skill 1 is activated. 4 Shiki also has a passive where every third shot is a piercing shot. Piercing shots deal the same damage to every hit enemy along a line between them and their target, and can even travel infinitely behind their target to hit enemies behind.
Example of Pierce skill (ft. 4 Shiki)
Due to how piercing shots are coded in GFL, pierce works differently across different units, as is illustrated in the gif below. It is why JS 05, PzB, and Type 4 piercing shots don't work as well as the pierce of Kord. This is also why piercing shots can occasionally fail to hit their actual target, because that target happened to fall between hitboxes. Some piercing shots can hit enemies behind their current target, allowing pierce RFs to deal damage to enemies that are out of range.
Gif explaining the different hit “circles” of some piercing attacks. Note how Type 4 and JS05 both have gaps in their hit “circles” while Kord’s overlap. (NOTE: this does not mean that Kord is able to hit the same enemy multiple times with her overlapping hit “circles”)
Pierce RFs are best suited when there are large groups of enemies that can be damaged by the piercing effect, allowing their total damage output to soar far above non−AoE RFs for each additional enemy hit. Also preferably the pierce is one they can fire often, otherwise it will have very little impact on overall DPS. So bamboo pierce like JS 05 sucks. As the way pierce is manifested is on a case−by−case basis, refer to the Doll’s respective page for more details.
Lastly, there are RFs that don't fit any of the aforementioned roles and should be looked at on a case−by−case basis. Commanders should consider what the T−Doll’s Skill does, what roles she performs, and the enemies they’re facing. A couple of examples to illustrate this:
- Carcano M1891 “Pink”: Commonly called Python’s SPEQ, her biggest trait is having a 40% chance of buffing Crit Rate and Rate of Fire for Dolls in her column every time she shoots. While this buff is not very powerful on its own, when “reflected” with Python’s passive, a far more powerful snowballing effect can build up.
- De Lisle: A support RF with a focus on debuffing enemy Armor and Evasion. This helps against enemies that rely heavily on those stats for survival. Her damage vulnerability debuff also makes focusing on one target an option. But her low statline and otherwise weak buffs don’t give her much to work with outside of those circumstances.
- HS.50: An RF who prioritizes armored enemies and deals 2x damage with every shot (4x if the target is armored). This allows her to quickly eliminate high-priority armored enemies such as Murats, but her lower effective RoF cap and need to reload after every 5th shot make her a specialist who is not suited for general use.
- Mondragon: A Support RF from Dual Randomness, capable of buffing the allies on her tiles during her Skill activation, in a similar manner to Ribeyrolles.
- General Liu: An annoying to categorize RF from Dual Randomness, has a passive that summons 3 weaker reinforcements with 3 Dummies each. Behaves similarly to other generalists, but with extra weirdness. Able to have frontline or backline targeting.
Lastly, Pros and Cons depend on each individual RF stats and Skill kit, therefore Commanders are recommended to check a Specialist’s Analysis page.
HG T−Doll roles
Most HGs fall under the categories below:
- FP HG: HGs that buff the Damage of their allies with their tiles/skill. Examples include SAA and Grizzly.
- RoF HG: HGs that buff the RoF of their allies with their tiles/skill. Examples include M950A (Calico) and Stechkin.
- Crit Rate HG: HGs that buff the Crit Rate of their allies with their tiles/skill. Examples include PPK and Five−seven.
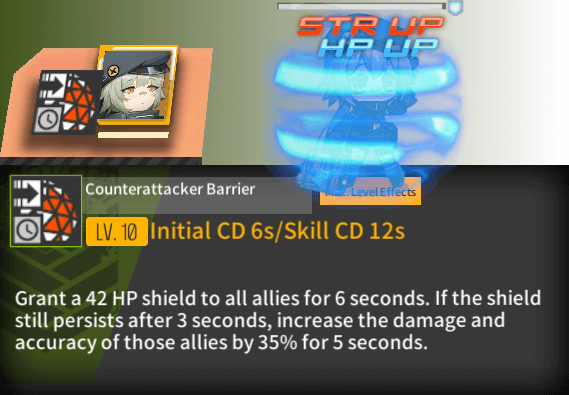
- Shield HG: HGs that can provide Shields to herself and other team members. Example: HS2000.
- DPS HG: A niche type of HG where their Skills focus on dealing damage.
- Debuff HG: An HG that reduces enemy stats with their skill. These types of HGs are rarely used because the best debuff is reducing the enemies’ HP to 0.
It’s common for an HG to buff more than one stat. PPK, for example, buffs Crit Rate and Damage, however as at Skill Level 10 her Damage buff (10%) is much smaller than her Crit Rate buff (35%), she is mostly used for her Crit Rate buff, and such is the case for other HGs.
Note: Neural Upgrade can change the behavior of some T−Dolls, either by granting them another category (MP−446 “Viking” Mod’s Skill 2 is an RoF buff) or giving them a unique role (Calico’s Skill 2 capable of buffing movement/debuffing enemy movement and Welrod Mod becoming a situational tank).
One way to distinguish what role an HG should be defined by is to see if both their tiles AND their skills buff a certain thing. A dedicated FP buffing HG would buff FP with both their tiles AND skill, such as SAA. But an HG like MP−446 would not be a dedicated FP buffing HG as only her tiles buff FP. Her skill does not, so she is a hybrid between a FP buffer and a debuffer. And on that note:
Damage HG: A HG T−Doll capable of buffing the echelon’s Damage stat through her Skill/tiles. Not to be confused with HGs that only self−buff their own stat, as Desert Eagle does with her Active Skill. Examples are Grizzly and SAA.
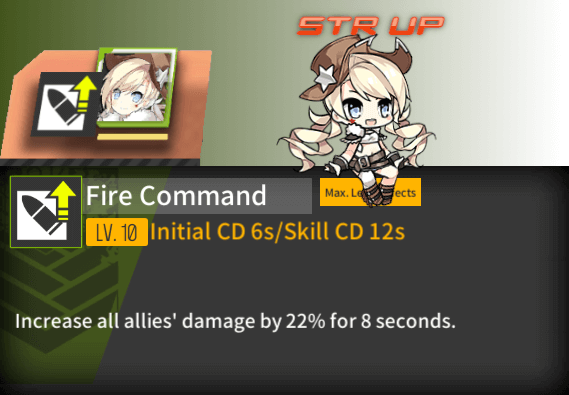
Example of FP buff skill (ft. SAA)
In RFHGs, FP HGs are usually a safe standard. There is no realistic cap on Firepower, all RFs’ performance scales with it, its benefits are usually straightforward, and it allows for brute forcing of armor when lacking proper AP. That said, using only dedicated FP−buffing HGs is generally considered a bad idea since that deprives the RFHG of any RoF. Additionally, too much firepower buffing can lead to overkilling.
RoF HG: A Doll capable of buffing the echelon’s RoF stat through their Skill/tiles. Examples are Stechkin and M950A.
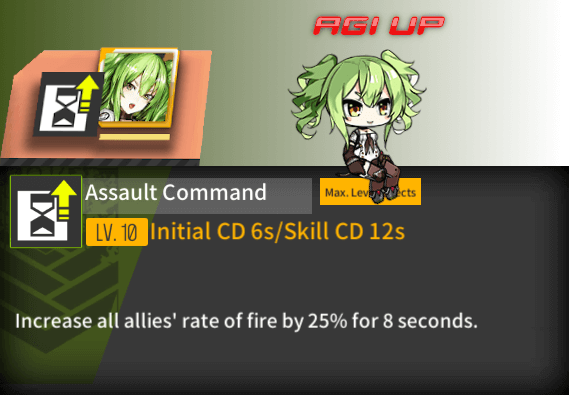
Example of RoF buff skill (ft. M950A “Calico”)
RoF HGs are generally considered to be an essential part of RFHGs. Due to the low base RoF of RFs, adding at least one source of RoF is usually highly recommended to prevent extreme overkilling and allow the RFHG to deal with packs of enemies easier.
As mentioned earlier, keep in mind that RoF can be capped. A common rule of thumb to go by is 1 dedicated RoF HG for RoF RFs. 1 to 2 dedicated RoF HGs for other types.
Crit Rate HG: A Doll capable of buffing the echelon’s Crit Rate through their Skill/tiles. Examples include Five−seven and PPK.
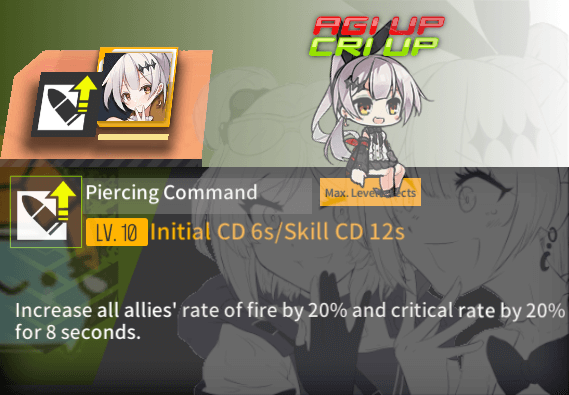
Example of Crit Rate buff skill (ft. Five−seven, art by @BramonCrepe on Twitter)
Crit is particularly useful on RFs since they already have such a high base Crit Rate. Their ability to equip AP means that the armor penalty will be lessened for the RF’s crits. While not strictly necessary, fielding a Crit Rate HG ensures the RFs have 100% Crit Rate. This means their damage output is much more stable since every shot is guaranteed to crit.
However, anything past 100% Crit Rate does not provide any extra effects. Dedicated Crit Rate HGs paired with RFs will often push the RF way past 100%. One way to utilize this otherwise wasted Crit Rate is to also bring HGs that convert Crit Rate like Px4 Storm or Jill Stingray.
PPK is especially useful early on as she is cheap to raise and offers Crit Rate when Commanders lack gold VFL scopes.
An HG whose primary Skill focuses on increasing her DPS output rather than buffing the entire team or debuffing enemies.
Example of DPS HG skill (ft. Desert Eagle “Deagle”)
Dolls in this class are hit or miss, with good DPS HG examples being Python and Deagle and bad examples being GSh−18 and CZ75. Depending on the enemy type, their placement in an RFHG could improve DPS or reduce it. Because of this, Commanders are advised to look at Dolls in this class on a case−by−case basis and refer to their analyses in their respective pages.
Depending on the scenario, they can be paired with a Damage Debuff HG to further increase the shield’s durability. It is also worth noting that HP shields act as a single link and thus allow Dolls to easily block attacks that affect multiple dummy links, such as Uhlan and Doppelsöldner grenades, Gladiator punches, Minotaur tases, Rodelero lasers, among others.
To take advantage of their shields, these Dolls are sometimes paired with a Doll capable of absorbing incoming damage. So, in the rare scenarios an RFSG team is used, P22 is often fielded to extend the SG’s tanking capabilities.
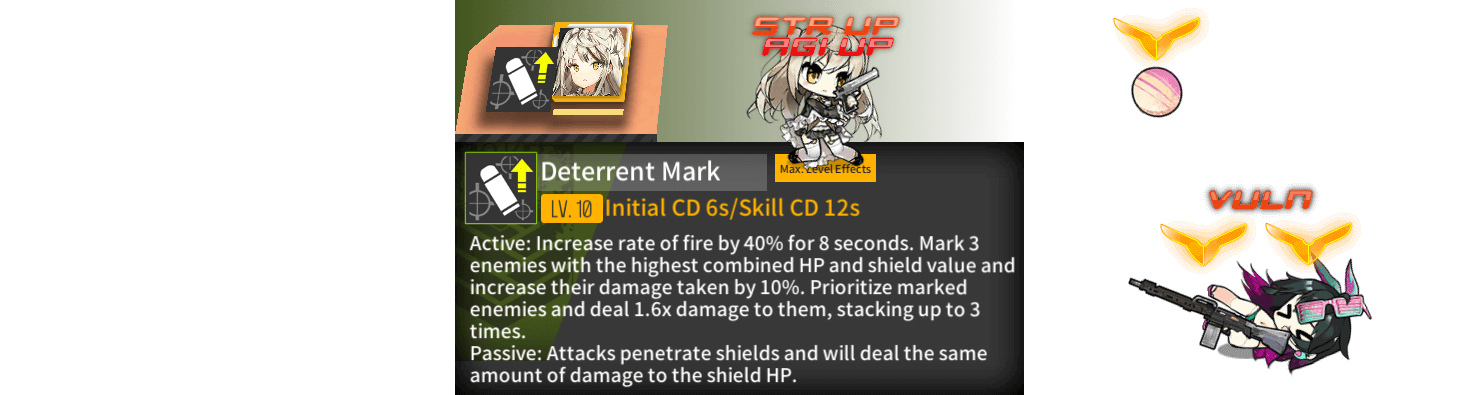
An HG T−Doll capable of debuffing the enemy team, be it through Evasion debuff (MP−448), Accuracy debuff (Welrod), Rate of Fire debuff (MP−446 “Viking”), Damage Vulnerability debuff (Contender), or Damage debuff (M1895 “Nagant Revolver”). Note that these are units that affect the enemy team, and HGs that debuff your team like Px4 Storm do not count. These are lumped together because most of them suffer the same issue.

Example of Debuff skill (ft. NZ75)
“The best defense is a good offense,” a wise man once said. “Dead enemies can’t shoot,” said a less wise yet equally correct man. This rule applies in Girls’ Frontline, especially for RFHG teams due to their fragile nature and the enemies they fight.
The large majority of debuff HGs focus on increasing survivability. These HGs get quickly outdated due to numerous factors such as scaling HP, increasing presence of enemies with high Accuracy stats or sure−hit attacks (e.g. Centaurus and Doppelsöldners), enemies with Damage stats too high to be meaningfully debuffed (e.g. Hydras and Typhons), and the enemies with RoF values too low to matter (e.g. Gladiators). In fact, due to their glass cannon−like nature, RFHGs usually try to avoid getting hurt in the first place, making the presence of most debuff HGs pointless on an RFHG.
One way to think of it is like this. If trying to tank enemies with an RFHG, why half−ass it with an HG? Instead, go all out with an SG or SMG, who are actually meant to be tanks. This gives rise to the notion of RFSGs and RFSMGs, very specialized team types which will be discussed in a later section. But it’s important to realize that HGs should not normally be considered as tanks in any way, they simply die too quickly.
But there are still notable debuff HGs, for varying reasons.
Neural Upgrades let HGs like MP−446 also perform an additional role outside of their debuff.
Damage vulnerability debuff HGs like HP-35 simply boost damage output with their debuff and were not concerned with survival in the first place. This makes them usable.
Evasion debuff HGs like Type 59 can help RFs hit evasive targets more reliably at night since RFs are unable to equip PEQs.
Damage debuffing HGs like MP−443, when paired with things such as HP shields, can help prevent team−wide attacks (e.g. Doppelsöldner skill) from hurting the RFs.
As always, their applications are highly situational and their analyses should be read before deciding if they should be added to any RFHG.
HGs that excels by offering a particular Skill that does not fit any of the aforementioned categories. Examples are:
- Webley, as when she is not fielded as the Leader in an Echelon she reduces the Leader’s Skill Cooldown while also buffing the Leader’s Damage and Rate of Fire.
- C93’s passive offers individual buffs based on the teammates’ debuff.
- Px4 Storm debuffs Crit Rate but buffs Crit Damage, which can be very powerful for RFs despite the debuff.
- Calico Mod offers either an allied movement speed buff or an enemy movement speed debuff based on whether the echelon is on an allied “blue” node, or in an enemy/neutral node. The debuff can stall for time. The buff can let normally slow-moving RFs avoid attacks.
- C96 is a flare HG. She increases the team’s night vision, allowing them to either avoid PEQs or enable DPS that cannot equip PEQs to hit enemies during night battles. (They’re fixed.)
Much like Specialist RFs, Pros and Cons depend on each individual HG stats and Skill kit, therefore Commanders are recommended to check a Specialist’s Analysis page.
Much like Specialist HGs, these HGs also have Skills that do not fit the traditional classes. However, they fail to provide a meaningful niche for themselves, and thus should largely be avoided being raised altogether. Some examples are:
- PA−15: compared to a traditional stun, like M9’s, it has too short a duration, and affects one high HP enemy that is more often than not immune to her stun
- Jericho: has a reload−based passive, which means it only works with MGs but is hindered by her unusual tiles, further cementing her place as a niche doll.
- P30: has a switchable Skill that buffs 10% RoF or 60% movement speed. Movement speed buffs are very niche on their own, as battles with extended walking time are rare.
- P7: She and other Evasion buffers buff the entire echelon’s Evasion. As HGs are not tanks, they have little to offer in an RFHG team, especially in the face of enemies with high Accuracy stats or sure−hit attacks.
Wkp where she belongs
Niche HGs usually have little to no upsides to outweigh their downsides and should largely be avoided. As the value of a niche is on a case−by−case basis, refer to the HGs’ respective page for more details.
Conditional Skills
Most units either apply their skills globally or on only themselves. Once they activate it every ally (or every enemy if it’s a debuffer) is affected by the buff, regardless of status or position. Or they are a self−buffer and they only modify their own stats. But some units and fairies have conditions that must be met for their skill. When fielding these units, it is important to keep these conditions in mind so that they can be used to their fullest potential. For some examples:
- Location−dependent:
- Relative−position: Units like Px4 Storm, Tabuk, and Gr SL8 have skills that depend on where they are/where their allies are/where the enemies they are shooting are. Be careful about kiting with them, as moving them out of their original position mid−combat and then activating their skill can result in their skill affecting no one.
- Absolute−position: Units like P22 will apply their skill on set locations, with the unit’s own spot in the formation not mattering. Makes moving them around for kiting less restrictive than relative−position.
- Type−dependent: Units like K5 and Carcano M1891 are picky about what type of units are on the field. They will modify their skill based on what type of unit it is, whether it’s low rarity, what nationality they are, etc.
- Mission−dependent: Night−specialists like Gr Mk23 and Type 88 have their skills changed based on whether the mission is night−time or not. Some may still suck at night, some may become very strong at night, some can be strong even at daytime. It depends on the individual unit.
- Node−dependent: Some fairies and units like M950A Mod II change their skill behavior based on if the node the team is fighting on is allied or not, or if the team walked into the enemy or got walked into. Track what conditions the team will be fighting in when using them.
- Leader−dependent: The leader of the echelon is the leftmost unit when viewing the team on the echelon page. Some T−Dolls like Rex Zero and Webley have skills that directly affect the leader specifically, so make sure the correct T−Doll is the leader.
There are a lot of skills in GFL, and plenty of conditional ones, more than we can really list off here. Just know that it is important to understand what conditions all members of an echelon want. For example, Px4 wants to be on position 8 when she uses her skill to buff both RFs. Make sure she is standing on position 8 when her skill is activated. Check their individual analyses for how they behave.
Advanced Topic: Tilebuff Diversity
When building an RFHG, one should watch out for having too many of the same type of buff.
Some obvious reasons for this have been mentioned above:
- Too much FP means potential for overkilling, too little means high armor is scary.
- Too much RoF means overcapping, too little means the team gets swarmed easily.
- Too much Crit means exceeding 100% Crit Rate, which is pointless.
- Too much Accuracy has diminishing returns on the already extremely accurate RFs.
But another reason why the types of buffs should be different is the tiles. While skills combine multiplicatively, tiles of the same buff type only combine additively.
For example, Grizzly’s 30%, Px4’s 24%, and K5’s 30% FP tiles combine additively to make 84% FP. But if we swapped K5’s 30% FP tile for M950A’s 30% RoF tile, then we would have 54% FP and 30% RoF, which multiplies out to become ~100.2% more DPS. 84% is worse than 100.2% by a significant margin.
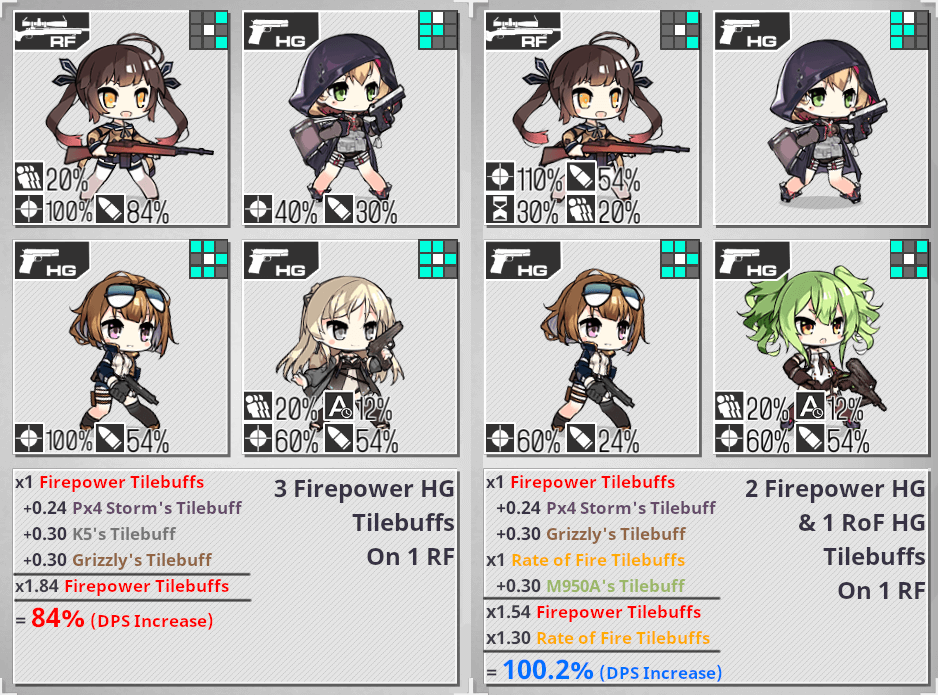
M14 with 3 FP Tilebuffs vs. with 2 FP Tilebuffs and 1 RoF Tilebuff
Another way of thinking about it is how much K5 contributes once Grizzly and Px4 Storm are already on the team. Grizzly and Px4 Storm provide 54%. The addition of K5 takes it to 84%. 1.84/1.54 = 1.1948. So K5’s tilebuff is only adding 19.48% damage, instead of the 30% expected. Since M950A has no competition in the RoF department, she gives the full 30% advertised.
That’s right, too much of one type of tile has diminishing returns. This is another reason why having multiple types of buffs is so highly encouraged when building RFHGs.
Advanced Topic: What is Corpse Whipping?
To perform proper RFHG teambuilding, one must factor in Corpse Whipping, as it heavily impacts RFHG teams’ DPS output due to the RFs nature of hitting hard and slow (compared to ARs). Corpse Whipping is when two DPS Dolls, RFs in this case, have the same or a similar RoF window and happen to shoot at the same target, which happens to have an HP pool low enough to be one−shot by one of the RFs. This results in an RF shot being “wasted” as it deals little to no damage, rather than it being spent on another group of enemies.
As RFs target the backline, they usually target squishy, dangerous enemies, and having a shot wasted can be the difference between no damage taken and HGs getting shot by said squishy enemies. If their rates of fire are similar for the entire fight, the RFs will do this for every shot.

2 RF dolls with a similar rate of fire corpse whipping every shot, so only one RF does any actual damage. If you are struggling to see, count the number of damage numbers. There would be 10 Damage numbers if all links were doing Damage.
This can be mitigated by buffing the RFs’ RoF so that they end up vastly different. As some RFHG compositions have an HG that doesn’t buff one of the RFs, this can be taken advantage of so that the HG on Position 8 has RoF tiles.
Another way to mitigate this is by using RFs that have base RoF stats different enough so that when buffed by HG RoF tiles they end up in significantly different RoF windows. Lastly, another way to mitigate this is by using mixed RF types, where one RF buffs their own RoF and the other doesn’t (like pairing M14 and WA2000).
As enemies gain more health and rely less on sheer numbers, corpse whipping becomes less important, since it takes multiple RF shots to take those enemies down.
Advanced Topic: RF Pairings
A question that often comes up when building RFHGs is who to pair with a certain RF. For most generalist RFs, the decision is actually quite arbitrary as they’ll work well with almost any other RF provided you factored for corpse whipping. But there are still things you can keep in mind if you want to min−max this.
Pairing 2 of the same kind of RFs has its benefits. Both RFs can fully realize the HG buffs tailored for their RF type, and the team can specialize in killing one type of enemy.
2 RoF RFs (e.g. WA2000 + SVD) minimize the chance of overkilling and maximize their swarm−killing capabilities.
2 FP RFs (e.g. M14 + Lee−Enfield) can use 2 RoF HGs without fear of severely overcapping and can also deal with high armor better.
2 Surehit RFs (e.g. M200 + Kar98k) can make quick work of night−battles or highly evasive enemies like Striders.
I suppose 2 bamboos (e.g. NTW−20 + M99) means you can synchronize their shots to make killing bosses easier, but as stated before, that kind of strategy has fallen from viability as bosses become more annoying/impossible to nuke.
Yet having 2 different types of RFs also has its benefits. Each RF type can bring its own strength to the table.
1 FP & 1 RoF RF (e.g. Lee−Enfield + WA2000) means they automatically desynchronize their RoF to completely avoid corpse whipping problems. The team can take care of numerous mobs as well as tanky targets. This kind of hybrid team is generally more recommended to run than same−types if possible due to being slightly more flexible and adaptable in their performance.
This can also be extended to other RF types. 1 RoF RF & 1 Bamboo RF (e.g. WA2000 + Carcano M91/38) can make the bamboo nuke the most dangerous enemy on the field, while the RoF RF cleans up the mobs surrounding it.
In late−game enemy compositions, RFHGs frequently face high HP enemies with escorts, such as Uhlans, Minotaurs, Doppelsöldner, and Gladiators, so there is a diminished risk of Corpse Whipping. Thus the focus on which RFs to pair shifts toward how to best deal against each type of enemy. (i.e. M200 sure−hit to counter Uhlans with Evasion at night, Gunners at night or the highly evasive Abandoned Patrollers. Carcano M91/38 for an easier time against Doppelsöldner or Minotaurs). At that point, it becomes less about pairing synergies and more focused on simply selecting RFs that, when combined, counter each enemy it will fight.
Kiting
Did you know? You can move your T−Dolls.
Fundamental to RFHGs is the idea of kiting. The incredibly high DPS of an RFHG usually peaks after 6 seconds in battle, after all units have activated their skills. But very few enemy nodes will take 6 entire seconds to start firing back. They’ve got places to be, Griffin scum to kill. So Commanders have to move their HGs in order to slow down the incoming enemies with kiting.
This section will briefly go over some basic points about kiting to be able to apply to RFHGs. For more in−depth details see:
Varz’s Kiting page can be seen here:

All G&K T−Dolls share the same range in combat, which is indicated by the giant arc on the ground in front of them. When enemies are within this range, all non−moving T−Dolls can shoot at them. As one might expect, being able to shoot your enemies is generally a good thing.
This range is determined by two things:
- Whether the front column (positions 3, 6, and 9) is occupied. Large range increase.
- Whether the team is not moving up. Small range increase.
“Occupied” meaning at least one unit is commanded to stand on that column.
“Moving up” in this case is when the entire team walks forwards due to no enemies being in range.
To take advantage of this, the most basic kiting move is to, at the start of battle, move a HG up to the front column. Of course assumes the echelon is in classic F formation so that one has room to move up a HG. This immediately stops the entire team from moving and occupies the front column, fulfilling both conditions and maximizing the team’s range. After the enemies have moved closer, the HG is free to move back, since the enemy should be close enough to be within the smaller range. As the fastest units in the game, HGs usually have plenty of time to pull this off without getting shot.
Another reason for moving a unit up is that all things have an “aim time,” which is the delay provided by rate of fire. Your T−Dolls have it, and the enemies have it. Since the HG is also in the front column, they will get into range of the enemy earlier. Once the enemy acquires the HG as a target, they have to stop moving and aim. And that’s when the HG is moved backwards, leaving enemy range and forcing them to move again. This can buy extra precious seconds without taking any damage, if done correctly.
So to abuse what was mentioned above, the classic strategy is to repeat this over and over with the unit on position 5.
- Move T−Doll to position 6. (Range expands, echelon stops)
- Wait until enemies have stopped walking.
- Move T−Doll towards position 5.
- Wait until enemies have started walking.
- Repeat steps 1−5 until enemies are too close to kite.
With HG base movement speed being the highest of any class, this should be especially easy.
Enemies will eventually reach you. They will eventually be too close to kite normally. Or they are unkiteable because they will instantly lock−on and shoot if stopped even for a moment(e.g. backspawned doppels, strikers, strelet+’s). There is still one thing HGs can do to avoid getting shot. They can retreat kite.
By retreating before they get hit, the unit can no longer take damage. This is a nod to "running away" being one of the best strategies to avoid getting hurt if you find yourself in a fight in real life. Any skills they activated still linger for their full duration, tile−buffs are permanent, and the unit will be back in the next fight, so a HG retreating is actually not that much of a loss in the short−term.
Obviously this should be done when the enemy is almost dead, since retreat−kiting the HGs but letting the RFs take damage instead is stupid.
There are certain enemies that attack down rows. Executioner, Dreamer, Gager, Rodeleros, Typhons, GARM, Patrollers, etc. Once they pick a specific row, they stick to it for the duration of their attack. So there is an easy fix. Move out of the row.
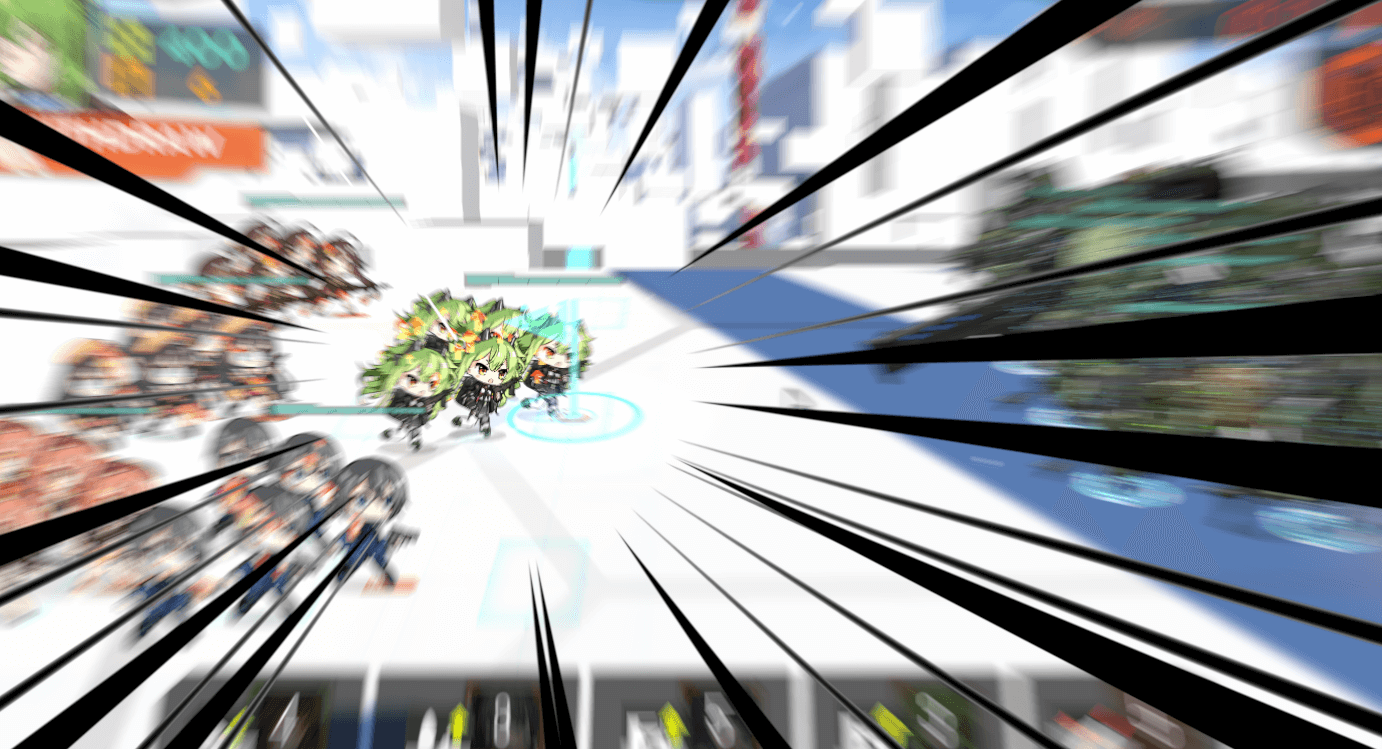
T−Dolls can dodge light−speed attacks. Take that, power scalers (ft. Makarov)
And now you know the basics of kiting, you’re welcome.
RFHG Survival Continued
Sometimes, even with the amount of DPS RFHGs can pump out and kiting, getting shot is inevitable. With the types of enemies RFHGs face, getting shot can quickly lead to a team wipe. This usually does not happen, as RFHGs kill things very quickly, but in these rare cases, they need something more to survive. Here are some optional and fight−specific methods.
If all five echelon members are dedicated to DPS, an option is to let the fairy do the “tanking”. Fairies such as Taunt Fairy are popular since they provide a physical dummy for enemies to shoot instead of your T−Dolls. They will still die if the fight takes too long, and do not necessarily protect your dolls against piercing attacks, grenades, or other area attacks such as Uhlan rams. Others like Shield Fairy directly give the T−Dolls a little more survivability, and some like Beach Fairy slow down the enemy so that they take longer to get in range.
As previously mentioned for HGs, HP shields are one way to extend team life in the face of usually painful damage. Enemy damage that does more damage the more links you have can be blocked by HP shields, since they are treated as only 1 link. Especially when paired with an FP−debuff, HP shields can prevent significant damage to your RFHG.
"something something turn off auto-retreat"
Every doll, once falling to 10% HP, becomes immune to damage for 1.5 seconds. HGs are no exception. With 3 HGs on every RFHG, this can be done 3 times per team−wide repair. While an HG’s small health pool will usually be unable to survive most attacks, proper kiting and a blatant disregard for the wellbeing of your HGs can buy the RFs lots of time to kill.
While unmodded Welrod is largely unsuited for RFHGs due to her status as a survivability debuff HG, her Neural Upgrade gives her a tanking role unique to her. This makes her a rare exception to the rule. Upon taking damage, she gains a shield that acts much like the Orthrus HP shields where every attack only does 1 damage. With this shield, Welrod Mod can survive some things that would kill other dedicated tanks. And do it with a low initial cooldown Skill. However, the mod is still situational.
Replacing one of the three HGs with an SMG for tanking gives rise to the concept of the RFSMG (note there’s still 2 HGs, they’re just usually not mentioned for convenience). In exchange for lower DPS, the SMG massively increases the team’s ability to stall with their higher HP pools, evasion, and survival−focused skills. SMGs to note are ones that also have tiles that buff RFs like Dorothy Haze, MP5 Mod, and Lusa to make the DPS sacrifice not as harsh. Also to note are SMGs that have the ability to survive insanely dangerous incoming damage such as RO635 Mod who can evade unavoidable attacks and MP5 Mod who has a force shield.
On an RFSG, an SG is able to block enemy attacks if the enemy’s attacks are low dmg, like swarms of Strelets, Vespids, ELIDs, or Cyclops that are too numerous for the RFHG to kill in time. SGs to note are ones that give themselves HP shields and can block link damage like S.A.T.8 and M500 Mod. DP−12 also has tiles that affect RFs, making the DPS tradeoff not as severe. LTLX has the ability to knock back a large portion of the enemy to buy the RFs time to kill, although she may also knock enemies out of your own range, forcing you to walk.
Despite all these options, remember that it is much easier if you were able to find a way to kill the enemy normally without getting shot in the first place. Would be much faster and cost less to resupply/repair.
3RF versus 2RF+HG
Unlike ARSMGs, the issue of using a third DPS unit instead of an HG in RFHG teams is much more straightforward. A 3rd RF has even more issues than just lowering the team’s overall DPS.
RFHG teams present a couple of peculiarities that ARSMGs doesn’t:
- They’re prone to overkilling
- They’re prone to corpse whipping
- RFs don’t have balanced stats like ARs
- They will lack tanks most of the time
Because there would be 3 competing DPS’s, 3 RFs are even more prone to corpse whipping than 2 RFs.
As RFHGs typically lack tanks, they’re a glass cannon, and thus reliant on:
- HG kiting to stall enemies
- HG tile buffs and skill buffs to burst down enemies
With a third RF, the team loses one source of tiles and Skill buffs, and one HG capable of kiting. In most cases, a third RF DPS won’t make up for the loss of a third source of buffs, and also leaves a much more rigid team, as is one less HG to kite. Additionally, enemy attacks that hit an entire row, such as Rodelero lasers, cannot be easily avoided with a rigid team like 3RF. Every row would be occupied with a slow RF.
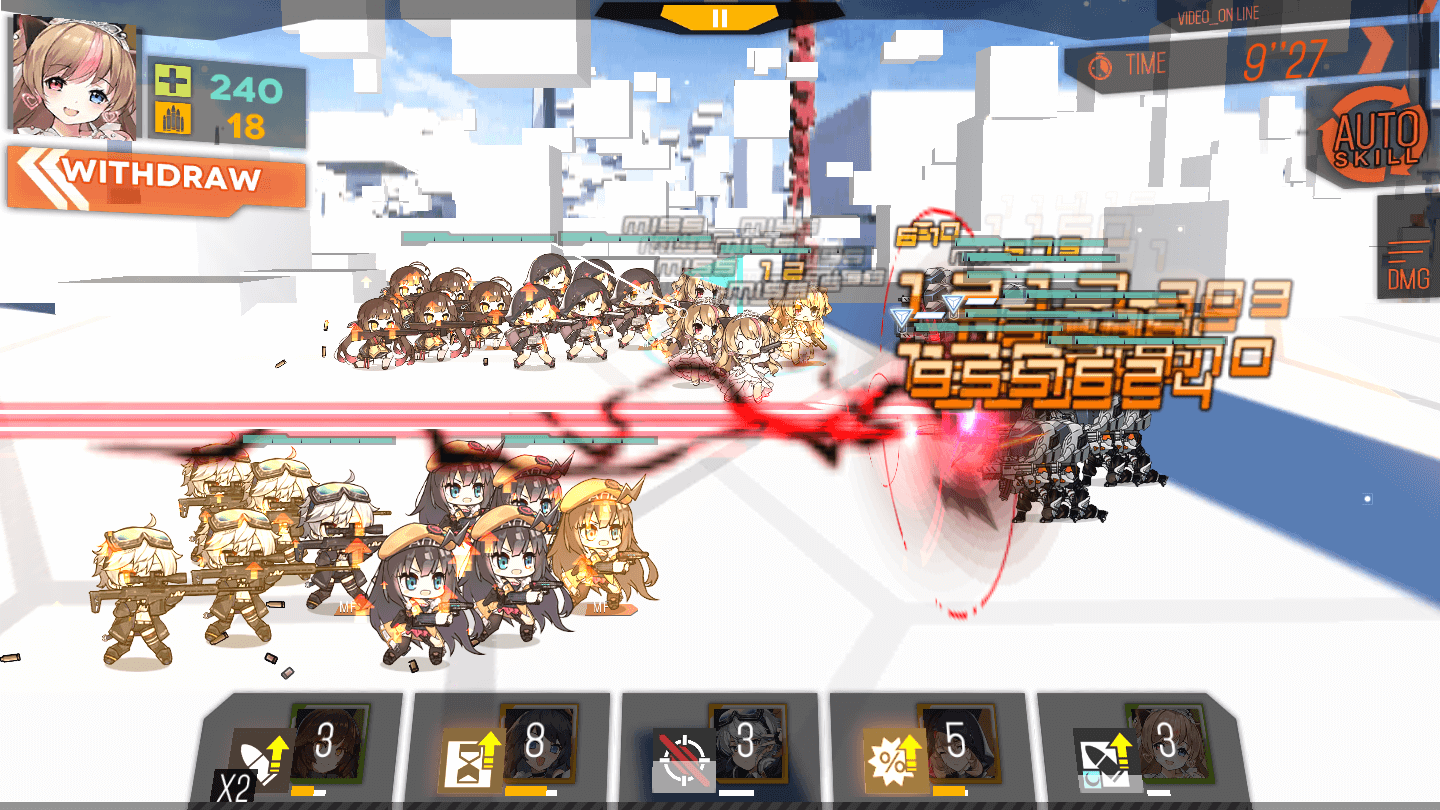
-
Haha, can’t touch this!
-
Ow. Ow. Ow. Ow. Ow.
The slight exception to this rule is Mondragon, a Dual Randomness support RF. However, due to the issues brought up here, using her in a 3RF team is still not usually recommended over a 2RF team. Because of the Doll’s limited availability, nature, and uniqueness, details on her performance will be on her analysis page.
Equipment
For RFs:
RFs will almost always want to equip a VFL 6−24x56 as their scope since they gain a much larger bonus from the crit rate than from an EOT or ITI due to their naturally high accuracy, high firepower, and low rate of fire.
If the enemy has less than 145 armor, if your RF entirely ignores armor with every shot (e.g. Pekola), or if the RF’s sole role on the team is to fire off a damaging skill, then the RF equips the M1022 Sniper Rounds. Otherwise, Mk211 High−Explosive Armor−Piercing ammo should be equipped.
A Thermoptic Camouflage Cape should virtually always be equipped for the stronger crits. On the rare occasion it’s a bamboo RF whose skill cannot deal critical hits and who doesn’t depend on auto-attacks, an LRF rangefinder will allow them to pop their nuke much earlier. (Honestly only NTW Mod would ever realistically use one).

A general guideline for RF equipment in certain situations
For HGs:
DPS HGs want to equip an RMR T4 Red Dot Sight (PEQ-16A at night), ILM Hollow−Point Ammo, and optionally an IOP X4 Exoskeleton so that they have maximum DPS.
Every other type of HG should equip an AC4 Suppressor (S.F. Modified Tactical Light at night), Signal Flare, and IOP T4 Exoskeleton so that they have maximum evasion and buff their allies’ accuracy/night vision. Same goes for SMG tanks you add.
SG tanks should equip an Type 3 Armor Plate, Shotgun Flash Shells, and a Mk0 Multi-Purpose Choke for maximizing clip size or an S.F. Modified Tactical Light at night/for the extra evasion.
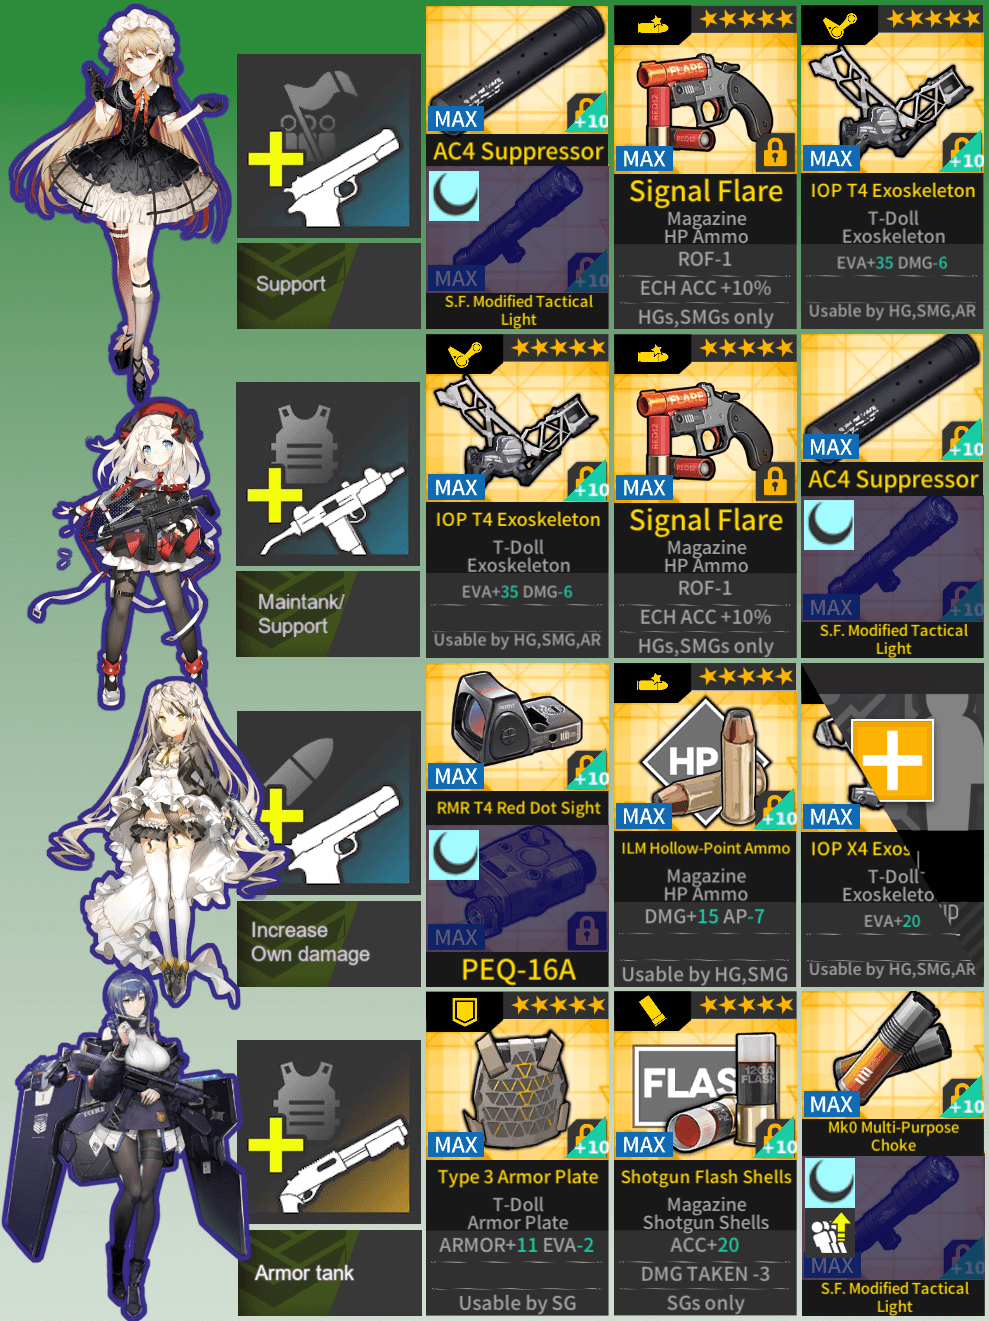
A general guideline for HG/SMG/SG equipment in certain situations
Applying Concepts: Starter’s RFHG in 2.08
Now to apply these concepts, let's go over one of the earliest RFHG teams generally recommended to newer players. Taking our roles we have:
- 2 DPS RFs: M14 & a not−yet−decided RF
- 3 Support HGs
- 1 RoF/Crit Rate HG: PPK
- 2 Dedicated FP HGs: Mk23 & SAA
M14 is a self−buffing Damage RF who is a good generalist and is given for free on the first day of making a GFL account.
PPK is an easily obtainable 2−star Handgun with great RoF tiles and a handy Critical Rate Skill, as early−on RFs don’t easily cap Crit Rate.
Mk23 and SAA are two FP buffer handguns obtainable early on through Career Rewards and Login Rewards.
The main issue is that, unlike a starter ARSMG team, there aren’t many good options for a second starter RF to pair with M14. Each of the following RFs most Commanders can be certain to acquire at the start present some issues:
- SV−98: Comes pre−leveled. Lackluster base stats, on top of being a bamboo RF. Her Mod does little to fix her issue of being a Bamboo RF, so she remains a bad option throughout the game. Cute tho.
- Springfield: Decent stats, comes pre−leveled, and her SPEQ available on 1−4N is easily farmable and the extra RoF really helps. Unfortunately, she also suffers from being a bamboo RF.
- VM59: 2 star RF, has decent stats, but falls behind easily due to being a 2 star RF. Mica give us VM59 Mod.
- FN49: Low stats. FN49 does get a much−needed stat buff with her Mod, on top of her Skill 2 being an RoF self−buff. She still performs worse than other, better generalists, like Lee−Enfield and WA2000 and R93, but being a 2−star Mod and a 2 star RF means she’s cheap to raise. Still sucks though.
- G28: Good 4* RF. Strong base stats and skill. But her farmable maps in Arctic Warfare take forever to grind. And in that time there’s a good chance an equally decent/better RF drops from T−Doll production.
With that said, New Commanders can either opt to either choose FN49/Springfield at their own risk, or wait until they have dropped a better RF generalist, like the aforementioned WA2000 or Lee−Enfield or cheaper budget alternatives like Type 4 (4 Shiki) and T−5000.
RFs to avoid using in a beginner’s RFHG are bamboos like Carcano M91/38 and NTW−20 or other specialist RFs that usually do not perform well in general RFHGs.
Since SAA’s tiles are the only ones that can hit both RFs from between them, she goes on position 4. Examples for a substitution include Stechkin, Grizzly, and Five−seven, but SAA herself has a powerful neural upgrade and does not necessarily need to be replaced later on.
PPK is situated on position 5 as almost all RFs want RoF, so she’s put into a place where she can reach both RFs. With very few other good sources of RoF, PPK’s RoF tiles will have to do. Replacements include M950A, El Clear, and Grizzly if another RoF HG has been found.
Mk23 goes on position 8 to take full advantage of the “F” formation layout. She’s a night−specialized HG that has such powerful tiles and skill that she performs well in the daytime too. While it’s preferred to have a buffing HG whose tiles manage to reach both RFs like P22, Webley, or Px4 Storm, it’s not a hard requirement and those types of HGs are not guaranteed for beginners to obtain.
M14 goes on position 7 since she’s likely the stronger of the 2 RFs, and therefore gets Mk23’s tiles as she contributes more to the team by getting it. Replacements for M14 are not required since she also has a very strong neural upgrade.
By process of elimination, the 2nd RF automatically goes into position 1 to make the most of the HG tiles.
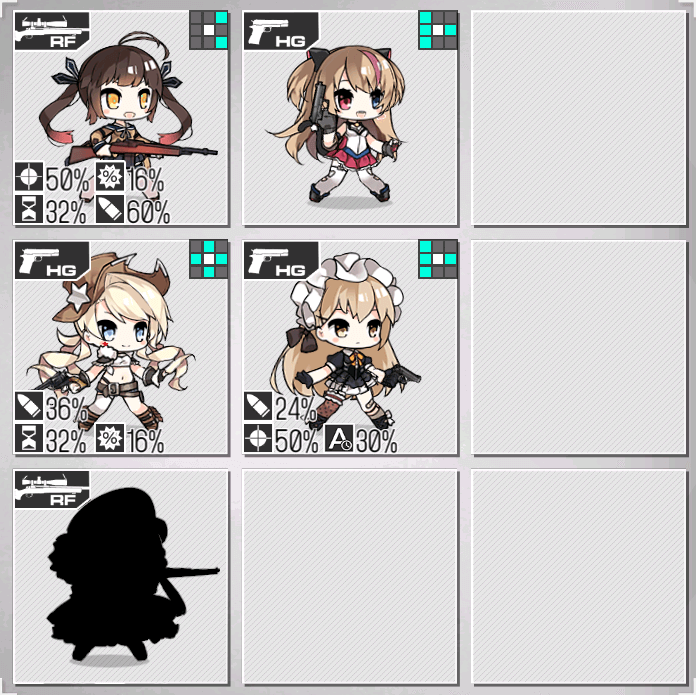
Standard recommended starting RFHG
Silhouette is for filling in with the best generalist RF option you have on hand
Applying Concepts: Starter’s RFHG Post−2.09
Okay so after that beautiful summary, MICA pulls a horrible uno reverse card starting with new players starting after client version 2.09. No Mk23 guarantee. Earliest M14 guarantee is the commander level 40 reward. Fuck you MICA.
So now taking our roles we have:
- 2 DPS RFs: M14 & a not−yet−decided RF**
- 3 support HGs
- 1 Dedicated RoF Support HG: PPK*
- 2 Dedicated FP Support HGs: SAA & P22
M14 is a self−buffing Damage RF who is a good generalist and is given for free starting at commander level 40 and a very common T−Doll production craft. Can be replaced with another generalist RF if one is found before she is crafted.
*M950A can be redeemed for as 1 of 2 guaranteed 5*’s for new players. It’s not recommended though. If she was not redeemed for, you can instead use PPK, who is an easily obtainable 2−star Handgun with great RoF tiles and a handy Critical Rate Skill, as early−on RFs don’t easily cap Crit Rate.
SAA is obtained through early career quest rewards.
P22 can be farmed from Isomer Campaign’s Faith of Blood II.
**If one of the redeemed 5*s was Lee Enfield or WA2000, they can be the not−yet−decided RF.

Standard recommended starting RFHG after 2.09 Client Update
Silhouette is for filling in with the best generalist RF option you have on hand
Desert Eagle is given during 2.09 7−day login rewards. Because of Desert Eagle’s tile−layout and how she does DPS, she plays horrifically with early RFHGs. Her demand for position 7 means difficulty using position 5 and 4 specialized HGs such as SAA, Stechkin, Grizzly, Astra, and M950A pre−mod. Please note that this is just for newer teams. She performs well for RFHGs that have better equipment, skill data, HG options, and fairies.