Introduction
Made by xVarz. Please contact me on the official or community GFL Discord servers for any questions, comments, or feedback.
Many thanks to Zeseling for making most of the GIFs throughout the document and not putting Dinergates everywhere.
This is a guide on how to kite fights in GFL, ranging from the most basic techniques to the notoriously difficult deathstacks. Covered topics include various specific kiting techniques, how to synthesize them together in difficult fights, and how to use certain specialized echelons.
The first two sections of this document cover basic kiting techniques that anyone can use with a bit of practice. They are written as a guide for newer players; in particular, The Basics is a guide for newbies to get started with kiting, while Intermediate Techniques is meant to help players get comfortable with kiting more regularly and win more fights.
Note that the sections below have not been completed yet.
The Optimizing Kiting section can be considered a textbook of sorts, covering specific game knowledge and general advanced kiting techniques. This section assumes that you have the knowledge in the first two sections. More advanced players can refer to whichever chapter they feel the need for; I have explicitly labelled any prerequisites within each chapter.
The Unique Units and Formations section exploits the game knowledge discussed above to make the most of certain unique or otherwise notable units and formations. Of these, I strongly recommend all players past the intermediate stage to read at least the first few chapters of How to M4 Exodia. As above, I have explicitly labelled any prerequisites with each subsection.
If you are unsure of what a specific term means, refer to the Glossary.
If there is a particular enemy type that you are unsure of how to fight or kite, see the Help I’m Getting Shredded section.
The Basics
Kiting is the act of moving dolls in combat (yes, it is possible, and no, it is not cheating), especially for the purpose of minimizing damage taken or accomplishing some other specific combat objective. This can range from very simple movements that anybody can do, to extremely complicated and precise techniques that even the top players need to practice many times before learning them. In other words, the GFL skill floor is very low, while the skill ceiling is sky-high.
Most players first hear about kiting when they start struggling with some fights. Often, the advice given to them is either something to change about their team, or to try kiting. While teambuilding is usually the more prevalent problem, learning how to kite can help drastically alleviate many of the struggles. Kiting helps minimize the damage taken in a given fight, and with practice, it can even allow your echelons to take zero damage across entire maps. Kiting can even make some otherwise impossible fights become trivial with just a few swipes.
In this section, I discuss the fundamental building blocks of kiting, and some basic techniques that you can immediately use today.
The RoF Timer
Consider the following GIF:
Here, we see a T-Doll (Shipka) and an enemy (Manticore) approaching each other, staring at each other for a moment, and then Shipka walks back to the far left before the Manticore catches up and shoots. The very first thing to notice is that in this GIF, it takes longer for the Manticore to shoot than if we had just let it walk right up to Shipka. This is the fundamental observation of kiting: it is possible to delay enemy shots.
Naturally, if enemy shots can be delayed, that also means that damage taken can also be delayed. Then, assuming the DPS from the T-Doll side is the same, the total damage taken by the echelon is reduced, since the enemy will die in the same total time, but doesn’t start shooting until later. Fortunately for us, GFL splits the role of DPS and tanking into different classes, and for standard formations, the tanks that weren’t doing much DPS to begin with are available for kiting.
One reasonable objection would be that this barely delays the enemy shots at all, and the total damage avoided may not be worth potential extra damage taken from making mistakes while kiting. For example, what if the player didn’t move Shipka back in time? However, such an objection neglects that:
- The GIF only shows one enemy being delayed; multiple enemies can be kited at once using the same techniques, leading to that many more shots avoided.
- The damage in any given GFL fight is almost always front-loaded, because there are more enemy links alive at the start. Delaying those first few shots gives your DPS time to take off a few extra enemy links before they start shooting. This also buys time for the DPS skills to become active and take off even more links.
- Reducing the damage up front also buys time for the tank skills to become active. I’d rather take enemy shots while my RO635’s evasion self-buff is active than when it’s not. Combining these two effects, the total HP savings are disproportionately large relative to the fraction of time saved.
- In some more extreme cases, buying those few moments can be the difference between taking only scratch damage and having a tank reduced to critical HP. For example, there are some fights where your T-Doll’s grenade or skill shot lands right after the enemy’s.
Let us now take a closer look at what is happening in the GIF. The bar above the Manticore represents its rate of fire timer, the time until the Manticore shoots. There are a few properties of the RoF timer that are of interest to us:
- while the enemy is walking forward, the RoF timer fills up;
- while the enemy is stopped, the RoF timer depletes at the same rate;
- the RoF timer starts at 0 at the very start of combat;
- the RoF timer has a maximum value, determined by the RoF stat.
As a side note, all of these properties are true of the T-Dolls too, with a few additional nuances that I discuss in later sections.
The GIF at the start of this section demonstrates the most common form of kiting: moving a (tank) doll forward to stall the enemy and deplete the RoF timer by a bit, then walking back to let the RoF timer replenish. This technique is often called staggering the enemy, especially when done multiple times in a row, because of how the enemy’s forward motion is “staggered” by the player. I may also refer to it as basic kiting in the rest of this document. This is also one of the major reasons why formations occupying the back columns are preferred to those in the front: back formations give more room for the player to kite and stagger the enemies, while front formations are shot at much earlier.
Warning Tiles
As you progress through the story chapters, you will start encountering enemies that “paint” some of the “tiles” with a bright orange warning sign. This is also the origin of the other name for warning tiles, “tilepaint”.

Behold Gager’s laser sword skill!
Although this may sound obvious, you should typically try to avoid warning tiles by moving your T-Dolls away from them. However, it is easy to miss the tiles when focusing on kiting, especially if there are multiple enemies around. Furthermore, it is not always obvious where to move the T-Dolls to. Take the following example situation:
The tilepaint is in the top-left, but where to go?
Since HK416 is being targeted by the Jaguar, we want to move her out of the way. However, if we move her in front of the tanks, the Dragoons and Jaegers will target HK416. If we move her down, our DPS will be moving for a long time, time that she won’t be shooting; remember, the longer it takes for us to kill the enemy, the longer the enemies get to shoot and deal damage to our echelon. So then, what is the best option?
In this particular case, I like moving both SMGs forward one tile before moving HK416 forward. This solves both issues above, and also prevents Uzi, an offtank, from sponging more damage than she is supposed to, since the maintank is also moved forward. However, there are other reasonable options, such as moving HK416 forward half a second before the Jaguar’s attack lands, and then moving her back; this also solves the problem of the Jaguar choosing another AR after HK416 leaves the backline, requiring more on-the-fly decisions. Another possibility could be swapping HK416 with Uzi before moving Uzi to the front, avoiding a situation where there isn’t enough time to move all three T-Dolls in time.
In general, different tilepaint situations call for different solutions. I address some of them in the Help I’m Getting Shredded section, but it is ultimately up to you to analyze the situation and come up with your own solution. For some bosses, you may want to enter the fight with an unconventional formation, while for others, it may be best to wait until you enter the fight before moving the dolls into a different formation. For some enemies, it might be best to withdraw the T-Doll being targeted, while for others, the best solution could be to prevent the enemy from even using the tilepaint skill in the first place. There is no catch-all solution by the simple fact that different enemies have different tilepaint patterns. The only general advice I can give is to pay attention to each tilepaint fight, think about what responses might work, and then try them.
Preparing for Fights
Having said all that, how would you go about trying things out? After all, it’s really tedious to run a map multiple times just to reach the annoying enemy sitting on the command post, just to test a strategy that may or may not work. Thankfully, GFL has a few QoL features that help with exactly that.
Target Saving
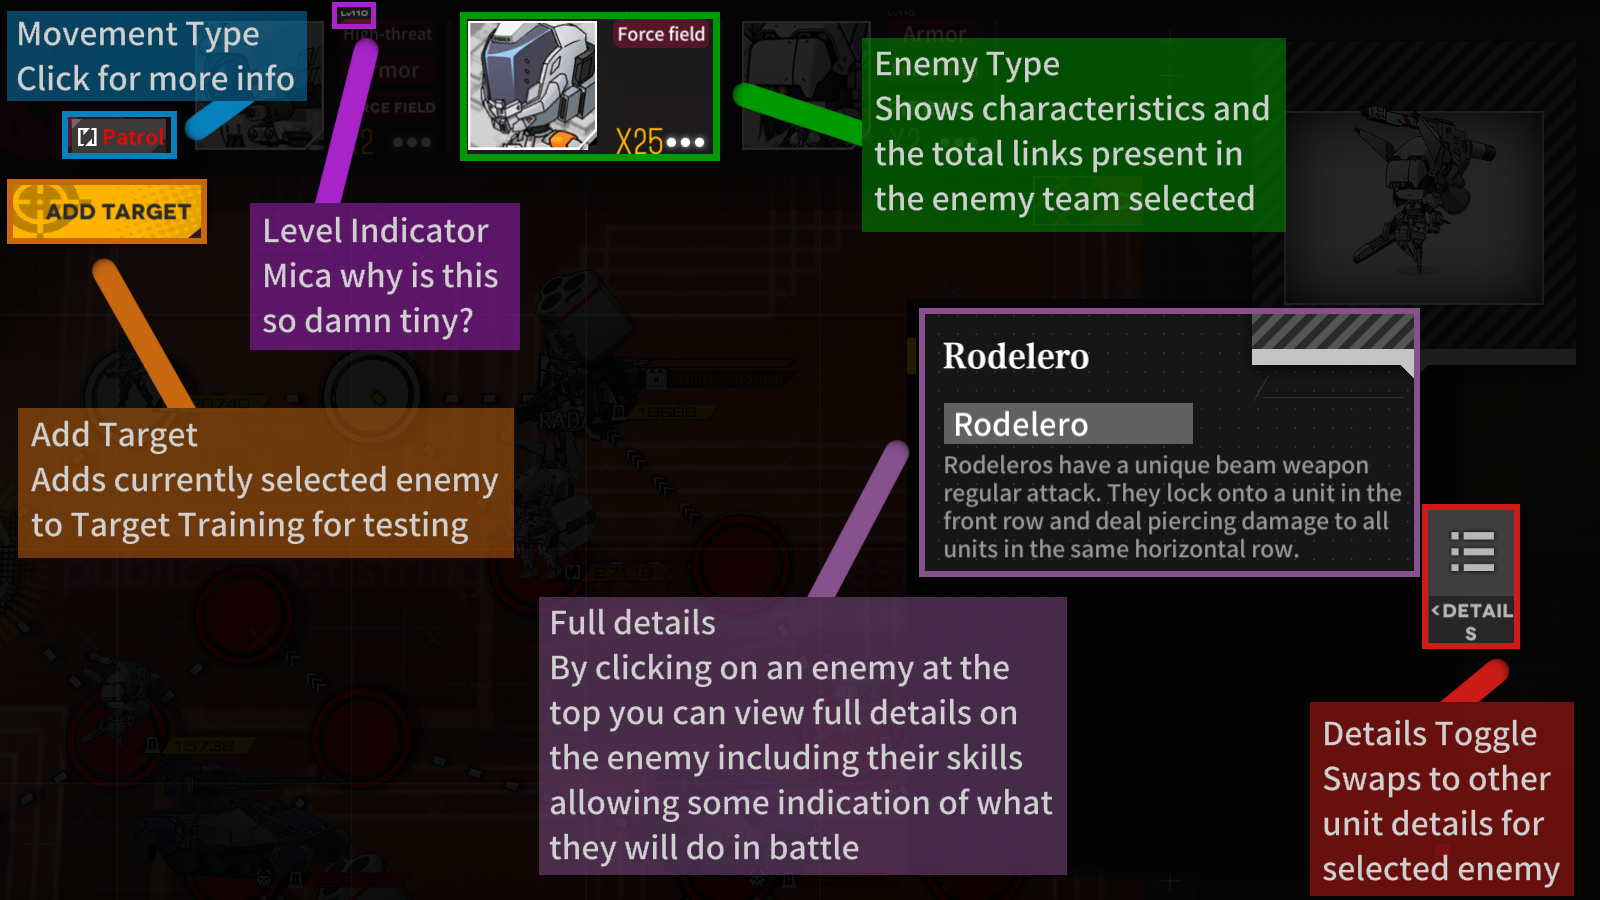
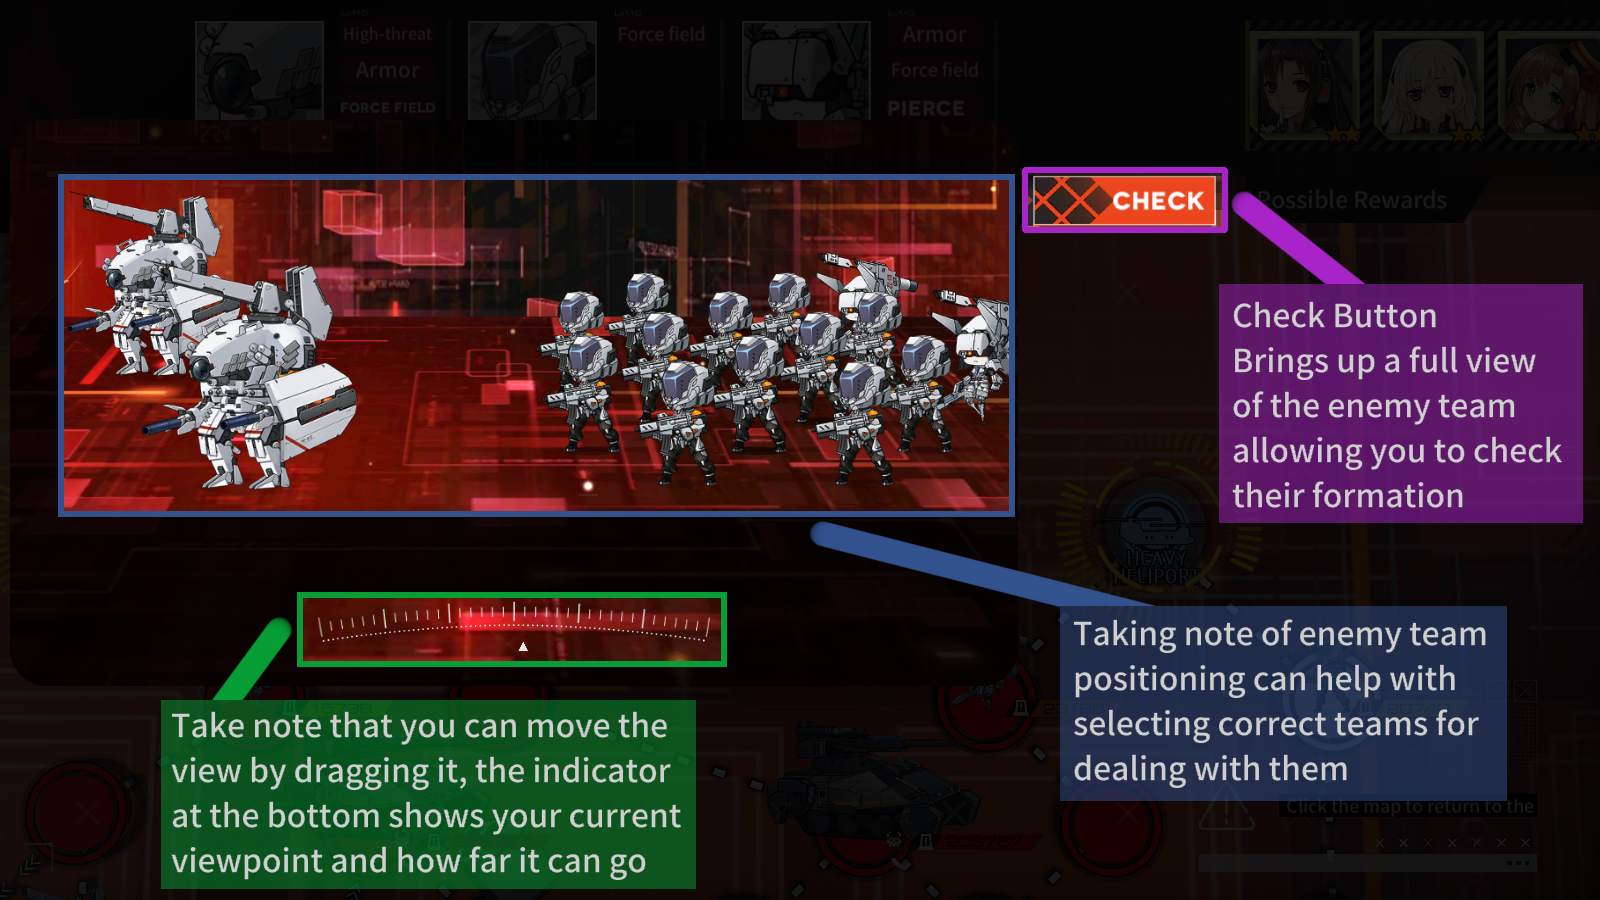
If you hold down on an enemy on the map, a screen showing the enemy formation will pop up. The “Add Target” button in the top left adds the enemy formation to the Target Practice combat simulations. There is another similar Add Target button in the in-combat pause menu in the bottom-left. Adding Targets is a feature that allows you to simulate the fight with your units without spending any resources, and since this menu can be brought up without entering the map, it also saves you the time to make your way to the fight in question. To simulate an enemy formation you have saved, go to the Combat Simulation menu, enter the Target Practice submenu, and then select Target Saving.
The two images below show an annotated version of other information you can get from this menu:
Shamelessly stolen borrowed from the Combat Introduction page.
In case you are having trouble bringing up the menu by holding down on the enemy, try hitting the radar button in the bottom-left corner (only shows up after a run starts) before tapping the enemy:
There are a few limitations to the in-game simulation to be aware of:
- The node faction/colour is considered to be neutral/white, which affects skills that care about the faction/colour of the node (or which party initiates combat, which is actually implemented in the same way as the former) such as Calico’s Skill 2, Scarecrow’s Skill 4, and PP-93’s Skill 2.
- No strategy fairy skills (e.g. Parachute Fairy debuff, Desert Fairy debuff/negation) or other map effects (e.g. EMP debuff, enemy HOC support) can be simulated. However, map-wide effects and Theatre buffs/debuffs are actually saved.
- No more than 4 HOCs can support the simulated fight. That being said, this one shouldn’t have too much of an impact, since there are hardly any fights in all of GFL that are in range of 5 or more HOCs, and even fewer still where such a consideration is even remotely relevant.
- Equipment cannot be freely swapped on/off T-Dolls that are “in combat” (i.e. in logistics), similar to the normal formation menu.
- Combat simulations cannot be run while you are in the middle of a map run. All such fight tests must be conducted before starting the map.
- Not all fights can be saved (e.g. the waves in EN’s Theater 9). These fights don’t come up very often, but when they do, the Add Target button will be grayed out with a message saying “this target cannot be saved”.
- Some enemies might not be present before the map starts, such as enemy Heliport spawns. The only way to save them in-game is to wait for them to spawn before bringing them into vision.
With all that being said, these limitations should not impact your tests 99% of the time, and are only relevant to a very small fraction of players (primarily top rankers). For those players, it is possible to use GFAlarm and the so-called KRSim as workarounds (more details in a later section).
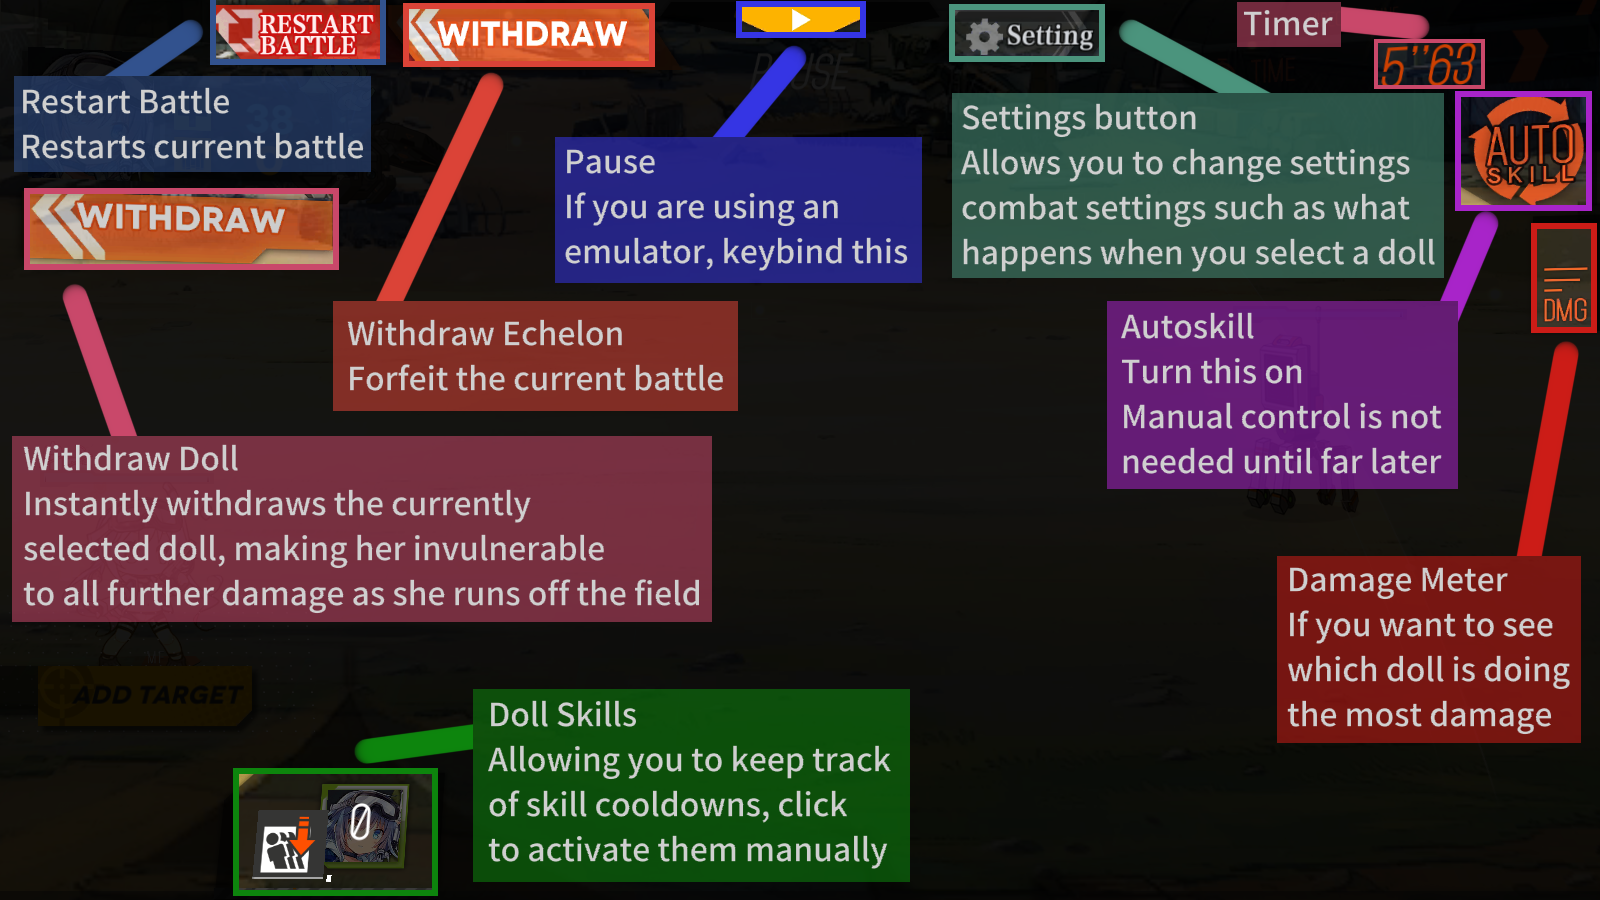
Restart Battle button
In the in-combat pause menu, there is a button in the top-left called “Restart Battle”. It’s pretty much what it sounds like, it brings the battle back to 0.00 seconds. There is no penalty to restarting the battle, other than losing the time you spent and progress you made in the previous attempt. If you happen to sneeze or some other accident happens mid-fight and you aren’t happy with what happened, you can retry as many times as you need using this button.
Also, in the case that you find a fight to be impossible or you wish to give up for whatever other reason, you can eliminate the repair costs and affection loss incurred in the current fight by restarting the battle (thus resetting the HP of your dolls to how it was at the start of the fight) before withdrawing your echelon.
Of course, these tricks can only be used if the fight hasn’t already ended (you still need to be able to enter the pause menu, after all).
See below for an annotated version of the in-combat menu:
Old-school battle resetting
Before the Restart Battle button was introduced in client v2.08, there was another method to restart battles: directly restarting the client. After logging in again, a message will pop up on the main menu, stating that a fight was interrupted and can be resumed. After entering the map again, the fight will load at the start. Note that the client will not directly load into the fight unless you are in a Theater run or Combat Simulation (except Data Sampling and Coalition Drills).
Of course, this is a much less time-efficient method than simply using the restart battle button, but there are still some remaining advantages to using the old-school method at times:
- It is possible to change the formation: if you wish to change the formation of the echelon mid-fight, you can do so by entering the formation menu and changing the formation.
- It is possible to change whether combat fairy skills are activated: if you wish to toggle a combat fairy skill on / off mid-fight, you can do so by entering the main menu settings and toggling the Auto-activation of Fairy skills option (under Battle settings).
- Some client bugs cannot be fixed or do not happen without restarting the client. For example, there are some instances where the client mistakenly believes that HOC support is not in range when it in fact should be, and the fight proceeds without the HOC support; this can be fixed by restarting the client. There are also examples of (beneficial) client bugs that only happen upon restarting the client, such as during the SC major event for the CN/TW/KR servers, where enemy HOC support disappeared after restarting the client under certain conditions (enemy HOC not in the player’s night vision range).
Note that these bugs are sometimes inconsistent and may be patched without notice. In general, it is best to avoid exploiting client bugs this way as an explicit strategy. That being said, this method is generally reliable for fixing client bugs.
Recommended Combat Settings
GFL comes with some in-combat settings that can be changed as the user wishes. However, unlike many other gacha games, these settings are not simply for aesthetics, and directly impact not only your enjoyment of watching the combat unfold, but also the combat results themselves. Below, I address each of the settings one-by-one, explaining what they do, why they matter, and my recommendations for you.
Bullet time
This is the name MICA gives for the slowdown effect when you hold down on a T-Doll or drag her on the screen. The three settings are Off, Bullet Time, and Freeze Time. Off makes it so that no slowdown occurs. Bullet Time is the default setting, slowing combat down by about 3x. Freeze Time makes it so that no time passes by while you are holding down.
For players just starting out, I would recommend sticking with Bullet Time, as it is both incredibly useful and relatively intuitive. Most of the kiting techniques were also developed before Freeze Time was implemented in the game, so using Bullet Time also helps develop better habits in general.
For players that are struggling with a specific technique that requires more precise inputs (e.g. retargeting), it may be helpful to try out Freeze Time, since it gives you time to think about your next action, while not completely interrupting the flow of battle as the pause button does.
Effect of Selected T-Doll
This is very similar to Bullet Time, but instead of what happens while you hold down on the T-Doll, this setting affects what happens when you just tap the T-Doll. For all players, I would recommend setting it to either Off or Bullet Time.
T-Doll echelon skill cut-in animations
This is the setting for the mini cutscenes that happen when T-Dolls use skills, inherited from the older gacha games like Kancolle or F/GO. In those games, these cutscenes are fine, because there isn’t any user interaction expected while the cutscene happens, but they are out of place in GFL. During these cutscenes, combat isn’t frozen and you cannot see what is happening, and it is very easy to lose control if you are interrupted in the middle of a movement. I strongly recommend turning this setting Off.
Coalition forces skill cut-in animations
This is a similar setting as the one above, but for Coalition ringleaders instead. Unlike for T-Dolls, the combat is actually frozen during these cutscenes, and they are actually animated, so for those that enjoy them, it’s fine to leave them on. However, I personally still dislike them because of how long and jarring they are, interrupting the flow of combat. I recommend setting this to Off, but leaving it on Single or On is relatively fine.
Heavy damage protection
When this setting is on (as it is by default), when dolls reach the critical HP threshold (30%), they automatically retreat. Presumably, the purpose of this setting is to help the Commander avoid the harsh repair costs and times below the critical HP threshold. However, this is actually extremely undesirable behaviour for a few reasons:
- Even if your tanks are at critical HP, they are still better tanks than your DPS. If your tank is automatically retreated, the enemies are now free to walk up to your DPS units and start killing them; at that point, the entire fight is lost, and your entire echelon is likely at crit HP. On the other hand, if you let the tank stay on the field, you can at least finish the current fight, even with the steeper repair costs.
- Even in the worst case that you want to give up the fight, it is still better to use the Restart Battle button to reset your dolls’ HP and then immediately withdraw the entire echelon to avoid the additional repair costs. In this scenario, it is very easy to react to the damaged art showing up on the screen, and having this setting off gives you a better chance to actually save the fight.
- Upon hitting critical HP, T-Dolls gain invulnerability for 1.5 seconds that can be used to tank shots for free. The immediate retreat throws this away for no benefit.
- The repair costs don’t suddenly spike at critical HP, what happens instead is that any additional damage taken is more expensive to repair than if the same amount of damage happened before the critical threshold. If you lose just 5 more HP after the tank goes critical HP, you end up paying like only 5 more MP to repair the T-Doll.
As such, I strongly recommend turning this setting Off.
Battle Simplification
This setting hides certain small details from the battle, such as removing the damage numbers when an attack misses. If you do choose to turn this setting on, there is one thing to be wary of: in enemy HOC supported fights (specifically, by artillery towers), the indicator for which T-Doll is being targeted does not show up. In terms of performance gains, they are extremely minimal, especially when compared to other game optimization methods such as using a decompressed client. This one is mostly just a cosmetic choice, and either Off or On is fine, with Off being slightly preferred to avoid potential future mishaps.
As of client v3.01, there have been a number of reports that battle simplification also causes a number of visual glitches with damage numbers, so proceed at your own risk.
don’t blame me for the inconsistent capitalization of the names of the settings, blame MICA
Intermediate Techniques
This section is useful for players challenging harder content, such as EX/UX story maps or Theatre Advanced/Core 8. These techniques are incredibly useful for some of the enemies that appear later on in the story. Some seemingly impossible fights suddenly become trivial, and echelons gain the capability to handle fights that previously would have been crippling. Players that have gotten the hang of staggering are encouraged to read this section to expand their repertoire of kiting skills, learning how to fight all but the hardest of GFL’s enemies.
Targeting and Retargeting
In GFL, there are three major kinds of targeting rules: closest, furthest, and random. All G&K T-Dolls fall into one of the three categories based on their class, unless otherwise stated in their skill description. ARs and SGs have closest targeting; RFs have furthest targeting; and SMGs, HGs, and MGs have random targeting. Leaving SGs and individual T-Doll exceptions aside, all of these rules have an extra property: the T-Dolls lock onto their chosen target until the target dies or otherwise becomes out-of-range, or the T-Doll is forcibly retargeted.
As described above, once a T-Doll picks their target, they will not change the target even if another enemy becomes the highest priority according to the targeting rule. For example, a typical AR will continue shooting at the same target even if another enemy moves in front of said target. Consider the following GIF:
Notice how the ARs continue shooting at the Recce Center despite the Pathfinders spawning in front. P22 is dead long before the ARs are able to kill the first Recce Center. The solution to this problem is to “wiggle” the ARs:
As you can see, after the ARs move and come to a stop again, they retarget to the new current frontmost enemy, and start shooting the Pathfinders. Since valuable DPS time is lost if we let the ARs run all the way, we can swap the ARs and then quickly swap them back so that both ARs only move for a very short amount of time. This way, ARSMGs are able to handle Recce Centers despite not having lots of AP to quickly kill them.
Another example where retargeting frontmost targeters is very useful is against enemies with backline spawned Dinergates or Tarantulas. RFHGs often don’t have the pre-skill RoF to kill all of the Dinergates before they run past the other enemies in the formation with longer range, so nobody can target the Dinergates that start killing the HGs. The solution is again to use an ARSMG with retargeting: after the Dinergates reach the front of the enemy formation, wiggle the ARs to retarget them. The ARs will then clean up the Dinergates before they can cause significant damage to the frontline, and then take their time finishing off the rest of the enemy.
This is also a good time to bring up one of the major differences between G&K and Coalition echelons. Coalition units also mostly fall into the same three categories of frontmost, rearmost, and random targeters. However, in contrast with G&K’s lock-on targeting, most Coalition units of the first two categories (but not the random targeters) have what is called real-time targeting. Units with real-time targeting do not lock onto their target, and instead choose a new target according to their criteria, every single shot. G&K’s SGs also fall under this category, choosing the frontmost 1-5 enemies (depending on what ammo they have equipped) in real time.
The Dinergate is cheering everyone on!
The fact that Coalition units have this property is one of the reasons why they are easier to get started with but also fall off earlier. Real-time targeting means that players do not need to retarget the units, but at the same time, they lose the option to lock on when it is needed. Lock-on targeting can do the same thing as real-time targeting with minimal DPS loss by wiggling as fast as possible (which can now be done at nearly frame-perfect speeds because of freeze time), while they can accomplish more by locking onto priority targets that only temporarily satisfy the targeting rules (e.g. Doppelsoldners, Murats).
The examples given above were for frontmost targeting, but similar ideas apply for rearmost and random targeting too. For example, RFs may get “stuck” on the first tank to walk into range, while the dangerous backline enemies are free to shoot at your delicate HGs; in such a scenario, you can wiggle you RFs to make them retarget to the backline while letting the enemy tanks sit around twiddling their thumbs.
Notice how the RFs retarget to the Hydras after being wiggled.
A similar idea can be applied to using MGs or DPS HGs/SMGs, but by the very nature of random targeting, every time you wiggle, there is a random chance whether or not your DPS will target the right enemy. There are many issues with this, including but not limited to the difficulty of telling which enemy the is now being targeted, inconsistent fights requiring different amounts of wiggles (and therefore time) to target the right enemies, and the sheer frustration when RNG refuses to cooperate. The applications do exist, but they are very niche and are beyond the scope of this section.
To summarize, most G&K units are lock-on targeters (with only a few exceptions), while most Coalition units are real-time targeters. Lock-on targeters need to be wiggled to retarget, while real-time targeters will automatically retarget. By retargeting, some fights that appear impossible at first glance like the ARSMG vs. Recce Center fight can become very easy to handle.
Range Manipulation
Recall the natural conditions for lock-on targeters to retarget: either the target dies, or it otherwise becomes out-of-range. What does the second condition mean? There are two main ways for this to happen: a knockback occurs, pushing the target out of range; or the range is shrunk far enough for the target to leave range. Here’s an example of a knockback skill pushing the target out of range:
Notice how LTLX has to run up again after pushing back the Patroller.
Clearly, since nothing is left in range, the target must certainly also be out of range, and when the echelon stops again, the T-Dolls will retarget according to their targeting criteria. However, it is quite difficult to consistently make use of this. On the other hand, the other way (shrinking the range) can actually be exploited by RFHGs:
In this example, when the front column is occupied, the Recce Centers are in range, while when the front column is vacant, the Recce Centers are not in range (yes, the size of the Recce Center’s actual hitbox is very small and is nowhere close to the size of the sprite). As a result, when we move P22 back to the middle column, the Recce Center that Lee-Enfield and WA2000 were shooting at ends up out-of-range, forcing the RFs to retarget to the furthest Pathfinder in range. That’s right, we were able to make RFs shoot at a target closer than the furthest target, by manipulating the range to exclude what the “actual” target should be. Then, once the Pathfinders have been taken care of, we can extend the range again to start dealing damage to the Recce Centers, while avoiding walking forward (which would bring the Recce Centers into range regardless of whether the front column is occupied, thus spelling trouble when the Pathfinders start spilling over again).
This technique can also be used for skills that pick an enemy target as well. Consider the following GIF:
Notice how the top Dragoons die immediately after moving RO635 back.
Like almost all grenades, HK416’s grenade targets the highest HP enemy at the time of activation. In this fight, that would typically be the boss. However, the Dragoons have incredibly bloated stats (colloquially referred to as “Super Dragoons”), and present a much greater immediate threat to the echelon than the boss. At the same time, since grenades have the linksplash property, HK416’s grenade would be a lot more effective if the grenade lands on the multi-link Dragoons than the single-linked boss. The solution here is to shrink the range so that the boss is no longer in range before activating HK416’s skill, removing the boss from the list of available targets, letting HK416 target the Dragoons.
It’s also possible to combine the two conditions. Consider the following GIF:
Notice how Grape’s nuke targets the Cherub.
Carcano M91/38 (AKA Grape)’s skill shot targets the highest HP enemy at the time of activation. In this fight, the Gladiators have the highest HP, but the truly dangerous enemy is the Cherub. We want Grape’s skill to kill the Cherub, but the Gladiators are in the way. The solution used here was to knockback the Gladiators but not the Cherub, and vacating the front column (thereby leaving the Cherub in range but the Gladiators out of range), before activating Grape’s skill shot when the Cherub is the only target in range.
At this time, one may wonder whether retargeting can be done with Coalition echelons. The answer here is no. Leaving aside the fact that Coalition units are real-time targeters, echelon range works very differently for G&K and Coalition echelons. While G&K’s echelon range is decided by whether a unit is standing in the front column, Coalition’s echelon range is determined by the longest range stat among the units currently on the field. Consider the following GIF:

Jaegers have a range stat of 9, while Nemeums have a range stat of 3. Once the Jaeger is retreated, the echelon range is shrunk, and the Nemeums have to walk all the way up. While this range is indeed still modified by walking and stopping, the echelon range is not affected by whether the front column is occupied.
Before you ask, no, the range stat is not listed anywhere in the game itself, these numbers were datamined and then cross-referenced with the in-combat range. Common range values for ranged Coalition units are 7 and 9, while common range values for melee Coalition units are 3 and 4. And no, I have no idea why MICA decided to give Nemeums a melee range stat. See Randomqwerty’s Coalition unit stat calculator for more details.
In summary, range manipulation is another technique similar to wiggling that allows G&K echelons to pick off the more important targets first. By range manipulating, some fights that appear impossible at first glance like the RFHG vs. Recce Center fight can become very easy to handle.
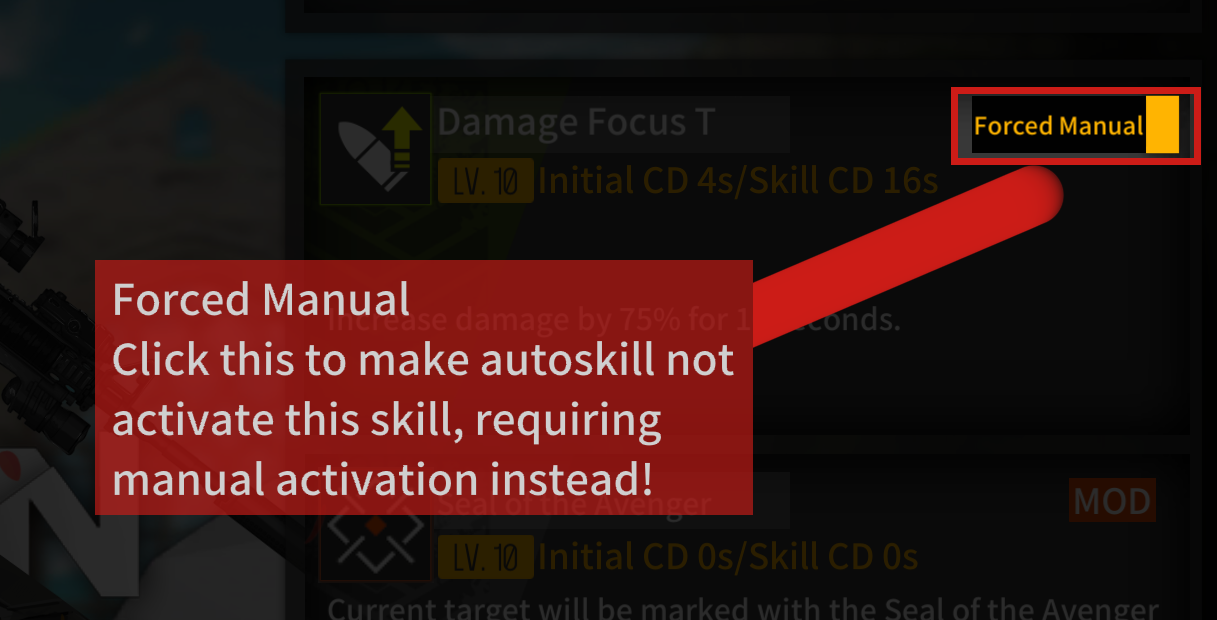
Forced Manual
While a vast majority of the units in the game are easiest to use with autoskill, there are a few important exceptions that should not be on auto. For example, compare Kord’s performance in the following two GIFs:
Kord on autoskill.
Kord on forced manual.
Hopefully, you can see the difference in the damage dealt in the first volley. Now, suppose you are using a team with a mix of dolls that want to be on autoskill and some that don’t. Obviously, it isn’t very fun to micromanage the skill activations for all the dolls that want to be autoskill. Thankfully, there is an in-game option that addresses this exact issue: the forced manual setting. This can be set for each individual unit’s active skills. We refer to turning this setting on as “setting a unit to forced manual”.
There are three main categories of units that are often recommended to be set to forced manual:
Units with toggle-type skills
Most dolls with toggle-type skills are used for only one specific mode for most fights, and constantly swapping between modes prevents them from excelling at their niche. Important examples of units with toggle-type skills include C-MS, Kord (see above), RPK-203, and General Liu. Note that most toggle-type skills are set to forced manual by default, with the glaring exceptions of Kord and M1895 CB.
Units that care about tight timing
Some dolls have skills that need to be activated within tight timing windows to get the most out of them. For instance, force shielders have a very short window of immunity that should be saved for when the otherwise untankable attacks come out, such as boss skills or Hydras. Important examples of units that care about tight timing include force shielders, bamboo/nuke-type skills, and LTLX-7000.
Notice how LTLX-7000’s knockback on auto-skill happens before the Hannibal stops.
By delaying the knockback with forced manual, we can avoid the damage from the Hannibal’s skill.
Units that care about skill activation order
There are a few dolls that have particular activation conditions or effects that require skills to be activated in a particular order. For instance, M4A1 Mod’s infamous cannon requires no more than 3 T-Dolls to be present on the field upon skill activation, but M4’s ICD is shorter than most buffers. Important examples of units that care about skill activation order include M4A1 Mod and Webley (for leader CDR).
For other examples, refer to this page for an exhaustive list of units that are worth considering setting to forced manual:
Coalition Melee Units and Stances
As the name implies, melee Coalition units typically have a much shorter range than ranged units. Furthermore, melee units have an additional targeting restriction: they can only aim at enemies both within their own range and the echelon range.
Notice how the SWAP Dragoon is not shooting the Target Drone.
That is to say, while ranged units use the maximum echelon range, melee units are limited to a small radius around themselves.
This makes melee units much more difficult to use without Coalition’s unique mechanic, stances. These are the three buttons in the bottom-right of the Coalition in-combat menu, replacing the rest of G&K’s skill bar. The three stances, from left to right, are Charge, Destroy, and Defend. For the most part, ranged units are unaffected by these stances, excluding certain skills such as Manticore’s Skill 2, SWAP Ripper’s Skills 1 and 2, and more.
Charge stance makes the melee units move straight forward until they reach an enemy or the maximum echelon range.
Notice how the SWAP Dragoon is still out of range of the Target Drone.
Destroy stance makes each melee unit move towards the enemy closest to itself, regardless of whether that may be in front or behind.
Destroy stance allows the Dragoon to approach the Target Drone, but the angle of approach changes.
Defend stance makes the melee units return to their original positions (or stay still if they are already there).
The best way to use the stances changes drastically from fight to fight, so it is hard to give general advice. If you ever decide to use a melee-heavy Coalition echelon, I strongly advise you to experiment with the stances to familiarize yourself with when each stance should be used.
Enemy Targeting
Virtually all GFL enemies are real-time targeters (at the time of writing, there exist no enemies that have lock-on targeting, although this may change in the future), behaving very similarly to melee Coalition units on Charge stance.
A majority of enemies have frontmost or closest targeting, with a few exceptions such as Jaguars (rearmost), Cherubs (fewest links), or Pyxis (the two frontmost targets). Some enemies have additional tiebreakers (e.g. Cherubs tiebreak by highest current HP), but the tiebreaker for enemies without special targeting is implemented in a very strange manner beyond the scope of this document. Leaving that aside, the best way to force the enemies to target your tanks is to move them in front of the rest of the echelon (after executing the other kiting techniques, of course).
Targeting Exceptions
There are a number of G&K and Coalition units that have unique targeting. The most notable ones are the G&K real-time targeters (e.g. General Liu, M200, Hanyang Mod), and the highest FP/threat targeters (e.g. MG338, QBZ-191, OBR Mod, M240L). These dolls usually have their unique targeting mentioned in their skill descriptions, but there are a few nuances (especially in the tiebreakers) that are often omitted. Of particular interest is the fact that many of these units are able to ignore enemy taunt skills (e.g. Gladiators, certain bosses), which can be a boon or bane depending on the fight.
Notice how M200 is shooting the Gunners despite the Gladiator applying the taunt skill.
To see a more comprehensive list of units with unique targeting, refer to RevenantXIII’s Tiebreaker Cheatsheet.