Introduction
Heavy Ordnance Corps (HOCs) are special support units that can support allied echelons in combat by bombarding the enemy. As massive hordes of enemies and force shields (reduce damage taken by their percentage) are plentiful, raising your HOCs is a crucial part of the later stages in GFL.
As all HOC progression is tied to Original and Pure Samples, which are in turn based on Weekly Quest progression and passive generation, there is no effective way to ‘whale’ to speed up the progress here. Raising all your HOCs will take time and the main place where other players will have an advantage over you is in time invested.
Due to the ever-increasing number of HOCs, all information detailing priorities and such is available on the separate HOC Priority Page.
New Player Notes
As a new player you will need an HOC with sufficient Pierce to clear the few fights with Force Shields in ch12 as soon as possible. BGM has the single highest Pierce of all the ATWs so she stands as a very good option for new players to get going, plus you get her for free through an Achievement.
Level 60 and a rarity increase or two is a decent stopping point for now, allowing you to unlock some Chips with Pierce and upgrading them.
To see priorities on what to raise after getting BGM to 60 and which skills for each HOC, which order to upgrade buildings in and any other priority related details see the HOC priority page.
HOC Basics
HOCs are unlocked after clearing Chapter 8-5, granting you access to the Intelligence Center. For priorities on everything related to HOCs, please see the HOC Priority page.
New HOCs are introduced with Theater events which come in pairs of 2, with a new HOC being introduced with each new set. The previous Theater pair’s HOC will be available for unlocking and promotion without Central Data once a new HOC is introduced, so with Theater 9 PP-93 became available for players who missed Theater 7/8.
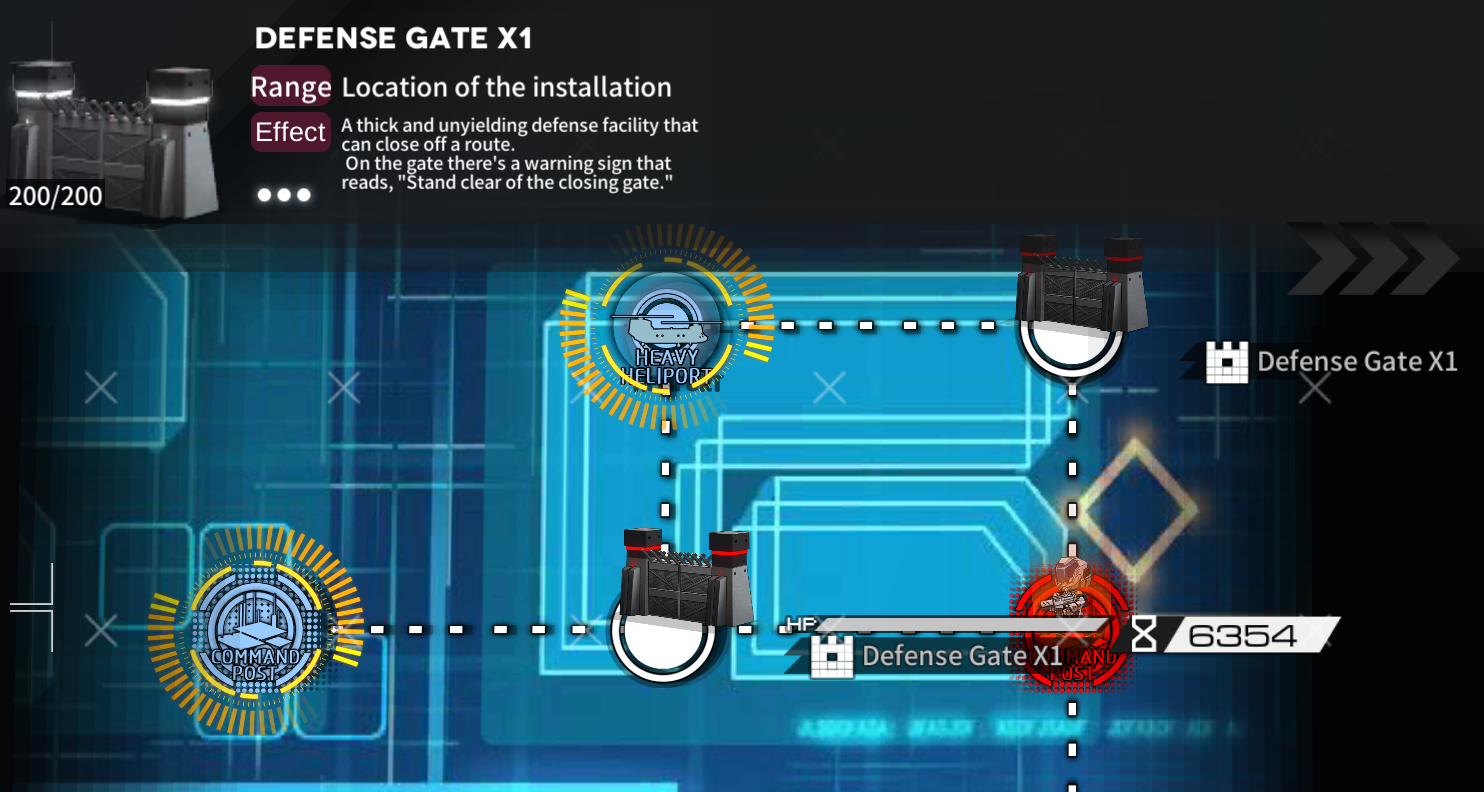
HOCs can only be deployed from Heavy Helipads. Each player-owned (blue) Heavy Helipad gives 3 Deploy Points and each HOC costs 2 points to deploy. This means the cap of how many HOCs you can deploy (provided the map doesn’t have other limits) is [1.5 x Heavy Helipad count].

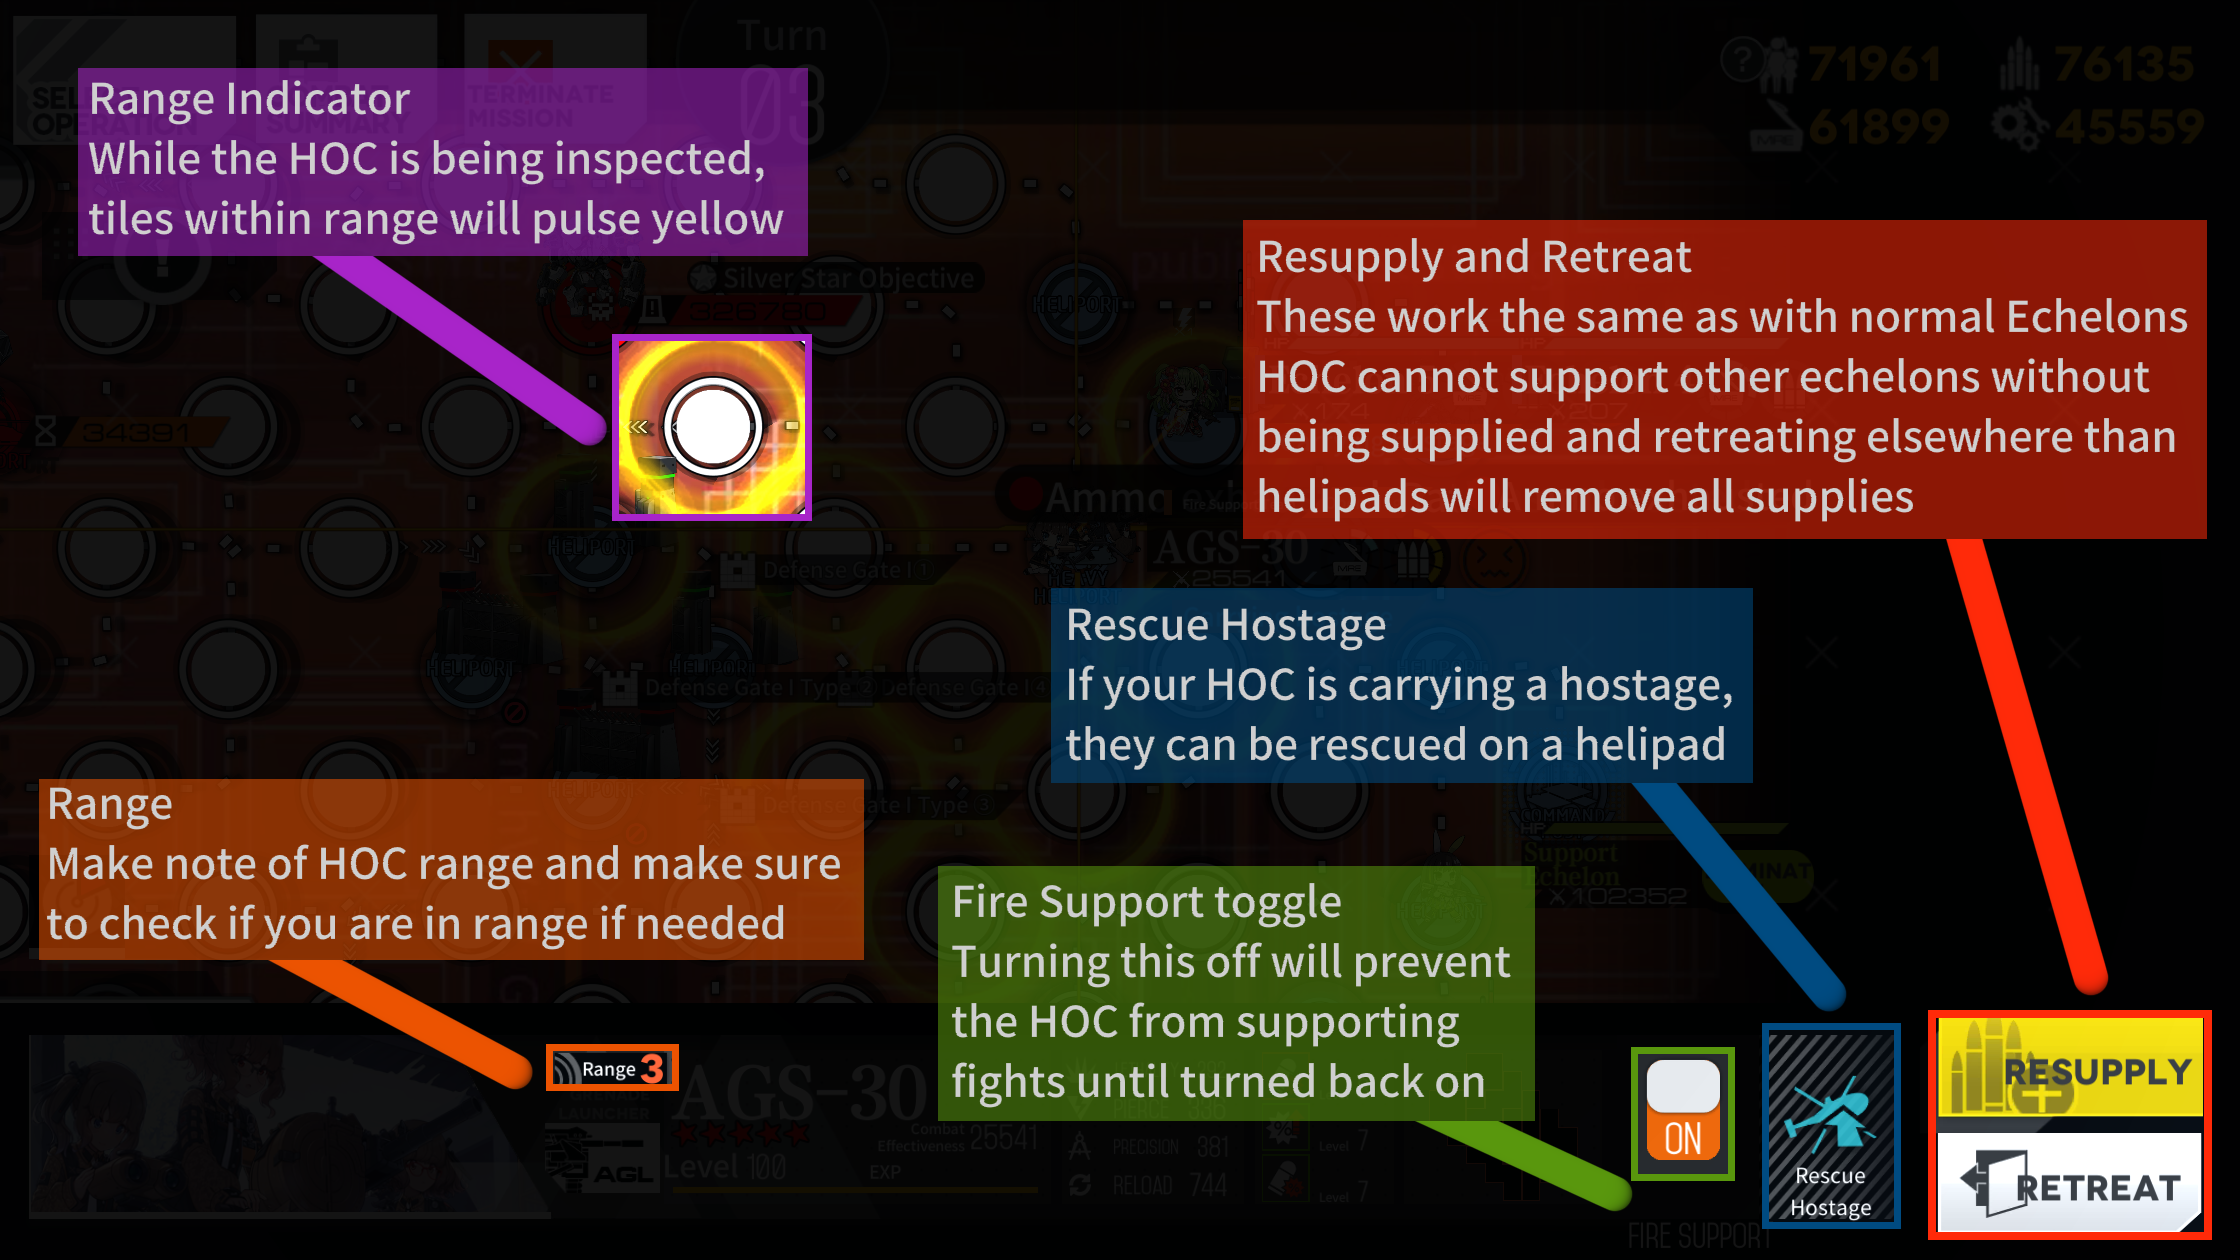
HOCs cannot fight directly and are only meant to support allies in combat. Any enemy ramming your HOC (or if you for some reason walk an HOC into an enemy) will destroy your HOC and you will need to repair them to deploy them again. HOCs can rescue Hostages and retrieve them at Helipads.
Making up for their lack of direct combat potential, HOCs are extremely strong when supporting allies in combat, and are absolutely required if the enemy’s force shields are too high, as support fire is the only way to deplete enemy force shields.
HOCs are Required
HOCs are not an optional feature. While you do not need to max out ALL of them, you are highly incentivised to at the very least raise all HOCs in the ATW and MTR classes. AGLs are not quite as powerful but can be occasionally useful, especially in Ranking maps that allow more than 3 HOCs to be deployed.
See HOC Priority page for more details on which HOC to raise first.
Force Shields
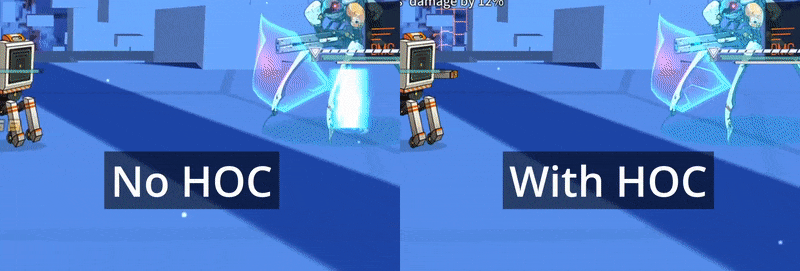
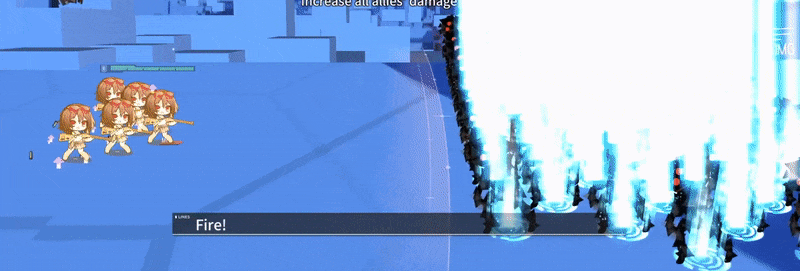
Note how the HOC reduces the force shields and makes it possible to damage the Patroller.
Force shields are a damage reducing extra bar that Paradeus units can have, reducing all damage taken by the percentage it covers. As such an enemy with 100% force shields is immune to damage unless you reduce its force shield.
This job is usually delegated to ATWs as breaking force shields is their speciality.
Massive blobs of enemies
Dealing with massive groups of enemies can be rather difficult, especially if your Doll selection, Equipment or Fairies are weaker. MTRs solve the issue of having enemies by blowing them all to smithereens. While MTRs have rather low Pierce values, their speciality is in wrecking absolute havoc in enemy lines.
Note how PP-93 removes almost all enemies in a single hit.
Breaking Rocks or Structures
As you progress further you will eventually come across maps where you are required to destroy obstacles. The damage dealt to these is equal to the Pierce stat for all HOCs.
Example from the Tutorial introducing this feature.
Deployment
As you can only deploy HOC units on heavy helipads, maps that do not have these do not allow HOCs. You can usually tell whether a map has HOC available or not on the screen before entering the map.
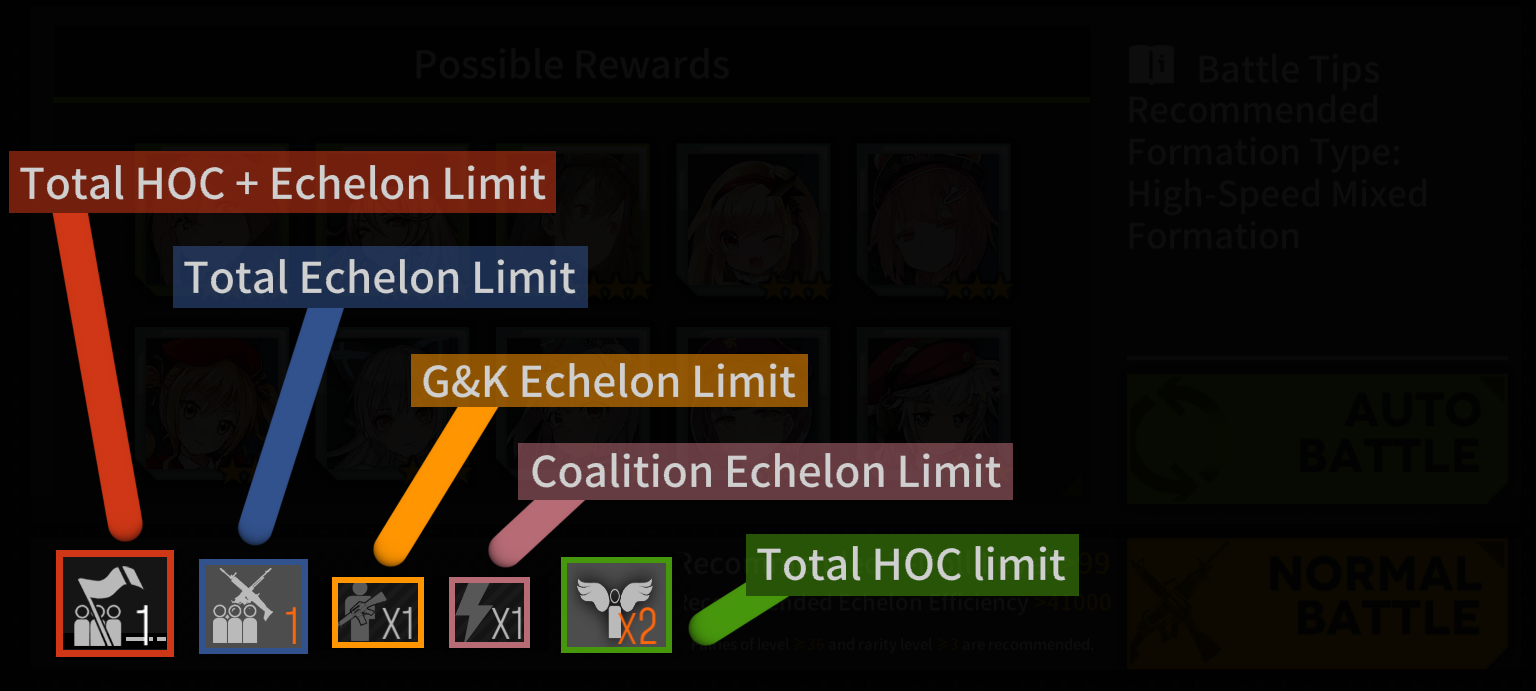
Total deployment limits, here you can deploy exactly 1 Echelon/HOC, meaning you likely can’t actually deploy HOC because an Echelon is usually required.
Again, the cap of how many HOCs you can deploy (provided the map doesn’t have other limits) is [1.5 x Heavy Helipad count].
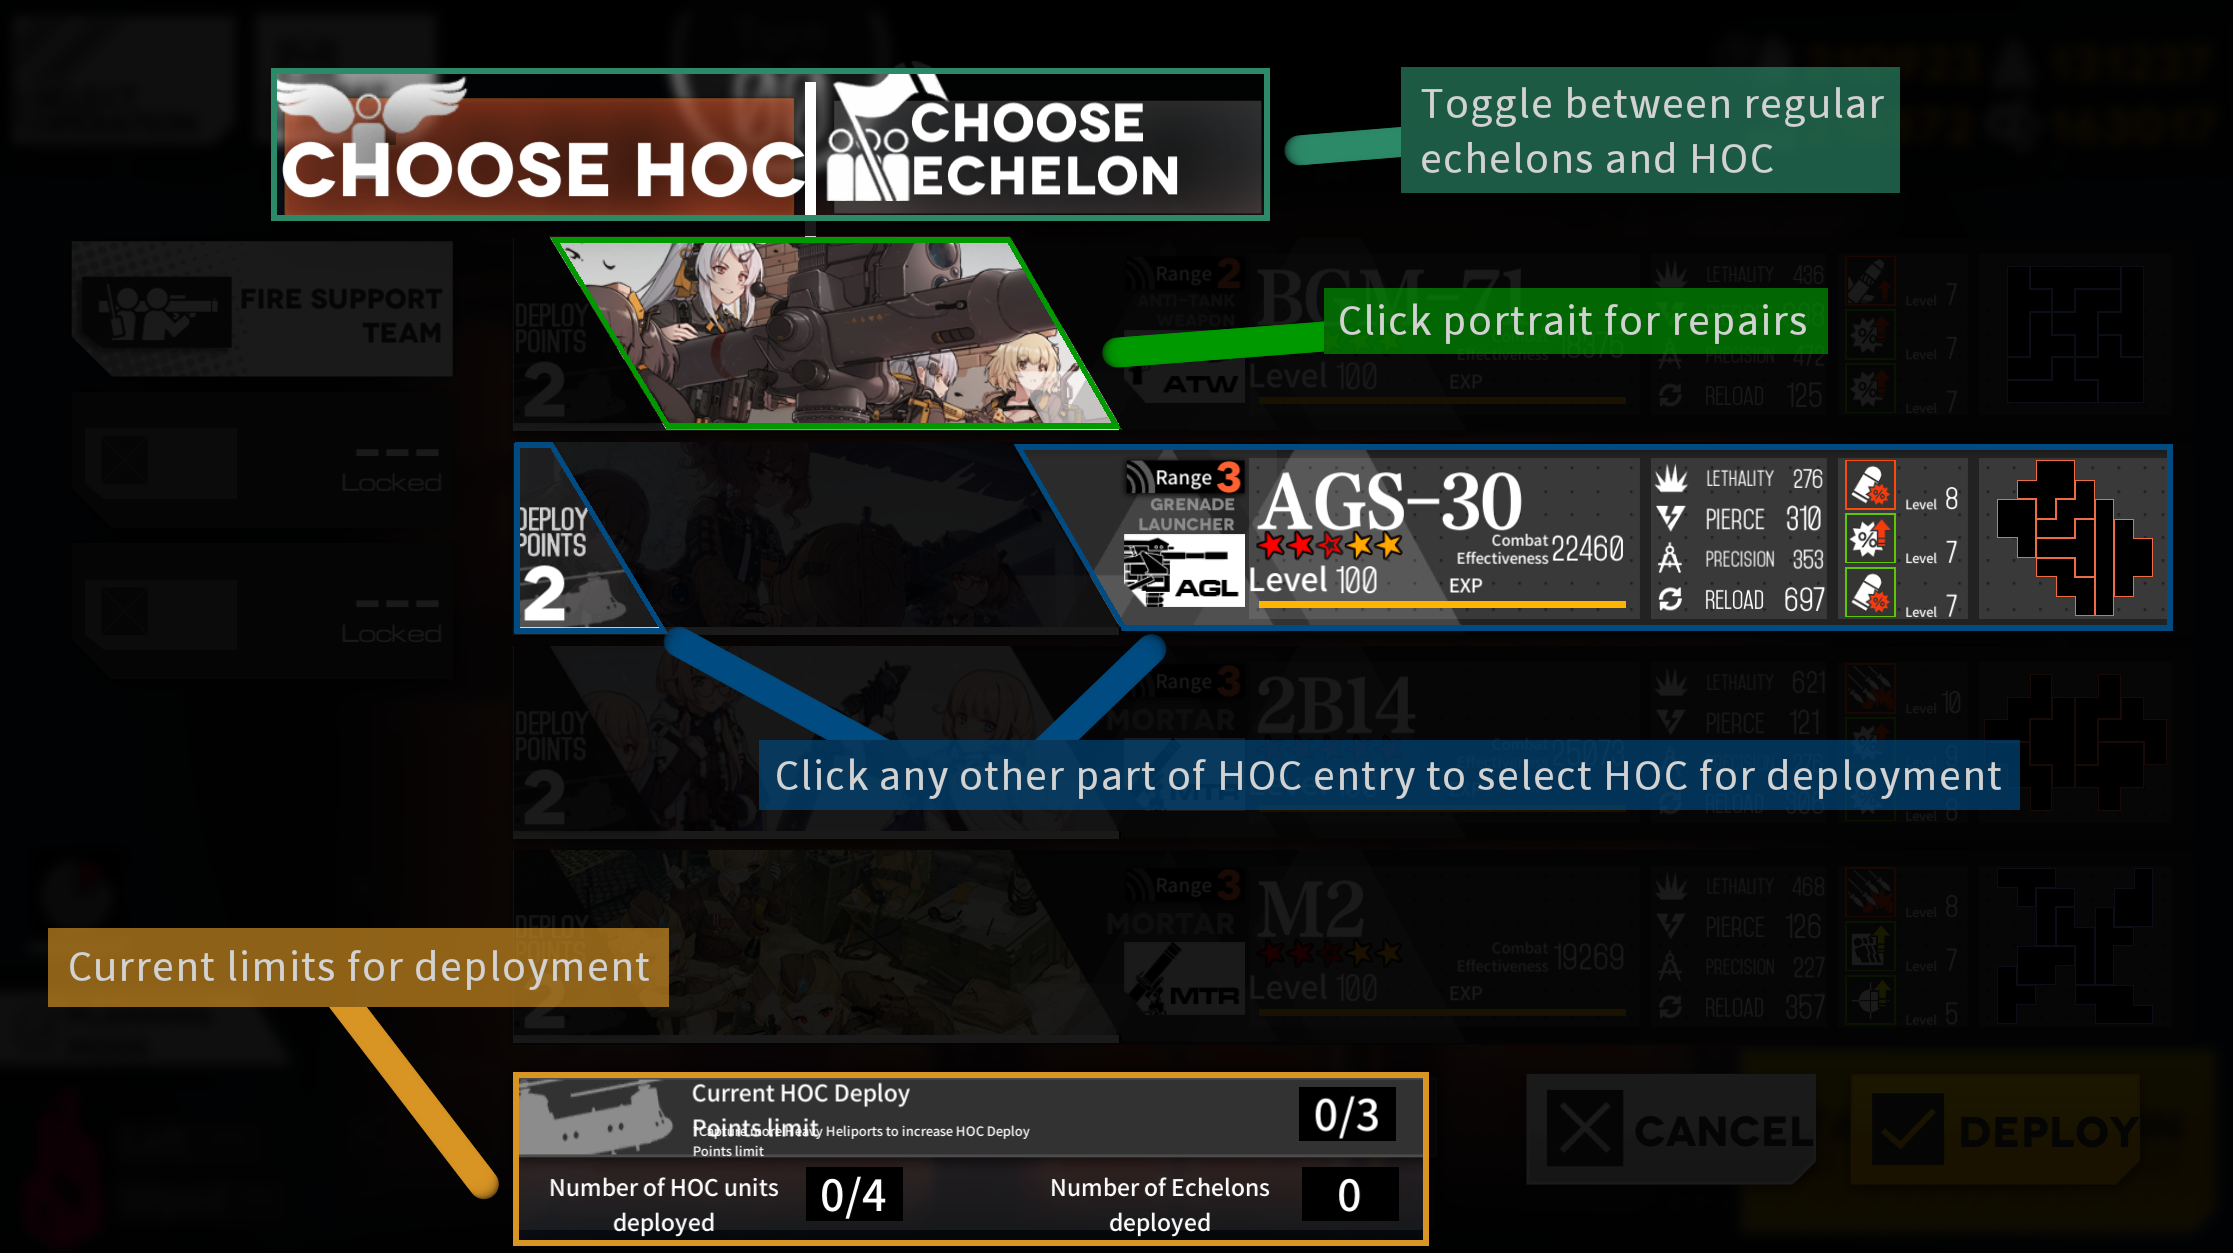
When using a Heavy Helipad you will have the option of choosing to deploy a regular echelon or an HOC, as well as various other limits and notes in the deployment screen.
Intelligence Center
Unlocking HOCs come with two new rooms that need to be upgraded and set up. This is covered in great detail on the Resource Allocation page.
For a quick overview see the following:
As a new player you are very limited by batteries, and your HOCs are an extreme battery sink for a very long while. As such it is important to get the important facilities up first while leaving less important ones for later.
Priority 1:
Data Hub to level 6.
- The Data Hub generates Samples passively. Higher levels increase the amount of Samples generated per cycle.
Priority 2:
Storage as needed.
Training Range if you need more Skill Training slots for HOCs. This maxes at level 8.
Further Upgrades
As you now have your facilities set up to Samples, there’s only one thing left to do; getting enough SCRs (Special Combat Reports) to actually level all your HOCs up.

The Data Room should thus be leveled up and set to spending your Surplus Exp to generate SCRs until you no longer need more SCRs. This will be your battery sink for the foreseeable future.
HOC Types
There are 3 types of HOCs each with their own uses. Note that some are far more useful than others.
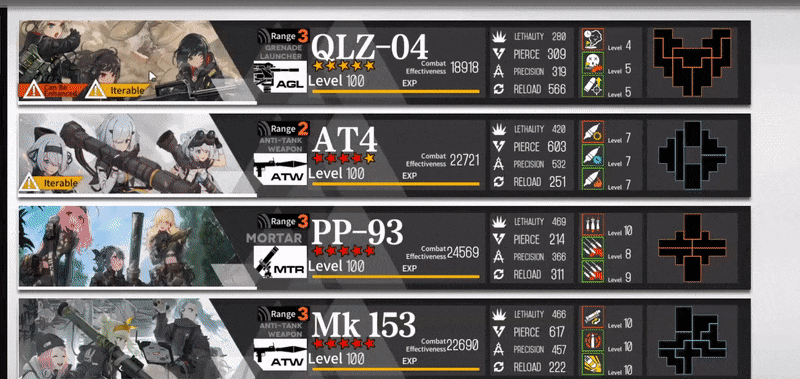
Anti-Tank Weapons (ATW)
ATWs have high Pierce and are meant for destroying enemy force shields. The main drawback for their very much so required niche of destroying force shields quickly used to be their limited range of 2. With the addition of Mk 153 this isn’t entirely true anymore, as Mk 153 is an ATW with 3 range, though further deployments for ATWs will come with the limitation.
Mortar (MTR)
Specialized in heavy splash damage and meant to wipe out large groups of enemies. Making up for their low pierce, maxed out mortar teams can often end a fight before the enemy even reaches you if it’s just lots of linked units and you do not need to destroy enemy force shields.
Automatic Grenade Launcher (AGL)
High reload and otherwise middling stats with only 3 range as their main appeal. The introduction of Mk 153 having 3 range as an ATW basically saw AGLs taking the back seat being outclassed in Pierce by ATWs and outclassed in damage by MTRs. Note that there are still uses for them, for example if you are not facing force shields and have already deployed all your MTRs the next in line are your AGLs. Similarly if you need more force shield breaking power and have already fielded all three ATWs, you will want to field AGS-30 next, as she is an AGL that has extra Pierce.
Other notes
- HOCs have 1 vision range at night and are immune to the Night Penalty.
- An HOC can only support 5 fights before needing resupply, which can be done like any other echelon from any Helipad, Supply Crate or HQ.
This means you can only support 5 echelons fighting 1 fight each over the endturn. Resupplying your deployed HOCs frequently is often required for harder maps and ranking.
Acquisition, Promotion and Iteration
HOCs are unlocked through the use of Central Data (specific to that HOC, acquired from Theater) and Pure Samples. It is still recommended to unlock BGM-71 first, as their high Pierce is helpful for dealing with early Force Shielded enemies.
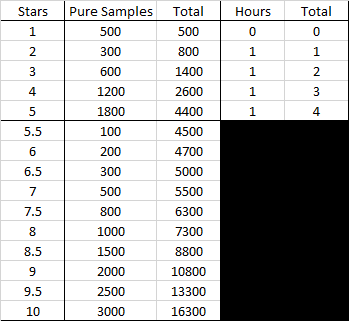
Central Data is tied to a specific HOC, for example the BGM-71 Data you receive from the initial Achievement can only be used for BGM-71. Pure Samples on the other hand can be used for any HOC not from the current Theater. See the Theater section for more details on this.
Samples (both Original and Pure) are gained primarily through the Intelligence Center’s Data Hub and Weekly Quest rewards, which can then be spent on unlocking and promoting HOCs and upgrading Chips.
For details on which facilities to level up first, see the HOC Priority page. Data Hub is important to max out early. Also make note that you should never ‘save’ your Pure Samples, the soft cap is low and you want to keep spending them.
You should keep Samples from overcapping, and spending your Samples regularly is a good idea until everything is maxed.
When you have acquired enough Central and General data to promote your HOC, you should do so. General data should be spent according to the priority, HOC-specific data can only be used for that HOC and can be used anytime you fill the bar fully with red data. General data will appear as pulsing orange blocks instead, indicating your progress when including that.
As you promote your HOC their boards for chips will also increase in size, becoming full size at 5☆. For how chips work and how to optimize your boards, see the Chips section further down.
Iteration
Iteration is the continued enhancement past 5☆, each iteration adding half a red ★ over the previous ones, ending up at 5 red ★s when fully iterated. This is only possible when an HOC is both 5☆ and level 100, at which point the HOC can be Iterated through the use of Pure Samples.
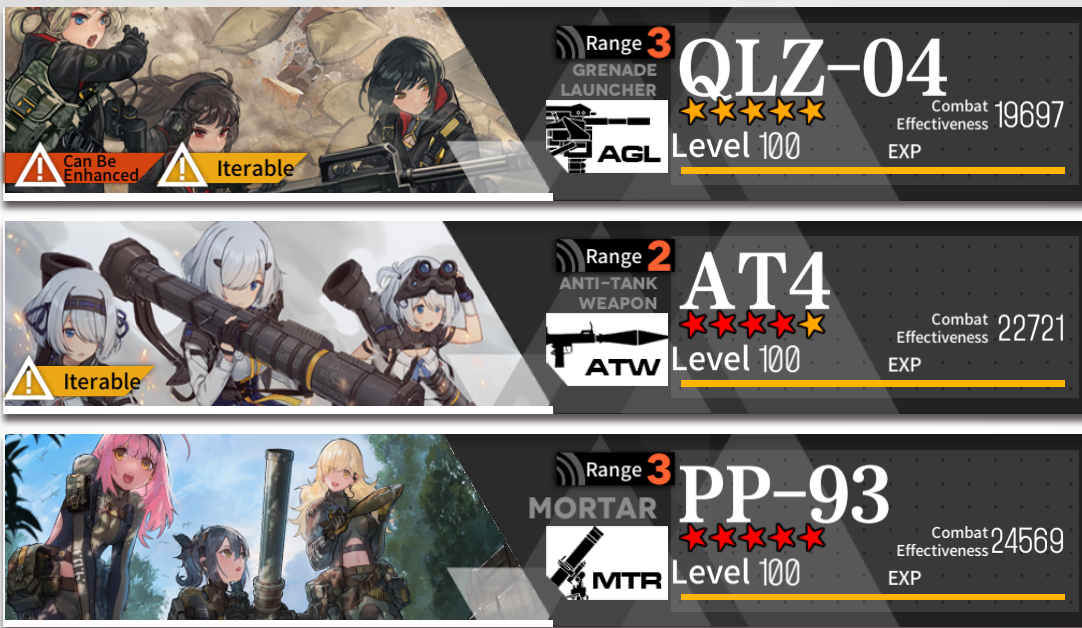
Note QLZ being uniterated, AT4 iteration 8 and PP-93 fully iterated.
See HOC Priority page for more details on which HOC to raise first.
Combat use and stats
While often required and undeniably powerful, HOCs are still very expensive to field and you’ll usually want to not use them unless you actually need them. Costs for fully supplying HOCs are as follows:
- ATWs: 500 ammo, 500 rations
- MTRs: 600 ammo, 400 rations
- AGLs: 400 ammo, 600 rations
HOCs work similarly to Coalition echelons with 10 total ammo pips, and each fight they are supporting will drain 2 ammo and 1 ration pip. As such they can only support 5 fights each before needing resupply.
Using HOCs
Each HOC has a range, either 2 or 3, showing how many nodes it can reach for support. By clicking on your HOC twice, you can display the nodes that are in range of the HOC. If you are unsure if a certain node is within range from your current position, this is how you check to ensure you don’t end up fighting 100% force shielded enemies without HOC.
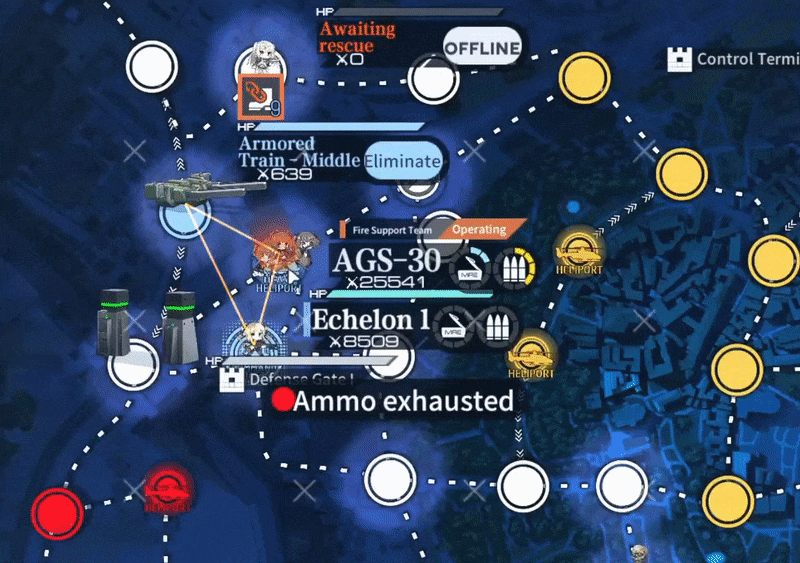
Example of AGS-30 being selected to check her range.
Make sure Fire Support is on and that your HOC is within range when using them.
You can tell if Fire Support is active by the line from the HOC as well as the icon over the Echelon.

Enabling the HOC enables the HOC! Shocking!
Stats
Lethality is damage, and ignores force shields for HOCs. As such an HOC will do the same amount of actual damage at 100% force shields as at 0% force shields, which is a big difference in how it works for the actual Echelon fighting the enemies. This means that even fully force shielded enemies will take full damage from the first MTR hit.
Pierce is the force shield breaking stat. ATWs primarily focus on this stat, with the different ones having different characteristics based on their skills. Enemy force shields have two notable values: The Max Force Shield, which is the maximum value the force shield could have and the Initial Force Shield %, which is the actually filled percentage of the Max Force Shield and simultaneously the % damage reduction the enemy gets.
As an example, the Patroller in chapter 12-2 has 5000 Max Force Shield, Initially at 100%. This means that dealing 1000 Pierce damage to the Patroller will reduce its shields to 80%.
Precision increases accuracy of damaging attacks. Note that Pierce is surehit and you cannot ever fail to apply force shield Pierce. HOC chance to hit has a 40% floor, and the calculation for accuracy is [= (prec/8) / (prec/8 + enemy evasion)], unaffected by night battle penalty.
Reload is your rate of fire, and is calculated in multiplicatives of 30 + 1. As such a breakpoint would not be 300, but 301. ChipCalc already accounts for this so if you’re using that it’s often not worth thinking about much, just be aware that this is how it works.
For further breakdowns of specifics on stats, skills and details on the various HOCs, see Rev’s sheet on this topic.
Repairs
HOCs die if rammed by enemies, requiring repairs to be deployed again.
Very expensive to repair, scales with level capping at 1440 mp/720 parts at level 100.
As of v3.02, HOCs autorepair when retreated or when a mission completes if they are not dead.
HOC performance does not get reduced by health, as such a 1 HP HOC can perform its role perfectly fine and does not need repairs mid-mission and will be fully healed when the mission ends.
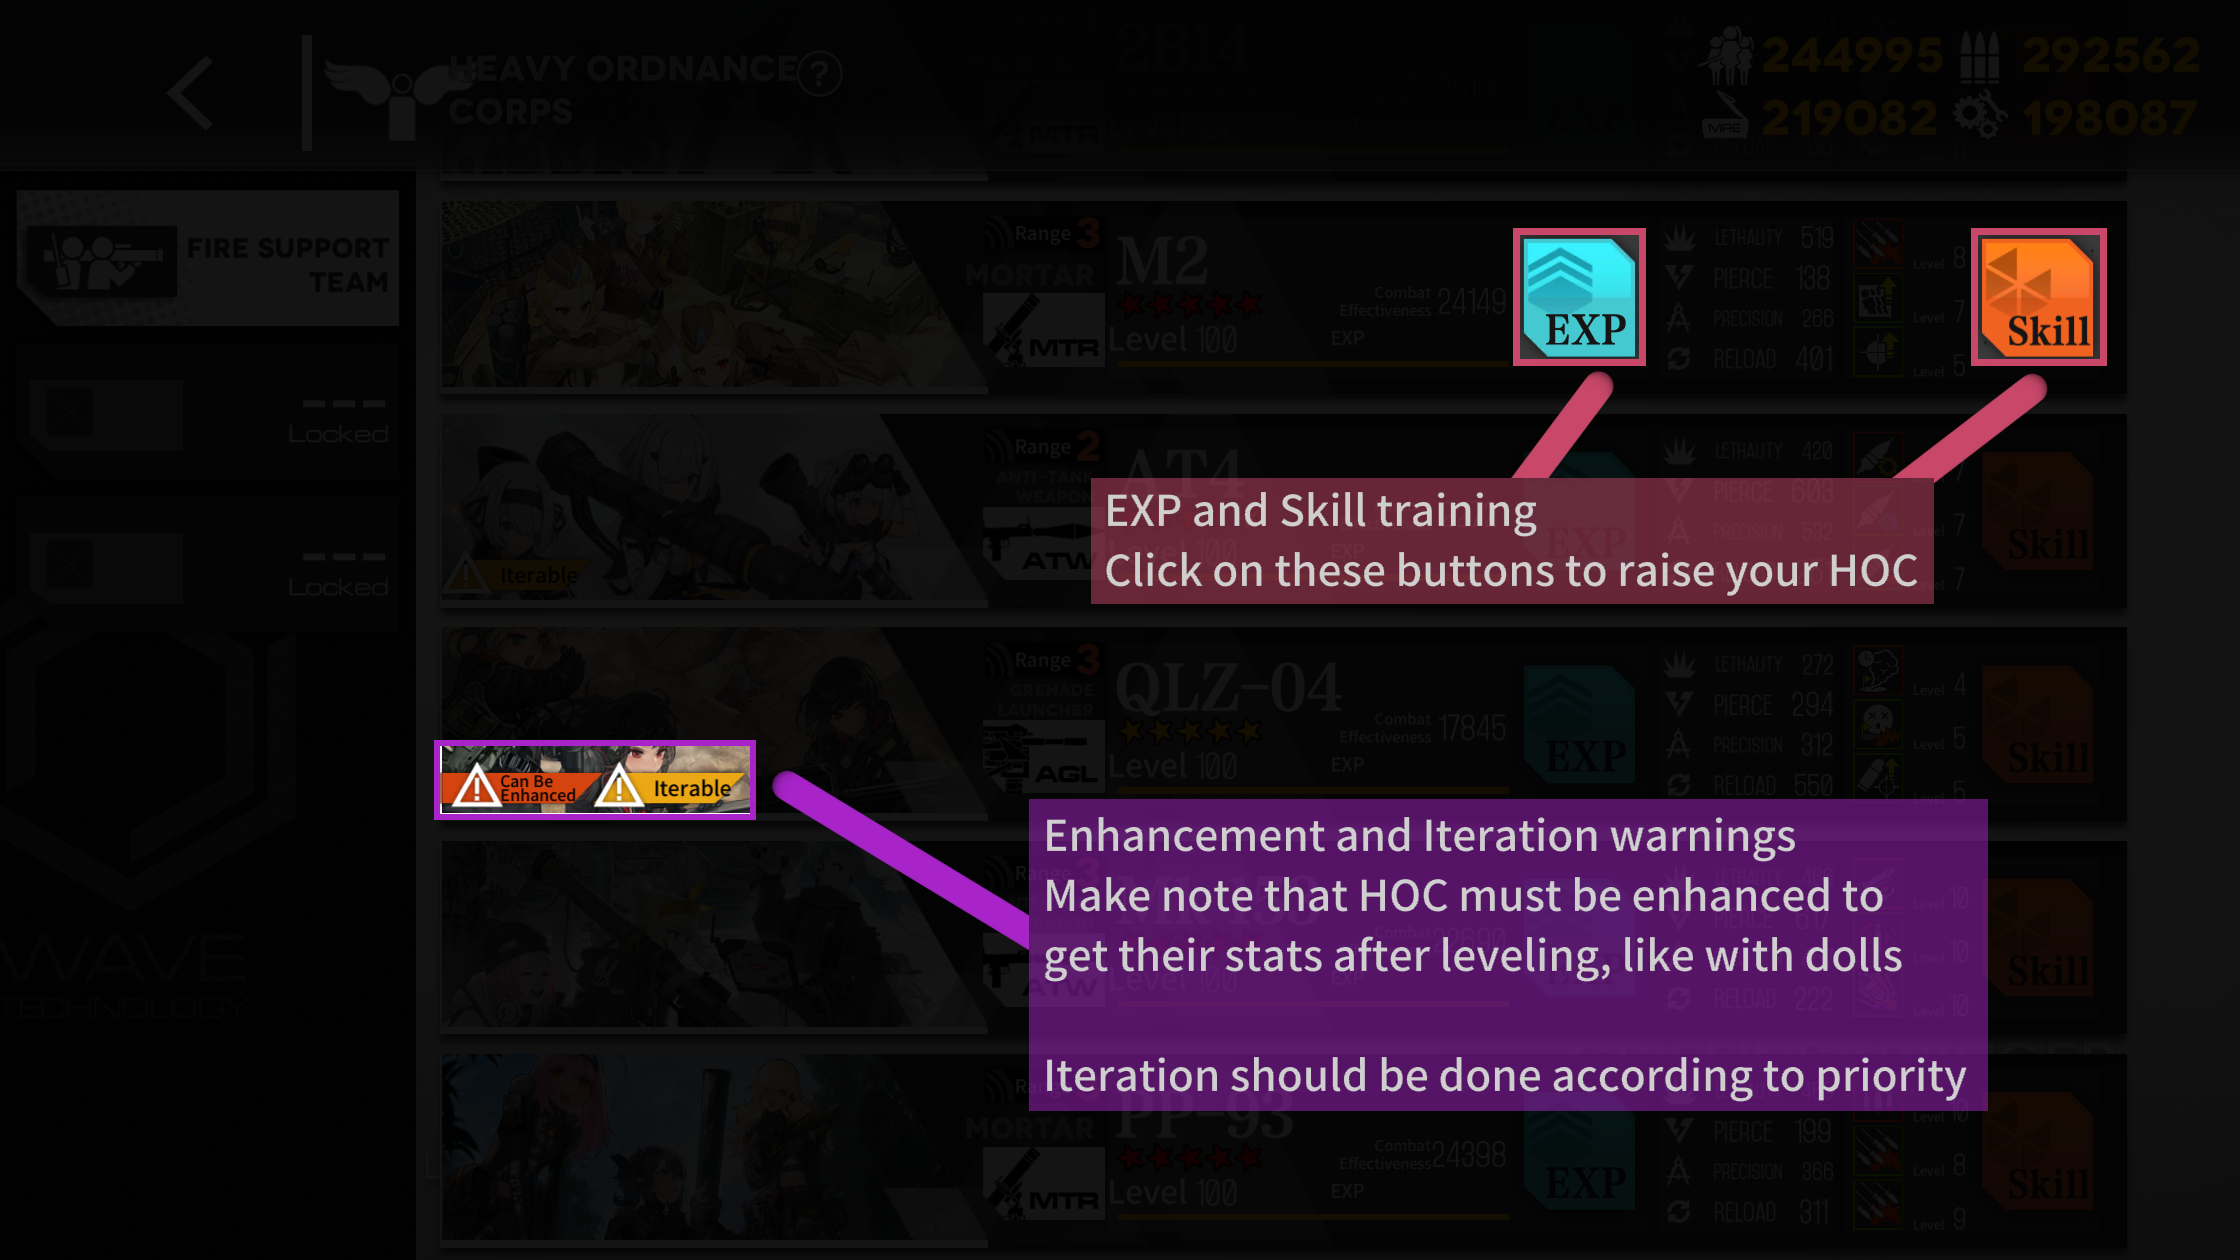
Enhancement, Skill Training and Leveling
Any HOC must be enhanced after leveling, as they do not get stats directly from the leveling process, rather simply increasing the capacity just like with Dolls. As such you must feed them Enhancement Capsules after you have leveled them.
Example of an HOC being enhanced.
Leveling and Skill leveling of HOCs are done through the Indoor Training Range, which also needs to be maxed out to optimize the Battery to SCR (Special Combat Report) ratio.
Explanation of the Training Range UI.
Leveling
Leveling HOCs through combat is technically possible, but a complete waste of time and resources. Instead you should be using your SCRs (Special Combat Reports) and training them in the Training Range.
SCRs are gained through converting surplus exp in the Data Room, as well as 700 SCRs being available from the Black Market every month. As raising a single HOC to level 100 costs 5000 SCRs, raising all your HOCs will take a long while.
Make note that the efficiency of Batteries to SCRs in the Training Range is based on the level of your Training Range. All calculations expect you to have the Training Range at max level as this is the only efficient way of leveling HOCs. As you upgrade the Training Range you can consume more SCRs per hour. Actual training is up to 24 hours, 5 batteries per hour, SCRs per hour increase with levels.
For details on which HOC to level first and what they are good against, see the HOC Priority page.
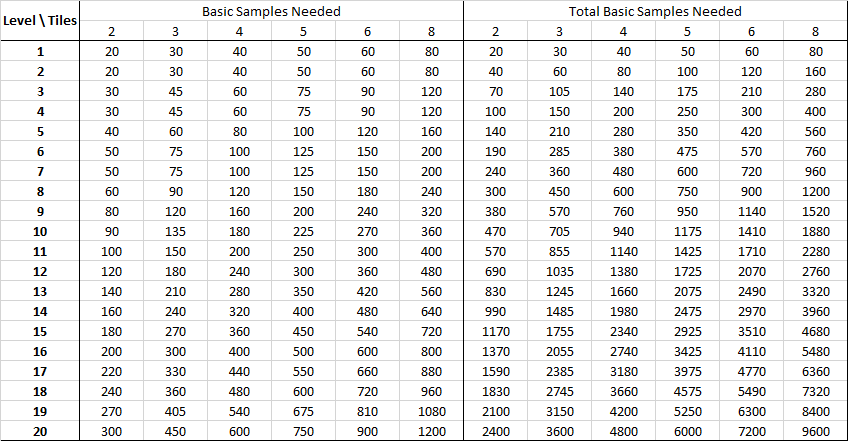
For SCR and battery requirements for leveling, use the following calculator. This assumes your Training Range is level 10.
Skill training
HOCs have 3 skills, a Primary skill (Skill1) and two Secondary skills (Skill2 and Skill3). While you absolutely do get more out of skilling these up, they are very expensive and you are generally better off making sure the Dolls you are using in your Echelons are maxed out before you start thinking about maxing out HOC skills. The recommendation is to skill up one to skill level 7, and the other two to skill level 4. Which skills these are differs from HOC to HOC so see the HOC Priority Page for details on each HOC.
| Level | Primary Skill Cost | Time | Secondary Skill Cost | Time |
|---|---|---|---|---|
| 1→2 | x200 x50 | 2:00 | x100 x50 | 1:00 |
| 2→3 | x400 x50 | 4:00 | x200 x50 | 2:00 |
| 3→4 | x600 x50 | 6:00 | x300 x50 | 4:00 |
| 4→5 | x200 x80 | 12:00 | x100 x80 | 6:00 |
| 5→6 | x400 x80 | 18:00 | x200 x80 | 9:00 |
| 6→7 | x600 x80 | 24:00 | x300 x80 | 12:00 |
| 7→8 | x200 x100 | 30:00 | x100 x100 | 15:00 |
| 8→9 | x400 x100 | 36:00 | x200 x100 | 18:00 |
| 9→10 | x600 x100 | 48:00 | x300 x100 | 24:00 |
Maxing a HOC's primary skill (Skill 1) therefore costs a total of x1200, x1200, x1200, x690 and 182 hours of training time.
Maxing one of a HOC's secondary skills (Skill 2 or 3) therefore costs a total of x600, x600, x600, x690 and 91 hours of training time.
Chips
Prior to v3.03, Chips used to be a complicated system that took a long time to give optimal HOC setups for. This is all in the past.
The new HOC Chip system grants you additional Chip unlock keys when you increase the rarity of your HOCs, and you will have access to all the Chips at 5☆. These Chips can then be enhanced with Samples.
For ATWs, you'll want to max out Pierce related Chips first, for MTRs you'll want to max Lethality and Reload first. Everything can be rather quickly maxed, so there's not much else to say here.
EXP requirements for each upgrade for chips scales linearly with size.
Theater
Theater is a coopetitive mini-event where you try to get as high a score as possible, gaining data for the newest HOC and various other rewards in the process.
Odd Theaters introduce new HOCs while making the previous reward available from Analysis.
HOC introduction is as follows:
BGM-71, AGS-30 and 2B14 were the initial HOCs.
M2 was introduced before Theater was ran.
Theater 1/2 was AT4.
Theater 3/4 was QLZ-04, AT4 made permanent.
Theater 5/6 was Mk 153, QLZ-04 made permanent.
Theater 7/8 was PP-93, Mk 153 made permanent.
Theater 9/10 was Mk 47, PP-93 made permanent.