Introduction
Vehicles (Mobile Armor) are a new type of unit introduced in v3.03, similar to HOC and Protocol Assimilation, unlocked after clearing main story 11-6. While Vehicles are similar to HOC in that there’s pretty much no power you can buy here, there is a massive amount of power gained from farming equipment and getting lucky with the correct drops.
There are two Vehicles: a Tank and a Mech.
The tank can shell enemies from range, obliterating them without granting them a chance to fight back:

The Tank can eliminate dangerous enemies from a distance.
It can also support other Echelons with HOC support (though it is much worse than actual HOC at this).
The Mech is very survivable and is quite proficient at direct combat:

Fully set up, the Mech can engage dangerous Paradeus teams without even taking damage.
Vehicles do not have levels like other units in GFL, instead EXP can be spent to unlock new effects in the Tech Tree. Any unit assigned to a Vehicle will be unable to be deployed elsewhere until removed. Units assigned to Vehicles will gain EXP when the Vehicle kills enemies.
Unlocking Vehicles
The Vehicle system unlocks after clearing 11-6, after which some additional requirements are needed to be fulfilled to unlock the two different Vehicles.
Unlocking Tank (Main Battle Tank)
- Commander level 50
- 120 medals from main story missions (Gold/Silver/Bronze)
- 10 level 100 Dolls/Coalition units
- Complete the tutorial
Unlocking Mech (Tactical Mech)
- Kill Ares (13-6)
- 50 Gold medals from main story missions
- 2 level 100 HOCs
- Complete the tutorial
Quick Recommendations
Level your Vehicles in GZ4. Collecting some random equipment on the way to the boss is enough to start clearing the first floors of the Tower. The Tank is required to bombard enemies from range to clear floors.
If you are using your Vehicles at Night, remember to equip Night Battle Equipment.
Vehicle Components can have talents that offer extra effects. These are much more important than the rarity of the Components.
Some safe weapon choices:
- Cannon is amazing for AoE and knockback
- Lightweight Rapid-Fire Railgun is a great light weapon
If you are struggling against single-linked enemies early on, the Laser Turret can be a great choice.
For Stat Chips, make sure to keep any that have good Armor bonuses, as these are pretty much required to get high enough Armor to tank things.
Temporary recommendations:
Heavy:
For Tank use one AoE and one Grenade Launcher/Missile MK1
For Mech, depends what you need
AoE: Regular "Cannon" (not AA) > Small Mortar, Missile MK2
Single-target/Tiny AoE: Grenade Launcher > Missile MK1
others are outclassed by listed above, Laser Weapon is decent vs single entity early, but outclassed by Missile Mk1 and Grenade Launcher later
Pulse Cannon is so bad you should never use it, enhancement fodder
Light:
General use: Lightweight Rapid-Fire Railgun > Rotating Turret, Machine Gun Team
Anti-Armor Sniper Rifle is backline priority if needed, also good single-target
Vehicle-Mounted Shotgun is KB if needed
Gatling Gun is AoE specialist
Heavy Machine Gun is pierce specialist, highly recommended for Tower 31-34 (SET TO MANUAL)
Flamethrower bad vs Armor, single-target specialist, can't buff RoF
Functional:
Slat Armor vs floor 31 can be useful
Explosive Reactive Armor can help survive a Hydra attack on 34
Jammer Gun can be extremely useful vs Hydras
Automotive Night Vision if Night
Smoke Grenade Launcher vs bosses
for just general use: Signal Receiver, Laser Rangefinder, Shield Generator, Jammer, Automated Defense System
Talents:
Heavy Weapon Shields is amazing for HP Shields, works very well with Grenade Launcher and Missile MK1
Shield Deflection, take 20% less damage
Light Weapon Shields is good for constant HP Shields vs bosses
Debuff Amplification is just permanent +20% damage
Weak Point Targeting is just free damage
Melee Threat, good for bossing
Charge Conversion, 30% armor
Mobbed Damage Reduction strong against multiple enemies
Stat Chips, make sure to keep any 5☆ of these you find, at least 1 of each (probably 2 of each):
firepower (heavy damage, light damage)
heavy damage (heavy damage, pierce)
light damage (light damage, rof)
rof (light damage, rof)
armor (armor, eva)
eva (armor, eva)
armor/eva (armor, eva)
21-25: function/defense components and chips
26-30: all weapons
31-35 tank: heavy weapons and chips
31-35 mech: light weapons and chips
Vehicle Stats and Functionality
Vehicles have an absolute ton of different stats, combining both Doll stats with HOC stats. The offensive stats depend on which type of weapon is being used, with Heavy weapons using HOC stats and Light weapons using Doll stats. Base stats function as usual.
Base Stats
Like most units you can send into battle, Vehicles have your standard set of stats:
- Health
- Armor
- Evasion
- Crit Rate
- Crit Damage
- Vision Range (for Night maps)
- Movement Speed
- Support Range (for the Tank’s remote shelling)
Light Weapons
Light weapons use Doll stats, and usually have 8 range (thus cannot hit for example Jaguars):
- Damage
- Accuracy
- Rate of Fire
- AP
Heavy Weapons
Heavy weapons use HOC stats, and have 20 range (can easily hit backline):
- Lethality
- Precision
- Reload
- Heavy AP
- Pierce
Due to how the calculations work out, Reload is not recommended for any use and has no effect on most of the Heavy weapons.
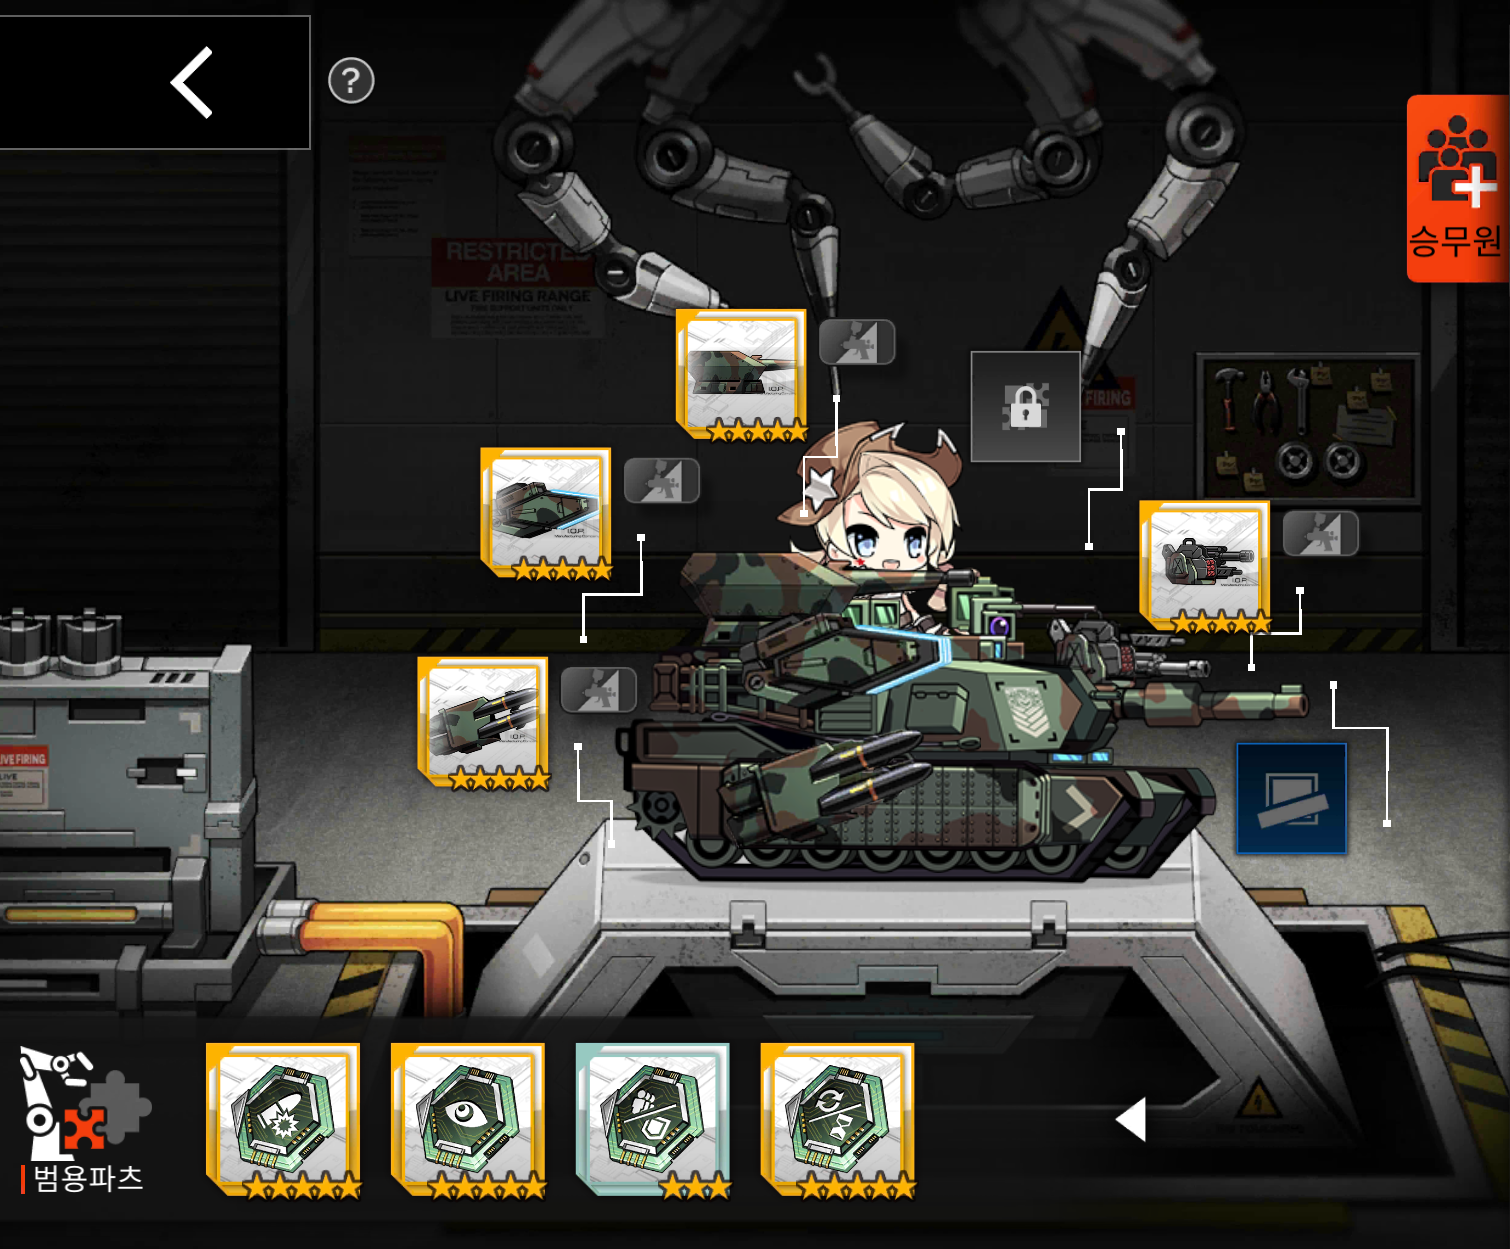
Vehicle Components
Each Vehicle can be equipped with 3 weapons, 2 defensive/utility Components and 4 stat boosters. More on this below. Note that the Components can also come with talents and this is where most of the power comes from.
Crew
The Vehicles need to be manned. At minimum, the main slot must be filled, but filling the rest is highly recommended. Any unit assigned to a Vehicle cannot be deployed elsewhere until removed from the Vehicle.
Tank slot types and permitted units are as follows:
- Commander - G&K Doll only
- Gunner - HOC only
- Loader - HOC only
- Driver - Any (G&K, HOC, Coalition)
The Mech only has a pilot slot and it is G&K only.
There are bonuses for putting in units as follows:
- Commander grants up to 5% RoF and 10% Acc, reaching max at level 90.
- Gunner grants up to 5% Lethality and 5% DMG, reaching max around level 80?.
- Loader grants up to 5% Reload and 5% Precision, reaching max around level 80?.
- Driver grants up to 10% Armor and 5% Evasion, reaching max at level 91.
Energy and Supply
Vehicles do not use AP to move, but rather use 20 Energy per move, a new resource specifically for Vehicles. Each Vehicle has usable Energy and Reserve Energy, with Reserve Energy replenishing usable Energy at the start of a new turn.
The Tank has 60 Energy and 180 Reserve Energy, allowing it to move 3 times a turn, for up to 4 turns or 12 moves in total.
The Mech has 80 Energy and 240 Reserve Energy, allowing it to move 4 times a turn for up to 4 turns or 16 moves in total.
Energy can be resupplied at a Helipad, same as resupplying. If a Vehicle runs out of both Energy and Reserve Energy, it will become stranded, no longer being able to move until either retreated or returned to a Helipad for resupplying.
Ammo and Rations function similarly to Coalition Echelons, and a Vehicle cannot fight without them.
Wifi Blips
Wifi Blips require equipping maxed Components, having a high CE and just otherwise using high level units. As it doesn't require you to have Talents in every slot it really isn't a good indicator of power. A Vehicle with talents unlocked could easily be stronger than a Vehicle with maxed Wifi Blips.
Tech Tree and “Leveling Up” Vehicles
As opposed to pretty much everything else in GFL, Vehicles do not gain levels. Instead, EXP (Proficiency) allows unlocking passives on the Tech Tree, such as passive stats or new Component slots and upgrading Skills.
"Leveling" Vehicles is recommended to be done in GZ4, as collecting any equipment from the various Vehicle nodes in GZ4 is enough to get you started on clearing the Tower.
209 500 EXP is required to unlock everything, which might take a while, but will eventually happen while farming the Vehicle Tower.
Components
Vehicle Components are the equipment you can put on your Vehicles, with the two Vehicles having minor differences in slot. This is where the majority of your power comes from, and getting good Components with good talents is essential. All Components unlock additional stats (and possibly talents) at certain upgrade values.
Talents (Amplification-type Strings)
Vehicle Components can sometimes drop with talents, and these are essential to making your Vehicles actually perform well in battle. The difference between a Vehicle with good talents and one without talents is immense.
Can appear on any of the three bonus slots for standard Components (+1, +3 or +10).
Note that talents require you to upgrade the Component with said talent to “activate” it.
As a comparison, 3☆ and 5☆ Component fully enhanced have minor stat difference.
You can only have 1 talent per Component, and the same talent cannot be activated multiple times.
Again, good talents are far more important than rarity.
- Heavy Weapon Shields is amazing for HP Shields, works very well with Grenade Launcher and Missile MK1
- Shield Deflection, take 20% less damage
- Light Weapon Shields is good for constant HP Shields vs bosses
- Debuff Amplification is just permanent +20% damage
- Weak Point Targeting is just free damage
- Melee Threat is good for bossing
- Charge Conversion is free +30% armor
- Mobbed Damage Reduction is strong against multiple enemies
Take note that Stun Malfunction is horribly bugged and is DETRIMENTAL to use. Do not use it. It only applies a super short stun, removes your debuffs and overrides other stuns.

Example of stun malfunction applying a 3f stun.
Melee Threat has a "reduce Damage of enemies within 5 units" effect. As the distance of "5 units" isn't very obvious in game, here is a visual to show this distance:

Visual indicator of Melee Threat range.
Slots
Each Vehicle has 5 Component slots and 4 Stat Chip slots.
- 3 Weapon slots
- Tank has 1 Flex slot, 1 Heavy, 1 Light
- Mech has 1 Flex slot, 2 Light
- 1 Defensive/Function slot
- 1 Function slot
- 4 Stat Chip slots
You cannot equip 2 of the same Component.
Note that weapons that want to be closer to enemies should be mounted in the slot closest to the enemy. This primarily includes light weapons, especially ones with damage scaling based on how close enemies are.
Heavy Weapons
For general content, you will want Heavy Weapons in every slot available, 2 for the Tank and 1 for the Mech.
Weapons inherit stats from the Vehicle at different ratios, these ratios will be listed for each weapon.
- For Tank use one AoE and one Grenade Launcher/Missile MK1
- For Mech, depends what you need
- AoE: Regular "Cannon" (not AA) > Small Mortar, Missile MK2
- Single-target/Tiny AoE: Grenade Launcher > Missile MK1
- Other Heavy Weapons are outclassed by the ones listed above
- Laser Weapon is decent vs single entities early on, but is outclassed by Missile Mk1 and Grenade Launcher later
- Pulse Cannon is so bad you should never use it, enhancement fodder
Most Heavy Weapons have too low Reload ratios, so simply increasing Damage is a better option.
Light Weapons
Light Weapons don't pack the same instant KABOOM that Heavy Weapons do, but have constant attacks and help you clear off the leftovers and do constant damage to bosses.
Weapons inherit stats from the Vehicle at different ratios, these ratios will be listed for each weapon.
- General use: Lightweight Rapid-Fire Railgun > Rotating Turret, Machine Gun Team
- Anti-Armor Sniper Rifle is backline priority if needed, also good single-target for example against bosses
- Vehicle-Mounted Shotgun is KB if needed
- Gatling Gun is AoE specialist
- Heavy Machine Gun is pierce specialist, highly recommended for Tower 31-34 (SET IT TO MANUAL)
- Flamethrower is bad vs Armor, single-target specialist, can't buff RoF so not recommended
Defensive Components
Offers defensive utility.
- Slat Armor vs floor 31 can be useful
- Explosive Reactive Armor can help survive a Hydra attack on 34 if KBs are lacking
- For general use: Shield Generator, Automated Defense System
Function Components
Offer other utility.
- Jammer Gun can be extremely useful vs Hydras
- Automotive Night Vision if Night. It's a PEQ
- Smoke Grenade Launcher vs bosses
- For general use: Signal Receiver, Laser Rangefinder, Jammer
Stat Chips (General Components)
These are simply stat sticks, applied separately from other Components. Each Vehicle can equip up to 4 of these, and they offer some good stat increases overall.
Each Stat Chip has 2 rolled stats, and collecting the ones with the best combination of stats is highly recommended.
The following are a list of very good chip combos, main stat of the Chip is listed first, the extra stats in paranthesis:
- Firepower (Heavy Damage, Light Damage)
- Heavy Damage (Heavy Damage, Pierce)
- Light Damage (Light Damage, RoF)
- RoF (Light Damage, RoF)
- Armor (Armor, Eva)
- Eva (Armor, Eva)
- Armor/Eva (Armor, Eva)
Acquisition
Vehicle Components are acquired in GZ4, primarily from the Tower after the boss. After killing the boss in a GZ4 area, the Tower will be available for 3 clears, after which the GZ area must be reset and the boss killed again to get back to the Tower. The first time you clear each floor of the Tower, you will gain 2-4 Tickets (Military-Grade Component Crates, 4 at floor 21+) allowing you to get additional random Components 5☆ Components. Take note that talents are still more important than rarity.
After clearing the Tower further farming will need to be done by simply Sweeping specific Tower floors for drops. Specific floors drop the following Components:
21-25: Function/Defense Components and Stat Chips
26-30: All Weapons
31-35 Tank: Heavy Weapons and Stat Chips
31-35 Mech: Light Weapons and Stat Chips
Floors 1-20 also drop lower rarity Components and are as such not recommended.
Enhancing Components
Components can be enhanced similarly to Equipment for Dolls in the Research Menu. To fully enhance a 5☆ Component to +10, 32660 EXP is needed. Enhancement can be done with either Spare Component Boxes or other Components, similar to Equipment and Universal Components. Components you do not need can be dismantled into Spare Component Boxes if you run out of space. There used to be a massive mismatch between dismantling and feeding directly, but this has since been fixed.
Spare Component Boxes give 100 EXP each.
3☆ Components give 2 Box when dismantled, or can be fed directly for 200 EXP.
4☆ Components give 5 Boxes when dismantled, or can be fed directly for 500 EXP.
5☆ Components give 10 Boxes when dismantled, or can be fed directly for 1000 EXP.
Newer Components (Vehicle-Mounted Shotgun, Small Mortar, Laser Rangefinder, Camouflage Netting and Slat Armor were introduced later) always give 1000 EXP or 10 Boxes regardless of rarity.
Both standard Components and Stat Chips have unlockable extra effects depending on upgrade level:
For Components, additional effects activate at upgrade +1, +3 and +10. These additional effects can be just minor stat boosts, or talents. What is in which slot is random, meaning talents can show up in any of the three slots. You can only have 1 talent per Component.
Stat Chips work similarly, granting additional stats at +3 and +10, but cannot have talents.
Component Skills and Rolls
Skills
Map Functionality
Vehicles CANNOT swap with other Echelons, use Energy to move and can actually become a hindrance if you use them incorrectly. As Energy is limited (up to 12/16 total moves per Vehicle), you can easily become stranded if you don’t plan your movement wisely. A stranded Vehicle will become a roadblock that other Echelons cannot bypass.
Note that the Quick Resupply chip for Coalition Echelons DOES work on Vehicles, refilling Energy, Ammo and Rations. While this won’t be too much use in most cases, it does exist if needed in an emergency.
There also exists both Vehicle Only and Walking Only nodes on some maps. As expected, only Vehicles can enter the prior and only regular Echelons and HOC can enter the other.
Remote Bombardment for Tank
The Tank is unique in that it can remotely engage enemy teams in combat, whittling them down from range. While the duration of your shelling is timer-based, weaker enemy teams can be completely obliterated this way if your Tank is strong enough.
This can be done once a turn and is required to clear the Tank Tower.
HOC Support for Tank
The Tank can also support other Echelons with HOC support, though is significantly weaker than actual HOC.
Combat
Most Skills will auto-fire with Auto-Skill on, and is recommended to be left on for general content.
There is button on the right side of the screen allowing the Vehicle to advance towards the right.
GZ4 Tower
The Tower that appears after killing the boss in GZ4 is where you'll be both leveling up and grinding for Components for Vehicles.
The initial floors are so easy you can just grab whatever you found on the way to the Tower and use it to start clearing. Equipping two Heavy weapons is recommended, as remote bombardment is required to clear floors efficiently.
The Tank Tower floors revolve around using both the Remote Bombardment and ramming into enemies to clear it within the turn limit. For the Mech there are some floors with Helipads that will spawn more enemies, so taking them over is recommended.
Take note that the buffs from GZ Buff Nodes carry over to the Tower for your current GZ4 run, so if you are struggling with certain bosses or such, make sure to bring all 3 buffs.
Farming
After you have cleared the Tower nodes the first time and gotten your free Tickets, further farming requires targeting specific floors with Sweeps.
21-25: Function/Defense components and chips
26-30: All weapons
31-35 Tank: Heavy weapons and chips
31-35 Mech: Light weapons and chips