Introduction
Gray Zone (GZ) is a new Combat mode, added to the Combat menu and on the Main Screen (if no other running event is overwriting it). For this mode, you may use the new Exploration Permits from Weekly Quest progression boxes, or simply use resources to enter nodes and work towards a boss.
To unlock GZ you simply need to clear Chapter 10 of Story and have 11-1 unlocked. Note that you can still earn Exploration Permits before unlocking GZ.
By clearing nodes, you gain Points towards the current GZ Banner, which rotates on a set schedule. Once a new Banner arrives, progress is reset and you can earn all rewards again.
If you do 2 GZ Combat Nodes per day and always beeline to boss and reset the map (which is the recommended way to do GZ), you will always complete the current Point Banner within the 28 day duration. As such, GZ should be considered extremely low effort and simply doing your daily quests will give you all rewards.
The main rewards for GZ are earned through the Point Banner, where you can earn Selector Tickets allowing you to select from a set of SPEQs, including some new SPEQs unique to GZ that grant Dolls powerful SPEQ-set bonuses. There are also Limited Dolls available for rescue in GZ, rotating together with the Point Banners.
For Foreign the currently available SPEQs and which GZ they were introduced in (as of writing) are listed as follows, EN will likely get these in the same order:

4k Basic Tix/6k Adv. Tix: These are the Selector Tickets. There are two of them, one earned at 4000 points and one earned at 6000 points. Base 2-4☆ Dolls have their SPEQs in 4k Tickets, Base 5☆ Dolls have their SPEQs in 6k Tickets.
Month/Event/Set/Rank: This shows the original source of the equipment.
2/3-set: New equipment only available in GZ grants Dolls a full which comes with an extra set bonus for having all the required SPEQs.
As of April 2024 Mica has started doing 2-sets for non-mod Dolls.
EN Incompetence
Apparently instead of giving us useful SPEQ-sets Mica EN is skipping 2 very good GZ banners in favor of giving us... the mostly useless batch that includes Type 100's Accessory that does nothing special, apparently because T100 is in the Mod batch arriving with SS. No Type64 or MG4 SPEQ-set for us until much later.
Additionally, Mica EN has mistranslated all the debuffs from the buff towers to state that they affect our units, instead of being debuffs for our enemies. The thing to note is that all buffs from the buff nodes are good, and if it seems like something would be bad it's probably Mica TL™.
Overview
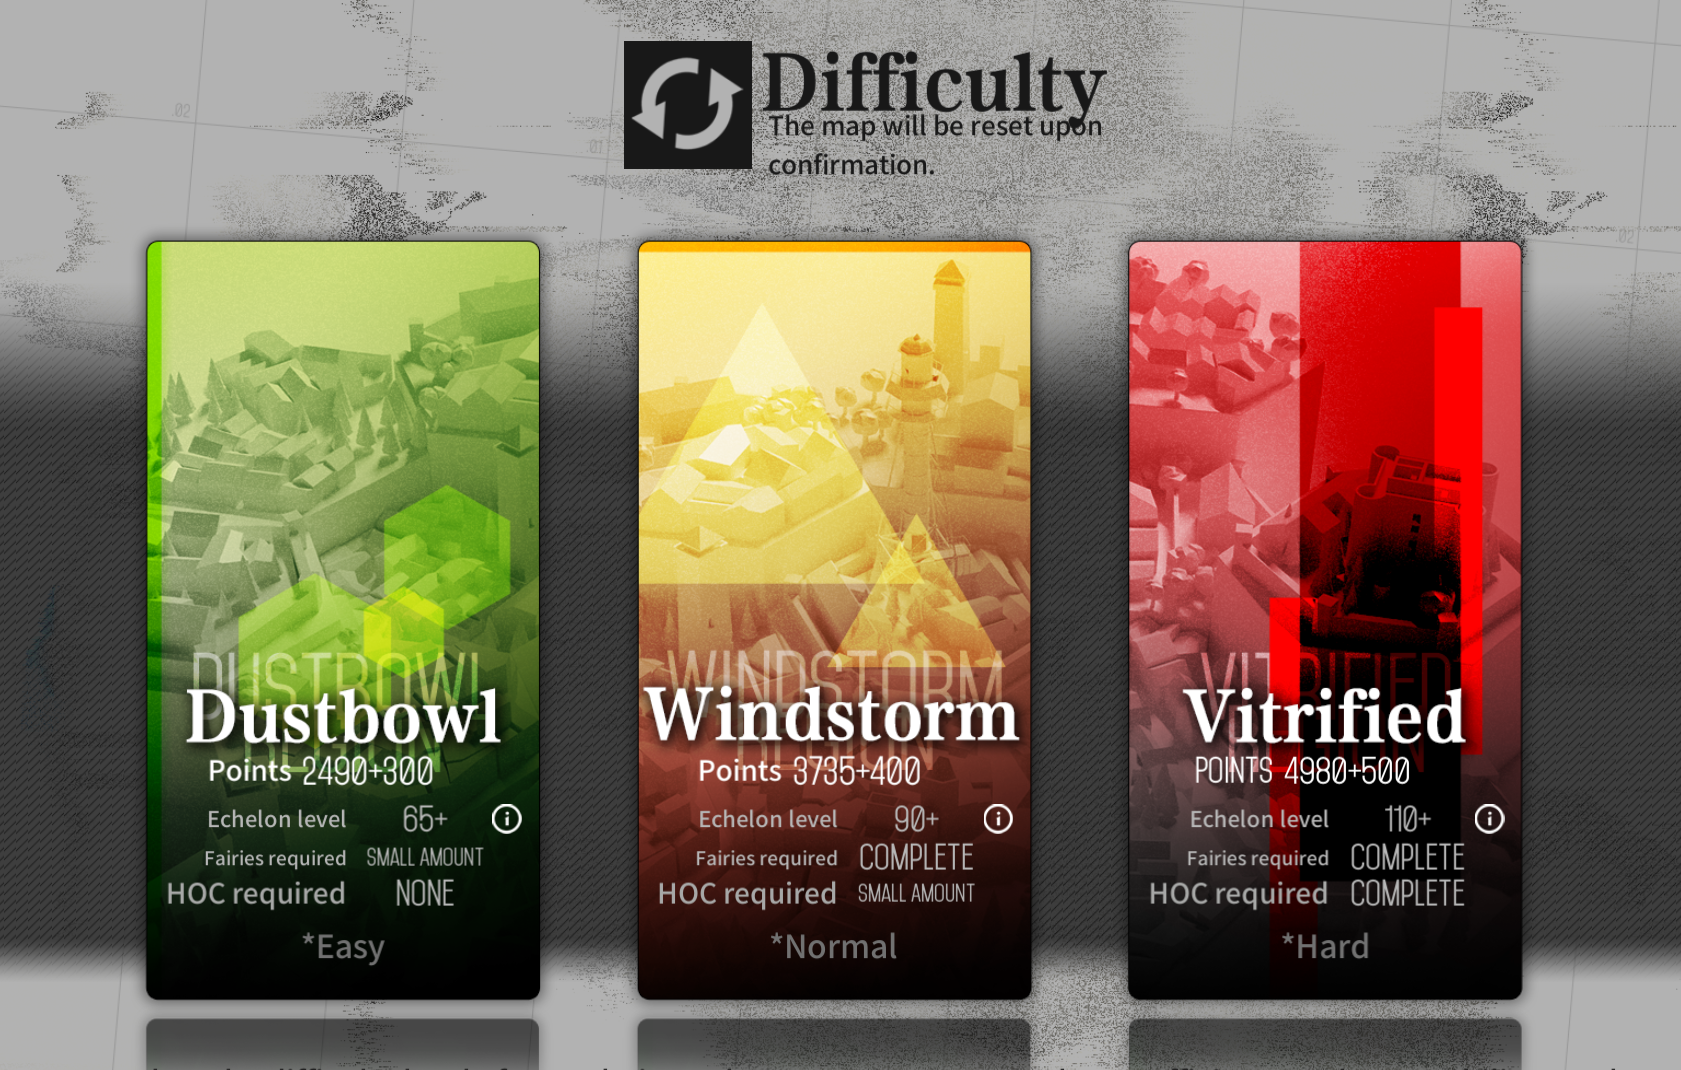
Gray Zone is split into different difficulties, but to keep things simple we’ll just call the different versions GZ1 through GZ4. With v3.02 only GZ1 through GZ3 are available, GZ4 will be added with v3.03 and is tightly tied to the Vehicle system.
When opening the GZ tab in the Combat menu, we will see the following:
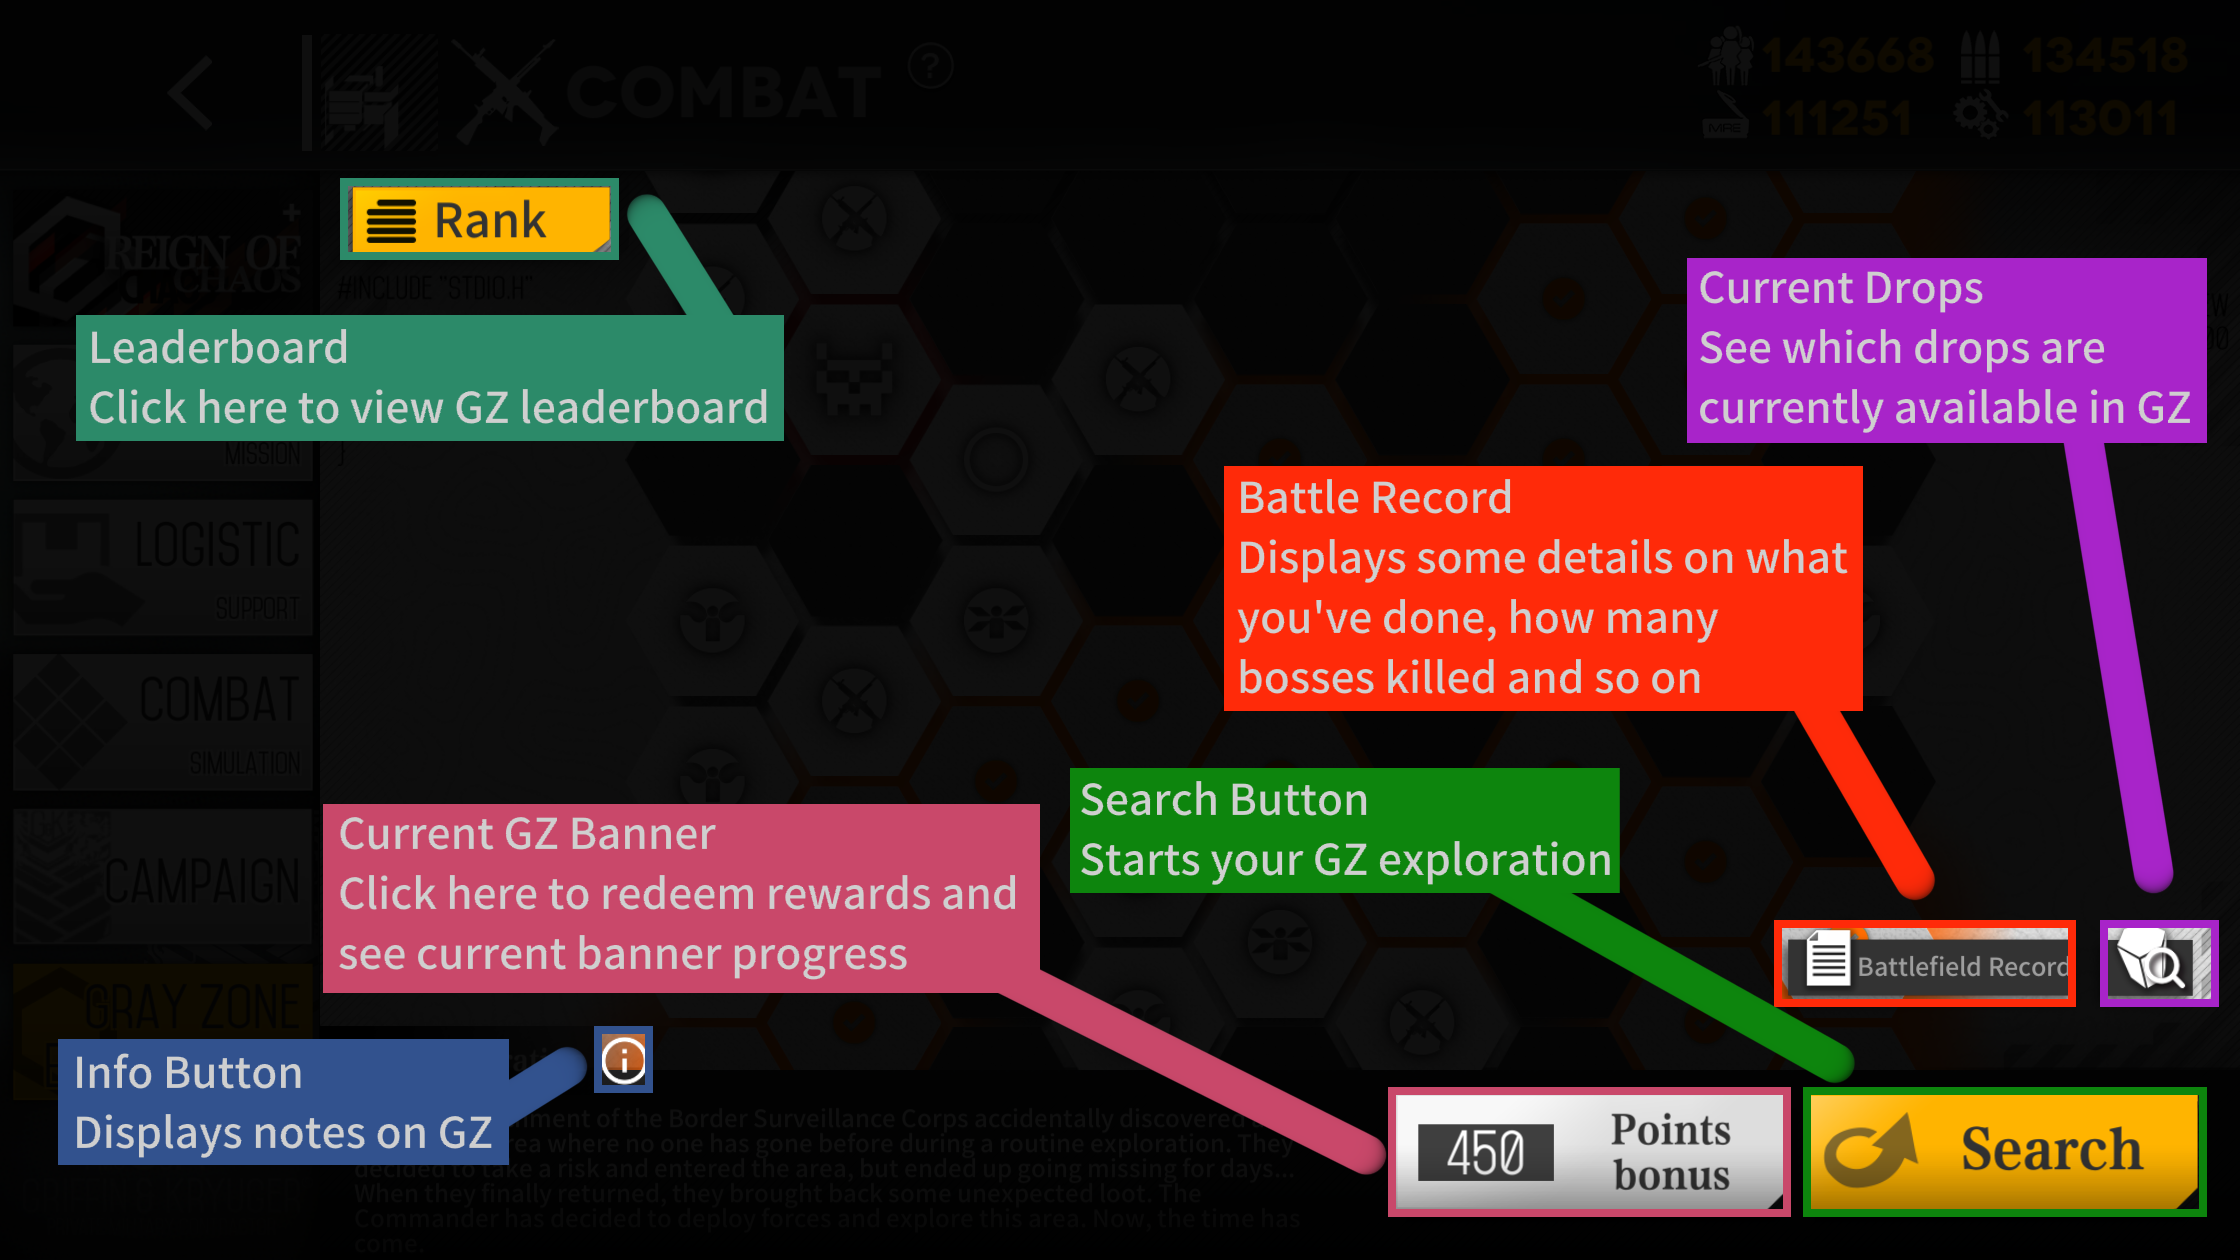
The info button on the GZ screen informs us of the following:
- GZ is always open.
- After selecting the difficulty level, a new exploration starts.
- Players may use Exploration Permits or Resources to rescue Dolls and earn Points.
- If you complete all GZ exploration, you can receive generous rewards.
- Limited Dolls in GZ change regularly.
- Unravel more mysteries.
The Battlefield Records menu simply displays some stats about GZ.
- Nodes explored - How many nodes you've cleared.
- Bosses killed - How many bosses you've killed.
- Nodes conquered - Mica can't TL and this is actually "Full clears". How many times you've completed all nodes in a GZ area.
The Combat menu screen will display an overview of the current GZ area and all its interconnected nodes. Each individual hex node is either a combat map or a Buff Tower. What each type of node contains will be covered in more detail further below.

Example of the current GZ map displayed in the Combat menu.
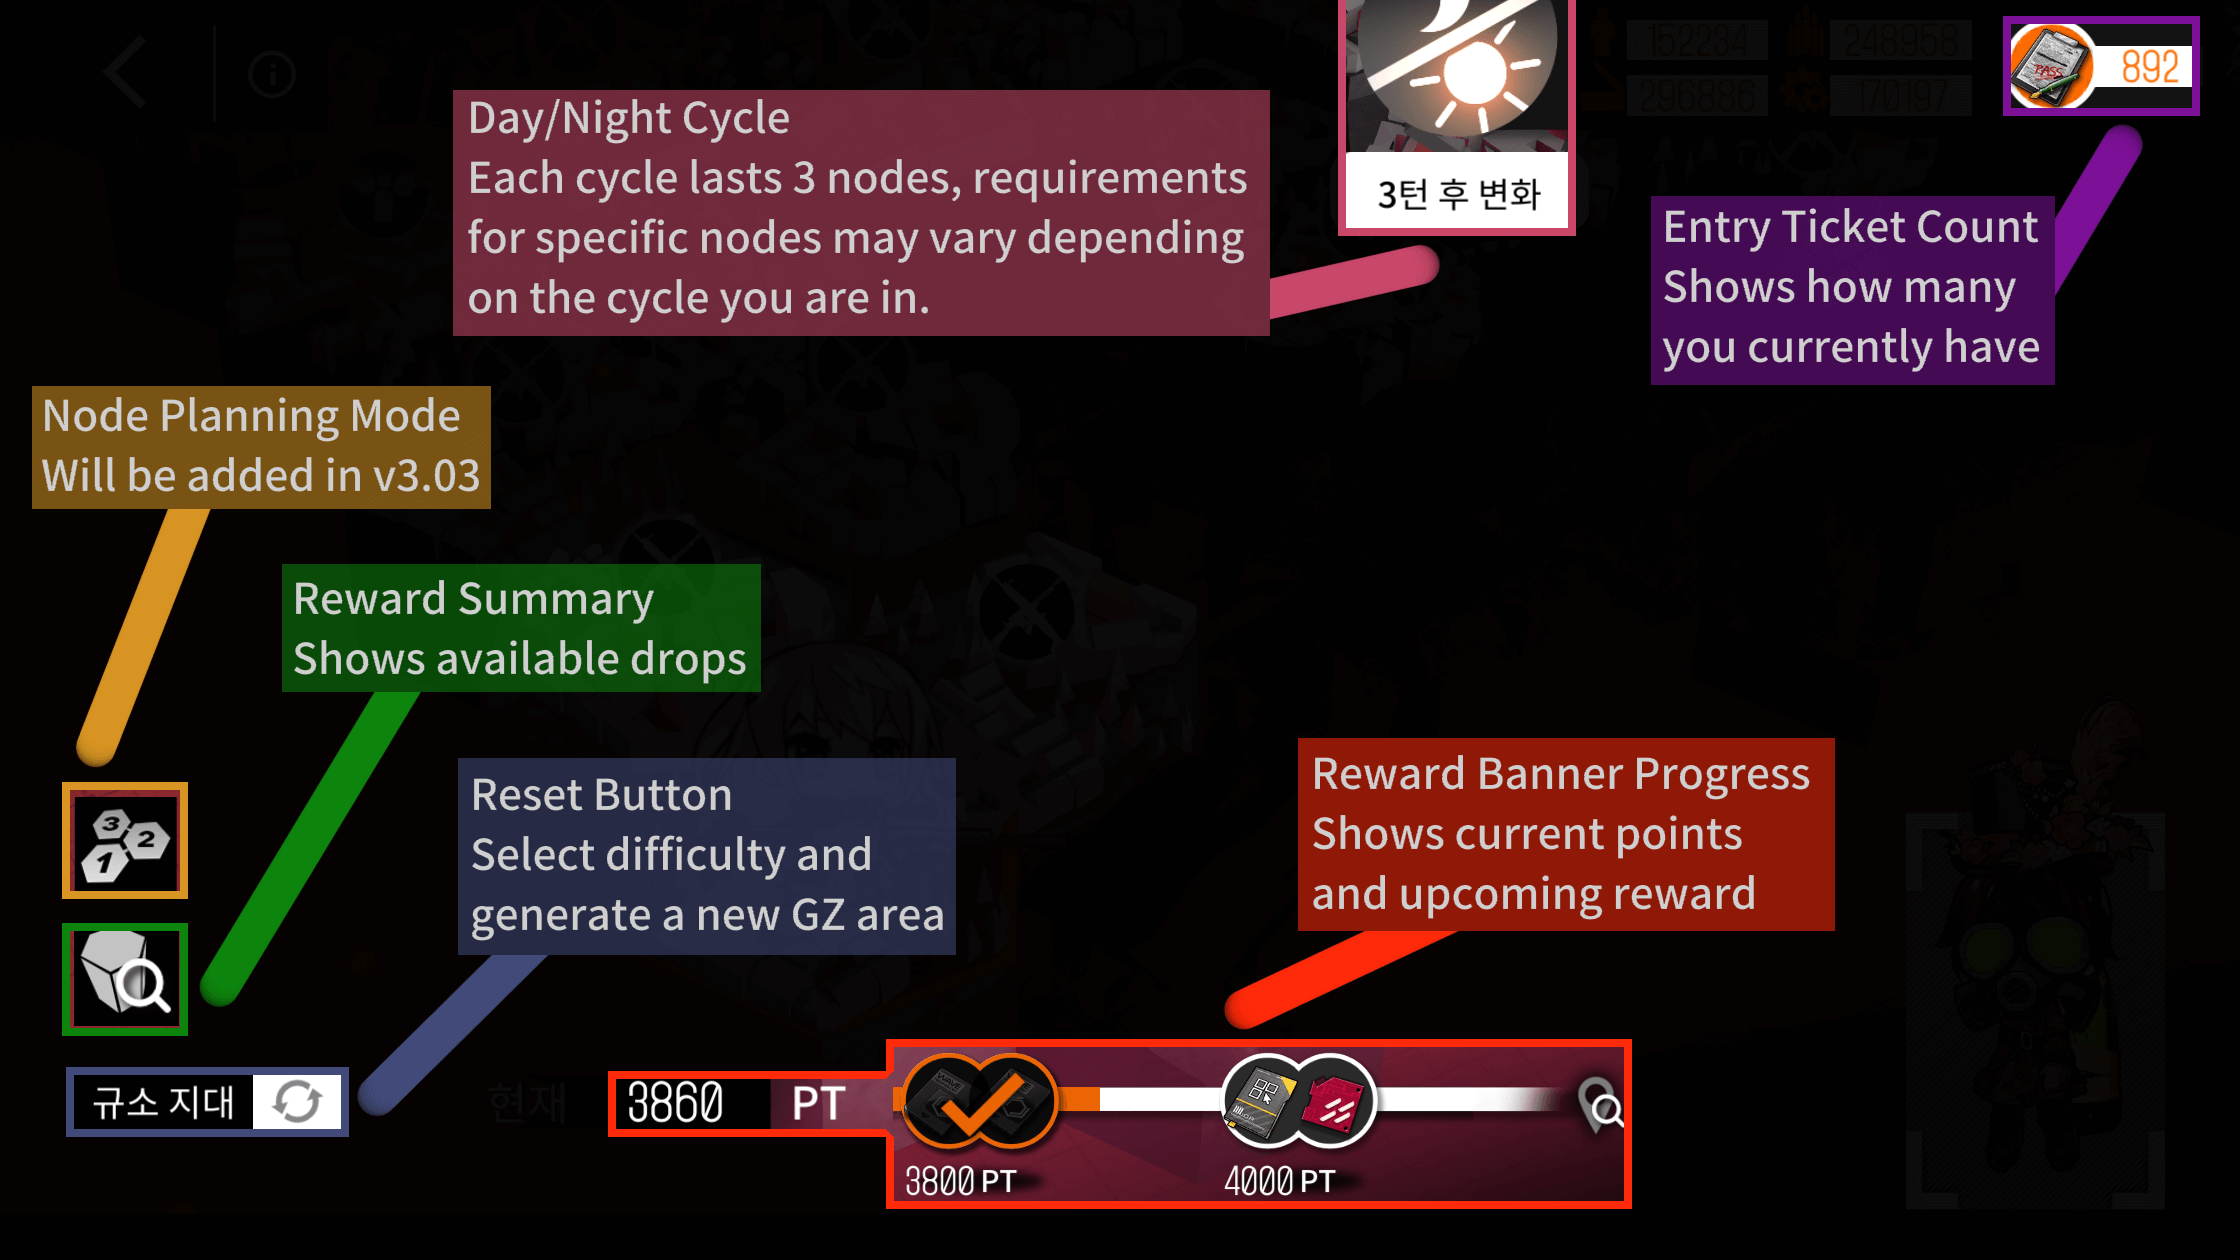
Until 3.03, selecting and entering a node will have to be done manually. Actually clearing the node can be done through planning mode or Auto mode.
The Day/Night cycle changes what you will face in the node, as well as the requirements for Fairy, HOC or Vehicle nodes. There is also a trick you can use to enter a node if you do not meet the current cycle’s requirements but do meet the other cycle’s requirements: By holding down the Day/Night toggle to view the other Cycle’s requirements, you can click the enter button.

Example of using this trick to enter a Mecha node with no Mecha unlocked.
This is particularly useful for Fairy and HOC nodes, and not really useful at all for Vehicles nodes. For Fairy and HOC nodes the Skill level requirements are quite steep in GZ3+, while you don’t actually need these Skill levels to clear the node comfortably. As such, simply being able to enter and deploy is often fine to clear the node.
Note that HOC and Vehicle nodes will only allow you to deploy the units that are required to enter, which means if you only have for example BGM raised this may present an issue if you cannot deploy BGM in the other Cycle version of the map. This is especially true for Vehicles, so tricking the game into letting you in still isn’t going to make you able to deploy the Tank in a Mecha node.
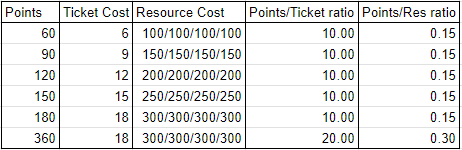
Visualization of Cost to Point ratio in GZ3+.
As you can see, all nodes give the same Point to Resource/Exploration Permit ratio except for bosses, which are worth double. As such, the strategy is always to rush bosses and repeat. There is a bonus of 500 points for clearing the entire map, but simply rushing the boss is far more effective. For more statistics on this see this link where a CN player tested 100 runs of each.
You should always spend Exploration Permits before spending resources in GZ, as the cost ratio is always the same.
Lower difficulties (GZ1 and GZ2) will grant significantly less Points per Resource/Exploration Permit.
GZ1 grants 5 Points per Exploration Permit and GZ2 grants 7.5 Points per Exploration Permit.
GZ3 and below can have the boss blocked by a non-standard node (HOC, Fairy and Vehicle nodes have requirements, such as Skill levels, more details below). As such you should make sure that you can actually clear the GZ before committing, and if not reset the map again. Resetting the map is free so there’s no penalty for doing so repeatedly.
Take note that the visual is from Planning mode, which will be added in v3.03. Actual details on how Planning mode works will be added when this arrives to EN.
Node Types
There are 6 (7 with Vehicles from v3.03) node types in GZ.
Standard Combat Node
Kill all enemies to clear the node.HOC Node
You can only deploy HOC and must either break rocks or support an NPC echelon in combat. For rock breaking, you can simply end turn to win (this is what the AI does).Fairy Node
You get assigned an NPC echelon and a Fairy type and must equip your own Fairy to the echelon to complete the map. You will likely want to use FCs during these maps (the AI spends FCs freely). An easy example is Parachute Fairy nodes requiring the use of Parachute.Buff Node
Buff nodes simply let you choose between three buffs that will be permanent for the entire GZ area until you reset it. They also work in the Vehicle tower. List of all buffs here.Boss Node
Kill the boss to win.Vehicle Node
Seems to have “survive x turns” conditions. These are meant to be used for leveling your Vehicles, so try to kill as much as possible before the turn limit expires.Jester Node
These Puzzle nodes appear randomly, replacing Standard Combat nodes for a specific cycle (it can be present in Day but be a Standard Combat node for Night or the opposite) and their icon is not revealed until you are next to them. Successfully clearing the puzzle will grant you significant bonus points compared to a normal combat node, failing it will grant bonus points based on the amount of blue nodes. The AI automatically ends the turn so you may get 0 points for most of these.
The exact rules for each puzzle will be described as you start the map. More details further below.
HOC, Fairy and Vehicle nodes have requirements on them. These scale by Difficulty and distance from Starting Point.
- HOC nodes will have Level/Rarity and Skill level requirements.
- Fairy nodes will have Level/Rarity and Skill level requirements.
- Vehicle nodes will have CE requirements.
Take note that you must equip the NPC echelon with your own Fairy before starting combat.
Buff Nodes cost nothing to enter and should generally just be pathed through on the way to the boss if you are going by them. For those struggling, going slightly out of your way to grab all three buffs would also be a good idea to ensure the boss isn’t too much of an issue. Take note that the first click is selecting the buff you want and you need to click again to confirm that you want this buff. Another note is that all negative effects are debuffs for the enemy, EN translations are just complete ass.
Puzzle/Jester nodes work as follows:
You need to turn as many nodes as you can blue (all of them are 100% completable). Stepping over an already blue node will turn it white so backtracking is not recommended. The helipad where M4 starts does not count. If any other node is blue, you gain points. Base points is 90 + 4 per blue node. There are 15 additional nodes other than the starting helipad, 15x4 = 60, so total points for fully completing it is 150.
There are 3 types of Puzzle/Jester nodes, each with 2 versions:
- 3 free moves, killing an enemy refreshes this to 3. Solution is to path around the map in a counterclockwise spiral for both of the versions.
- One-way paths. You have 16 free moves and need to be wary of the one-way paths blocking you from completing them.
- Some nodes are already blue. You have 16 free moves again for these, simply going around in a spiral and possibly walking over one node twice to turn it white then blue again may be needed.
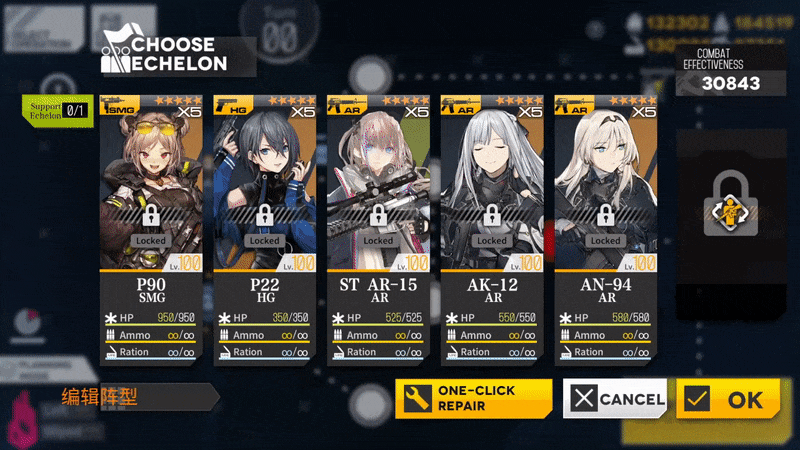
GZ Easter Egg Items:
When doing any normal combat node, you may run into some seasonal enemies spawning on a random node, and killing it will give some of the Easter Egg items. The border of the item indicates what it is used for (Green = Affection, Blue = EXP, Gray = Vehicle Enhancement). A listing of all possible items is as follows:
Resetting GZ
In the GZ exploration map, there is a button in the bottom left that allows you to re-select difficulties. This is how you ‘reset the map’ and it is highly recommended you do this after killing the boss. In addition, due to how GZ1→GZ3 function, the boss can sometimes be on a node locked behind an HOC/Fairy node, which means the requirements for the HOC/Fairy node (often being Skill levels 9/10 that far away from the Starting Point) then become the requirements to actually access the boss.

As such, it is highly recommended that you check the GZ nodes near the boss to make sure that you can actually get to the boss in the current layout, and reset the map again otherwise. The chance that the boss is entirely blocked isn’t that high, but it can happen. In GZ4 (added in v3.03) this problem is entirely removed as bosses cannot spawn outside corners and corners are never blocked by non-standard nodes (you can always get to all other corners from any particular corner without being blocked by non-standard nodes).
As there will always be a viable path through the center (even if you have to go around it), the only nodes you actually need to check for this “boss is blocked by non-standard node” condition is actually the nodes right next to the boss, and only if they are HOC/Fairy nodes. Normal combat nodes never have special requirements to enter them.
Auto Mode
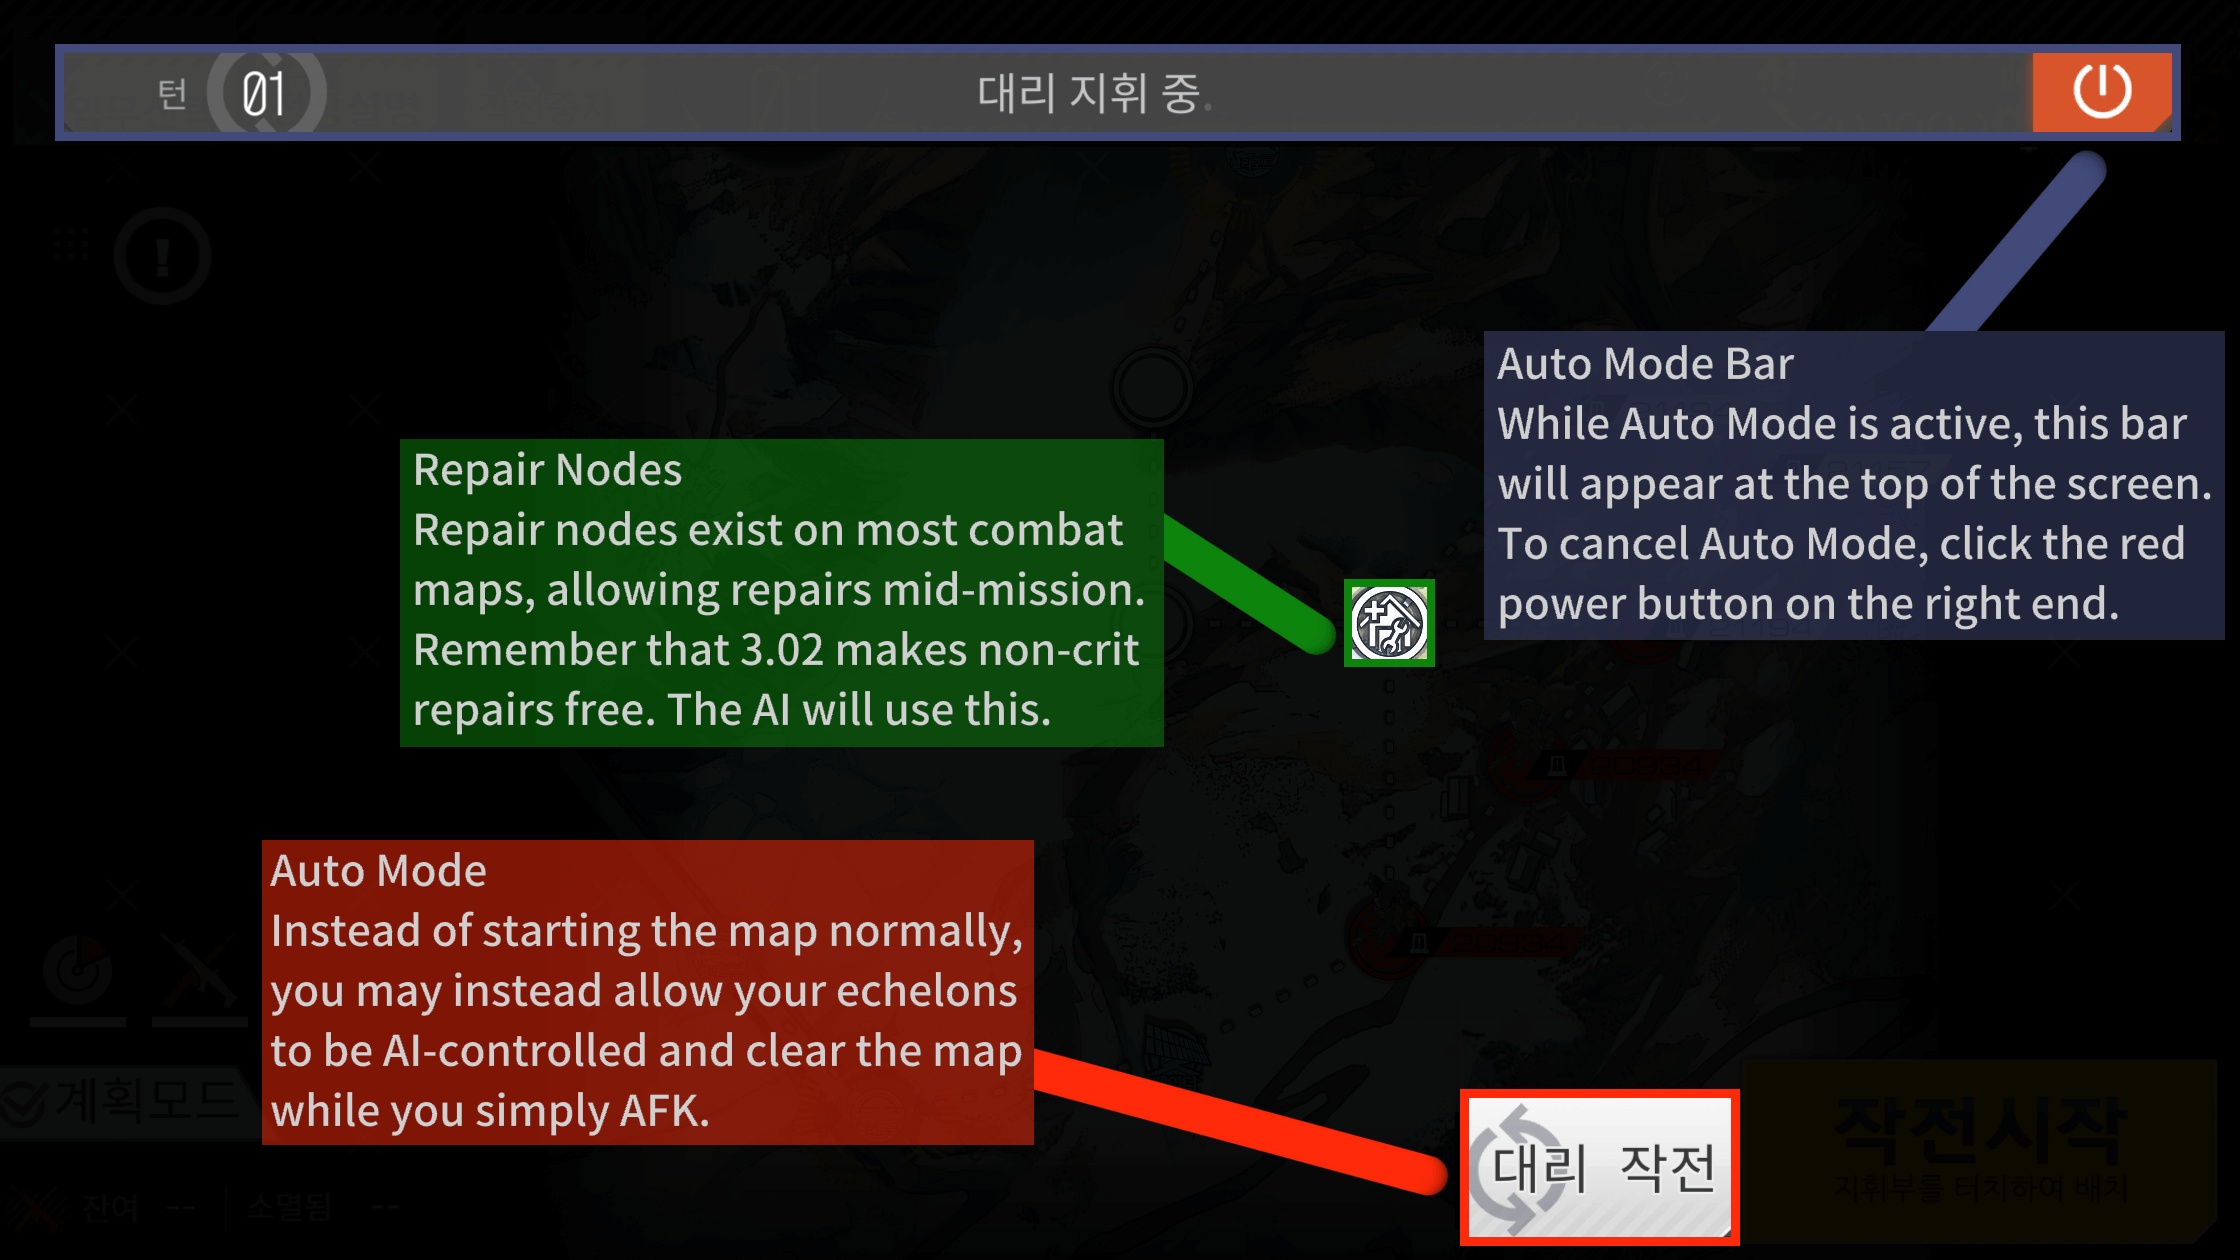
By default, this uses the highest CE echelons available and freely spends Fairy Commands if a Combat Fairy is equipped.
Client update v3.04 made planning mode on the GZ overview layer available, as well as added extra options to configure which Echelons are sent into battle in GZ, and you can set them to not use Fairy Skills if so desired, as well as whether to use them for Night or Day. Take note that the auto-mode adheres to CE recommendations for nodes, so if you want it to use your Echelons everywhere, make sure they have high enough CE (44k Day, 41k Night). If you just want low effort clearing (which is generally recommended due to how much GZ you will end up doing) then making a couple Echelons that can handle everything would be a good idea. Something as simple as Scarecrow with a couple of Manticores already clears pretty much everything except bosses just fine even in GZ4.
Difficulties (GZ1→4)
GZ1 is around Story Chapter 4 in stats, though considering the enemies and Boss Skills, you’d likely still want to just have properly raise (lvl90 5x) Dolls anyway for this.
GZ2 is significantly harder, probably more alike to Chapters 12 and 13 content, with the Bosses now starting to have significant HP.
GZ3 requires some well raised units to handle the Bosses, more on that below.
Lower difficulties reward less Points per Exploration Permit/Resource, as noted above, as such lower difficulties are mostly there if you can’t clear the higher difficulties yet. As First-time Rewards are once per Banner duration and refresh with new Banners, you’d still want to get through the rewards once but probably leave further farming until Echelons are stronger.
Easter Egg Enemies
Occasionally, an extra Seasonal enemy (like Jaws) will spawn in addition to normal enemies in Regular Combat nodes. These only appear after you start the mission, and will reward you with some extra special items.
These are just fancy Cakes, CRs or items that can be used to upgrade Vehicle equipment in v3.03 (these last ones obviously have no use until v3.03). You may collect or use these as you wish.
GZ Point Banners
Each GZ Point Banner is usually 28 days, or 4 weeks, but may be longer if there’s a major client update or other reasons causing extensions.

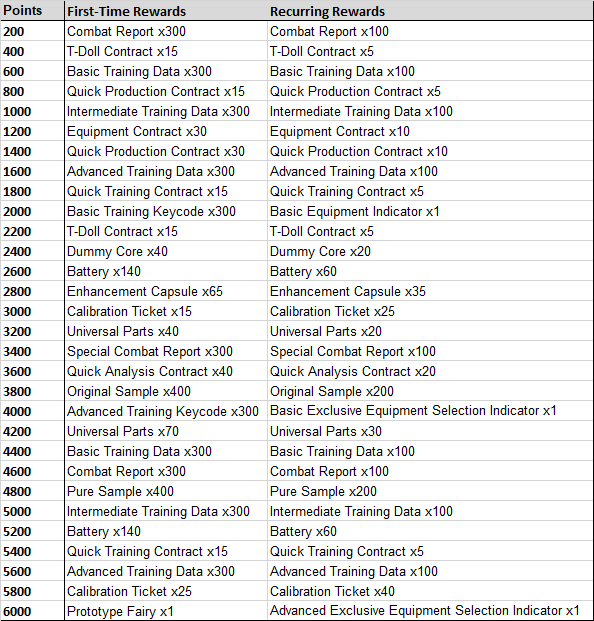
GZ Banners have a whole pile of rewards, similar to the Frontline Protocol (GFL’s BP), but with no paid option, everything is F2P. In addition, the rewards are split into First-time and Recurring. The first time you earn points, you will earn both the First-time rewards and the Recurring options, but subsequent point progression during the same Banner will only earn Recurring rewards.
The info button informs us of the following:
- Points earned will unlock rewards for GZ exploration.
- There will always be a Point reward Banner active.
- Banners change on a regular basis.
- There are two types of rewards:
- First-time rewards, more generous but you can only earn these once per Banner.
- Recurring rewards, always available and can be repeatedly earned. - Rewards are earned through collecting Points by completing nodes in GZ exploration, bonus points can be earned for clearing all nodes in an area.
- First-time rewards can only be earned once per Banner, Recurring rewards will remain open.
- Recurring rewards are cyclical, if you earn the last reward you will return to the start.
- Each time the Banner changes, points are reset to 0.
After earning all rewards once, the point total returns to 0 and you can earn Recurring rewards again, thus allowing you to farm the GZ Equipment Selector Tickets again. As such, anything in said Selector Tickets is always farmable, with the extra note that every new GZ Banner adds new rewards to the tickets. If you missed a GZ Banner, you can simply farm the SPEQs you missed by repeatedly clearing GZ.
Here is a listing of all the rewards:
Bosses
Usually at the opposite end compared to the starting point, there will be a boss node. There are 5 somewhat powered-up SF bosses that can appear in GZ. The hardest is for sure Scarecrow, but none of them are too bad provided you have the tools to deal with them.
If you have SCARs, Suomod and either P10C or K5mod none of these should really pose a threat, though of course there may be cheaper alternatives. Using Sniper Fairy may also be a good choice for the Vuln and constant damage.
The boss stats listed are from GZ4, GZ3 will have slightly less HP and such.
Judge (360/300k HP, 30/25 Eva, 100 Armor)
This Judge never removes her own Damage reduction, as such she has max 30 FP at all times. As such, any 2 SGs with Flash ammo can tank this forever and you can just use any single-target DPS. Incredibly easy boss.
Gaia (340k/280k HP, 60/40 Eva)
Absolute pain in the ass without K5mod or P10C. With either of these you just activate the immunity when Gaia leaps backwards after the skill cut-in. Holding DPS until after her first jump will likely make the fight faster, as if you use them immediately your Skills will time out while she’s flying around being immune (time keeps passing while she is doing her extremely long animation).
Intruder (280k/230k HP, 80/60 Eva)
Summons Dinergates that must be dealt with. A single Molotov will take care of almost all of them, leaving just 2 left to require frontline targeting through either wiggling an AR or Liu toggled to frontmost and with some RoF buffer. Suomi tanks the boss just fine.
Architect (320k/260k HP, 60/40 Eva)
Shoots the main tank with a massive 3x3 explosion. Simply using Suomod or G36c are easy options, though Suomod can basically solo her so that’s way cheaper. P10C might also work but requires way more effort.
Scarecrow (320k/260k HP, 120/60 Eva)
Her main Skill has an 8s ICD and absolutely obliterates anything without HP Shields. Of course, you can ignore this and use a conventional Force Shield as well because the timing lines up pretty well even with auto-skill. Killing her fast is highly recommended. The use of SCARs or 4HG with a Force Shield can be fully AFK.