


Overview
While Sygna Suit Cynthia & Kommo-O may sport the best AoE Dragon damage in the game currently, Lance & Dragonite are still the kings of one-on-one Dragon damage. As the first sync pair to have a 4-bar move, Lance & Dragonite are very simple in their design and focused in their one goal: to outright obliterate anything that stands in their way. This tactic is exemplified in the Hyper Beam sync grid, which attempts to give Lance & Dragonite more general utility and staying power to support their offensive power. However, their intended purpose can also be turned on its head with the Dragon Claw Secondary Attacker grid, which largely forgoes this sync pair’s sheer power in favor of their rather attractive and frequently overlooked team utility traits.
Sync Grid Build 1: Hyper Beam
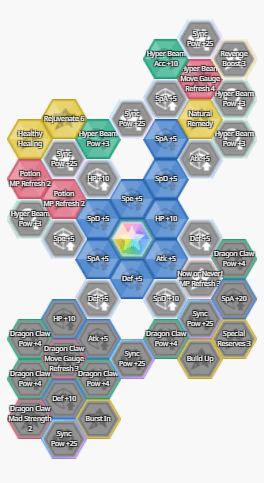
Hyper Beam Move Gauge Refresh 4, Hyper Beam Power+3, and Hyper Beam Accuracy+10 are first. Together, they not only give a solid chance to refund 1 bar from a given use of Hyper Beam, they also ensure that it never misses under normal circumstances. Next up are the two Potion MP Refresh 2 nodes, as the utility of Potion in most game modes simply cannot be understated. Healthy Healing provides auto-recovery, which keeps Dragonite healthier throughout the battle and potentially affords Lance the ability to use a Potion on a team mate. Natural Remedy can heal status once per battle and let our favorite Dragon Type Elite Four member/Champion continue his rampage, and finally Rejuvenate 6 fully fills the move gauge on use of a sync move, basically translating into a free Hyper Beam and a half.
If you want to focus on Hyper Beam, then this is the grid for you. Lance & Dragonite don’t have many useful damage-boosting nodes, so their grid is best focused on sheer utility. This grid fills in a lot of the holes in Lance’s base kit and adds a substantial amount of team utility as well. For example; while going for Now or Never! Is not generally recommended for use outside of dire situations, it’s a more viable option with this grid given the sheer regenerative utility afforded. This grid is good in a relevant Champion’s Stadium stage or a Full Force Battle, where it can cut huge chunks of HP off of virtually any opponent that comes up against it. Just make sure that you have some method of keeping the move gauge up. It’s also useful in Dragon-weak Legendary Arenas due to its large doses of focused damage and potential team-support capabilities. It’s usable in the Battle Villa, but the huge cost of Hyper Beam will become very obvious after a short time without speed support, so it’s probably better to just stick with Iris & Haxorus.
While many common strikers nowadays focus on a solid overall kit and self-reliance, Lance says “the heck with that, I want PURE POWER!”. Because of this, Lance & Dragonite really want offensive support! In particular, Critical Rate and Special Attack support are key to turning this already powerful sync pair into a Dragon Type nuke. In this role, Sabrina & Alakazam are the absolute stand-outs, as they can max both while providing healing, physical attack reduction with Barrier, and Accuracy support to ensure that Hyper Beam never misses even if the Accuracy+10 node is ignored in favor of more Hyper Beam Power+ nodes. Hands down, Sabrina & Alakazam are the all-in-one best pick for a partner to Lance & Dragonite, as they fill in every offensive gap in their kit with ease and can fully leave the tank slot for the team open. Another outstanding option is Professor Sycamore & Xerneas due to their ability to max Speed and Special Attack in one Sync Move use, not to mention their tanking capabilities. Just note that you’ll also need a Critical Rate buffer in order to max out the power of Hyper Beam. Sygna Suit Blue & Blastoise can also do just about everything that Sabrina & Alakazam can do, but they are a bit slower in terms of both how quickly they buff and how high their speed stat is. They’re also more reliant on luck, as many buffs are randomly generated and at least one MP refresh is needed to max out the team’s Critical Rate. Sygna Suit Leaf & Venusaur can tank and provide redundant potion coverage and passive recovery to make the team ridiculously hard to break, and can also drop the enemy team’s Special Defense, making Hyper Beam downright deadly if properly buffed. Skyla & Swanna provide arguably the best Potion support in the game, and can boost team Defense/Speed, which is very important to help mitigate Hyper Beam’s high cost.
Sync Grid Build 2: Dragon Claw Secondary Attacker

This grid starts out much the same way as the previous one; two Potion MP Refresh 2 nodes, Healthy Healing, Rejuvenate 6, and Natural Remedy are all standard, and work to increase the general viability of Lance & Dragonite. Where this grid takes a very harsh left turn is in the attack of choice. Dragon Claw Move Gauge Refresh 3, Dragon Claw Mad Strength 2, and Dragon Claw Power+4 all work to make Dragon Claw a more viable move and to allow it to boost itself over time. Now for the big question: “why on earth should I use Dragon Claw over Hyper Beam? The attack has less than ¼ the base power!” and you’d be right; Dragon Claw is far weaker than Hyper Beam. However, the utility of this grid relies on looking at Lance & Dragonite in a very different light; not as a wrecking ball main striker, but as a secondary attacker/healer. While not bulky enough to tank well, Dragonite has the offensive power to make Dragon Claw sting, and two MP refreshes on Potion mean that Lance can easily sit in the back and provide solid Dragon Type backup damage while healing the team when needed, or even performing a bit of a self-sacrifice with Now or Never! to give the team a last-ditch chance to attack hard and/or switching to Hyper Beam a few times as a desperation move. If your main striker is largely self-sufficient and your tank sync pair can handle themselves/provide the team with any needed buffs, then this grid can let Lance & Dragonite keep up team momentum to a surprisingly effective degree.
Worth noting here is the choice to pick up Rejuvenate 6. In this grid, the main goal of this node is to let Lance & Dragonite use their sync move as a damage dealing utility move. However, if this is not an appealing prospect for a given team, then it can be dropped for either Hyper Beam Accuracy+10 or Hyper Beam Move Gauge Refresh 4 in order to launch an occasional nuclear strike when the move gauge allows.
This grid is potentially outstanding in the Champion’s Stadium, where Lance & Dragonite can provide great damage support as a utility-striker and keep the team healthy. They can help to whittle away at any priority targets without getting in the way of the main striker, which can be very valuable in many stages. The same can be said for Full Force Battles, where the longevity added by Potion can also be valuable. It’s also fair in Legendary Arenas for the same reasons previously outlined, and is probably best not utilized much in the Battle Villa due to its emphasis on skill uses. Still, its dual MP refresh on Potion could allow it to excel with a few resets.
Due to its flexibility, this grid works well with many high-powered strikers. For example, using it with Sygna Suit Cynthia & Kommo-O doubles up Dragon damage, allowing Dragonite to score extra hits on the center and heal the team while Kommo-O unleashes its powerful AoE attacks. Worth noting, however, is the fact that team building around this grid poses one potential issue; you’re going to need a powerful tank to protect Lance & Dragonite and whatever main striker they’re paired with, and the sync pair in this slot is likely to be the only option for spreading team buffs. In this regard, Critical Rate and Attack support are paramount, and Speed support is greatly appreciated. For this, Sygna Suit Blue & Blastoise can come in with their outstanding support options and fill every need plus even more. Other tanks that can provide Critical Rate support like Piers & Obstagoon can also provide valuable tanking/support options.
Lucky Skills
Lucky Skills are a bit odd on Lance & Dragonite. Critical Strike 2 is the best skill for sheer damage, but they can’t increase their own Critical Rate, so it’s nearly worthless if Lance & Dragonite aren’t paired with an appropriate partner. If this is the case, then Power Flux 3 becomes the Lucky Skill of choice, though this also brings issues as the high cost of Hyper beam means that it will almost never provide maximum damage output unless Lance & Dragonite are given some form of speed support. Mad Strength 2 is also worth consideration if you intend to go with the Dragon Claw set. Their grid already has a similar node, but the two effects can act in tandem for double odds of an attack boost. Still, it’s probably best to just stick with one of the other damage-boosting Lucky Skills and pick up a Support unit that can boost Attack in some way.
Sync Workshop Index:
If you're looking for help building your other Sync Pairs or getting a sense of what each does for your gem economizing efforts, the Sync Workshop Index is the place for you! Even if you aren't, really, you can't go wrong with it in an attempt to broaden your understanding of the meta or just find something interesting to binge read either.

About the Author(s)


