Introduction
Minstrel is one of the available support classes in the game. Your primary job is to increase your frontline’s combat effectiveness through the buffing of their statistics.
Your primary weapons are Instruments but you are also able to equip other support weapons such as books, staffs and orbs. For starters, it is recommended to fill your grid with as many high-rarity Instruments as possible since higher rarity weapons come with superior stats and skills. Then, fill out the empty slots with the best available books first and then staves. Do not put any orbs in your grid outside of PVE, as a support isn’t supposed to deal damage in Colosseum.
Minstrels for the most part should tailor their grid composition towards their guild’s needs, that is to complement the vanguard’s playstyle and increasing stats that the guild is currently lacking in for starters.
Minstrel’s buff strength scales with their own respective stats. For example, Instruments that buff physical attack will scale with your own physical attack stat, while Instruments that buff physical defense will scale with your physical defense stat. Thus, most people, barring extreme specialists, will want to prioritize in getting all stats such as Patk, Matk, Pdef and Mdef in equal measure. As there is no Instrument that scales with HP, there is no need to prioritize in acquiring HP as a minstrel, but the stat is still useful in a few situations.
Jobs and Characters
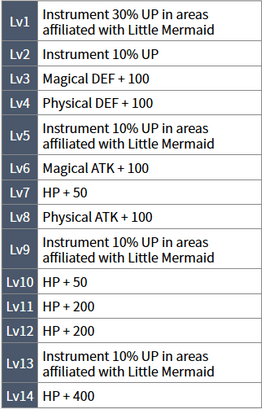
As of launch, all Minstrel jobs are equally viable in colosseum. As shown in the example figure, all Minstrel jobs get a bonus of 10% UP to Instruments’ effectiveness at character lv2, so there is no difference in performance for all regular Minstrel jobs in Colosseum. However, there is also a special Half-Nightmare minstrel class Little Mermaid/Half-nightmare that we will explain later in the builds section.
The recommended character will be dependent on the affiliated character for the area. This is because characters affiliated with an area will be given a massive bonus to their Job weapon efficiency, which is Instruments (up to 70% depending on Job level) for Minstrels.
Character strengthening is a feature released later on in the game. It allows the player to strengthen a character through the use of materials obtained as rewards from participating in the Colosseum. The recommended character to strengthen for a Minstrel is Little Mermaid because she possesses the only Half-Nightmare specializing on Instruments. After investing in character strengthening for Little Mermaid, one should use Little Mermaid in Colosseum at all times for the bonuses conferred by character strengthening. As a bonus, one of the nodes in Little Mermaid’s character strengthening tree unlocks a new subgrid slot. Other characters with similar special bonus are Gretel (subgrid slot +1), Dorothy, Three Little Pigs, Aladdin (main grid limit break skill +1), Pinocchio, and Rapunzel (subgrid limit break skill +1).
Weapons
The primary weapons you will be focusing on are Instruments, but certain builds make use of other classes of weapons such as Books. This section will explain the different skills of Instruments and how they compare to each other.
Note: all the descriptions listed can only appear in SS base rarity Instruments; Instruments with lesser rarities will possess weaker versions of the same skill. The rule to compare within the same rarity remains the same.
List of attack buffing skills sorted by their type and effectiveness:
Attack
Good
1-2 Target/Double stat
- Increase the physical ATK and magical ATK of 1-2 allies by a great amount.
- Increase the physical ATK and physical DEF of 1-2 allies by a great amount.
- Increase the magical ATK and magical DEF of 1-2 allies by a great amount.
2 Target/Double stat
- Increase the physical ATK and magical ATK of 2 allies by a moderate amount.
- Increase the physical ATK and physical DEF of 2 allies by a moderate amount.
- Increase the magical ATK and magical DEF of 2 allies by a moderate amount.
2-3 Target/Single stat
- Increase the magical ATK of 2-3 allies by a massive amount.
- Increase the physical ATK of 2-3 allies by a massive amount.
5 Minutes
- Increase the physical DEF and magical DEF of 1-2 allies by a moderate amount. Increase Skill Effects at 5 Minutes Remaining until match ends.
- Increase the physical ATK and magical ATK of 1-2 allies by a moderate amount. Increase Skill Effects at 5 Minutes Remaining until match ends.
15 Minutes
- Increase the physical ATK and physical DEF of 1-2 allies by a moderate amount. Between the Start of Colosseum & 5 Minutes before it ends, Increase Effects.
- Increase the physical ATK and magical ATK of 1-2 allies by a moderate amount. Between the Start of Colosseum & 5 Minutes before it ends, Increase Effects.
- Increase the magical ATK and magical DEF of 1-2 allies by a moderate amount. Between the Start of Colosseum & 5 Minutes before it ends, Increase Effects.
Acceptable
1 Target/Double stat
- Increase the physical ATK and magical ATK of 1 ally by a great amount.
Barb
- Increase the magical ATK of 1 ally by a massive amount, 1.5x effect when at a disadvantage.
- Increase the physical ATK of 1 ally by a massive amount, 1.5x effect when at a disadvantage.
Bad
2 Target/Single stat
- Increase the physical ATK of 2 allies by a moderate amount.
- Increase the magical ATK of 2 allies by a moderate amount.
1-2 Target/Single stat
- Increase the physical ATK of 1-2 allies by a great amount.
- Increase the magical ATK of 1-2 allies by a great amount.
1 Target/Single stat
- Increase the physical ATK of 1 ally by a massive amount.
- Increase the magical ATK of 1 ally by a massive amount.
Defense:
List of purely defense buffing skills:
Good
1-2 Target/Double stat
- Increase the physical DEF and magical DEF of 1-2 allies by a great amount.
2 Target/Double stat
- Increase the physical DEF and magical DEF of 2 allies by a moderate amount.
5 minutes
- Increase the physical DEF and magical DEF of 1-2 allies by a moderate amount. Increase Skill Effects at 5 Minutes Remaining until match ends.
- Increase the physical ATK and physical DEF of 1-2 allies by a moderate amount. Increase Skill Effects at 5 Minutes Remaining until match ends.
Acceptable
1 Target/Double stat
- Increase the physical DEF and magical DEF of 1 ally by a massive amount.
Bad
2 Target/Single stat:
- Increase the physical DEF of 2 allies by a moderate amount.
- Increase the magical DEF of 2 allies by a moderate amount.
1-2 Target/Single stat:
- Increase the physical DEF of 1-2 allies by a great amount.
- Increase the magical DEF of 1-2 allies by a great amount.
1 Target/Single stat
- Increase the magical DEF of 1 ally by a massive amount.
Multi target double stat and Multi target single stat
As one may notice, multi-target/ double stat skills are favored. This is because the multi stat skills usually have higher multiplier across both stats than their single stat counterparts and multi target means that more buffs are applied to the frontline. Even taking factors such as mana cost into account, multi target/double stat skills usually win out in efficiency, not to mention other factors such as weapon cooldown and time limits etc.
In addition, multi-target/ double stat skills are also more versatile in a sense that whatever they are targeting, one of their buffs will always be relevant. For example, if the frontline is composed of both Matk and Patk specialists, whoever the skill targets will benefit from the buff regardless. On the other hand, if using a 2 target/single stat instrument on the same team, there’s a chance that the secondary target buffed by the skill will not benefit from the buff. (Patk buff on a paladin for example).
So, barring a few niche cases, it is recommended to build your grid with mostly Multitarget Double Stat Instruments whenever possible.
This does not mean multi-target/ single stat skills are totally useless, however; there's a niche application for those skills in guilds that rely only on a single attack type (Patk or Matk). In these cases, the skills can be freely used without fear of the secondary target buffed by the skill being of the wrong damage type.
Single target, single stat
Single stat, single target skill weapons are outclassed by weapons possessing every other type of skill. Replace any weapon of this type ASAP.
Single target, double stat
While their performance is better than those in the bad category, they are outclassed by better weapons belonging to the good category. Some of these Instruments can be used to fill out one’s grid if better options are unavailable.
Barb instruments
This type of skill is very strong if cast when one’s guild has a lower Inochi score compared to the opponent during Colosseum. The skill effect is multiplied (1.5x) when the conditions are met, allowing one to massively increase the buff on a single target in a short time, especially when paired with other factors such as passive skills. However the skill itself is very weak outside of that specific condition. The skill costs more mana than the regular version, while having the same output, making it a terrible choice when one’s guild is winning or is breaking even.
Nonetheless, this instrument possessing this skill is still highly sought after for their strategic applications. It is recommended to place Instruments in this category in a separate specialized grid to switch into if your guild is losing, or if you are anticipating your guild will be at a disadvantage.
15 minutes Instruments
The skills belonging to this category are very strong; at base, all of them are on par with the normal version of multi-target/double stat. When its condition is met (between start of colosseum to 5 minutes before it ends), the skill’s effect is amplified, causing it to be even stronger than the already good base effect. With the exception for 5min grids, It is recommended to fill your grid with this type of weapons, because the bonus is active for the majority of the match, and even if the condition is not met, most of the Instruments possessing this skill are considered to be good overall (provided they are also in possession of a useful passive skill).
(Note: as of the time of writing, all skills belonging to this category are multi target and multi stat)
5 minutes Instruments
The final 5 minutes of a Colosseum match is where most of the major score swings happen, as most guilds will try to use their strongest nightmare or Barbarian (nightmare) during this time window to try for a comeback, to prevent the opponent’s comeback attempt, or simply push their advantage. One wipe could very possibly decide the match in this time window, so the magnified effect of this type of skills provides a very welcome boost for this limited time frame.
Similar to 15 minutes skills, the base skill that comes with these Instruments is already considered strong. It is acceptable to fill your grid out with weapons of this category providing that their passive, limit break status and skill level are as good if not better than the Instrument that it will be replacing. If not, it is advisable to build a separate 5-minute grid specifically to include weapons of this category.
(Note: As of the time of writing, all skills belonging to this category are multi target and multi stat)
For defense only: single stat vs double stat
For skills that purely buff defenses, double stats are preferred because while one could work with their own vanguard to figure out what type of stat they require or what they specialize in, one can hardly prepare against an unknown opponent. Because of this, double stat is preferred in most cases to ensure flexibility to handle all situations.
Colosseum passive skills are available at different ranks inside the same rarity. For example, you can find both Mana Supply (l) and Mana Supply (ll) in different SS base rarity weapons. Generally, character weapons will come with a weaker Colosseum passive skill, limiting their potential in Colosseum while a spec gacha weapon will usually feature better passive skills together with a strong active skill.
List of colosseum passive skills:
Support backup
- Support backup: Fixed chance to slightly increase support effects while providing backup.
Mana supply
- Mana supply: Fixed chance to slightly reduce SP consumption while executing commands.
Chance to increase stat
- Weapon Repair: Fixed chance to moderately increase one vanguard member's physical ATK and magical ATK while providing backup.
- Armor Repair: Fixed chance to moderately increase one vanguard member's DEF while providing backup.
- Blade Assist: Fixed chance to increase the physical ATK of 1 ally in the vanguard by a moderate amount while executing commands.
- Iron Shield Deployment: Fixed chance to increase physical DEF of one member of the vanguard by a moderate amount while executing commands.
Chance for effect on attack
- Attack Interference: Fixed chance to slightly reduce enemy's physical ATK and magical ATK while attacking.
- Anti-Army Barrier: Fixed chance to slightly increase own physical DEF and magical DEF while attacking.
- Attack Backup: Fixed chance to slightly increase own physical ATK and magical ATK while attacking.
- Barrier Destruction: Fixed chance to moderately reduce enemy's physical DEF and magical DEF while attacking.
Special
- Resurrection: Fixed chance to moderately increase support effects while providing backup. Increased effect when at a disadvantage.
Support Backup
To put it bluntly, the best colosseum passive skill for a minstrel is Support Backup. Ideally, you want your grid to be filled with as many Support Backup weapons as possible. At rank 1, it boosts your support skills effects by 10%, 15% at rank 2, and then 20% at rank 3. It is a direct boost to your buff value, making this an ideal passive skill to have - the effect of this skill directly multiplies your base output, so the more you improve your grid, the more effective Support backup will be.
Mana supply
At rank 2, Mana supply is a good skill to have in your grid in absence of Support backup. This skill decreases the SP cost of your weapons on occasion and are usually considered better than the “chance to increase stat” passive skills. However, you do not want to have too many of these in your grid at a time. Weapons with rank 1 Mana supply should be replaced ASAP with better weapons.
Chance to increase stat
The passive skills belonging to this category buff a number of your vanguards when you perform an action depending on the individual skills. The effectiveness of these passive skills is comparable to Support Backup (l) at rank 2 so they are acceptable to fill your grid with when starting out. Note that while Support Backup becomes more effective the better your grid are, the effect of this type of skill is static. They will perform the same whether your grid is filled with strong instruments or weak ones, so you will want to gradually replace weapons with this skill with better alternatives.
Chance for effect on attack
You shouldn’t take weapons with passive skills from this category if an alternative is available because as a Minstrel, you should never be attacking the opponent.
Resurrection
Resurrection is a special passive skill that is only found on certain husk weapons; functionally, it is similar to Support Backup of the same rank while your guild is ahead in Colosseum. If it happens that your guild is behind the enemy in Inochi score during Colosseum, the effect of this skill multiplies, being capable of giving your guild an enormous advantage. Common tactics for taking advantage of this skill is to use the Nightmare “Poppy” or an equivalent while the guild is behind in score to increase the proc chance of this skill. Husk weapons with this skill should be included in any relevant grid. Due to the potency of this skill one may want to equip both the husk book and husk harp in any grid that is not a Half-nightmare grid.
Builds
When starting out, it is impossible to fill your grid with proper Instruments without whaling, so most beginners will start with a mixed grid first. When placing weapons into your grid, prioritize Instruments, followed by Books of the highest rarity. Staves of the highest rarity can then be used to fill the remaining slots.
Instrument and Book active skills are both affected by the passive Support Backup, which causes these weapons to synergize with one another. Staves, however, have their own version of the passive for recovery skills and only a few other compatible passives, so they should be moderated.
The list below mentions the passive skills of the off-spec weapon you would want to have in your grid:
Books (passive): Prioritize Support Backup, Resurrection, and Mana Supply.
- Support Backup
- Mana supply
- Resurrection
- Weapon Repair
- Armor Repair
- Blade Assist
- Iron Shield Deployment
Staff (passive): Prioritize Mana Supply.
- Mana supply
- Barrier Deployment
- Iron Shield Deployment
You will want mainly Support Backup and Mana Supply as passive skills for your off-spec weapons. The other listed passives are acceptable but should be replaced as soon as better options become available. Note that staves are not affected by Support Backup, which should constitute the majority of your grid, and thus should be replaced with Instruments and Books as soon as the option arrives. For beginners it is best to focus on strong Instruments and Books first, then work your way to the desired build.

The “regular” build for Minstrels, while all other normal Minstrel jobs give a flat 10% bonus to Instruments at lv2 in Colosseum regardless of character, Little Mermaid/Half-nightmare however, gives a 15% bonus to Instruments at Job level 8 in Colosseum, but also comes with a massive penalty (-75%) to both Staff and Book weapons.
For the reasons explained above, it is not recommended to include anything but Instruments in this build. Both to take maximum advantage of the extra Instrument bonus conferred by Little Mermaid/Half-Nightmare, and also to avoid the massive demerit to other support weapon types.
Note that if you use Little Mermaid/Half-Nightmare, you are trading away the flexibility of using other powerful non-Instrument weapons, so it is suggested to do so only when a “pure” Instrument grid can be achieved without a loss in overall performance.
Note: Little Mermaid/Half-nightmare will be available at a later date after the game’s release.
This type of grid is usually built with a few focuses in mind: assisting in quickly winning Shinma, taking advantage of powerful skills on a handful of books, or maximizing the number of Support backup passives in your grid.
Shinma grid:
Placing a few books in your grid can drastically improve your guild’s chance at winning a Book Shinma, provided the other Minstrels are running the same type of grid. This type of grid is used because winning Book Shinma can drastically swing the match in your guild’s favor, or to prevent the opponent from doing so.
With this build, you will want to place around 5 Books in your grid. Some prefer to place more to improve their guild’s chance at winning Shinma, but that also decreases the overall buff output as a result, so care should be taken to balance the ratio.
The strategy to use for this build is to switch into the grid before the 10min mark if the Book Shinma appears second, or start with this build if Book Shinma appears first. Around the time when Shinma usually triggers, do not use your books and save them so you will have at least (preferably) 4 books ready to be used when Shinma triggers.
Another bold strategy with this build is keeping 4 (or 5) books ready as the last weapon left in your deck, and do not use them until Shinma appears. Thus, when it does appear, you can use the Books and quickly refresh the grid, allowing you to potentially use more than 5 books during Shinma. This move is risky, as it lowers your guild’s buff stack drastically and Shinma is often unpredictable, but it is sometimes worth it if winning Shinma is critical to securing victory.
Mixed grid to maximize Support backup or powerful skills:
Some Books come with powerful skills such as the husk book (evolved) which comes with the Resurrection passive, or Books with 5/15 minutes effect active skills. These are extremely powerful and switching into them or using them during their relevant time frames can swing the match into your guild’s favor, potentially outweighing the benefits of the bonus provided by Half-Nightmare and normal Minstrel.
To maximize Support Backup fill your grid with as many weapons with Support Backup as possible, along with better active skills. This type of build is used sometimes when the player does not have enough strong weapons to make a viable 20 instrument Half-Nightmare grid and has access to a few strong books in their inventory. With the Job bonus for the normal Minstrel class being only a 10% increase in Colosseum and 15% for Half-Nightmares, placing good Books in your grid may offset the 5% efficiency loss if it means replacing some underperforming Instruments.
To finalize
The above mentioned Mnsorc builds do not have to be mutually exclusive and can be overlapped if one is able to find a balance or simply has access to the right weapons. For example, a 15 minutes grid could function as a Shinma grid while fulfilling its main role.
Elemental-specific builds are another type of builds designed with the aim of taking maximum advantage of Nightmares that your guild uses during certain key moments , for example while playing for a guild that summons Rikone for the last push, one may opt to switch into a heavily fire-leaning grid to maximize buff output during that time frame.
One should communicate with their guild to figure out what type of Nightmare the guild commonly uses during a specific timeframe to best synergize with it. For a guild that summons water Nightmares early and then fire Nightmare towards the end, one can swap into a water grid for the water Nightmares, then switch into your normal grid, then switch into fire grid for the last part (*note that switching grids 2 times while the match is ongoing requires calling the Nightmare Ajatar or an equivalent.)
When building this grid, weaker non-limit break weapons without Support backup but with the desired element may replace stronger but non-elemental specific weapons for this build. Still, take note that the replaced weapon should still possess a good active skill (multi target/stats).
Stat specialized build focuses on only one or a few stats, usually Patk or Matk plus both defenses. If one finds themselves in a specialized guild (for example, a full physical or full magical guild), one should tailor their build based on the needs of the guild or to complement the other supports. In case of a full physical guild, remove all Instruments that only buff magic attack and focus solely on Instruments that buff Patk.
The reason to do this is for the purpose of efficiency: a vanguard of a certain damage type does not make use of the opposite attack stat, rendering those buffs wasted. In a rare scenario such as this, Instruments with multi target/single stat skills of a relevant type, regarded as typically inferior in many situations can be used in this grid, because double attack stat does not matter for a single stat specialized guild.
Guilds such as this do have their drawbacks, as they open themselves up for specific counters from enemy Sorcerers.
Colosseum tips
-
There’s a diminishing return on buff values based on current stacks: at 10 stacks, buff effectiveness is reduced by 50%, and by 90% at 18 stacks, so prioritize switching targets and spread buffs around once a target’s buff stack on that stat has reached 10.
-
Work with your vanguard to determine what kind of buff they need. For veterans, there is no such concern as most will be running specialized grids that make use of only 1 attack stat (Patk or Matk). However, with a less experienced vanguard, some may still use a mixed grid due to not having enough L weapons to make a fully specialized grid, so catering to each individual vanguard is necessary.
-
One of the reasons to run a mixed grid is to help the guild to compete on winning Shinma. Running a mixed grid (or switching into it at the right time) can drastically increase your guild’s chance at winning Book Shinma. Winning Shinma is important because in the case of Book and Instrument Shinmas, the bonus conferred can dramatically modify the buff stacks among both vanguards heavily swinging the match to your guild’s favor.
-
Save your weapons selectively based on elements if you anticipate certain Nightmares being called (such as if your guild regularly calls for Freeze Golem on the 17-minutes remaining mark, then it is prudent to save water-type weapons for that time).
-
In the same vein as the point above, try to match the element of the Nightmare your guild uses for the last push during the last 5 minutes of colo. this is usually done by switching to your 5-minutes grid containing mostly weapons from its matching element.