OF-EX4 Normal And Challenge Mode
OF-EX4, “Getting Better,” is the fourth Operation of the EX series for the Heart of Surging Flame: Obsidian Festival event.
This guide describes a strategy for clearing OF-EX4 that should work for both the Normal and Challenge mode.


Map Information
“It is known that some passionate fans would do whatever it takes to get closer to their idol.”
Here are a few things to know about the kinds of enemies on this map:
- The enemies here deploy quickly, in large numbers, and are overall pretty hardy. You WILL need substantial DPS—preferably AoE DPS—in order to avoid being overwhelmed.
- Most of the enemies are melee, but there are a few of those annoying super-long-range Stunning snipers mixed in as well. Deployment order is important here, in order to avoid having important units Stunned at the wrong time.
- There are a lot of heavy enemies on this map. Some are the high-DEF shield-wielding types, while others are the axe-wielders that gain RES when blocked. Both physical and Arts damage Operators are important on this map.
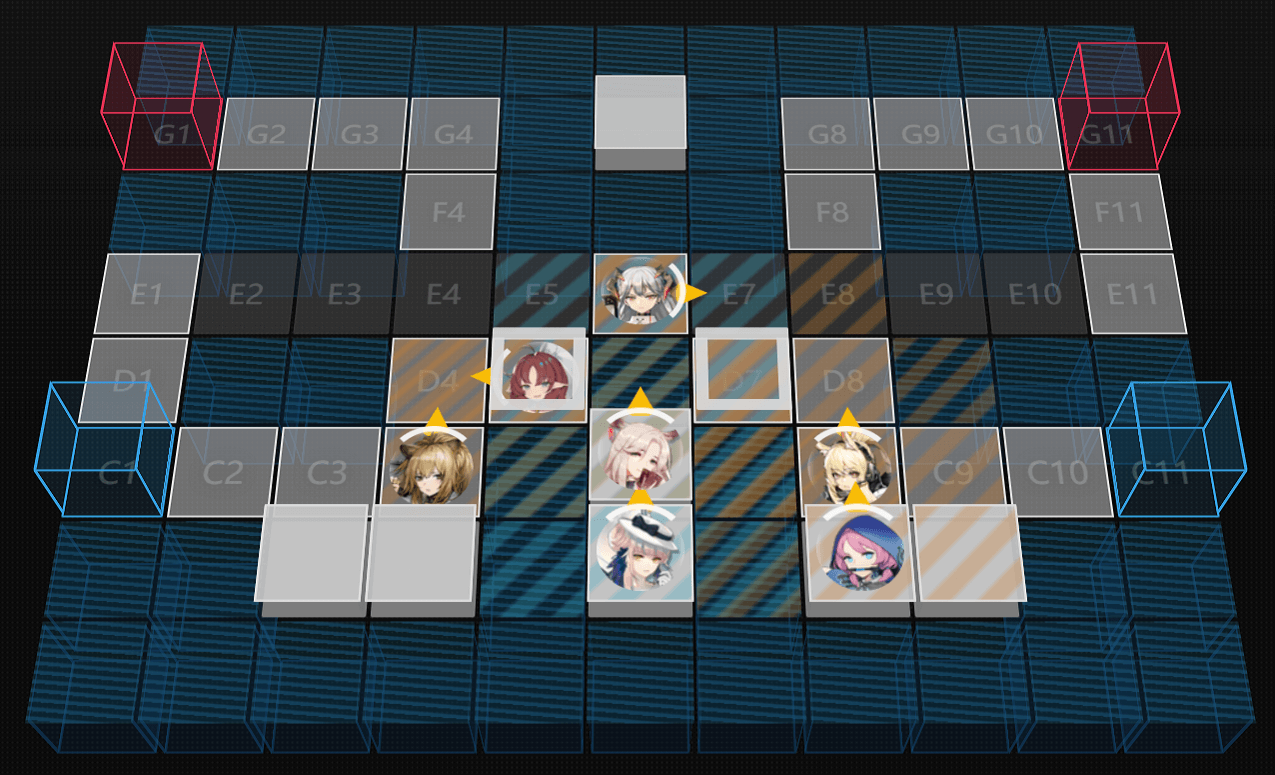
You should also be aware of how the enemies are going to move. This map looks like there are a lot of routes that you will have to defend, but in truth, the enemies don’t move down every single path, especially if you block them at the correct points. Generally speaking, here are the three areas you’ll want to block:
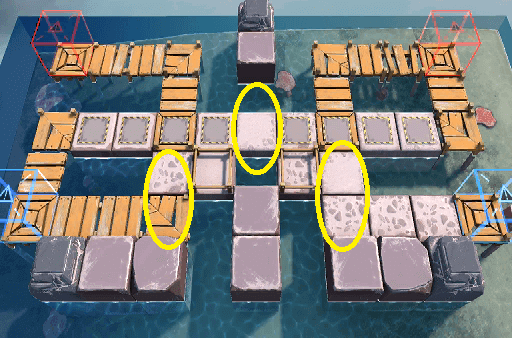
By setting up at these three points, you can force the enemies to approach you in only the following ways:
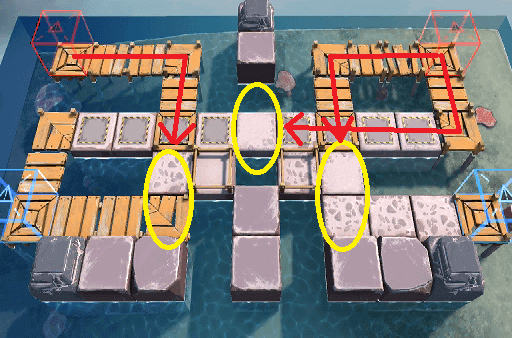
This allows you to leave the far left side undefended, so your Operators (in particular your Medics) don’t have to be as spread out to do their jobs.
Speaking of your Operators, let’s take a look at who you might want to bring to this map.
Challenge Mode
The Challenge Mode for this stage is, “Medic Operators cost three times as much to deploy.” Because of this, we are going to want to get through this stage using as few Medics as possible. Deploying one Medic should be feasible, but more than one would be a huge DP drain that we probably can't afford.
Recommended Team Composition
2 Vanguards: Your two Vanguards together need to be able to block and kill the first wave of enemies on the left side of the stage. This means two low-DPS Vanguards (i.e., Courier and Myrtle) or two low-Block Vanguards (i.e., Plume and Vigna) should NOT be used together on this stage, or you’ll have trouble getting past the opening gambit.
- V1 should be a Skill-DP-Recovery Vanguard (or Grani). You need this unit to be able to Block-2, so it should NOT be Myrtle.
- V2 can be any Vanguard. This is where Myrtle goes if you have her, or a DP-on-Kill Vanguard that isn’t Grani. This unit just needs to do damage and generate DP.
1 Medic: This stage is built for Ceylon; it plays perfectly to her E1 healing range. If you aren’t raising Ceylon, Silence is probably the best option, since she can use her Medical Drone to cover corners her range doesn’t reach. Other Medics can work too, but you might want to back them up with Healing Defenders, self-healing Operators like Estelle, or Lancet-2 as a flex option in order to make sure you have enough healing. The enemies here hit hard, so you’ll need it.
3 Defenders: You must have three sturdy Operators who can Block-3 or more in order to block the three key defense points on the map. One of these should be Cuora, who is easily accessible and very good on this stage. The other two can be Normal Defenders, Healing Defenders, or even an E2-promoted AoE Guard.
1 Sniper: An AoE Sniper (i.e., Shirayuki) or a faux-AoE Sniper (i.e., Vermeil) is preferred for this spot, but a regular Sniper can do the job as well.
1 AoE Caster: You want an AoE Caster with a DPS-boosting Skill that can be used twice during the map. Greyy, Gitano, or Skyfire probably want to use their Skill 1 for a quicker charge time, and 12F is not ideal because he doesn’t have a Skill at all. (Quick tip: If you have Ifrit, try putting her on the top-middle grid of the map and pointing her to the left. The results are hilariously effective!)
1 AoE Guard: This particular AoE Guard won’t be blocking any enemies, so they don’t need to be E2-promoted for the role (that’s right, it’s Popukar’s chance to shine!) Shaw or FEater can fill the role if needed, since they also attack multiple enemies per attack. (Sadly, they can't push enemies into the water here. What gives, SmileGate?!)
1-3 Decoy Units: Because the enemy Snipers are so damn annoying on this stage, we need a few units to deploy at the end of our deployment order explicitly to draw the Stunning shots. A second Sniper is useful for this because they can contribute DPS from the left side of the stage. The Robots are also perfect for the role since they don’t take up Unit Limit when deployed.
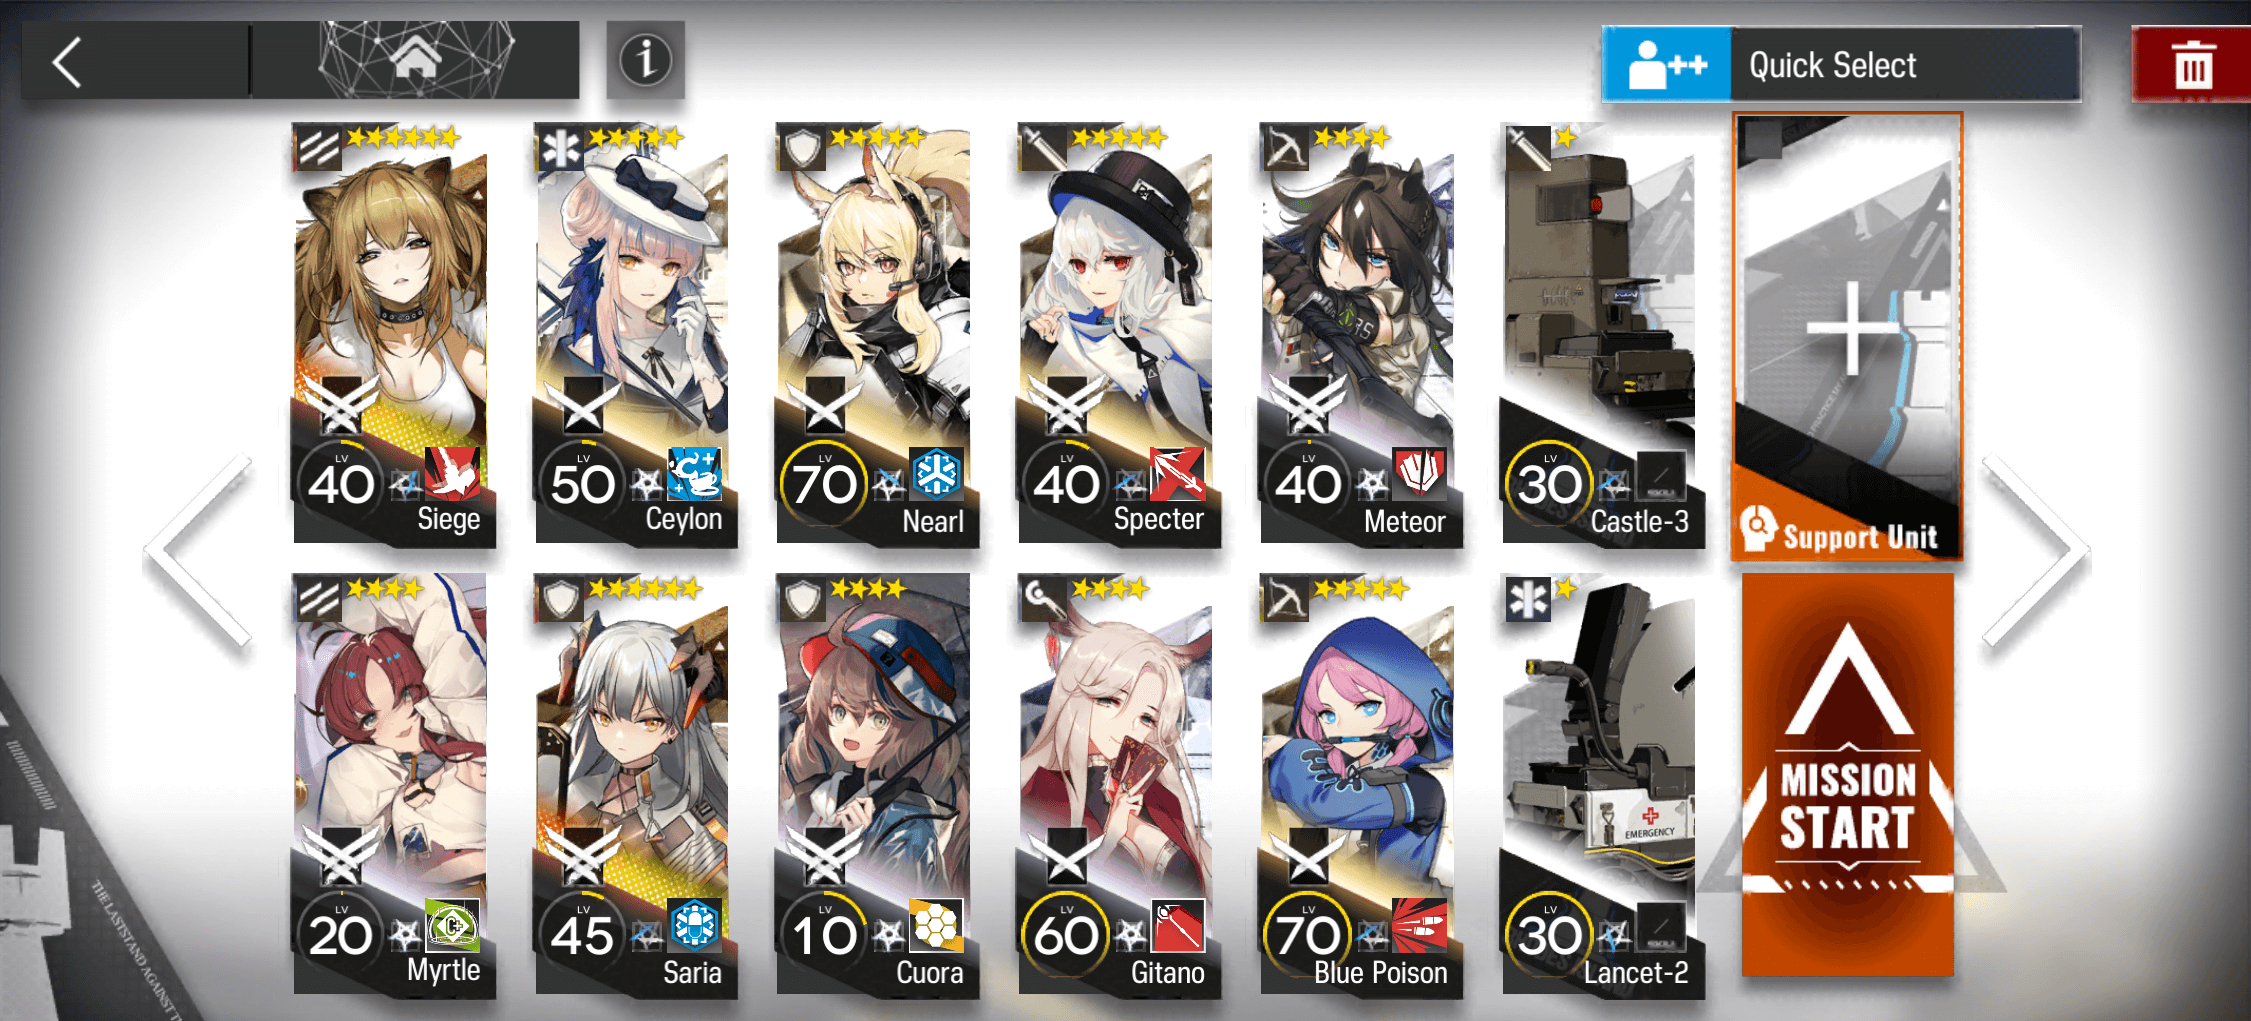
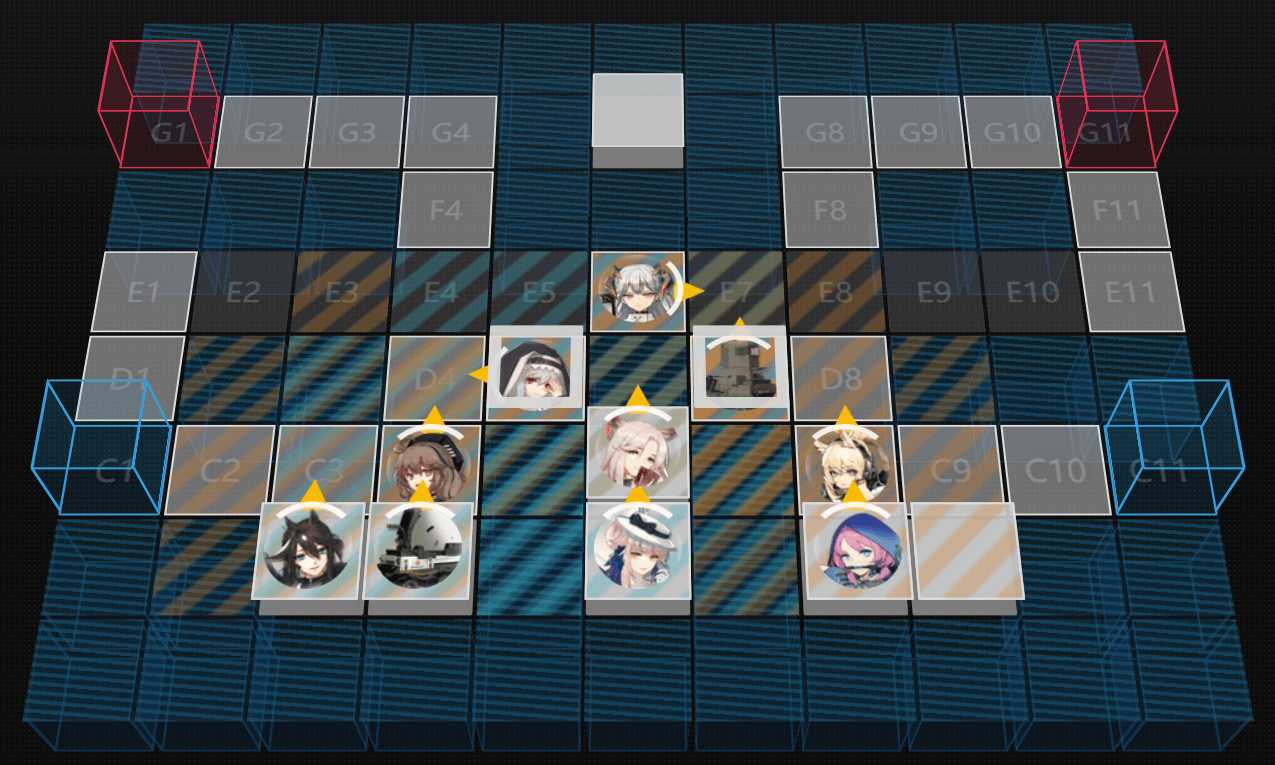
Here is an example of the team I used:
Deployment
First off, let’s get one thing out in the open: you CAN and SHOULD deploy Operators on these two grids:
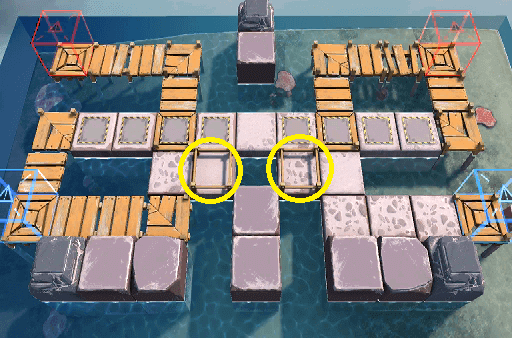
Because they look fenced off, you may not realize you can use these as deployment grids at first, but you absolutely can. They are absolutely crucial to our strategy, so get used to seeing them.
With that out of the way, let’s start deploying. Deploy units in the following order:
- Vanguard 1 (Siege)
- Vanguard 2 (Myrtle)
- Defender 1 (Nearl)
- Sniper (Blue Poison)
- Defender 2 (Saria)
- Medic (Ceylon)
- AoE Caster (Gitano)
At this point, you can retreat both of your Vanguards. We’re going to replace them like so:
- Retreat Vanguards 1 and 2 (Siege and Myrtle)
- Defender 3 (Cuora)
- AoE Guard (Specter)
- Decoy Unit 1 (Meteor)
- Decoy Unit 2 (if applicable) (Lancet-2)
- Decoy Unit 3 (if applicable) (Castle-3)
Some things to note:
- Siege and Saria are NOT necessary for this stage: lower-rarity Operators can fill their roles just fine. The same goes for Blue Poison and Specter.
- On Challenge Mode, you’ll have a long delay before you can deploy Ceylon (because she costs three times as much DP as usual). If either of your Vanguards aren’t generating DP during this time (i.e., you have a DP-on-Kill Vanguard out), then retreat them after you deploy Defender 2. Refunding your Vanguard’s DP will get you a little closer to deploying Ceylon.
There are two points in the battle where the enemies tend to pile up and things might get dicey. This is when you want to use your Skills, especially those of your AoE Caster and AoE Guard. These times are:
- Danger Zone #1: Around 20-25 kills. Keep a close eye on your Defenders during this time, and if any of them look like they’re about to be overwhelmed, activate Skills to save them.
- Danger Zone #2: Around 40-45 kills. Again, keep a close eye on your Defenders, especially the one in the middle of the screen. Your Skills should have recharged by now, so activate them again as necessary.