Should You Pull?
Only if you like Kogasa and her surprisingly superb baseball skills (unless the new Story Card has your interest). It’s Summer Season again, and it’s time to revisit the beach of chill vibes! This time, we have a karakasa obake in a swimsuit and she is a natural when it comes to playing baseball, similar to how a Shrine Maiden loves volleyball. But can the Beach Umbrella Castaway surprise her competition to survive via the Beach Baseball, and… BOO! Epic Prayer? Let’s see…
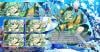
C3 Kogasa Tatara comes in as an Attack-Class Friend with a massive Yang ATK base stat at 1975, and she is great with providing herself the buffs she needs to strike hard against her foes. With a 55% boost on her elemental bullet lines if they are effective against the enemy (and she has a lot of Metal and Water in her kit), enemies weak to Water and/or Metal elements will be hit hard by C3 Kogasa! On top of that, she gives herself quick bursts of Yang ATK and CRIT ATK, as well as gaining big chunks of Spirit Power, with some of it being shared with the team. Speaking of her team, she grants them vast and lasting Accuracy buffs on Skill 3, and very quick bursts of Yang ATK when Boosting and by using Spell Card 2. She also has some great Slice Scaling that goes from 88% on Shots and Spell Cards to 188% on her Last Word, and it is also backed up by her Agility buffs on her Spell Cards. And of course, as a result of C3 Kogasa being an Epic Friend, we can’t forget those Rank II buffs returning again, this time in the form of Yang ATK II.
Something you may remember from the L1 variant of Kogasa is how she can use anomalies to provide buffs, but this becomes something we see again here, although with different anomalies in question being used. This time, for any layers of Burn or Freeze inflicted on C3 Kogasa, she gets buffs in Yang ATK, Yin ATK, CRIT ATK and CRIT Accuracy whilst Paralyze inflictions on her can buff Agility, Accuracy and Evasion. While she can only inflict herself with Freeze of these three, it does allow some forms of team synergy to work with, like when other Friends may be able to inflict the team with either Burn, Freeze or Paralyze. Speaking of anomalies, C3 Kogasa can break the ice by inflicting enemies with them as well as breaking a good chunk of them, backed up that little bit more with some Poison through her Last Word, but on top of the Metal and Water damage potential, enemies weak to one/both them are also most likely going to end up having their barriers broken due to all the available elemental breaks C3 Kogasa has to work with.
Ultimately, C3 Kogasa can fend for herself very well, and while her support for the team isn’t the most outstanding, it’s also not dire either. However, some other downsides to look into would be her Killer range being the only thing stopping her from sky-high CRIT damage to complement the above. While Human, Fairy, Soul, Aquatic, Swimsuit, Summer, Human VIllage, Hakurei Shrine and Myouren Temple together aren’t bottom of the barrel levels of bad, there are going to be some gaps in enemy coverage that may cause a karakatastrophe. In addition, this was foreshadowed above by being referred to as “quick bursts”, but a lot of C3 Kogasa’s buffs have very low turn durations, such as Skill 1 and Last Word’s buffs lasting 1 turn, and any other Yang ATK buffs not being able to be extended by herself naturally. You could argue it’s somewhat mitigated by decent cooldown durations on Skills to work with, as well as Freeze anomalies on Skill 2 helping with Yang ATK buffs in its own way, but it is still a weakness regardless.
But that’s not all this Prayer has to offer! A new Story Card emerges called Let The Oil Money Flow, and it has some surprising effects including a massive 2.10 Spirit Power, and 2 other effects that are rather busted, but also limited to specific roles. If used by a Debuff-Class Friend, it reduces the Yin DEF of an enemy by a whopping 4 Stages for 3 turns, whereas if used by an Attack-Class Friend will boost their Yang ATK by 4 Stages, also for 3 turns! We thought Divine Spirit Tajikarao was an absurdly powerful Story Card but this might give it a run for its (oil) money! Of course, the Story Card has both Shion and Joon Yorigami and naturally, they both also take great advantage of this card in their own right! While the 2.10 Spirit Power boost is already insane enough, if you want to give it to a Yang Attacker or Yin Debuffer, options for Debuff-Class units for that Yin DEF debuff effect would be L1 Shion, L1 Rumia, L1 Koakuma, L1 Reisen, L1 Mystia, L1 Wriggle, L1 Hina, L1 Rin, L1 Seiran, L1 Sannyo, A6 Cirno, A6 Daiyousei and C3 Flandre. Meanwhile, Yang-Based Attack-Class units looking to take great advantage of this would be L1 Joon, L1 Meiling, L1 Youmu, L1 Yuyuko, L1 Ran, L1 Sunny Milk, L1 Yuuka, L1 Miko, L1 Shou, L1 Mayumi, L1 Eiki, L1 Shinmyoumaru, L1 Chimata, A6 Reimu, A7A Marisa, B3 Yorihime, B5 Lunasa, E1 Patchouli, S5 Utsuho, C3 Koishi, and yes, C3 Kogasa as well!
Yeah, that’s a lot of units that would definitely get more than 1 use out of this card, but even without the extra role-restricted effect, the Spirit Power buff alone is still massive.
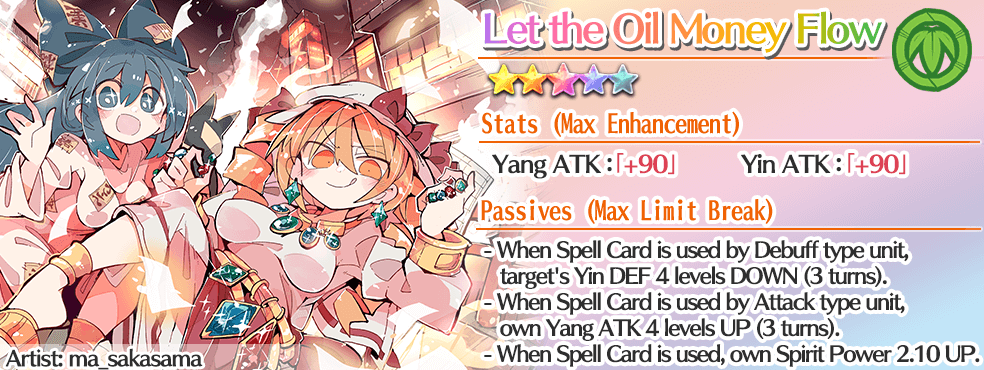
Featured Story Card "Let The Oil Money Flow"!
So with all the surprises out of the way, both in baseball and the new Story Card, yeah this is mostly dependant on the player, but personally, 50 rolls (250 Seal Crystals) for even a single copy of this card isn’t too costly in the grand scheme of things, as even with slightly weaker effects, it can still pack a punch for a lot of units, mainly the ones mentioned above! If you are still unsure on C3 Kogasa, and whether she is really worth 2000 Seal Crystals should luck not be in your favor, you can probably afford to skip her if it comes to that. There are some areas in her kit where you can make comparisons to C3 Koishi Komeiji, and if you already have C3 Koishi, you can probably afford to skip her. On top of that, if you are covered well when it comes to both Water and Metal breaking, maybe you can get away with not picking up C3 Kogasa based on that too.
With all of that said, C3 Kogasa will have her moments to shine, especially when her Killers can land, thus dealing grand slam-esque levels of damage, and with her Prayer also backed up by such a busted Story Card may definitely make this worth the 50 rolls for that alone. Outside of that, if you are saving up Seal Crystals for a future Friend or you are generally low on them, you can manage fine if you choose to skip this 2 week long Prayer. And now that the newest baseball pro in a Summer-y Gensokyo has pitched herself to all of us, best of luck to everyone hoping for an Epic surprise via this Prayer, and by extension, hoping for many home runs to come!
Quick Overview

C3 Kogasa Tatara is an Attack-Class Friend who has vast Water and Metal breaking potential, Freeze anomalies to go around and high natural Yang ATK, with a bit of Yang ATK II on top.
Incredible Damage Potential
C3 Kogasa has multiple ways of increasing her damage to really surprise her enemies. From a high base Yang ATK stat coming in at 1975, to her Metal and/or Water elements getting a 55% boost in power if they are effective against her target(s), and can also take advantage of Yang ATK II buffs on Skill 3 and her Last Word! To top it off, if she can land any Killers, C3 Kogasa will be scoring home runs with those CRITs!
A Large Umbrella’s Worth of Anomalies
Whether it’s using anomalies to benefit herself or inflicting and breaking them on her competition, C3 Kogasa is not to be underestimated with her handling of anomalies. C3 Kogasa inflicts herself with Freeze anomalies to boost offensive stats (mainly Yang ATK and CRIT ATK) through Skill 2, and Burn anomalies if inflicted on her also provide the same benefit. While she doesn’t inflict any Paralyze anomalies on herself, they can still boost her Agility, Accuracy and Evasion if possible. Enemies suffer Freeze anomalies from Skill 2 and Spell Card 1 and have them broken via Spell Card 1 and Last Word at 2P and 3P respectively, while Poison anomalies can be inflicted via Last Word, also being broken at 3P. On top of that, if you want to break enemies with elements, no worries there, as every single bullet line will either be Metal or Water, making it that bit easier to achieve those breaks.
Autonomous Tsukumogami
Not only does C3 Kogasa have the potential to deal devastating damage, but she can do that easily just with what her kit’s buffs provide, like with her Skill 1’s Yang ATK and CRIT ATK buffs, 5 turns worth of 4 stages of Accuracy for the team via Skill 3, Agility buffs on Spell Cards to enhance the impact of her Slice Scaling, 2.30 Spirit Power gained from Skills 1 and 3 (Skill 1 grants 0.55 Spirit Power to the team every 3 turns), and actually isn’t going to struggle too much with keeping her anomalies in check as Skill 2 both provides Freeze anomalies for herself while also adding a Barrier, so that if she needs to Graze to avoid damage, C3 Kogasa can survive that little bit longer. If she needs to escape a Bind and Spell Card 2 is available, that will do the trick for her as well.
Surprisingly Limited Killer Range
The main thing holding back C3 Kogasa whenever she goes out swinging is her Killers not hitting as many enemies as some other Friends out there. While the ones she has (Human, Fairy, Soul, Aquatic, Swimsuit, Summer, Human Village, Hakurei Shrine, Myouren Temple) are not the worst as a collective, they certainly aren’t the best either, as the ones you’re probably getting the most out of will probably be Human, Fairy and Soul, as well as maybe Swimsuit and Summer on some VS Divergent Spirit stages with other C3 enemies. Ultimately, this is C3 Kogasa’s main obstacle stopping her from her grand slams critically decimating her foes.
Turn Durations on some Buffs are Hit or Miss
Despite her self-sustainability as mentioned above, while some turn durations on buffs like team Accuracy and selfish Agility are rather long, Skill 1 is a good example of her Yang ATK and CRIT ATK potentially being hard to maintain, especially on her own. This is because those buffs on Skill 1 last for 1 turn, and a lot of other buffs, like on Spell Card 2 and Last Word also last 1-2 turns which could be an issue when it comes to rather longer 1 wave stages.